Onboard a Threat Defense Device
 Attention |
Secure Firewall device manager (FDM) support and functionality is only available upon request. If you do not already have Firewall device manager support enabled on your tenant you cannot manage or deploy to FDM-managed devices. Send a request to the support team to enable this platform. |
There are different methods of onboarding a threat defense device. We recommend using the registration key method.
If you experience issues while onboarding a device, see Troubleshoot FDM-Managed Device Onboarding Using Serial Number or Failed Because of Insufficient License for more information.
Onboard a Threat Defense Device to Cloud-delivered Firewall Management Center
You can onboard threat defense devices running version 7.2 and later to the Cloud-delivered Firewall Management Center. See Onboard an FTD to the Cloud-Delivered Firewall Management Center for more information.
Onboard a Threat Defense Device with a Serial Number
This procedure is a simplified method of onboarding the Firepower 1000, Firepower 2100, or Secure Firewall 3100 series physical devices running supported versions of software. To onboard the device, you need the chassis serial number or PCA serial number of the device and ensure that the device is added to a network that can reach the internet.
You can onboard new factory-shipped devices or already configured devices to Security Cloud Control.
See Onboard an FDM-Managed Device using the Device's Serial Number for more information.
Onboard a Threat Defense Device with a Registration Key
We recommend onboarding threat defense devices with a registration key. This is beneficial if your device is assigned an IP address using DHCP. If that IP address changes for some reason, your threat defense device remains connected to Security Cloud Control if you have onboarded it with a registration key.
Onboard an Threat Defense Device Using Credentials
You can onboard a threat defense device using the device credentials and the IP address of the device's outside, inside, or management interface depending on how the device is configured in your network. To onboard a device with credentials, see Onboard an FDM-Managed Device Using Username, Password, and IP Address. To onboard with an interface address, see Device Addressing later in this article.
Security Cloud Control needs HTTPS access to the device in order to manage it. How you allow HTTPS access to the device depends on how your device is configured in your network and whether you onboard the device using a Secure Device Connector or a Cloud Connector.
Note |
If you connect to https://us.manage.security.cisco.com and you are using software version 6.4, you must onboard the threat defense device with this method. You cannot use the registration key method. |
When using device credentials to connect Security Cloud Control to a device, it a best practice to download and deploy a Secure Device Connector (SDC) in your network to manage the communication between Security Cloud Control and the device. Typically, these devices are non-perimeter based, do not have a public IP address, or have an open port to the outside interface. The threat defense device, when onboarded with credentials, can be onboarded to Security Cloud Control using an SDC.
Note that customers also using the threat defense devie as the head-end for VPN connections will not be able to use the outside interface to manage their device.
Onboard a Threat Defense Cluster
You can onboard a threat defense device that is clustered prior to onboarding to Security Cloud Control. Clustering lets you group multiple firewall threat defense units together as a single logical device that provides the convenience of a single device (management, integration into a network) while achieving the increased throughput and redundancy of multiple devices.
See Onboard a Clustered Secure Firewall Threat Defense Device.
FDM-Managed Device Configuration Prerequisites for Onboarding
FDM-Managed Device Management
You can only onboard threat defense devices that are being managed by Secure Firewall device manager (FDM). threat defense devices being managed by Secure Firewall Management Center cannot be managed by the cloud-delivered Firewall Management Center.
If the device is not configured for local management, you must switch to local management before onboarding the device. See the Switching Between Local and Remote Management chapter of the Secure Firewall Threat Defense Configuration Guide for Firepower Device Manager.
Licensing
The device must have at least an license installed before it can be onboarded to Security Cloud Control although you can have a Smart License applied in some circumstances.
|
Onboarding Method |
Secure Firewall device manager Software Version |
90-day Evaluation licensed allowed? |
Can the device already be smart-licensed before onboarding? |
Can the device already be registered with Cisco Cloud Services before you onboarding? |
|---|---|---|---|---|
|
Credentials (user name and password) |
6.4 or later |
Yes |
Yes |
Yes |
| Registration Key |
6.4 or 6.5 |
Yes |
No. Unregister the smart license and then onboard the device. |
N/A |
|
Registration Key |
6.6 or later |
Yes |
Yes |
No. Unregister the device from Cisco Cloud Services and then onboard the device. |
|
Zero-Touch Provisioning |
6.7 or later |
Yes |
Yes |
Yes |
|
Onboarding a device with a Serial Number |
6.7 or later |
Yes |
Yes |
Yes |
See Cisco Firepower System Feature Licenses for more information.
Device Addressing
It is a best practice that the address you use to onboard the FDM-managed device is a static address. If the device's IP address is assigned by DHCP, it would be optimal to use a DDNS (dynamic domain name system) to automatically update your device's domain name entry with the new IP address of the device if it changes.
Note |
FDM-managed devices do not natively support DDNS; you must configure your own DDNS. |
Important |
If your device gets an IP address from a DHCP server, and you do not have a DDNS server updating the FDM-managed device's domain name entry with any new IP addresses, or your device receives a new address, you can change the IP address Security Cloud Control maintains for the device and then reconnect the device. Better still, onboard the device with a registration key. |
Managing an FDM-Managed Device from the Inside Interface
Managing an FDM-managed device using the inside interface may be desirable if the dedicated MGMT interface is assigned an address that is not routable within your organization; for example, it might only be reachable from within your data center or lab.
Remote Access VPN Requirement
If the FDM-managed device you manage with Security Cloud Control will be managing Remote Access VPN (RA VPN) connections, Security Cloud Control must manage the device using the inside interface.
What to do next:
Continue to Manage an FDM-Managed Device from the Inside Interface for the procedure for configuring the FDM-managed device.
Manage an FDM-Managed Device from the Inside Interface
This configuration method:
-
Assumes that the FDM-managed device has not been on-boarded to Security Cloud Control.
-
Configures a data interface as the inside interface.
-
Configures the inside interface to receive MGMT traffic (HTTPS).
-
Allows the address of the cloud connector to reach the inside interface of the device.
Before you begin
Procedure
|
Step 1 |
Log in to the Secure Firewall device manager. |
|
Step 2 |
In the System Settings menu, click Management Access. |
|
Step 3 |
Click the Data Interfaces tab and click Create Data Interface.
|
|
Step 4 |
Deploy the change. You can now manage the device using the inside interface. |
What to do next
What if you are using a Cloud Connector?
Use the procedure above and add these steps:
-
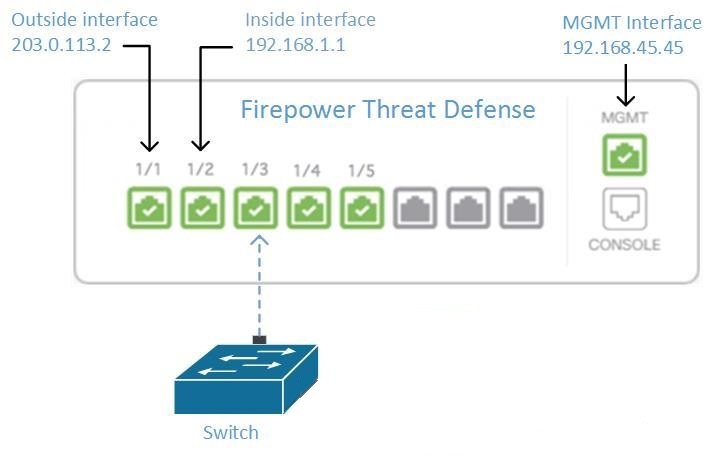
Add a step to "NAT" the outside interface to (203.0.113.2) to the inside interface (192.168.1.1). See Interface Addresses.
-
In step 3c of the procedure above, your "Allowed Network" is a network group object containing the public IP addresses of the cloud connector.
-
Add a step that creates an Access Control rule allowing access to the outside interface (203.0.113.2) from the public IP addresses of the cloud connector. See for a list of all the Cloud Connector IP addresses for the various Security Cloud Control regions.
Onboard the FDM-Managed Device
The recommended way of onboarding the FDM-managed device to Security Cloud Control is to use the registration token onboarding approach. After you configure the inside interface to allow management access from the Cloud Connector to the FDM-managed device, onboard the FDM-managed device with the user name and password. See Onboard an FDM-Managed Device Using Username, Password, and IP Address for more information. You will connect using the IP address of the inside interface. In our scenario above, that address is 192.168.1.1.
Managing an FDM-Managed Device from the Outside Interface
Managing an cloud-delivered Firewall Management Center device from the outside interface may be desirable if you have one public IP address assigned to a branch office and Security Cloud Control is managed using a Cloud Connector at another location.

This configuration doesn't mean that the physical MGMT interface is no longer the device's management interface. If you were in the office where the cloud-delivered Firewall Management Center device was located, you would be able to connect to the address of the MGMT interface and manage the device directly.
Remote Access VPN Requirement
If the device you manage with cloud-delivered Firewall Management Center will be managing Remote Access VPN (RA VPN) connections, cloud-delivered Firewall Management Center will not be able to manage the cloud-delivered Firewall Management Center device using the outside interface. See Managing an FDM-Managed Device from the Inside Interface instead.
What to do next:
Continue to Manage the FDM-Managed Device's Outside Interface for the procedure for configuring the cloud-delivered Firewall Management Center device.
Manage the FDM-Managed Device's Outside Interface
This configuration method:
-
Assumes that the FDM-managed device has not been on-boarded to Security Cloud Control.
-
Configures a data interface as the outside interface.
-
Configures management access on the outside interface.
-
Allows the public IP address of the cloud connector (after it has been NAT'd through the firewall) to reach the outside interface.
Before you begin
Procedure
|
Step 1 |
Log in to the Secure Firewall device manager. |
|
Step 2 |
In the System Settings menu, click Management Access. |
|
Step 3 |
Click the Data Interfaces tab and click Create Data Interface.
|
|
Step 4 |
Create an Access Control policy in Secure Firewall device manager that allows management traffic (HTTPS) from the public IP address of the SDC or cloud connector, to the outside interface of your FDM-managed device. In this scenario, the source address would be 203.0.113.2 and the source protocol would be HTTPS; the destination address would be 209.165.202.129 and the protocol would be HTTPS. |
|
Step 5 |
Deploy the change. You can now manage the device using the outside interface. |
What to do next
What if you are using a cloud connector?
The process is very similar, except for two things:
-
In step 3c of the procedure above, your "Allowed Network" is a network group object containing the public IP addresses of the cloud connector. See Connecting Devices to Security Cloud Control Through the Cloud Connector for a list of Cloud Connector IP addresses for the various Security Cloud Control regions.
-
In step 4 of the procedure above, you create an Access Control rule that allows access to the outside interface from the public IP addresses of the cloud connector.
The registration token onboarding approach is the recommended way of onboarding the FDM-managed device to Security Cloud Control. After you configure the outside interface to allow management access from the cloud connector, onboard the FDM-managed device. You will connect using the IP address of the outside interface. In our scenario, that address is 209.165.202.129.
Onboard an FDM-Managed Device to Security Cloud Control
Use the following procedures to onboard an FDM-managed to Security Cloud Control with the following methods.
Onboard an FDM-Managed Device Using Username, Password, and IP Address
Use this procedure to onboard an FDM-managed device using only the device credentials and the device's Management IP address. This is the simplest method of onboarding an FDM-managed device. However, the recommended way of onboarding an FDM-managed device to Security Cloud Control is by using a registration key.
Before you begin
Important |
Before you onboard an FDM-managed device to Security Cloud Control, read Onboard an FDM-Managed Device and Connect Security Cloud Control to your Managed Devices. They provide the general device requirements and onboarding prerequisites needed to onboard a device. |
-
You need the following information to onboard an FDM-managed device using the credentials method:
-
The device credentials Security Cloud Control will use to connect to the device.
-
The device's IP address of the interface you are using to manage the device. This may be the Management interface, an inside interface, or the outside interface depending on how you have configured your network.
-
The device must be managed by Secure Firewall device manager and configured for local management in order for you to onboard it to Security Cloud Control. It cannot be managed by Secure Firewall Management Center.
-
Note |
If you connect to https://eu.manage.security.cisco.com and your FDM-managed device is running software version 6.4, you must use this method. You can only onboard an FDM-managed device running software version 6.5+. |
Procedure
|
Step 1 |
Log in to Security Cloud Control. |
||
|
Step 2 |
In the left pane, click . |
||
|
Step 3 |
Click the blue plus button |
||
|
Step 4 |
Click FTD.
|
||
|
Step 5 |
In the onboarding wizard, click Use Credentials. |
||
|
Step 6 |
In the Device Details step:
|
||
|
Step 7 |
In the Database Updates area, the Immediately perform security updates, and enable recurring updates is enabled by default. This option immediately triggers a security update as well as automatically schedules the device to check for additional updates every Monday at 2AM. See Update FTD Security Databases and Schedule a Security Database Update for more information. Disabling this option does not affect any previously scheduled updates you may have configured through FDM. Click Next. |
||
|
Step 8 |
Enter the device administrator's username and password and click Next. |
||
|
Step 9 |
If there are pending changes on the device's Secure Firewall device manager, you will be notified and you can revert the changes or log in to the manager and deploy the pending changes. If there are no pending changes on Secure Firewall device manager, you will not see a prompt. |
||
|
Step 10 |
(Optional) Add a label the device. See Labels and Label Groups for more information. |
 to Onboard a device.

Onboard an FDM-Managed Device Running Software Version 6.4 or 6.5 Using a Registration Key
This procedure describes how to onboard an FDM-managed device using a registration key. This method is the recommended way of onboarding the FDM-managed device to Security Cloud Control and is beneficial if your FDM-managed device is assigned an IP address using DHCP. If that IP address changes for some reason, your FDM-managed device remains connected to Security Cloud Control. Additionally, your FDM-managed device can have an address on your local area network, and as long as it can access the outside network, it can be onboarded to Security Cloud Control using this method.
 Warning |
If you already have a SecureX or Cisco Threat Response (CTR) account, you will need to merge your Security Cloud Control tenant and SecureX/CTR account in order for your devices to be registered with SecureX. Until your accounts are merged, you will not be able to see your device's events in SecureX or benefit from other SecureX features. We strongly recommend merging your accounts before you create a Security Cloud Control module in SecureX. Your accounts can be merged through the SecureX portal. See Merge Accounts for instructions. |
Before Onboarding
-
For customers running version 6.4, this method of onboarding is only supported for the US region, https://us.manage.security.cisco.com.
-
For customers running version 6.4, and connecting to the EU region, they must onboard their device using its device username, password, and IP address.
-
Customers running version 6.5 or later, and connecting either to the US, EU, or APJ regions can use this method of onboarding.
-
Review Connect Security Cloud Control to your Managed Devices for the networking requirements needed to connect Security Cloud Control to yourFDM-managed device.
-
Make sure your device is managed by Secure Firewall device manager, not Secure Firewall Management Center.
-
Devices running version 6.4 and 6.5 must not be registered with Cisco Smart Software Manager before onboarding them with a registration key. You will need to unregister the smart licenses of those FDM-managed devices before onboarding them to Security Cloud Control. See "Unregistering a Smart-licensed Firewall device manager" below.
-
The device may be using a 90-day evaluation license.
-
Log in to the FDM-managed device and make sure that there are no pending changes waiting on the device.
-
Make sure DNS is configured properly on your FDM-managed device.
-
Make sure the time services are configured properly on the FDM-managed device.
-
Make sure the FDM-managed device shows the correct date and time otherwise the onboarding will fail.
What to do next
Do one of these two these things:
-
Unregsiter your FDM-managed device from Cisco Smart Software Manager if it is already smart-licensed. You must unregister the device from Cisco Smart Software Manager before you onboard it to Security Cloud Control with a registration Key.Continue to Unregister a Smart-licensed FDM-Managed Device.
-
If your device is not already smart-licensed, continue to Procedure to Onboard an FDM-Managed Device Running Software Version 6.4 or 6.5 Using a Registration Key.
Unregister a Smart-licensed FDM-Managed Device
If the device you want to onboard is running version 6.4 or 6.5, and is already smart-licensed, the device is likely to be registered with Cisco Smart Software Manager. You must unregister the device from Cisco Smart Software Manager before you onboard it to Security Cloud Control with a registration Key. When you unregister, the base license and all optional licenses associated with the device, are freed in your virtual account.
After unregistering the device, the current configuration and policies on the device continue to work as-is, but you cannot make or deploy any changes.
Procedure
|
Step 1 |
Log on to the device using the Secure Firewall device manager. |
|
Step 2 |
Click the device icon in the upper tab.
|
|
Step 3 |
In the Smart License area, click View Configuration. |
|
Step 4 |
Click the Go to Cloud Services gear menu and select Unregister Device.
|
|
Step 5 |
Read the warning and click Unregister to unregister the device. |
What to do next
If you unregistered your in order to onboard it to Security Cloud Control, continue to Procedure to Onboard an FDM-Managed Device Running Software Version 6.4 or 6.5 Using a Registration Key
Procedure to Onboard an FDM-Managed Device Running Software Version 6.4 or 6.5 Using a Registration Key
To onboard an FDM-managed using a registration key, follow this procedure:
Before you begin
Review the prerequisites discussed in Onboard an FDM-Managed Device Running Software Version 6.4 or 6.5 Using a Registration Key.
Procedure
|
Step 1 |
Log in to Security Cloud Control. |
||
|
Step 2 |
In the left pane, click . |
||
|
Step 3 |
click the blue plus button |
||
|
Step 4 |
Click FTD.
|
||
|
Step 5 |
On the Onboard FTD Device screen, click Use Registration Key. |
||
|
Step 6 |
Enter the device name in the Device Name field. This could be the hostname of the device or any other name you choose. |
||
|
Step 7 |
In the Database Updates area, the Immediately perform security updates, and enable recurring updates option is enabled by default. This option immediately triggers a security update as well as automatically schedules the device to check for additional updates every Monday at 2AM. See Update FTD Security Databases and Schedule a Security Database Update for more information.
|
||
|
Step 8 |
In the Create Registration Key area, Security Cloud Control generates a registration key.
|
||
|
Step 9 |
Click the Copy icon
On the Inventory page, you will see that the device is now in the connectivity state, "Unprovisioned". Copy the registration key appearing under Unprovisioned to Firewall device manager to complete the onboarding process. |
||
|
Step 10 |
Log into the Secure Firewall device manager of the device you want to onboard to Security Cloud Control. |
||
|
Step 11 |
In System Settings, click Cloud Services. |
||
|
Step 12 |
In the Security Cloud Control tile, click Get Started. |
||
|
Step 13 |
In the Region field, select the Cisco cloud region that your tenant is assigned to.
|
||
|
Step 14 |
In the Registration Key field, paste the registration key that you generated in Security Cloud Control.
|
||
|
Step 15 |
Click Register and then Accept the Cisco Disclosure. |
||
|
Step 16 |
Return to Security Cloud Control. Select all the licenses you want to apply to the device. For more information, see Applying or Updating a Smart License. You can also click Skip to continue the onboarding with a 90-day evaluation license. |
||
|
Step 17 |
Return to Security Cloud Control, open the Inventory page and see that the device status progresses from "Unprovisioned" to "Locating" to "Syncing" to "Synced." |
 to copy the registration key.
Onboard an FDM-Managed Device Running Software Version 6.6+ Using a Registration Key
This procedure describes how to onboard an FDM-managed device running Version 6.6+ using a registration key. This method is the recommended way of onboarding the FDM-managed device to Security Cloud Control and is beneficial if your FDM-managed device is assigned an IP address using DHCP. If that IP address changes for some reason, your FDM-managed device remains connected to Security Cloud Control. Additionally, your FDM-managed device can have an address on your local area network, and as long as it can access the outside network, it can be onboarded to Security Cloud Control using this method.
Warning |
If you already have a SecureX or Cisco Threat Response (CTR) account, you will need to merge your Security Cloud Control tenant and SecureX/CTR account in order for your devices to be registered with SecureX. Until your accounts are merged, you will not be able to see your device's events in SecureX or benefit from other SecureX features. We strongly recommend merging your accounts before you create a Security Cloud Control module in SecureX. Your accounts can be merged through the SecureX portal. See Merge Accounts for instructions. |
If you want to onboard an FDM-managed device running version 6.4 or 6.5, see Onboard an FDM-Managed Device Running Software Version 6.4 or 6.5 Using a Registration Key.
Before Onboarding
-
This method of onboarding is currently available for version 6.6+ and to customers connecting to https://us.manage.security.cisco.com, https://eu.manage.security.cisco.com, or https://apj.manage.security.cisco.com.
-
Review Connect Security Cloud Control to your Managed Devices for the networking requirements needed to connect Security Cloud Control to your FDM-managed device.
-
Make sure your device is managed by Secure Firewall device manager, not Secure Firewall Management Center.
-
The device can be using a 90-day evaluation license or it can be smart-licensed. Devices running version 6.6+ can be onboarded to Security Cloud Control using a registration key without unregistering any installed smart licenses.
-
The device cannot already be registered with Cisco Cloud Services. See "Unregistering an FDM-Managed Device from Cisco Cloud Services" below before onboarding.
-
Log in to the device's Secure Firewall device manager UI and make sure that there are no pending changes waiting on the device.
-
Make sure DNS is configured properly on your FDM-managed device.
-
Make sure the time services are configured on the FDM-managed device.
-
Make sure the FDM-managed device shows the correct date and time otherwise the onboarding will fail.
What to do next:
Do one of these things:
-
If your FDM-managed device running verison 6.6+ is already registered with Cisco Cloud Services, you need to unregister the device before onboarding it. Continue to Unregistering an FDM-Managed Device from Cisco Cloud Services.
-
If your device is not registered to Cisco Cloud Services, continue to Procedure to Onboad an FDM-Managed Device Running Software Version 6.6+ Using a Registration Key.
Unregistering an FDM-Managed Device from Cisco Cloud Services
The following procedure is how to unregister the device from Cisco Cloud Services. Use this method before you onboard and FDM-managed device to Security Cloud Control with a registration key.
Note |
If you onboard a virtual FDM-managed device running version 7.0 or later, registering the virtual FDM-managed device to Security Cloud Control automatically resets the performance-tiered Smart Licensing selection to Variable, which is the default tier. You must manually re-select the tier that matches the license associated with the device through the Secure Firewall device manager UI after onboarding. |
Use this procedure to check and make sure it is not registered to Cisco Cloud Services:
Procedure
|
Step 1 |
Log on to the device using Secure Firewall device manager. |
|
Step 2 |
Click the device icon in the upper tab. 
|
|
Step 3 |
Expand the System Settings menu and then click Cloud Services. |
|
Step 4 |
In the Cloud Services page, click the gear menu and select Unregister Cloud Services. 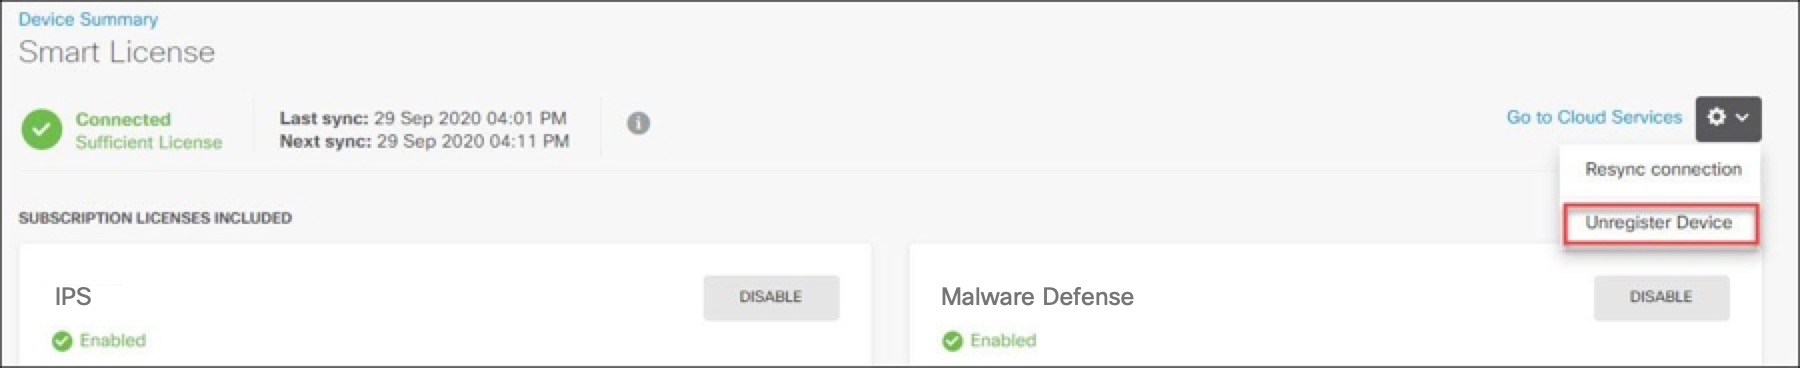
|
|
Step 5 |
Read the warning and click Unregister to unregister the device. |
What to do next
Procedure to Onboad an FDM-Managed Device Running Software Version 6.6+ Using a Registration Key
To onboard an FDM-managed device using a registration key, follow this procedure:
Procedure
|
Step 1 |
Log in to Security Cloud Control. |
||
|
Step 2 |
In the left pane, click . |
||
|
Step 3 |
Click the blue plus button |
||
|
Step 4 |
Click FTD.
|
||
|
Step 5 |
On the Onboard FTD Device screen, click Use Registration Key. |
||
|
Step 6 |
Enter the device name in the Device Name field. This could be the hostname of the device or any other name you choose. |
||
|
Step 7 |
In the Database Updates area, the Immediately perform security updates, and enable recurring updates is enabled by default. This option immediately triggers a security update as well as automatically schedules the device to check for additional updates every Monday at 2AM. See Update FTD Security Databases and Schedule a Security Database Update for more information.
|
||
|
Step 8 |
In the Create Registration Key step, Security Cloud Control generates a registration key.
|
||
|
Step 9 |
Click the Copy icon
On the Inventory page, you will see that the device is now in the connectivity state, "Unprovisioned". Copy the registration key appearing under Unprovisionedto Firewall device manager to complete the onboarding process. |
||
|
Step 10 |
Log into the Secure Firewall device manager of the device you are onboarding. |
||
|
Step 11 |
Under System Settings, click Cloud Services. |
||
|
Step 12 |
In the Region field, select the Cisco cloud region that your tenant is assigned to. |
||
|
Step 13 |
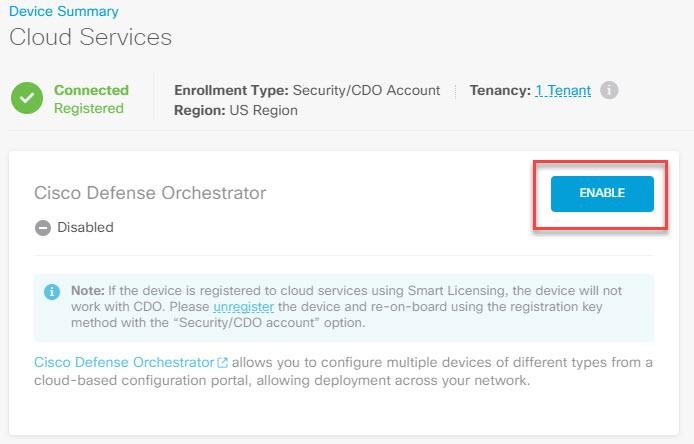
In the Enrollment Type area, click Security Account .
|
||
|
Step 14 |
In the Registration Key field, paste the registration key that you generated in Security Cloud Control. |
||
|
Step 15 |
For devices running version 6.7 or later in the Service Enrollment area, check Enable Cisco Security Cloud Control. |
||
|
Step 16 |
Review the information about the Cisco Success Network Enrollment. If you do not want to participate, uncheck the Enroll Cisco Success Network checkbox. |
||
|
Step 17 |
Click Register and then Accept the Cisco Disclosure. Secure Firewall device manager sends the registration request to Security Cloud Control. |
||
|
Step 18 |
Return to Security Cloud Control, in the Create Registration Key area, click Next. |
||
|
Step 19 |
Select all licenses you want to apply to the device. Click Next. |
||
|
Step 20 |
Return to Security Cloud Control, open the Inventory page and see that the device status progresses from "Unprovisioned" to "Locating" to "Syncing" to "Synced." |

Onboard an FDM-Managed Device using the Device's Serial Number
This procedure is a simplified method of setting up and onboarding the FDM-managed devices to Security Cloud Control. All you need is the chassis serial number or PCA serial number of the device. You can apply a smart license or use a 90-day evaluation license when onboarding the device.
Ensure that you read through the use cases to understand the concepts before you perform the onboarding steps.
Important |
These methods of onboarding FDM-managed devices are only available for devices running version 6.7 or higher. |
Use Cases
-
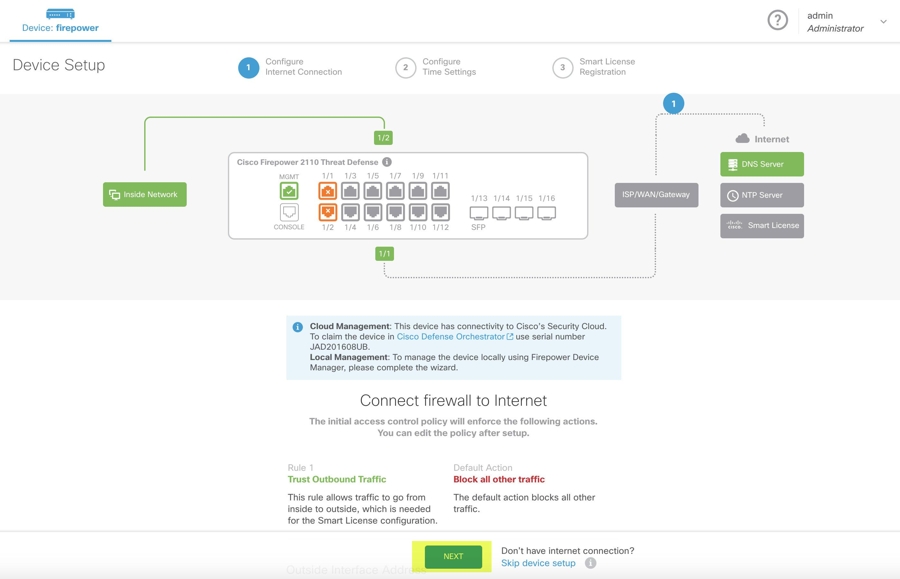
Onboard an FDM-Managed Device using the Device's Serial Number: Onboarding a new factory-shipped FDM-managed device that is added to a network and reached from the Internet. The initial device setup wizard is not complete on the device.
-
Onboard a Configured FDM-Managed Device using the Device's Serial Number: Onboarding an already configured FDM-managed device or an upgraded device that is already added to a network and reached from the Internet. The initial device setup wizard is complete on the device.
Important |
If you want to use this method to onboard a device running on an older software version that is supported for your device, you need to perform a fresh installation (reimage) of the software on that device instead of an upgrade. |
Workflow and Prerequisites to Onboard the FDM-Managed Device Using Zero-Touch Provisioning
Zero-Touch Provisioning is a feature that allows a new factory-shipped Firepower 1000, Firepower 2100, or Secure Firewall 3100 series device to be provisioned and configured automatically, eliminating most of the manual tasks involved with onboarding the device to Security Cloud Control. The zero-touch provisioning is intended for remote offices or other locations where your employees are less experienced working with networking devices.
To use the zero-touch provisioning process, you must onboard the device to Security Cloud Control, connect it to a network that can reach the internet, and power on the device. See Onboard a Configured FDM-Managed Device using the Device's Serial Number for more information.
Note |
You can power-on the device before or after onboarding it to Security Cloud Control. We recommend that you onboard the device to Security Cloud Control first and power-on the device and connect it to your branch network second. When you onboard the device in Security Cloud Control, the device is associated with your Security Cloud Control tenant in the Cisco cloud and Security Cloud Control automatically syncs the device configuration. |
You can also use this procedure to onboard a device purchased from an external vendor or onboard a device already managed by another cloud tenant in a different region. However, if the device is already registered to the external vendor's cloud tenant or a cloud tenant in a different region, Security Cloud Control doesn't onboard the device but displays the "Device serial number already claimed" error message. In such cases, the Security Cloud Control admin must unregister the device's serial number from its previous cloud tenant and then claim the Security Cloud Control device in their own tenant. See Device Serial Number Already Claimed in the troubleshooting chapter.
The device Connectivity status changes to "Online" and the Configuration status changes to "Synced". The FDM-managed device is onboarded to Security Cloud Control.
You can see the Status LED (Firepower 1010), SYS LED (Firepower 2100), or S LED Secure Firewall 3100) flashing green on the rear panel of the hardware. The device LED continues to flash in green when it's connected to the cloud. If the device can't connect to the Cisco cloud or loses its connectivity after being connected, you can see the Status LED (Firepower 1010), SYS LED (Firepower 2100), or M LED (Secure Firewall 3100) flashing alternate green and amber.
See this video: Installing Your Cisco Firepower Firewall Using Zero-Touch Provisioning video to understand the LED indicators.
Important |
If you have logged into the FDM-managed device console, SSH, or Secure Firewall Threat Defense, you would have changed the device's password during your first login. You can still use the zero-touch provisioning process for onboarding the device using Security Cloud Control. After you log into Secure Firewall Threat Defense, ensure that you do not complete the device setup wizard step that configures the outside interface. If you complete this step, the device is unregistered from the cloud, and you cannot use the zero-touch provisioning process. |
When you log into Secure Firewall Threat Defense, you will see the following screen on the dashboard.
Without proceeding further on the Secure Firewall Threat Defense UI, go to the serial number onboarding wizard and onboard the device. Here, you must select Default Password Changed because the device password has already been changed.
Prerequisites
Software and Hardware Requirements
The FDM-managed devices must be running software that supports serial-number-onboarding. Use the following table as a guide:
| Firewall Model Numbers that Support Zero-Touch Provisioning |
Supported Firewall Software Version |
Software Package |
|---|---|---|
|
Firepower 1000 series device models: 1010, 1120, 1140, 1150 |
6.7 or later |
SF-F1K-TDx.x-K9 |
|
Firepower 2100 series device models: 2110, 2120, 2130, 2140 |
6.7 or later |
SF-F2K-TDx.x-K9 |
|
Secure Firewall 3100 series device models: 3110, 3120, 3130, 3140 |
7.1 or later |
SF-F3K-TDx.x-K9 |
Confirm the management platforms are running the correct version.
| Manager |
Supported Version |
|---|---|
|
Secure Firewall Device Manager |
7.0 or later |
|
On-Premises Firewall Management Center |
7.2 or later |
|
Cloud-delivered Firewall Management Center |
Not applicable |
Configuration Prerequisites for Hardware Installation
-
The network at the branch office cannot use the 192.168.1.0/24 address space. The network on Ethernet 1/1 (outside) cannot use the 192.168.1.0/24 address space. The default IP address of the Ethernet 1/2 "inside" interface on the 1000 and 2100 series devices running FDM 6.7 is 192.168.1.1 may conflict with the DHCP address allocated by your WAN modem if it's on that subnet.
-
inside - Ethernet 1/2, IP address 192.168.1.1
-
outside - Ethernet 1/1, IP address from DHCP or an address you specify during setup

If you are unable to change the outside interface settings, use Secure Firewall device manager to change the subnet on the Ethernet 1/2 "inside" interface settings to avoid conflict. For example, you could change to the following subnet settings:
-
IP Address: 192.168.95.1
-
DHCP server range: 192.168.95.5-192.168.95.254
To learn about the steps for configuring the physical interface, see the "Secure Firewall Device Manager Configuration Guide". In the "Interfaces" chapter, see the "Configure a Physical Interface" section.
-
-
The threat defense device must be installed and connected to the Cisco Cloud.
-
The outside or management interface of the device must be connected to a network providing DHCP addressing. Typically, the device has a default DHCP client on the outside or management interface.
Note
If the management interface is connected to a network having a DHCP server, it takes precedence over the outside interface for Linux stack initiated traffic.
-
Your outside or management interface needs to access to be able to access the following Security Services Exchange domains for the serial onboarding method.
-
Australia Region
-
api.aus.sse.itd.cisco.com
-
est.sco.cisco.com (common across geographies)
-
mx*.aus.sse.itd.cisco.com (currently only mx01.aus.sse.itd.cisco.com)
-
dex.aus.sse.itd.cisco.com (for customer success)
-
eventing-ingest.aus.sse.itd.cisco.com (for CTR and Security Cloud Control)
-
registration.aus.sse.itd.cisco.com (allows for device registration to the regional Cisco cloud)
-
-
APJ Region
-
api.apj.sse.itd.cisco.com
-
est.sco.cisco.com (common across geographies)
-
mx*.apj.sse.itd.cisco.com (currently only mx01.apj.sse.itd.cisco.com)
-
dex.apj.sse.itd.cisco.com (for customer success)
-
eventing-ingest.apj.sse.itd.cisco.com (for CTR and Security Cloud Control)
-
http://registration.apj.sse.itd.cisco.com (allows for device registration to the regional Cisco cloud)
-
-
EU Region
-
api.eu.sse.itd.cisco.com
-
est.sco.cisco.com (common across geographies)
-
mx*.eu.sse.itd.cisco.com (currently only mx01.eu.sse.itd.cisco.com)
-
dex.eu.sse.itd.cisco.com (for customer success)
-
eventing-ingest.eu.sse.itd.cisco.com (for CTR and Security Cloud Control)
-
registration.eu.sse.itd.cisco.com (allows for device registration to the regional Cisco cloud)
-
-
India Region
-
api.in.sse.itd.cisco.com
-
est.sco.cisco.com (common across geographies)
-
mx*.in.sse.itd.cisco.com (currently only mx01.in.sse.itd.cisco.com)
-
dex.in.sse.itd.cisco.com (for customer success)
-
eventing-ingest.in.sse.itd.cisco.com (for CTR and Security Cloud Control)
-
registration.in.sse.itd.cisco.com (allows for device registration to the regional Cisco cloud)
-
-
US Region
-
api-sse.cisco.com
-
est.sco.cisco.com (common across geographies)
-
mx*.sse.itd.cisco.com (currently only mx01.sse.itd.cisco.com)
-
dex.sse.itd.cisco.com (for customer success)
-
eventing-ingest.sse.itd.cisco.com (for CTR and Security Cloud Control)
-
registration.us.sse.itd.cisco.com (allows for device registration to the regional Cisco cloud)
-
-
-
The outside interface of the device must have DNS access to Cisco Umbrella DNS.
Before Claiming the Device in Security Cloud Control
Before claiming the device in Security Cloud Control, make sure that you have the following information:
-
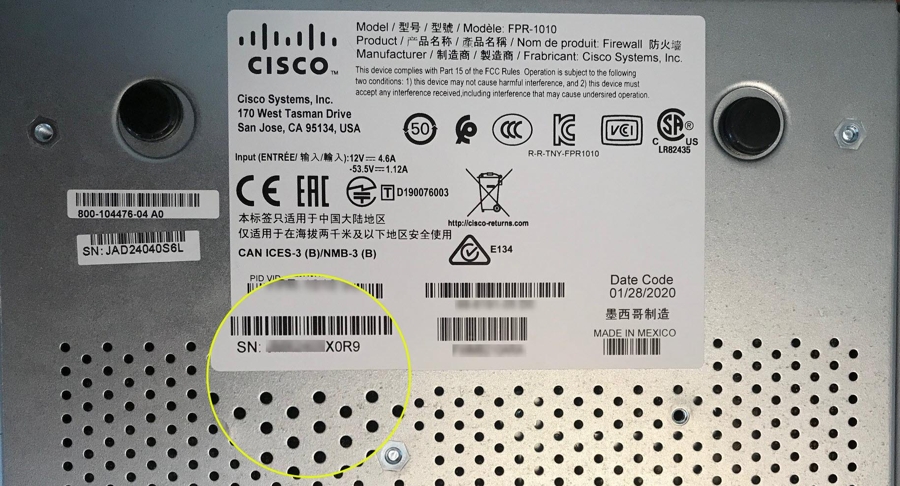
Chassis serial number or PCA number of the threat defense device. You can find this information on the bottom of the hardware chassis or on the carton box in which your device is delivered. In the following example picture, you can see the serial number "*******X0R9" on the bottom of the Firepower 1010 chassis.
-
The default password of the device.
-
A smart license generated from Cisco Smart Software Manager for using the additional capabilities. However, you can complete the device onboarding using a 90-day evaluation license and later apply the smart license.
Onboard a Secure Firewall Threat Defense Device With Zero-Touch Provisioning
 Caution |
When the device is being onboarded in Security Cloud Control, we recommend that you not perform the device easy setup using the Secure Firewall device manager. This causes provisional error in Security Cloud Control. |
Before you begin
-
The threat defense device must not be prevously or currently managed by Firewall Device Manager or Management Center. If the device is currently managed by a platform, see Onboard a Configured FDM-Managed Device using the Device's Serial Number.
-
If you onboard a device with the intention of managing it with an on-premises management center, the on-premises management center must be running version 7.4 and later.
Procedure
|
Step 1 |
If you are onboarding a device purchased from an external vendor, you must reimage the device first. For more information, see the "Reimage Procedures" chapter of the Cisco FXOS Troubleshooting Guide. |
||
|
Step 2 |
Log in to Security Cloud Control. |
||
|
Step 3 |
In the navigation pane, click Security Devices. |
||
|
Step 4 |
Click the blue plus button |
||
|
Step 5 |
Click the FTD tile.
|
||
|
Step 6 |
On the Onboard FTD Device screen, click Use Serial Number. |
||
|
Step 7 |
In the Select FMC step, use the drop-down menu to select an on-premises management center that has already been onboarded to Security Cloud Control. Click Next. The on-premises management center must be running version 7.4 or higher. If you do not have an on-premises management center onboarded, click +Onboard On-Prem FMC for the onboarding wizard. |
||
|
Step 8 |
In the Connection step, enter the device's serial number and device name. Click Next. |
||
|
Step 9 |
For zero-touch provisioning, the device must be brand new, or has been reimaged. For the Password Reset, be sure to select Yes, this new device has never been logged into or configured for a manager. Enter a new password and confirm the new password for the device, then click Next. |
||
|
Step 10 |
For Policy Assignment, use the drop-down menu to select a access control policy to be deployed once the device is onboarded. If you do not have a customized policy, Security Cloud Control auto-selects the default access control policy. Click Next. |
||
|
Step 11 |
Select all licenses you want to apply to the device. Click Next. |
||
|
Step 12 |
(Optional) Add labels to the device. Security Cloud Control applies these labels once the device successfully onboards. |
What to do next
Security Cloud Control starts claiming the device, and you will see the Claiming message on the right. Security Cloud Control continuously polls for an hour to determine if the device is online and registered to the cloud. Once it's registered to the cloud, Security Cloud Control starts the initial provisioning and onboards the device successfully. The device registration can be confirmed when the LED status flashes green on the device. If the device can't connect to the Cisco cloud or lose its connectivity after being connected, you can see the Status LED (Firepower 1000) or SYS LED (Firepower 2100) flashing alternate green and amber.
If the device is still not registered to the cloud within the first one hour, a time-out occurs, and now Security Cloud Control polls periodically for every 10 minutes to determine the device status and remain in Claiming state. When the device is turned on and connected to the cloud, you don't have to wait for 10 minutes to know its onboarding status. You can click the Check Status link anytime to see the status. Security Cloud Control starts the initial provisioning and onboards the device successfully.
Important |
Suppose you have already completed the device setup wizard (see Onboard an Already Configured FDM-Managed Device), the device is unregistered from the cloud, and in this case, Security Cloud Control remains in Claiming state. You need to complete manual registration from Secure Firewall device manager to add it to Security Cloud Control. (In Secure Firewall device manager, go to System Settings > Cloud Services and select the Auto-enroll with Tenancy from Cisco Security Cloud Control option and click Register). Then, click Check Status. |
Onboard a Configured FDM-Managed Device using the Device's Serial Number
This procedure is for devices that have already been configured for local management. Because the device setup wizard is completed on an already configured FDM-managed device, the device is unregistered from the cloud, and you can't onboard such devices to Security Cloud Control using the zero-touch provisioning process.
If you device is brand new and has never been managed or configured, you can onboard the device with zero-touch provisioning. See Onboard a Secure Firewall Threat Defense Device With Zero-Touch Provisioning for more information.
Note |
When the device is not connected to the Cisco cloud, you can see the Status LED (Firepower 1000), SYS LED (Firepower 2100), or M LED (Secure Firewall 3100) flashing alternate green and amber. |
You may have completed the device setup wizard to perform the following tasks:
-
The device must be running version 6.7 or later.
-
Configure a static IP address on the management interface of the device. If the interfaces cannot obtain the necessary dynamic IP address, or the DHCP server does not provide the gateway route, you need to configure a static IP address.
-
Obtain an address using PPPoE and configure the outside interface.
-
Manage the device running version 6.7 or later device using Secure Firewall device manager or Secure Firewall Management Center.
-
You have an active SecureX account. If you do not have a SecureX account, see SecureX and Security Cloud Control for more information.
-
Your Security Cloud Control and SecureX account are merged. See Link Your Security Cloud Control and SecureX or Cisco XDR Tenant Accounts for more information.
Important |
You can switch the manager of a Secure Firewall Threat Defense device from Secure Firewall device manager to Secure Firewall Management Center, or the other way. Perform the steps explained in the Switching Between Local and Remote Management section of the "System Management" chapter of the Cisco Firepower Threat Defense Configuration Guide for Firepower Device Manager for the version the device runs. |
If you want to onboard devices, perform the following:
Procedure
|
Step 1 |
Review the prerequisites for onboarding here Procedure for Onboarding FDM-Managed Device using Device Serial Number. |
|
Step 2 |
In the Secure Firewall device manager UI, navigate to and select the Auto-enroll with Tenancy from Cisco Security Cloud Control option and click Register. |
|
Step 3 |
Log in to Security Cloud Control. |
|
Step 4 |
In the navigation pane, click Security Devices. |
|
Step 5 |
Click the FTD tile. |
|
Step 6 |
On the Onboard FTD Device screen, click Use Serial Number. |
|
Step 7 |
In the Select FMC step, use the drop-down menu to select an on-premises management center that has already been onboarded to Security Cloud Control. Click Next. The on-premises management center must be running version 7.4 or higher. If you do not have an on-premises management center onboarded, click +Onboard On-Prem FMC for the onboarding wizard. |
|
Step 8 |
In the Connection step, enter the device's serial number and device name. Click Next. |
|
Step 9 |
If the device is not brand new and has already been configured for management, select Yes, this new device has never been logged into or configured for a manager for the Password Reset. Click Next. |
|
Step 10 |
For Policy Assignment, use the drop-down menu to select a access control policy to be deployed once the device is onboarded. If you do not have a customized policy, Security Cloud Control auto-selects the default access control policy. Click Next. |
|
Step 11 |
Select all licenses you want to apply to the device. Click Next. |
Security Cloud Control changes the device Connectivity status changes to "Online" and the Configuration status changes to the "Synced" state. The FDM-managed device is onboarded to Security Cloud Control. You can see the Status LED (Firepower 1000), SYS LED (Firepower 2100), or M LED flashing green on the rear panel of the hardware. The device LED continues to flash in green when it's connected to Cisco Cloud. If the device can't connect to the Cisco cloud or loses its connectivity after being connected, you can see the same status LED flash alternate green and amber.
Onboard an FDM-Managed High Availability Pair
To onboard an Secure Firewall Threat Defense HA pair to Security Cloud Control, you must onboard each device of the pair individually. Once both peers of the pair are onboarded Security Cloud Control automatically combines them as a single entry in the Inventory page. Onboard the devices using either the device login credentials or a registration key. We recommend onboarding both devices with the same method. Also be aware that if you onboard a device that is in standby mode first, Security Cloud Control disables the ability to deploy or read from that device. You can only read or deploy to the active device within an HA pair.
Note |
Security Cloud Control strongly recommends onboarding devices with a registration key. Onboarding with a registration key is slightly different for Threat Defense devices running specific versions. See Onboard an FDM-Managed HA Pair Running Version 6.4 or Version 6.5 and Onboard an FDM-Managed HA Pair Running Threat Defense Version 6.6 or Version 6.7 and later for more information. |
Before you onboard an Threat Defense HA pair to Security Cloud Control, review the following:
-
Your HA pair is already formed prior to onboarding to Security Cloud Control.
-
Both devices are in a healthy state. The pair could be either primary/active and secondary/standby or primary/standby and secondary/active modes. Unhealthy devices will not successfully sync to Security Cloud Control.
-
Your HA pair is managed by Secure Firewall device manager, not Secure Firewall Management Center.
-
Your cloud connector connects to Security Cloud Control at https://us.manage.security.cisco.com.
Onboard an FDM-Managed High Availablity Pair with a Registration Key
Be aware of the following prerequisites before you onboard an FDM-managed High Availability (HA) pair with a registration key:
-
Onboarding devices that are running version 6.4 with a registration key is only supported for the US region (https://us.manage.security.cisco.com). To connect to the EU region (https://eu.manage.security.cisco.com) they must onboard their HA pair with username, password, and IP address.
-
Customers running version 6.5 or later, and connecting either to the US, EU, or APJ regions can use this method of onboarding.
-
Devices running version 6.4 and 6.5 must not be registered with Cisco Smart Software Manager before onboarding them with a registration key. You will need to unregister the smart licenses of those FDM-managed devices before onboarding them to Security Cloud Control. See Unregister a Smart-licensed FDM-Managed Device for more information.
Onboard an FDM-Managed HA Pair Running Version 6.4 or Version 6.5
To onboard an FDM-managed HA pair running software version 6.4 or 6.5, you must onboard the devices one at a time. It does not matter if you onboard the active or standby, the primary or secondary device.
Note |
If you onboard either device of an HA pair with a registration key, you must onboard the other peer device in the same method. |
Use the following steps for onboard an HA pair running Version 6.4 or 6.5:
Procedure
|
Step 1 |
Onboard a peer device. See Procedure to Onboard an FDM-Managed Device Running Software Version 6.4 or 6.5 Using a Registration Key to onboard the first device within the pair. |
||
|
Step 2 |
In the left pane, click . |
||
|
Step 3 |
Click the Devices tab to locate your device. |
||
|
Step 4 |
Click the FTD tab. Once the device is synced, select the device so it is highlighted. In the action pane located directly below Device Details, click Onboard Device. |
||
|
Step 5 |
Enter the HA Peer Device Name for the peer device that has already been onboarded. Click Next. |
||
|
Step 6 |
If you provided a smart license for the first device, Security Cloud Control repopulates that license so you can use it for onboarding this current device. Click Next.
|
||
|
Step 7 |
Security Cloud Control automatically generates that registration key for the device you are preparing to onboarding. Click the Copy icon |
||
|
Step 8 |
Log into the Secure Firewall device manager UI of the device you are onboarding. |
||
|
Step 9 |
In System Settings, click Cloud Services. |
||
|
Step 10 |
In the Security Cloud Control tile, click Get Started. |
||
|
Step 11 |
In the Registration Key field, paste the registration key that you generated in Security Cloud Control. 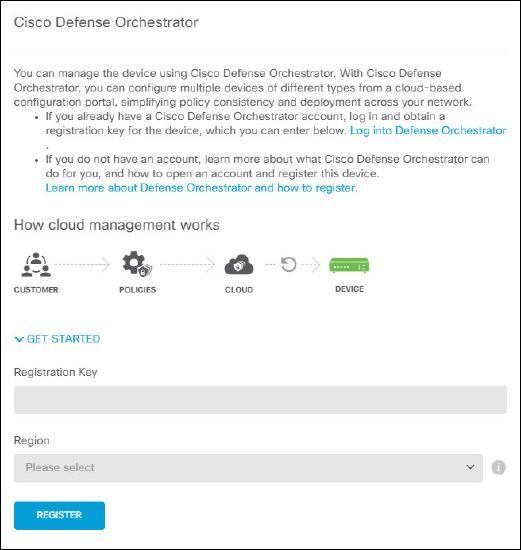
|
||
|
Step 12 |
In the Region field, select the Cisco cloud region that your tenant is assigned to.
|
||
|
Step 13 |
Click Register and then Accept the Cisco Disclosure. |
||
|
Step 14 |
Return to Security Cloud Control and, in the Create Registration Key area, click Next. |
||
|
Step 15 |
Click Go to Inventory. Security Cloud Control automatically onboards the device and combines them as a single entry. Similar to the first peer device you onboard, the device status changes from "Unprovisioned" to "Locating" to "Syncing" to "Synced." |
Onboard an FDM-Managed HA Pair Running Threat Defense Version 6.6 or Version 6.7 and later
To onboard an FDM-managed HA pair running threat defense version 6.6 or 6.7, you must onboard the device one at a time. It does not matter if you onboard the active or standby, the primary or secondary device.
Note |
If you onboard either device of an HA pair with a registration key, you must onboard the other peer device in the same method. Use the following steps for onboard an HA pair running version 6.6 or 6.7: |
Procedure
|
Step 1 |
Onboard a peer device. See Onboard an FDM-Managed Device Running Software Version 6.6+ Using a Registration Key |
||
|
Step 2 |
In the left pane, click . |
||
|
Step 3 |
Click the Devices tab to locate your device. |
||
|
Step 4 |
Click the FTD tab. Once the device is synced, select the device so it is highlighted. In the action pane located directly below Device Details, click Onboard Device. |
||
|
Step 5 |
Enter the HA Peer Device Name for the peer device that has already been onboarded. Click Next. |
||
|
Step 6 |
If you provided a smart license for the first device, Security Cloud Control repopulates that license so you can use it for onboarding this current device. Click Next. |
||
|
Step 7 |
Security Cloud Control automatically generates that registration key for the device you are preparing to onboarding. Click the Copy icon |
||
|
Step 8 |
Log into the Secure Firewall device manager UI of the device you want to onboard to Security Cloud Control. |
||
|
Step 9 |
Under System Settings, click Cloud Services. |
||
|
Step 10 |
In the Enrollment Type area, click Security/Security Cloud Control Account.
|
||
|
Step 11 |
In the Region field, select the Cisco cloud region that your tenant is assigned to. |
||
|
Step 12 |
In the Registration Key field, paste the registration key that you generated in Security Cloud Control. |
||
|
Step 13 |
For devices running version 6.7 or later in the Service Enrollment area, check Enable Cisco Security Cloud Control. |
||
|
Step 14 |
Review the information about the Cisco Success Network Enrollment. If you do not want to participate, uncheck the Enroll Cisco Success Network check box. |
||
|
Step 15 |
Click Register and then Accept the Cisco Disclosure. FDM sends the registration request to Security Cloud Control. |
||
|
Step 16 |
Return to Security Cloud Control, in the Create Registration Key area, click Next. |
||
|
Step 17 |
In the Smart License area, you can apply a smart license to the FDM-managed device and click Nextor you can click Skip to continue the onboarding with a 90-day evaluation license or if the device is already smart-licensed. For more information, see Updating an Existing Smart License of an FDM-Managed Device.
|
||
|
Step 18 |
Return to Security Cloud Control, click Go to Inventory. Security Cloud Control automatically onboards the device and combines them as a single entry. Similar to the first peer device you onboard, the device status changes from "Unprovisioned" to "Locating" to "Syncing" to "Synced." |
Onboard an FDM-Managed High Availability Pair
Note |
Whichever method you onboard the first device of an HA pair with, you must onboard the other peer device in the same method. |
To onboard an FDM-managed HA pair that has been created outside of Security Cloud Control, follow this procedure:
Procedure
|
Step 1 |
Onboard one of the peer devices within the HA pair. Onboard the device with its username, registration key, or serial number. |
|
Step 2 |
Once the device is synced, in the Security Devices page, click the Devices tab. |
|
Step 3 |
Click the FTD tab. |
|
Step 4 |
Select the device. In the action pane located directly below Device Details, click Onboard Device. |
|
Step 5 |
In the pop-up window, enter the HA peer's device name and location. |
|
Step 6 |
Click Onboard Device. Once both devices are successfully synced to Security Cloud Control, the HA pair is displayed as a single entity in the Inventory page. |
Onboard an FTD Cluster
Onboard a Clustered Secure Firewall Threat Defense Device
Onboard a threat defense device that has already been clustered with the following procedure:
Before you begin
The following devices support clustering:
-
Secure Firewall 3100 devices
-
Firepower 4100 devices
-
Firepower 9300 devices
-
Threat Defense Virtual device (AWS, Azure, VMware, KVM, GCP)
Note the following limitations for clustered devices:
-
Devices must be running at least version 6.4.
-
Devices must be managed by a physical or virtual Secure Firewall Management Center.
-
Firepower 4100 and Firepower 9300 devices must be clustered through the device's chassis manager.
-
Secure Firewall 3100 devices, KVM, and VMware environments must be clustered through the Secure Firewall Management Center UI.
-
Azure, AWS, and GCP environment clusters must be created through their own environment and onboarded to Secure Firewall Management Center.
Procedure
|
Step 1 |
Log in to Security Cloud Control. |
|
Step 2 |
In the left pane, click . |
|
Step 3 |
Click the blue plus button |
|
Step 4 |
Click FTD. |
|
Step 5 |
Under Management Mode, be sure FTD is selected. By selecting FTD, you are retaining Secure Firewall Management Center as the managing platform. If you select FDM, this switches the manager from Secure Firewall Management Center to a local manager such as the Firewall Device Manager or cloud-delivered Firewall Management Center. Note that Switching managers resets all existing policy configurations except for interface configurations and you must re-configure policies after you onboard the device. |
|
Step 6 |
On the Onboard FTD Device screen, click Use CLI Registration Key. |
|
Step 7 |
Enter the device name in the Device Name field. This could be the hostname of the device or any other name you choose. |
|
Step 8 |
In the Policy Assignment step, use the drop-down menu to select an access control policy to deploy once the device is onboarded. If you have no policies configured, select the Default Access Control Policy. |
|
Step 9 |
Specify whether the device you are onboarding is a physical or virtual device. If you are onboarding a virtual device, you must select the device's performance tier from the drop-down menu. |
|
Step 10 |
Select the essentials licenses you want applied to the device. Click Next. |
|
Step 11 |
Security Cloud Control generates a command with the registration key. Paste the entire registration key as is into the device's CLI. |
|
Step 12 |
The device starts to onboard. As an optional step, you can add labels to your device to help sort and filter the Inventory page. Enter a label and select the blue plus button. . |
What to do next
Once the device is sychronized, Security Cloud Control automatically detects that the device is clustered. From here, select the device you just onboarded from the Inventory page and select any of the options listed under the Management pane located to the right. We strongly recommend the following actions:
-
If you did not already, create a custom access control policy to customize the security for your environment. See FDM-Managed Access Control Policy for more information.
-
Enable Cisco Security Analytics and Logging (SAL) to view events in the Security Cloud Control dashboard or register the device to an Secure Firewall Management Center for security analytics.
Applying or Updating a Smart License
Applying a New Smart License to an FDM-Managed Device
Perform one of the following procedures to Smart License the FDM-managed device:
-
Smart license an FDM-managed device when onboarding using a registration key.
-
Smart license an FDM-managed device after onboarding the device using a registration key or the administrator's credentials.
Note |
The FDM-managed device may be using a 90-day evaluation license, or the license could be unregistered. |
Smart-License an FDM-Managed Device When Onboarding Using a Registration Key
Procedure
|
Step 1 |
Log on to the Cisco Smart Software Manager and generate a new Smart License key. Copy the newly generated key. You can watch the Generate Smart Licensing video for more information.
|
|
Step 2 |
Begin onboarding an FDM-managed device using a registration key. For more information, see Onboard an FDM-Managed Device Running Software Version 6.6+ Using a Registration Key or Onboard an FDM-Managed Device Running Software Version 6.4 or 6.5 Using a Registration Key. |
|
Step 3 |
In step 4 of the onboarding wizard, in the Smart License here box, paste the Smart License in the Activate field and click Next.
|
|
Step 4 |
Click Go to Inventory page. |
|
Step 5 |
Click the FTD tab and see the progress of the onboarding process. The device starts synchronizing and applies the Smart License. You should see that the device is now in the Online connectivity state. If the device is not in the online connectivity state, look in the Device Actions pane on the right and click to update the connectivity state. |
|
Step 6 |
After applying the Smart License successfully to the FDM-managed device, click the Manage Licenses. The device status shows "Connected, Sufficient License." You can enable or disable the optional licenses. For more information, see FDM-managed Device Smart Licensing Types.
|


Smart-License an FDM-Managed Device After Onboarding the Device Using a Registration Key or its Credentials
Procedure
|
Step 1 |
In the navigation pane, click Inventory. |
|
Step 2 |
Click the Devices tab to locate the device. |
|
Step 3 |
Click the FTD tab and select the device that you want to license. |
|
Step 4 |
In the Device Actions pane on the right, click Manage Licenses.
|
|
Step 5 |
Follow the on-screen instructions and enter the Smart License generated from Cisco Smart Software Manager. |
|
Step 6 |
Paste the new license key in the box and click Register Device. After synchronizing with the device, the connectivity state changes to 'Online'. After applying the Smart License successfully to the FDM-managed device, the device status shows "Connected, Sufficient License." You can enable or disable the optional licenses. For more information, see FDM-managed Device Smart Licensing Types. |
Updating an Existing Smart License of an FDM-Managed Device
You can apply a new Smart License to an FDM-managed device which is Smart Licensed. Based on the method you have selected for onboarding your device, select the appropriate procedure:
Change the Smart License Applied to an FDM-Managed Device Onboarded Using a Registration Key
Procedure
|
Step 1 |
Remove the corresponding FDM-managed device from Security Cloud Control. |
|
Step 2 |
Log into the Secure Firewall device manager for that device and unregister the Smart License. For more information, see Unregister a Smart-licensedFDM-Managed Device. |
|
Step 3 |
In Security Cloud Control, onboard the FDM-managed device again using a registration key. For more information, see Onboard an FDM-Managed Device with a Registration Key. |
|
Step 4 |
Click the Devices tab to locate the device. |
|
Step 5 |
Click the tab. |
|
Step 6 |
Apply the new Smart License during the onboarding process or by looking in the Device Actions pane on the right and clickingManage Licenses.
|
Change the Smart License Applied to an FDM-Managed Device Onboarded Using its Credentials
Procedure
|
Step 1 |
Log into the Secure Firewall device manager for that device and unregister the Smart License. For more information, see Onboard an FDM-Managed Device with a Registration Key. |
|
Step 2 |
Apply the new Smart License to the FDM-managed device in Secure Firewall device manager.
|
|
Step 3 |
On the Inventory page in Security Cloud Control, click the Devices tab. |
|
Step 4 |
Click the FTD device. Check the FDM-managed device configuration for changes so that Security Cloud Control can make a copy of the FDM-managed device's deployed configuration and save it to the Security Cloud Control database. For more information, see Reading, Discarding, Checking for, and Deploying Configuration Changes. |
Security Cloud Control Support for DHCP Addressing of FDM-Managed Devices
What happens if the IP address used by my FDM-managed device changes?
Security Cloud Control has many Adaptive Security Appliance (ASA) and FDM-managed device customers who have onboarded devices using the IP address provided by their service provider using DHCP.
If the IP address of the device for any reason, whether that is a change in the static IP address or a change in the IP address due to DHCP, you can change the IP address that Security Cloud Control uses to connect to the device and then reconnect the device.
The field, expressed concerns regarding the case of branch deployed FDM-managed devices managed by Security Cloud Control, a static IP is required on the outside interface of the FDM-managed device, which, in the view of some SE's, precludes using Security Cloud Control as a management solution when the FDM-managed device has a DHCP address configured for the outside interface.
However, this situation does not impact customers that have VPN tunnels to remote branch firewalls, and we know that a vast majority of customers have Site to Site tunnels from their Branch Offices back to their datacenters. In the case that Site-to -Site VPN is used to connect to the central site from devices, DHCP on the outside interface is not a concern since Security Cloud Control (and any management platform) can connect to the FW via its inside, statically addressed, interface (if so configured). This is a recommended practice and we have Security Cloud Control customers with many (+1000) devices using this deployment mode.
Also, the fact that an interface IP address is being issued via DHCP does not preclude the customer from managing the device using that IP. Again, this is not optimal, but the experience of periodically having to potentially change the IP address in Security Cloud Control has not been seen as a hurdle to customers. This situation is not exclusive to Security Cloud Control and happens with any manager using the outside interface including ASDM, FDM or SSH.
FDM-Managed Device Licensing Types
Smart License Types
The following table explains the licenses available for FDM-managed devices.
Your purchase of an FDM-managed device automatically includes a base license. All additional licenses are optional.
|
License |
Duration |
Granted Capabilities |
|---|---|---|
|
License (automatically included) |
Perpetual |
All features not covered by the subscription term licenses. You must also specify whether to Allow export-controlled functionality on the products registered with this token. You can select this option only if your country meets export-control standards. This option controls your use of advanced encryption and the features that require advanced encryption. |
|
Term-based |
Intrusion detection and prevention-Intrusion policies analyze network traffic for intrusions and exploits and, optionally, drop offending packets. File control-File policies detect and, optionally, block users from uploading (sending) or downloading (receiving) files of specific types. AMP for Firepower, which requires a Malware license, allows you to inspect and block files that contain malware. You must have the license to use any type of File policy. Security Intelligence filtering-Drop selected traffic before the traffic is subjected to analysis by access control rules. Dynamic feeds allow you to drop connections based on the latest intelligence immediately. |
|
|
Malware |
Term-based |
File policies that check for malware, which use Cisco Advanced Malware Protection (AMP) with AMP for Firepower (network-based Advanced Malware Protection) and Cisco Threat Grid. File policies can detect and block malware in files transmitted over your network. |
|
URL License |
Term-based |
Category and reputation-based URL filtering. You can perform URL filtering on individual URLs without this license. |
|
Term-based or perpetual based on the license type |
Remote access VPN configuration. Your essentials license must allow export-controlled functionality to configure RA VPN. You select whether you meet export requirements when you register the device. Firepower Device Manager can use any valid AnyConnect license. The available features do not differ based on the license type. If you have not already purchased one, see Licensing Requirements for Remote Access VPN. Also, see the Cisco AnyConnect Ordering Guide, http://www.cisco.com/c/dam/en/us/products/collateral/security/anyconnect-og.pdf. |
Virtual FDM-Managed Device Tiered Licenses
Version 7.0 introduces support for performance-tiered Smart Licensing for virtual FDM-Managed devices based on throughput requirements and RA VPN session limits. When the virtual FDM-Managed device is licensed with one of the available performance licenses, two things occur: session limits for RA VPNs are determined by the installed virtual FDM-Managed device platform entitlement tier, and enforced via a rate limiter.
Security Cloud Control does not fully support tiered smart licensing at this time; see the following limitations:
-
You cannot modify the tiered license through Security Cloud Control. You must make the changes in the Secure Firewall device manager UI.
-
If you register a virtual FDM-Managed device to be managed by the cloud-delivered Firewall Management Center, the tiered license selection automatically resets to Variable, which is the default tier.
-
If you onboard a virtual FDM-Managed device running version 7.0 or later, and select a license that is not a default license during the onboarding process, the tiered license selection automatically resets to Variable, which is the default tier.
We strongly recommend selecting a tier for your virtual FDM-Managed device license after onboarding your device to avoid the issues listed above. See Managing Smart Licenses for more information.
Viewing Smart-Licenses for a Device
Procedure
|
Step 1 |
In the navigation bar, click Inventory. |
|
Step 2 |
Click the Devices tab to locate your device. |
|
Step 3 |
Click the FTD tab. |
|
Step 4 |
Select an FDM-managed device to view its current license status. |
|
Step 5 |
In the Device Actions pane on the right, click Manage Licenses. The Manage Licenses screen provides the following information:
|
Enabling or Disabling Optional Licenses
You can enable (register) optional licenses on FDM-managed devices that are using a 90-day evaluation license or a full license. You must enable a license to use the features controlled by the license.
If you no longer want to use the features covered by an optional term license, you can disable (release) the license. Disabling the license releases it in your Cisco Smart Software Manager account so that you can apply it to another device.
In evaluation mode, you can also enable evaluation versions of the optional licenses and perform all operations. In this mode, the licenses aren't registered with Cisco Smart Software Manager until you register the device.
Note |
You can't enable the license in evaluation mode. |
Before you begin
Before disabling a license, ensure that you are not using it. Rewrite or delete any policies that require the license.
For units operating in a high availability configuration, you enable or disable licenses on the active unit only. The change is reflected in the standby unit the next time you deploy the configuration when the standby unit requests (or frees) the necessary licenses. When enabling licenses, you must ensure that your Cisco Smart Software Manager account has sufficient licenses available, or you could have one unit compliant while the other unit is non-compliant.
To enable or disable optional licenses, follow this procedure:
Procedure
|
Step 1 |
In the Inventory page, select the FDM-managed device that you want and click Manage Licenses in Device Actions pane, The Manage Licenses screen appears. |
|
Step 2 |
Click the slider control for each optional license to enable or disable the license. The status of the license shows OK when enabled.
|
|
Step 3 |
Click Save to save the changes. |
Impact of Expired or Disabled Optional Licenses
If an optional license expires, you can continue using features that require the license. However, the license is marked out of compliance, and you need to purchase the license and add it to your account to bring the license back into compliance.
If you disable an optional license, the system reacts as follows:
-
Malware license: The system stops querying the AMP cloud and also stops acknowledging retrospective events sent from the AMP cloud. You cannot re-deploy existing access control policies if they include file policies that apply malware inspection. Note that for a very brief time after a Malware license is disabled, the system can use existing cached file dispositions. After the time window expires, the system assigns a disposition of Unavailable to those files.
-
: The system no longer applies intrusion or file-control policies. For Security Intelligence policies, the system no longer applies the policy and stops downloading feed updates. You cannot re-deploy existing policies that require the license.
-
URL: Access control rules with URL category conditions immediately stop filtering URLs, and the system no longer downloads updates to URL data. You cannot re-deploy existing access control policies if they include rules with category and reputation-based URL conditions.
-
: You cannot edit the remote access VPN configuration, but you can remove it. Users can still connect using the RA VPN configuration. However, if you change the device registration so that the system is no longer export compliant, the remote access VPN configuration stops immediately, and no remote users can connect through the VPN.
Create and Import an Firewall Device Manager Model
Security Cloud Control provides the ability to export the complete configuration of an FDM-managed device on a Security Cloud Control tenant to a JSON file format. You can then import this file to another tenant as an Firewall device manager model and apply it to a new device on that tenant. The feature is beneficial when you want to use an FDM-managed device's configuration on different tenants that you manage.
Note |
If the FDM-managed device contains rulesets, the shared rules associated with the rulesets are modified as local rules when exporting the configuration. Later, when the model is imported to another tenant and applied to an FDM-managed device, you'll see the local rules in the device. |
Export FDM-Managed Device Configuration
The export configuration functionality is unavailable if your FDM-managed device has the following configuration:
-
High Availability
-
Snort 3 enabled
Procedure
|
Step 1 |
In the navigation bar, click Inventory. |
|
Step 2 |
Click the Devices tab to locate the device or the Templates tab to locate the model device. |
|
Step 3 |
Click the FTD tab. |
|
Step 4 |
Select an FDM-managed device and in the Device Actions on the right pane, click Export Configuration. |
Import FDM-Managed Device Configuration
Procedure
|
Step 1 |
In the Inventory page, click the blue plus ( |
||
|
Step 2 |
Click Import to import configuration for offline management. |
||
|
Step 3 |
Select the Device Type as FTD. |
||
|
Step 4 |
Click Browse and select the configuration file (JSON format) to upload. |
||
|
Step 5 |
Once the configuration is verified, you're prompted to label the device or service. See Labels and Label Groups for more information. |
||
|
Step 6 |
After labeling your model device, you can view it in the Inventory list.
|
 . The button changes to read, "Download Backup Image."
 .
.


 Feedback