FAQ and Support

This chapter contains the following sections:

Cisco Security Cloud Control

What is Cisco Security Cloud Control?

Cisco Security Cloud Control (formerly Cisco Defense Orchestrator) is a cloud-based multi-device manager that allows network administrators to create and maintain consistent security policies across various security devices.

You can use Security Cloud Control to manage these devices:

  • Cisco Secure Firewall ASA

  • Cisco Secure Firewall Threat Defense

  • Cisco Umbrella

  • Meraki

  • Cisco IOS devices

  • Amazon Web Services (AWS) instances

  • Devices administered using an SSH connection

Security Cloud Control administrators can monitor and maintain all these device types through a single interface.

FAQ About Onboarding Devices to Security Cloud Control

FAQs About Onboarding Secure Firewall ASA to Security Cloud Control

How do I onboard an ASA using credentials?

You can onboard ASAs one at a time or in a bulk operation. device at a time. When onboarding an ASA that is part of a high-availability pair, use Onboard an ASA Device to onboard only the primary device of the pair. The method of onboarding a security context or admin context is the same for onboarding any other ASA.

How do I onboard more than one ASA at a time?

You can create a list of ASAs using a CSV file, and Security Cloud Control will onboard all the ASAs in the list. See Onboard ASAs in Bulk for instructions on how to bulk onboard ASAs.

What do I do after onboarding my ASAs?

See Managing ASA with Cisco Security Cloud Control to get started.

FAQs About Onboarding FDM-Managed Devices to Security Cloud Control

How do I onboard FDM-managed devices?

There are different methods of onboarding an FDM-managed device. We recommend using the registration key method. See Onboard an FDM-Managed Device to get started.

FAQs About Onboarding Secure Firewall Threat Defense to Cloud-delivered Firewall Management Center

How do I onboard Secure Firewall Threat Defense?

You can onboard an FTD device using a CLI registration key, through zero-touch provisioning, or with a serial number.

What do I do after onboarding my Secure Firewall Threat Defense?

Once the device is sychronized, navigate to Tools & Services > Firewall Management Center and select an action from the Actions, Management, or Settings pane to begin configuring your threat defense device in cloud-delivered Firewall Management Center. See Cloud-delivered Firewall Management Center Application Page to get started.

How do I troubleshoot my Secure Firewall Threat Defense?

See Troubleshoot Onboarding your Secure Firewall Threat Defense.

FAQs About On-Premises Secure Firewall Management Center

How do I onboard an On-Prem management center?

You can onboard an On-Prem Management Center to Security Cloud Control. Onboarding an On-Prem Management Center also onboards all of the devices registered to the On-Prem Management Center. Security Cloud Control does not support creating or modifying objects or policies associated with the On-Prem Management Center or the devices registered to the On-Prem Management Center. You must make these changes in the On-Prem Management Center UI. See Onboard an On-Prem Management Center to get started.

FAQs About Onboarding Meraki Devices to Security Cloud Control

How do I onboard a Meraki device?

MX devices can be managed by both Security Cloud Control and the Meraki dashboard. Security Cloud Control deploys configuration changes to the Meraki dashboard, which in turn deploys the configuration securely to the device. See Onboard Meraki MX Devices to get started.

FAQs About Onboarding SSH Devices to Security Cloud Control

How do I onboard an SSH device?

You can use the username and password of a highly privileged user stored on the SSH device to onboard the device with a Secure Device Connector (SDC). See Onboard an SSH Device to get started.

How do I delete a device?

You can delete a device from the Security Devices page.

FAQs About Onboarding IOS Devices to Security Cloud Control

How do I onboard a Cisco IOS device?

You can onboard a live Cisco device running Cisco IOS (Internetwork Operating System) with a Secure Device Connector (SDC). See Onboard a Cisco IOS Device to get started.

How do I delete a device?

You can delete a device from the Security Devices page.

Device Types

What is an Adaptive Security Appliance (ASA)?

The Cisco ASA provides advanced stateful firewall and VPN concentrator functionality in one device as well as integrated services with add-on modules. The ASA includes many advanced features, such as multiple security contexts (similar to virtualized firewalls), clustering (combining multiple firewalls into a single firewall), transparent (Layer 2) firewall or routed (Layer 3) firewall operation, advanced inspection engines, IPsec VPN, SSL VPN, and clientless SSL VPN support, and many more features. ASAs can be installed on virtual machines or supported hardware.

What is an ASA Model?

An ASA model is a copy of the running configuration file of an ASA device that you have onboarded to Security Cloud Control. You can use an ASA model to analyze the configuration of an ASA device without onboarding the device itself.

What is Firepower Threat Defense (FTD)

Cisco's next generation firewall software image. It strives to combine the best of Sourcefire next generation firewall services and the ASA platform. It can be installed on a number of different Firepower hardware devices or virtual machines. This is not the same as a ASA FirePOWER module. See ASA Software and Hardware Support for more information.

What is Firepower Device Manager (FDM)

Firepower Device Manager is Firepower Threat Defense management software delivered with the FTD image. FDM is designed to manage the one FTD it is delivered with. You may also hear FDM referred to as the "local device manager."

What is Firepower?

Firepower is a general term that refers to a group of next generation firewall hardware and software.

When is a device Synced?

When the configuration on Security Cloud Control and the configuration stored locally on the device are the same.

When is a device Not Synced?

When the configuration stored in Security Cloud Control was changed and it is now different that the configuration stored locally on the device.

When is a device in a Conflict Detected state?

When the configuration on the device was changed outside of Security Cloud Control (out-of-band), and is now different than the configuration stored on Security Cloud Control.

What is an out-of-band change?

When a change is made to the device outside of Security Cloud Control. The change is made directly on the device using CLI command or by using the on-device manager such as ASDM or FDM. An out-of-band change causes Security Cloud Control to report a "Conflict Detected" state for the device.

What does it mean to deploy a change to a device?

After you onboard a device to Security Cloud Control, Security Cloud Control maintains a copy of its configuration. When you make a change on Security Cloud Control, Security Cloud Control makes a change to its copy of the device's configuration. When you "deploy" that change back to a device, Security Cloud Control copies the changes you made to the device's copy of its configuration. See these topics:

What ASA commands are currently supported?

All commands. Click the Command Line Interface link under Device Actions to use the ASA CLI.

Are there any scale limitations for device management?

Security Cloud Control's cloud architecture allows it to scale to thousands of devices.

Does Security Cloud Control manage Cisco Integrated Services Routers and Aggregation Services Routers?

Security Cloud Control allows you to create a model device for ISRs and ASRs and import its configuration. You can then create templates based on the imported configurations and export the configuration as a standardized configuration that can be deployed to new or existing ISR and ASR devices for consistent security.

Can Security Cloud Control manage SMA?

No, Security Cloud Control does not currently manage SMA.

Security

Is Security Cloud Control Secure?

Security Cloud Control offers end-to-end security for customer data through the following features:

Security Cloud Control requires multi-factor authentication for users to connect to their cloud portal. Multi-factor authentication is a vital function needed to protect the identity of customers.

All data, in flight and at rest, is encrypted. Communication from devices on customer premises and Security Cloud Control is encrypted with SSL, and all customer-tenant data volumes are encrypted.

Security Cloud Control's multi-tenant architecture isolates tenant data and encrypts traffic between databases and application servers. When users authenticate to gain access to Security Cloud Control, they receive a token. This token is used to fetch a key from a key-management service, and the key is used to encrypt traffic to the database.

Security Cloud Control provides value to customers quickly while making sure customer credentials are secured. This is achieved by deploying a "Secure Data Connector" in the cloud or a customer's own network (in roadmap) that controls all inbound and outbound traffic to make sure the credential data doesn't leave the customer premises.

I received the error "Could not validate your OTP" when logging into Security Cloud Control for the first time

Check that your desktop or mobile device clock is synchronized with a world time server. Clocks being out of sync by less or more than a minute can cause incorrect OTPs to be generated.

Is my device connected directly to Security Cloud Control cloud platform?

Yes. The secured connection is performed using the Security Cloud Control SDC which is used as a proxy between the device and Security Cloud Control platform. Security Cloud Control architecture, designed with security first in mind, enables having complete separation between data traversing back and forth to the device.

How can I connect a device which does not have a public IP address?

You can leverage Security Cloud Control Secure Device Connector (SDC) which can be deployed within your network and doesn't need any outside port to be open. Once the SDC is deployed you can onboard devices with internal (non-internet routable) IP addresses.

Does the SDC require any additional cost or license?

No.

How can I check the tunnel status? State options

Security Cloud Control performs the tunnel connectivity checks automatically every hour, however ad-hoc VPN tunnel connectivity checks can be performed by choosing a tunnel and requesting to check connectivity. Results may take several seconds to process.

Can I search a tunnel based on the device name as well as its IP address of one of its peers?

Yes. Search and pivot to a specific VPN tunnel details by using available filters and search capabilities on both name and the peers IP addresses.

Troubleshooting

While performing complete deploy of device configuration from Security Cloud Control to managed device, I get a warning "Cannot deploy changes to device". What can I do to solve that?

If an error occurrs when you deploy a full configuration (changes performed beyond Security Cloud Control supported commands) to the device, click "Check for changes" to pull the latest available configuration from device. This may solve the problem and you will be able to continue making changes on Security Cloud Control and deploy them. In case the issue persist, please contact Cisco TAC from the Contact Support page.

While resolving out-of-band issue (changes performed outside of Security Cloud Control; directly to a device), comparing the configuration present in Security Cloud Control that of the device, Security Cloud Control presents additional metadata that were not added or modified by me. Why?

As Security Cloud Control expands its functionality, additional information will be collected from the device's configuration to enrich and maintain all required data for better policy and device management analysis. These are not changes that occurred on managed device but already existing information. Resolving the conflict detected state can be easily solved by checking for changes from the device and reviewing the changes occurred.

Why is Security Cloud Control rejecting my certificate?

See Resolving New Certificates

Terminologies and Definitions used in Zero-Touch Provisioning

  • Claimed - Used in the context of serial number onboarding in Security Cloud Control. A device is "claimed" if its serial number has been onboarded to a Security Cloud Control tenant.

  • Parked - Used in the context of serial number onboarding in Security Cloud Control. A device is "parked" if it has connected to the Cisco Cloud, and a Security Cloud Control tenant has not claimed its serial number.

  • Initial provisioning - Used in the context of the initial FTD setup. During this phase, the device accepts EULA, creates a new password, configures management IP address, sets FQDN, sets DNS servers, and chooses to manage the device locally with FDM.

  • Zero-Touch Provisioning - It is the process of shipping an FTD from the factory to a customer site (typically a branch office), an employee at the site connects the FTD to their network, and the device contacts the Cisco Cloud. At that point, the device is onboarded to Security Cloud Control tenant if its serial number has already been "claimed," or the FTD is "parked" in the Cisco cloud until a Security Cloud Control tenant claims it.

Policy Optimization

How can I identify a case when two or more access lists (within the same access group) are shadowing each other?

Security Cloud Control Network Policy Management (NPM) is able to identify and alert the user if within a rule set, a rule higher in order, is shadowing a different rule. User can either navigate between all network policies or filter to identify all shadow issues.


Note


Security Cloud Control supports only fully shadowed rules.


Connectivity

The Secure Device Connector changed IP address, but this was not reflected within Security Cloud Control. What can I do to reflect the change?

In order to obtain and update the new Secure Device Connector (SDC) within Security Cloud Control, you will need to restart the container using the following commands:
 Stop Docker deamon>#service docker stop
Change IP address
Start Docker deamon >#service docker start
Restart container on the SDC virtual appliance >bash-4.2$ ./cdo/toolkit/toolkit.sh restartSDC <tenant-name>

What happens if the IP address used by Security Cloud Control to manage my devices ( FTD or ASA) changes?

If the IP address of the device changes for any reason, whether it is a change in the static IP address or a change in the IP address due to DHCP, you can change the IP address that Security Cloud Control uses to connect to the device (see Changing a Device's IP Address in Security Cloud Control) and then reconnect the device (see Bulk Reconnect Devices to Security Cloud Control). When reconnecting the device you will be asked to enter the new IP address of the device as well as re-enter the authentication credentials.

What networking is required to connect my ASA to Security Cloud Control?

  • ASDM image present and enabled for ASA.

  • Public interface access to 52.25.109.29, 52.34.234.2, 52.36.70.147

  • ASA's HTTPS port must be set to 443 or to a value of 1024 or higher. For example, it cannot be set to port 636.

  • If the ASA under management is also configured to accept AnyConnect VPN Client connections, the ASA HTTPS port must be changed to a value of 1024 or higher.

Complete the Initial Configuration of a Secure Firewall Threat Defense Device Using the CLI

Connect to the device's CLI to perform initial setup, including setting the management IP address, gateway, and other basic networking settings using the setup wizard. Ensure all DNS and firewall ports are accessible for communication.

The dedicated management interface is a special interface with its own network settings. If you do not want to use the management interface, you can use the CLI to configure a data interface instead.

This configuration is ideal for devices that are going to be onboarded with their CLI registration key.


Note


Do not use this configuration procedure for devices that are onboarding with zero-touch provisioning.


Procedure


Step 1

Connect to the device's CLI, either from the console port or using SSH to the management interface. If you intend to change the network settings, we recommend using the console port so you do not get disconnected.

(Firepower and Secure Firewall hardware models) The console port connects to the FXOS CLI. The SSH session connects directly to the threat defense CLI.

Step 2

Log in with the username admin and the password Admin123.

(Firepower and Secure Firewall hardware models) At the console port, you connect to the FXOS CLI. The first time you log in to FXOS, you are prompted to change the password. This password is also used for the threat defense login for SSH.

Note


If the password was already changed, and you do not know it, you must reimage the device to reset the password to the default.

For Firepower and Secure Firewall hardware, see the Reimage Procedures in the Cisco FXOS Troubleshooting Guide for the Firepower 1000/2100 and Secure Firewall 3100/4200 with Threat Defense .

Example:


firepower login: admin
Password: Admin123
Successful login attempts for user 'admin' : 1

[...]

Hello admin. You must change your password.
Enter new password: ********
Confirm new password: ********
Your password was updated successfully.

[...]

firepower# 

Step 3

(Firepower and Secure Firewall hardware models) If you connected to FXOS on the console port, connect to the threat defense CLI.

connect ftd

Example:


firepower# connect ftd
>

Step 4

The first time you log in to the device, you are prompted to accept the End User License Agreement (EULA) and, if using an SSH connection, to change the admin password. You are then presented with the CLI setup script.

Note


You cannot repeat the CLI setup wizard unless you clear the configuration; for example, by reimaging. However, all of these settings can be changed later at the CLI using configure network commands. See the threat defense command reference.

Defaults or previously entered values appear in brackets. To accept previously entered values, press Enter.

Note


The management interface settings are used even when you enable threat defense access on a data interface. For example, the management traffic that is routed over the backplane through the data interface will resolve FQDNs using the management interface DNS servers, and not the data interface DNS servers.

See the following guidelines:

  • Configure IPv4 via DHCP or manually?—If you want to use a data interface for threat defense access instead of the management interface, choose manual. Although you do not plan to use the management interface, you must set an IP address, for example, a private address. You cannot configure a data interface for management if the management interface is set to DHCP, because the default route, which must be data-interfaces (see the next bullet), might be overwritten with one received from the DHCP server.

  • Enter the IPv4 default gateway for the management interfaceIf you want to use a data interface for threat defense access instead of the management interface, set the gateway to be data-interfaces. This setting forwards management traffic over the backplane so it can be routed through the FMC access data interface.

  • If your networking information has changed, you will need to reconnect—If you are connected with SSH but you change the IP address at initial setup, you will be disconnected. Reconnect with the new IP address and password. Console connections are not affected.

  • Manage the device locally?—Enter YES to configure the device for the device to be managed by either the cloud-delivered Firewall Management Center or Secure Firewall device manager.

    Manage the device locally?—Enter NO to configure the device for remote management with the on-premises management center.

  • Configure firewall mode?—We recommend that you set the firewall mode at initial configuration. Changing the firewall mode after initial setup erases your running configuration. Note that data interface threat defense access is only supported in routed firewall mode.

Step 5

(Optional) Configure a data interface for management center access.

configure network management-data-interface

You are then prompted to configure basic network settings for the data interface.

Note


You should use the console port when using this command. If you use SSH to the Management interface, you might get disconnected and have to reconnect to the console port. See below for more information about SSH usage.

See the following details for using this command. See About Data Interfaces for more informatio.

  • The original management interface cannot use DHCP if you want to use a data interface for management. If you did not set the IP address manually during initial setup, you can set it now using the configure network {ipv4 | ipv6} manual command. If you did not already set the management interface gateway to data-interfaces, this command will set it now.

  • When you onboard the device for threat defense management through Security Cloud Control, Security Cloud Control discovers and maintains the interface configuration, including the following settings: interface name and IP address, static route to the gateway, DNS servers, and DDNS server. For more information about the DNS server configuration, see below. You can later make changes to the access interface configuration, but make sure you don't make changes that can prevent the device or Security Cloud Control from re-establishing the management connection. If the management connection is disrupted, the device includes the configure policy rollback command to restore the previous deployment.

  • This command sets the data interface DNS server. The Management DNS server that you set with the setup script (or using the configure network dns servers command) is used for management traffic. The data DNS server is used for DDNS (if configured) or for security policies applied to this interface.

    Also, local DNS servers are only retained if the DNS servers were discovered at initial registration. For example, if you registered the device using the Management interface, but then later configure a data interface using the configure network management-data-interface command, then you must manually configure all of these settings in Security Cloud Control, including the DNS servers, to match the device configuration.

  • You can change the management interface after you onboard the threat defense for threat defense management through threat defense, to either the management interface or another data interface.

  • The FQDN that you set in the setup wizard will be used for this interface.

  • You can clear the entire device configuration as part of the command; you might use this option in a recovery scenario, but we do not suggest you use it for initial setup or normal operation.

  • To disable data managemement, enter the configure network management-data-interface disable command.

Example:


> configure network management-data-interface
Data interface to use for management: ethernet1/1
Specify a name for the interface [outside]:
IP address (manual / dhcp) [dhcp]:  
DDNS server update URL [none]: https://jcrichton:pa$$w0rd17@domains.example.com/nic/update?hostname=<h>&myip=<a>
Do you wish to clear all the device configuration before applying ? (y/n) [n]:

Configuration done with option to allow FMC access from any network, if you wish to change the FMC access network 
use the 'client' option in the command 'configure network management-data-interface'.

Setting IPv4 network configuration.
Network settings changed.

> 

Example:


> configure network management-data-interface
Data interface to use for management: ethernet1/1
Specify a name for the interface [outside]: internet
IP address (manual / dhcp) [dhcp]: manual
IPv4/IPv6 address: 10.10.6.7
Netmask/IPv6 Prefix: 255.255.255.0
Default Gateway: 10.10.6.1
Comma-separated list of DNS servers [none]: 208.67.222.222,208.67.220.220
DDNS server update URL [none]:
Do you wish to clear all the device configuration before applying ? (y/n) [n]:

Configuration done with option to allow FMC access from any network, if you wish to change the FMC access network
use the 'client' option in the command 'configure network management-data-interface'.

Setting IPv4 network configuration.
Network settings changed.

>

Step 6

(Optional) Limit data interface access to Security Cloud Control on a specific network.

configure network management-data-interface client ip_address netmask

By default, all networks are allowed.


About Data Interfaces

You can use either the dedicated management interface or a regular data interface for communication with the device. Security Cloud Control access on a data interface is useful if you want to manage the FTD remotely from the outside interface, or you do not have a separate management network. Security Cloud Control supports high availability on the FTD managed remotely from the data interface.

FTD management access from a data interface has the following limitations:

  • You can only enable manager access on one physical, data interface. You cannot use a subinterface or EtherChannel.

  • Routed firewall mode only, using a routed interface.

  • PPPoE is not supported. If your ISP requires PPPoE, you will have to put a router with PPPoE support between the FTD and the WAN modem.

  • The interface must be in the global VRF only.

  • SSH is not enabled by default for data interfaces, so you will have to enable SSH later using Security Cloud Control. Because the management interface gateway will be changed to be the data interfaces, you also cannot SSH to the management interface from a remote network unless you add a static route for the management interface using the configure network static-routes command.

Contact Security Cloud Control Support

This chapter covers the following sections:

Export The Workflow

We strongly recommend exporting the workflow of a device that is experience issues prior to opening a support ticket. This additional information can help the support team expeditiously identify and correct any troubleshooting efforts.

Use the following procedure to export the workflow:

Procedure


Step 1

In the left pane, click Security Devices.

Step 2

Click the Devices tab to locate your device.

Step 3

Click the appropriate device type tab and select the device you need to troubleshoot.

Use the filter or search bar to locate the device you need to troubleshoot. Select the device so it is highlighted.

Step 4

In the Device Actions pane, select Workflows.

Step 5

Click the Export button located at the top right of the page, above the table of events. The file automatically saves locally as a .json file. Attach this to any emails or tickets you open with TAC.


Open a Support Ticket with TAC

A customer using a 30-day trial or a licensed Security Cloud Control account can open a support ticket with Cisco's Technical Assistance Center (TAC).

How Security Cloud Control Customers Open a Support Ticket with TAC

This section explains how a customer using a licensed Security Cloud Control tenant can open a support ticket with Cisco's Technical Assistance Center (TAC).

Procedure

Step 1

Log in to Security Cloud Control.

Step 2

Next to your tenant name, click the help button and select Contact Support.

Step 3

Click Support Case Manager.

Step 4

Click the blue Open New Case button.

Step 5

Click Open Case.

Step 6

Select Products and Services and then click Open Case.

Step 7

Choose a Request Type.

Step 8

Expand Find Product by Service Agreement row.

Step 9

Fill in all the fields. Many of the fields are obvious. This is some additional information:

  • Product Name (PID) - If you no longer have this number, see the Cisco Security Cloud Control Data Sheet.

  • Product Description - This is the description of the PID.

  • Site Name - Enter your site name. If you are a Cisco Partner opening a case for one of your customers, enter the customer's name.

  • Service Contract - Enter your service contract number.

    • Important: In order for your case to be associated with your Cisco.com account, you need to associate your contract number to your Cisco.com profile. Use this procedure to associate your contract number to your Cisco.com profile.

      1. Open to Cisco Profile Manager.

      2. Click the Access Management tab.

      3. Click Add Access.

      4. Choose TAC and RMA case creation, Software Download, support tools, and entitled content on Cisco.com and click Go.

      5. Enter service contracts number(s) in the space provided and click Submit. You will receive notification via email that the service contract associations have been completed. Service contract association can take up to 6 hours to complete.

Important


Important: If you are not able to access any of the links below, please contact your authorized Cisco partner or re-seller, your Cisco account representative, or the individual in your company who manages Cisco service agreement information.

Step 10

Click Next.

Step 11

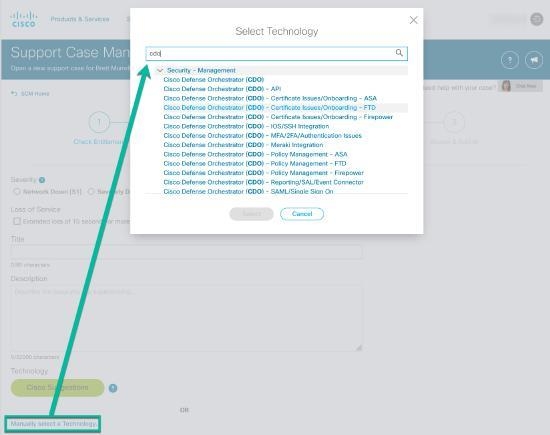
In the Describe Problem screen, scroll down to Manually select a Technology, click it, and type Security Cloud Control in the search field.

Step 12

Select the category that best matches your request, and click Select.

Step 13

Complete the remainder of the service request and click Submit.


How Security Cloud Control Trial Customers Open a Support Ticket with TAC

This section explains how a customer using a free trial of a Security Cloud Control tenant can open a support ticket with Cisco's Technical Assistance Center (TAC).

Procedure

Step 1

Log in to Security Cloud Control.

Step 2

Next to your tenant and account name, click the help button and select Contact Support.

Step 3

In the Enter Issue or request below field, specify the issue that you are facing or your request and click Submit.

Your request, along with the technical information, will be sent to the support team, and a technical support engineer will respond to your query.


Security Cloud Control Service Status Page

Security Cloud Control maintains a customer-facing service status page that shows you if the Security Cloud Control service is up and any service interruptions it may have had. You can view up-time information with daily, weekly, or monthly graphs.

You can reach the Security Cloud Control status page by clicking Security Cloud Control Status in the help menu on any page in Security Cloud Control.

On the status page, you can click the Subscribe to Updates to receive a notification if the Security Cloud Control service goes down.