Configure Policies

Policies Overview

Policies and alarms can alert you to unexpected behavior which can help you identify possible misconfigurations, malicious routing activity, and network utilization issues. You use policies to monitor network operations (routing health, utilization, and so on). You create policies by defining a set of rules with specified threshold values. When a rule is violated and thresholds are exceeded, Crosswork Cloud activates an alarm that can be sent to a number of endpoints.

In the main window, navigate to one of the following Crosswork Cloud applications to create, modify, or view policies:

Crosswork Cloud Network Insights Policies

Add Crosswork Cloud Network Insights Policies


Note


It is sometimes helpful to duplicate an existing policy and make minor modifications rather than creating a new policy. For more information, see Manage Crosswork Cloud Network Insights Policies.


Procedure


Step 1

In the main window, click > Configure > Policies.

Step 2

Click Add Policy.

Step 3

Click on one of the policy types:

  • ASN Policy

  • Prefix Policy

  • Peer Policy

Step 4

Enter a policy name in the Name field.

Step 5

To add a notification endpoint that receives notifications when a rule in the policy is violated, click Add Endpoint.

Step 6

If you selected to create a prefix policy, in the Expected AS Path Editor section, enter values for the following fields:

  • Origin ASNs—The ASN origin, which is the route through which the prefix is advertised.

  • Upstream ASNs—The ASN one hop before.

  • Click Configure to enter a valid AS path pattern. Crosswork Cloud Network Insights compares the specified ASN pattern (the expected sequence of AS numbers in order) with the advertised AS path on a prefix and detects when they do not match.

Step 7

In the Rules section, click Add Rule, then select one or more rules to apply to the policy.

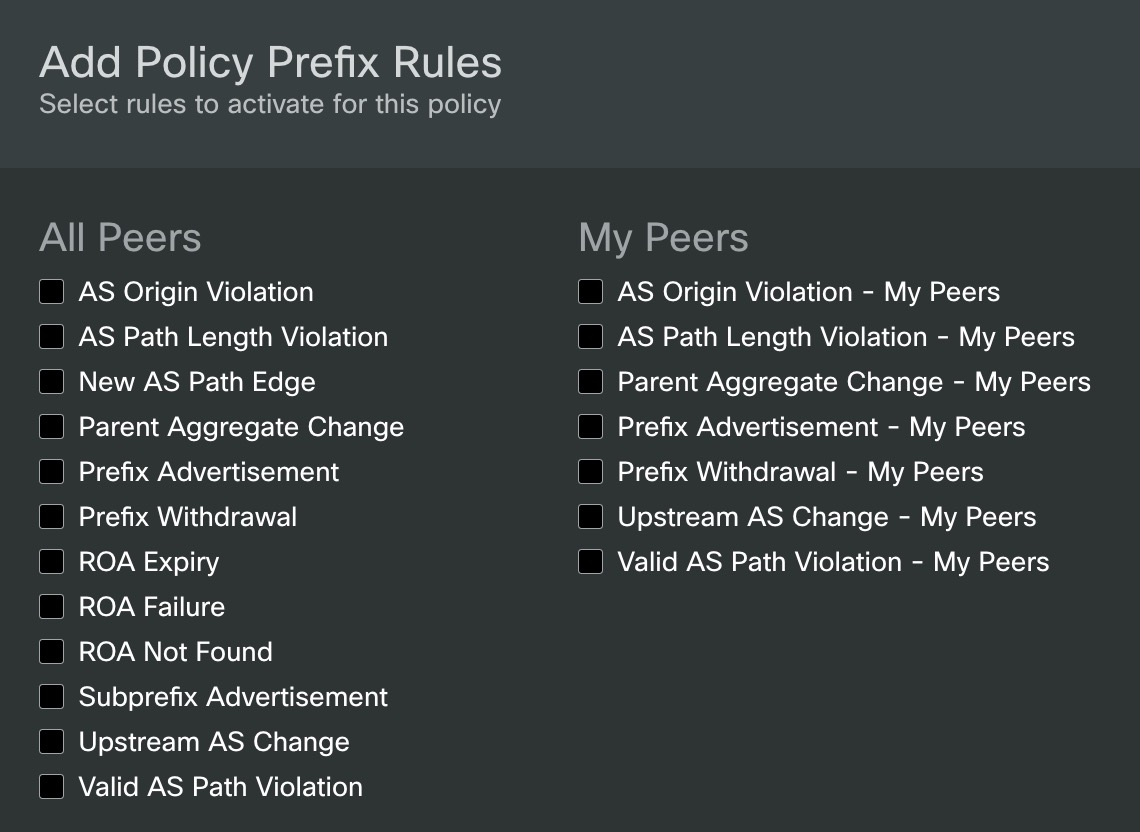
  1. (For Prefix policies only) There are two Prefix policy rule categories available with certain Crosswork Cloud subscriptions: All Peers and My Peers. My Peers rules follow BGP updates only from your peers, whereas All Peers follow BGP updates from your peers and global peers.

    Check all rules which you would like to include in the Prefix policy and click Save.

    Figure 1. Prefix Policy Rules: All Peers and My Peers
    Prefix Policy Rules: All Peers and My Peers

Step 8

For each rule, specify the following:

  • Whether the rule is Enabled (default) or Disabled.

  • Peers to Resolve—Enter the number of unique peers that should detect a specific event before silencing an alarm.

  • Peers to Trigger—Enter the number of unique peers that should detect a specific event before triggering an alarm.

  • Severity—Select the severity level of the alarm.

Step 9

In the Endpoints section, click Add Endpoint.

Step 10

Select an endpoint type from the Endpoint Type drop-down list.

Step 11

Click in the Endpoint field, then select an existing endpoint or click Add Endpoint and complete the required fields.

You can configure endpoints at any time. See Configure Notification Endpoints for more information.

Step 12

In the Notes field, enter any necessary notes.

Step 13

Click Save.


Manage Crosswork Cloud Network Insights Policies

To view, modify, or duplicate policies, do the following:

Procedure


Step 1

In the main window, click > Configure > Policies.

Step 2

Click the name of the policy for which you want to duplicate, manage, or view more details. Crosswork Cloud Network Insights displays additional details about the policy as described in the following table.

Table 1. Policy Details Field Descriptions

Tab

Field

Description

Overview

The Overview tab contains details about the policy you specified.

Expected Origin ASNs

The ASN origin, which you specified when you created the policy, Crosswork Cloud Network Insights expects.

Expected Upstream ASNs

The Upstream ASN that you specified when you created the policy.

Valid AS Path Pattern

The Valid AS Path Pattern that you specified when you created the policy.

Rules

List of rules in the policy. Crosswork Cloud Network Insights displays details about each rule, including the number of active alarms for each rule. To view the specific alarms for any rule, click Active Alarms in any of the rules.

Prefixes

The Prefixes tab contains details about the prefixes associated with the policy.

Prefix

Lists the prefix IP address. Click on the IP address to view prefix details. See View Prefix Details for more information.

Click Link Prefixes to link additional prefixes to the policy.

Tags

Lists the tags associated with the prefix.

Alarms

The Alarms tab contains details about alarms associated with the prefix.

Alarm state

Click any of the following alarm states:

  • ActiveCrosswork Cloud Network Insights displays a list of all active alarms sorted by priority.

  • AcknowledgedCrosswork Cloud Network Insights displays a list of all acknowledged alarms sorted by priority.

  • HistoryCrosswork Cloud Network Insights displays a list of historic alarms for which you can specify a time range from the Timeframe drop-down list.

To acknowledge or snooze an alarm, select the checkbox next to an alarm, then click Acknowledge or Snooze.

Alarm Details

Details about the alarm.

Trigger

The prefix or ASN that triggered the alarm.

Rule

The rule that was violated.

# Peers

The number of peers that reported the violation.

Severity

The configured severity level of the alarm.

Activated

Date and time the alarm occurred.

Notes

Any user-entered notes.

Step 3

To modify the policy, click Edit.

  1. Update notification endpoints, Origin and Upstream ASNs, AS path patterns, and rules as needed.

  2. Click Save.

Step 4

To delete the policy, click Remove. Click Remove again to confirm removal.

Step 5

To copy an existing policy, click Duplicate.

  1. By default, the name of the new policy begins with Copy of followed by the name of duplicated policy.

  2. Make the necessary changes, then click Save.


Crosswork Cloud Traffic Analysis Policies

Add Crosswork Cloud Traffic Analysis Policies

Crosswork Cloud Traffic Analysis automatically creates two policies:

To create additional policies that monitor TX, RX, and jumbo prefix utilization, do the following:


Note


It is sometimes helpful to duplicate an existing policy and make minor modifications rather than creating a new policy. For more information, see Manage Crosswork Cloud Traffic Analysis Policies.


Procedure


Step 1

In the main window, click Crosswork Cloud Traffic Analysis icon > Configure > Policies.

Step 2

Click Add Policy.

Step 3

Enter a policy name in the Name field.

Step 4

Under Triggers, click Add Rules.

Note


If you choose to cancel during this procedure, the unfinished policy will still be listed in the Policies page.

Step 5

Check the Interface policies you want to create:

  • Interface TX Utilization—Monitors transmitting traffic information. You specify the TX utilization range that will trigger an alarm.

  • Interface RX Utilization—Monitors receiving traffic information. You specify the RX utilization range that will trigger an alarm.

  • Prefix Utilization—Monitors jumbo prefix utilization. You specify the prefix utilization range that will trigger an alarm.

Step 6

For each rule, move the sliders to indicate utilization ranges and severity levels that will trigger alarms.

Step 7

Click Next.

Step 8

Under Data, click Add to select which interfaces you want to monitor.

Step 9

Follow the instructions displayed on the Select Interfaces to Monitor page, then click Add.

Step 10

Under Actions, click Add Notification until all the notification types you want sent (after a rule is triggered) is configured.

Step 11

Click Save.


Manage Crosswork Cloud Traffic Analysis Policies

To view, modify, or duplicate policies, do the following:

Procedure


Step 1

In the main window, click Crosswork Cloud Traffic Analysis icon > Configure > Policies.

Step 2

To modify the Gateway Connectivity or Device Connectivity policies, click Details in the respective window. For more information, see Gateway Connectivity and Device Connectivity.

Step 3

To duplicate, manage, or view details of user created policies, click the name of the policy. Crosswork Cloud Traffic Analysis displays additional details about the policy as described in the following table.

Table 2. Policy Details Field Descriptions

Tab

Field

Description

Overview

The Overview tab contains details about the policy you specified.

Triggers

Displays the interface rules configured for this policy.

Data

Displays the monitored interfaces for this policy.

Actions

Displays the endpoint notifications configured for this policy.

Alarms

The Alarms tab contains details about alarms associated with the policy.

Alarm state tab

Click any of the following alarm states:

  • Active—Displays a list of all active alarms sorted by priority.

  • Acknowledged—Displays a list of all acknowledged alarms sorted by priority.

  • History—Displays a list of historic alarms for which you can specify a time range from the Timeframe drop-down list.

To acknowledge or snooze an alarm, select the checkbox next to an alarm, then click Acknowledge or Snooze.

Step 4

To modify the policy, click Edit.

  1. Update interface rules, monitored interfaces, and configured endpoint notifications as needed.

  2. Click Save.

Step 5

To delete the policy, click Remove. Click Remove again to confirm removal.

Step 6

To copy an existing policy, click Duplicate.

  1. By default, the name of the new policy begins with Copy of followed by the name of duplicated policy.

  2. Click Edit to make the necessary changes, then click Save.


Crosswork Cloud Trust Insights Policies

Add Crosswork Cloud Trust Insights Policies

Crosswork Cloud Trust Insights automatically creates two policies:

To create additional policies that monitor device integrity, do the following:


Note


It is sometimes helpful to duplicate an existing policy and make minor modifications rather than creating a new policy. For more information, see Manage Crosswork Cloud Trust Insights Policies.


Procedure


Step 1

In the main window, click Crosswork Cloud Trust Insights > Configure > Policies.

Step 2

Click Add Policy.

Step 3

Enter a policy name in the Name field and click Next.

Step 4

Under Triggers, click Add Rules.

Note


If you choose to cancel during this procedure, the unfinished policy will still be listed in the Policies page.

Step 5

Check the Device rules you want to create:

Step 6

For each rule, indicate severity level and attributes that will trigger an alarm.

Step 7

Click Next.

Step 8

Under Data, click Add to select which devices you want to monitor.

Step 9

Follow the instructions displayed on the Select Devices page, then click Add.

Step 10

Under Actions, click Add Notification until all the notification types you want sent (after a rule is triggered) is configured.

Step 11

Click Save.


Manage Crosswork Cloud Trust Insights Policies

To view, modify, or duplicate policies, do the following:

Procedure


Step 1

In the main window, click Crosswork Cloud Trust Insights > Configure > Policies.

Step 2

To modify the Gateway Connectivity or Device Connectivity policies, click Details in the respective window. For more information, see Gateway Connectivity and Device Connectivity.

Step 3

To duplicate, manage, or view details of user created policies, click the name of the policy. Crosswork Cloud Trust Insights displays additional details about the policy as described in the following table.

Table 3. Policy Details Field Descriptions

Tab

Field

Description

Overview

The Overview tab contains details about the policy you specified.

Triggers

Displays the device rules configured for this policy.

Data

Displays the monitored devices for this policy.

Actions

Displays the endpoint notifications configured for this policy.

Alarms

The Alarms tab contains details about alarms associated with the policy.

Alarm state tab

Click any of the following alarm states:

  • Active—Displays a list of all active alarms sorted by priority.

  • Acknowledged—Displays a list of all acknowledged alarms sorted by priority.

  • History—Displays a list of historic alarms for which you can specify a time range from the Timeframe drop-down list.

To acknowledge or snooze an alarm, select the checkbox next to an alarm, then click Acknowledge or Snooze.

Step 4

To modify the policy, click Edit.

  1. Update device rules, monitored devices, and configured endpoint notifications as needed.

  2. Click Save.

Step 5

To delete the policy, click Remove. Click Remove again to confirm removal.

Step 6

To copy an existing policy, click Duplicate.

  1. By default, the name of the new policy begins with Copy of followed by the name of duplicated policy.

  2. Click Edit to make the necessary changes, then click Save.