Upgrading Sites

Overview


Note


This feature is supported for Cisco APIC sites only. It is not supported for Cisco Cloud APIC or Cisco DCNM fabrics.


Prior to Release 3.1(1), when you deployed Cisco Multi-Site, each site's APIC clusters and switch nodes software had to be managed individually at the site level. As the number of sites in your Multi-Site domain grew, the release life cycle and upgrades could become complicated as they had to be manually coordinated and managed for release and feature compatibility.

Starting with Release 3.1(1), Cisco Nexus Dashboard Orchestrator provides a workflow that allows you to manage all sites' software upgrades from a single point eliminating the need for multiple site administrators to manually coordinate software upgrades and giving you insight into any potential issues that could affect the upgrades.

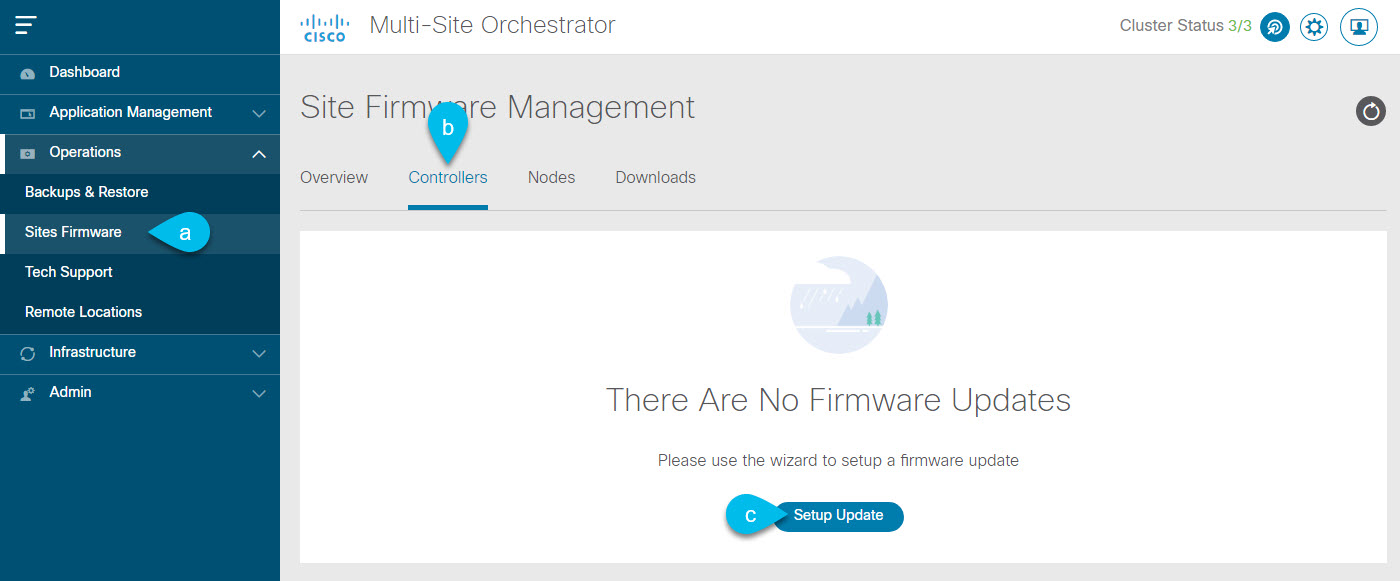
You can access the site upgrades screen by navigating to Operations > Sites Firmware. The page contains four tabs, which are described in this and following sections.

The Overview tab displays information about the sites in your Multi-Site domain and the firmware versions that are deployed or ready to be deployed. The Sites Firmware service polls the sites every 5 minutes for new or changed data such as the latest status of any of the upgrade policies. You can manually trigger a refresh by clicking the Refresh button in the upper right corner of the main pane.

Figure 1. Sites Firmware Overview

The page is divided into the following areas:

  • Firmware Update Summary—provides overall summary of the firmware images that are present across all sites in your Multi-Site domain, including the Cisco APIC and the switch firmware.

    For each type of image, the specific information includes the number of images in each state:

    • Completed—the image is currently deployed to the controllers or the switches.
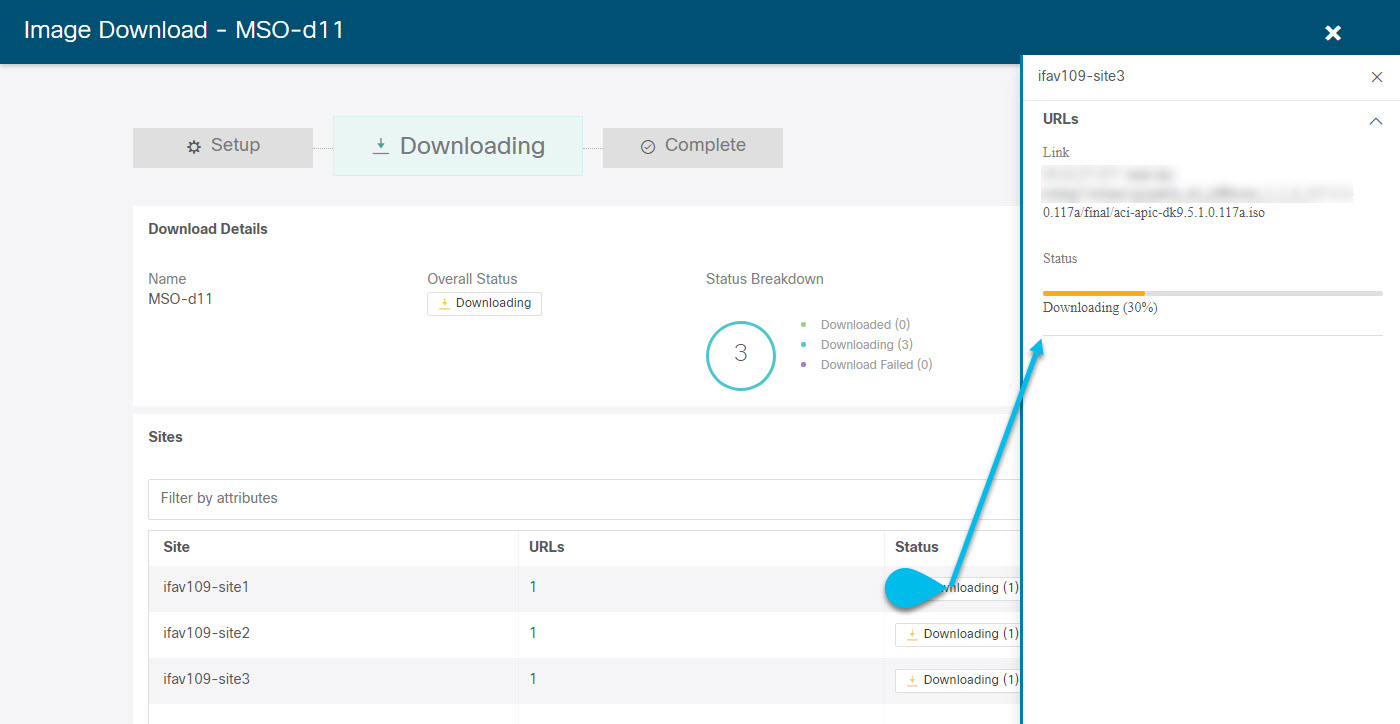
    • Downloading (for switch nodes only)—the image is being downloaded to the switch nodes.

    • Ready to Install (for switch nodes only)—the image was successfully downloaded to the switch nodes and is ready to be installed.

    • Installing—the images currently in the process of being deployed to the controllers or the switch nodes.

    • Not Supported—the images that do not support remote firmware upgrades, such as releases prior to Release 4.2(5).

  • Site-specific information—additional sections of the page display information about individual sites, which includes the version of the currently deployed software and the number of controllers or nodes.

Guidelines and Limitations

When performing fabric upgrades from the Nexus Dashboard Orchestrator, the following restrictions apply:

  • You must review and follow the guidelines, recommendations, and limitations specific to the Cisco APIC upgrade process described in the Upgrading and Downgrading the Cisco APIC and Switch Software of the Cisco APIC Installation, Upgrade, and Downgrade Guide.

  • Your Nexus Dashboard Orchestrator must be deployed in Cisco Nexus Dashboard.

    The site upgrade feature is not available for NDO deployments in VMware ESX and you need to follow the standard upgrade procedures described in Cisco APIC Installation, Upgrade, and Downgrade Guide

  • The fabrics must be running Cisco APIC, Release 4.2(5) or later.

    Fabrics running earlier APIC releases will not be available for selection during the upgrade workflow. Follow the standard upgrade procedures described in Cisco APIC Installation, Upgrade, and Downgrade Guide.

  • We recommend coordinating the site upgrades with the site administrators managing those fabrics. You may need access to the controllers or switch nodes to troubleshoot any potential issues should they arise.

  • If a fabric switch node goes into an inactive state in the middle of the upgrade process, for example due to hardware or power failure, the process will be unable to complete. You will not be able to remove or modify the node upgrade policy from NDO during this time as NDO is unable to differentiate whether the node went down or is simply in the middle of a reboot for the upgrade.

    To resolve this issue, you must manually decommission the inactive node from the APIC, at which point the NDO upgrade policy will recognize the change and return a failed status. Then you can update the upgrade policy on the NDO to remove the switch and re-run the upgrade.

Downloading Controller and Switch Node Firmware to Sites

You must download the controller and switch software to all the site controllers in your fabrics before performing the upgrade. After you complete the following steps, you will be able to start the upgrade process at a later time using the downloaded images.

Procedure


Step 1

Log in to your Nexus Dashboard Orchestrator.

Step 2

Set up firmware download.

  1. From the left navigation pane, select Operations > Sites Firmware.

  2. In the main window, select the Downloads tab.

  3. Click Setup Downloads tab.

    If you have previously set up one or more downloads, click the Setup Downloads button in the top right of the main pane instead.

    The Download Image to APIC screen opens.

Step 3

Select the sites.

The image will be downloaded to the Cisco APICs of all the sites you select here.

  1. Click Select Sites.

  2. In the Select Sites window, check one or more sites and click Add and Close.

  3. Click Next to proceed.

Step 4

Provide the download details.

  1. Provide the Name.

    You can provide a descriptive name for tracking the download.

  2. Choose the protocol.

    You can choose to download the image via HTTP or SCP.

  3. Click + Add URL to provide location of the image(s).

    You can provide both, the APIC and the switch firmware images.

  4. If you selected SCP, provide the authentication information.

    You need to provide the login Username, for example admin.

    Then choose the Authentication Type:

    • For Password authentication, simply enter the password for the username you provided earlier.

    • For SSH Key authentication, you will need to enter the SSH Key and the SSH Key Passphrase.

  5. Click Next to proceed.

Step 5

In the confirmation screen, review the information and click Submit to proceed.

In the Downloading screen that opens, you can view the status of the image download.

You can also click the status, to see additional details about the progress.

After all downloads complete, you will transition to the Completed screen. You do not have to wait at the Downloading screen, you can always navigate back to it from the Downloads tab by clicking the download name you provided in a previous step.


Upgrading Controllers

This section describes how to set up a software upgrade for your sites' APIC clusters.

Procedure


Step 1

Log in to your Nexus Dashboard Orchestrator.

Step 2

Set up APIC cluster upgrade.

  1. From the left navigation pane, select Operations > Sites Firmware.

  2. In the main window, select the Controllers tab.

  3. Click Setup Update tab.

    If you have previously set up one or more updates, click the Setup Update button in the top right of the main pane instead.

    The Setup Site Firmware Update screen opens.

Step 3

Provide the upgrade details.

  1. Provide the Name.

    This is the controller upgrade policy name you will be able to use to track the upgrade progress at any time.

  2. Click Select Sites.

    The Select Sites window opens.

  3. In the Select Sites window, check one or more sites and click Add and Close.

  4. Click Next to proceed.

Step 4

In the Version Selection screen, select the firmware version and click Next.

The firmware must be downloaded to the sites before it becomes available here. If the download you set up in previous section has completed successfully but the image is still not available here, close the Setup Site Firmware Update screen, navigate back to Operations > Sites Firmware > Controllers tab, and click the Refresh button to reload the latest information available for the sites; then restart the upgrade steps.

Step 5

In the Validation screen, review the information, then click Next.

Ensure that there are no faults and review any additional information that may affect your upgrade:

Step 6

In the Confirmation screen, review the information and click Submit to start the upgrade.

Step 7

In the Ready to Install screen, click Install to start the upgrade.

If NDO to site connectivity is lost during the upgrade process, the GUI will display the last known status of the upgrade prior to loss of connectivity. Once connectivity is re-established, the upgrade status will be refreshed. You can perform a manual refresh after connectivity loss by clicking the Refresh button in the top right of the main pane.


Upgrading Nodes

This section describes how to set up a software upgrade for your sites' switch nodes.

Procedure


Step 1

Log in to your Nexus Dashboard Orchestrator.

Step 2

Set up switch nodes upgrade.

  1. From the left navigation pane, select Operations > Sites Firmware.

  2. In the main window, select the Nodes tab.

  3. Click Setup Update tab.

    If you have previously set up one or more updates, click the Setup Update button in the top right of the main pane instead.

    The Setup Node Firmware Update screen opens.

Step 3

Provide the upgrade details.

  1. Provide the Name.

    This is the upgrade policy name you will be able to use to track the upgrade progress at any time.

  2. Click Select Nodes.

    The Select Nodes window opens.

  3. Select a site, then select the switch nodes in that site and click Add and Close.

    You can add switch nodes from a single site at a time. You will repeat this step if you want to add switches from other sites.

  4. Repeat the previous substep for nodes in other sites

  5. Click Next to proceed.

Step 4

In the Version Selection screen, select the firmware version and click Next.

The firmware must be downloaded to the sites before it becomes available here. If the download you set up in previous section has completed successfully but the image is still not available here, close the Setup Site Firmware Update screen, navigate back to Operations > Sites Firmware > Nodes tab, and click the Refresh button to reload the latest information available for the sites; then restart the upgrade steps.

Step 5

In the Validation screen, ensure that there are no faults raised, then click Next.

Ensure that there are no faults and review any additional information that may affect your upgrade:

Note


Sites running releases prior to Release 5.0(1) do not support node validation, so we recommend checking for any switch node faults in the site's APIC prior to starting the upgrade from NDO.

Step 6

In the Confirmation screen, review the information and click Submit.

This will trigger image to be pre-downloaded to all the nodes you have selected. After the download completes, the screen will transition to Ready to Install and you can proceed to the next step.

Step 7

(Optional) Change Advanced Settings.

Note


Review the guidelines, recommendations, and limitations for the Cisco APIC upgrade process described in the Upgrading and Downgrading the Cisco APIC and Switch Software of the Cisco APIC Installation, Upgrade, and Downgrade Guide before making changes to the advanced options.

In the Ready to Install screen, you can open the Advanced Settings menu for additional options:

  • Ignore Compatibility Check—by default, the option is set to No and compatibility check is enabled and verifies if an upgrade path from the currently-running version of the system to a specified newer version is supported.

    If you choose to ignore the compatibility check feature, you run the risk of making an unsupported upgrade to your system, which could result in your system going to an unavailable state.

  • Graceful Check—by default, the option is set to No and the upgrade process will not put any of the switches into Graceful Insertion and Removal (GIR) mode before performing the upgrade.

    You can choose to enable this option to bring down the node gracefully (using GIR) while performing the upgrade so that the upgrade will have reduced traffic loss.

  • Run Mode—by default, the option is set to Continue on Failure and if a node upgrade fails, the process proceeds to the next node. Alternatively, you can set this option to Pause on Failure to halt upgrade process if any one of the node upgrades fails.

Step 8

Remove any nodes marked as Failed from the upgrade.

The upgrade cannot proceed if the upgrade policy contains one or more nodes that failed to download the firmware. You can mouse over the Failed status for more information and reason for failure.

To remove the nodes from the upgrade, click Edit Update Details link in the Ready to Install screen.

Step 9

Click Install to start the upgrade.

If NDO to site connectivity is lost during the upgrade process, the GUI will display the last known status of the upgrade prior to loss of connectivity. Once connectivity is re-established, the upgrade status will be refreshed. You can perform a manual refresh after connectivity loss by clicking the Refresh button in the top right of the main pane.