FlexConnect Groups

Information About FlexConnect Groups

To organize and manage your FlexConnect access points, you can create FlexConnect Groups and assign specific access points to them.

All of the FlexConnect APs in a group can share the same backup RADIUS server, fast secure roaming, local authentication configuration, and WLAN-VLAN mapping information. We recommend this feature if you have multiple FlexConnect APs in a remote office or on the floor of a building and you want to configure them all at once. For example, you can configure a backup RADIUS server for a FlexConnect group rather than having to configure the same server on each AP. A maximum of 100 APs is supported per FlexConnect group (other than the default FlexConnect group, which is limited only by the maximum APs supported by the controller).
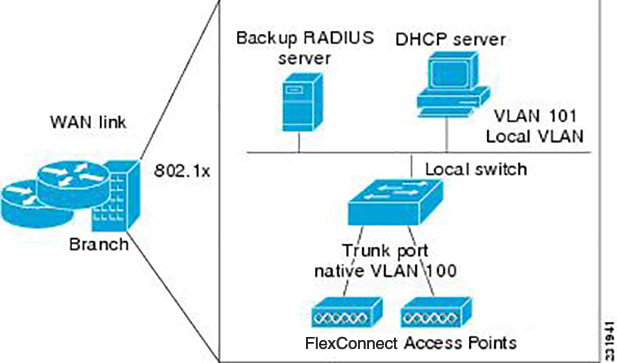
Figure 1. FlexConnect Group Deployment. The following figure shows a typical FlexConnect deployment with a backup RADIUS server in the branch office.

FlexConnect Groups and VLAN Support

You can configure VLAN Support and VLAN ID on a per FlexConnect group basis. This allows all APs in a FlexConnect group to inherit the VLAN configuration from the FlexConnect group including VLAN support, Native VLAN, and WLAN-VLAN mappings.

Deployment Considerations

  • When the override flag is set at the FlexConnect Group, modification of VLAN Support, Native VLAN ID, WLAN-VLAN mappings, and Inheritance-Level at the AP is not allowed.

  • An Inheritance-Level configuration is available at the FlexConnect AP. You have to set this to “Make VLAN AP Specific” to configure any AP-Specific VLAN Support, Native VLAN ID and VLAN-WLAN mappings on the AP. Note that you can modify this only when the override flag at the group is disabled.

    To achieve this on the controller GUI, choose Wireless > All APs, click on the AP name. In the FlexConnect tab, select Make VLAN AP Specific from the drop-down list.

IP-MAC Context Distribution for FlexConnect Local Switching Clients

Using this feature, you can prevent IP theft and ARP spoofing within the same FlexConnect group. The controller distributes the client IP:MAC context to all the APs in the same FlexConnect group. When the client roams to a new AP in the same FlexConnect group, the AP uses the IP:MAC context to validate the client data.

The Client IP-MAC context consists of the following parameter values:

  • Source AP MAC Address to which a client is associated with

  • Client’s MAC Address

  • Client’s IPv4 Address

  • Client’s IPv6 address count

  • List of IPv6 addresses based on count

This section contains the following subsections:

Guidelines and Restrictions for IP-MAC Context Distribution for FlexConnect Local Switching Clients

  • A maximum of 2000 client IP-MAC entries are supported in an AP.

  • IP-MAC entries are deleted when the AP is rebooted.

  • Clients behind NAT/PAT-enabled WLANs cannot use this IP:MAC binding as the controller reports and de-authenticates clients with duplicated IP address.

  • AP evaluates IP-MAC context only for clients with IPv4 addresses, although distribution is done for both IPv4 and IPv6 addresses.

  • This feature is not applicable to the default Flex Group.

  • This feature does not support centrally switched clients as IP-Source guard is done at the controller data path.

Configuring IP-MAC Context Distribution For FlexConnect Local Switching Clients (GUI)

Procedure

Step 1

Choose WLANs > WLANs to open the WLANs page.

Step 2

Click the WLAN id you want to configure.

Step 3

Click the Advanced tab

Step 4

Under the DHCP section, check the DHCP Addr. Assignment check box.

Step 5

Under the FlexConnect section, check the FlexConnect Local Switching check box.

Step 6

Save the configuration.


Configuring IP-MAC Context Distribution For FlexConnect Local Switching Clients (CLI)

Procedure
  • Configure the DHCP server on a WLAN by entering this command:

    config wlan dhcp_server wlan-id ip_addr required

  • Configure the FlexConnect local switching on a WLAN by entering this command:

    config wlan flexconnect local-switching wlan-id enable

FlexConnect Groups and Backup RADIUS Servers

You can configure the controller to allow a FlexConnect access point in standalone mode to perform full 802.1X authentication to a backup RADIUS server. You can configure a primary backup RADIUS server or both a primary and secondary backup RADIUS server. These servers can be used when the FlexConnect access point is in of these two modes: standalone or connected.

FlexConnect Groups and Fast Secure Roaming

Fast secure roaming among FlexConnect APs is supported only if the APs are in non-default FlexConnect groups. For OKC, fast roaming is supported between APs in different FlexConnect groups (because key caching is handled by the controller). For 802.11r and CCKM, fast roaming is supported only among APs in the same FlexConnect group. Sticky key caching is not supported with FlexConnect APs.


Note


Fast roaming among FlexConnect and non-FlexConnect APs is not supported.


Note


FlexConnect Groups is needed for fast roaming to work. Flex group needs to be created for fast roaming, 11r, and OKC , only then the caching can happen on an AP. The group name must be same between APs for a fast roaming to happen for 11r/fast roaming. The group can be different for OKC as final check is done at the controller.


FlexConnect Groups and Local Authentication Server

You can configure the controller to allow a Cisco Wave 1 (IOS-based) FlexConnect AP in standalone mode to perform LEAP, EAP-FAST, PEAP, or EAP-TLS authentication for up to 100 statically configured users. The controller sends the static list of usernames and passwords to each FlexConnect access point when it joins the controller. Each access point in the group authenticates only its own associated clients.


Note


This feature is not supported on Wave 2 and 802.11ax APs.


Note


If you want to enable FlexConnect local authentication, you have to enable FlexConnect AP Local Authentication in the Local Authentication tab.

If the FlexConnect APs act as an 802.11X authenticator (RADIUS client), then configure the RADIUS servers in the General tab.


This feature is ideal for customers who are migrating from an autonomous access point network to a lightweight FlexConnect access point network and are not interested in maintaining a large user database or adding another hardware device to replace the RADIUS server functionality available in the autonomous access point.


Note


  • You can configure LEAP, EAP-FAST, PEAP, or EAP-TLS authentication only if AP local authentication is enabled.


You have to provision a certificate to the AP because the AP has to send the certificate to the client. You must download the Vendor Device Certificate and the Vendor Certification Authority Certificate to the controller. The controller then pushes these certificates to the AP. If you do not configure a Vendor Device Certificate and the Vendor CA Certificate on the controller, the APs associating with the FlexConnect group download the self-signed certificate of the controller, which may not be recognized by many wireless clients.

With EAP-TLS, AP does not recognize and accept client certificate if the client root CA is different from the AP root CA. When you use Enterprise public key infrastructures (PKI), you must download a Vendor Device Certificate and Vendor CA Certificate to the controller so that the controller can push the certificates to the AP in the FlexConnect group. Without a common client and AP root CA, EAP-TLS fails on the local AP. The AP cannot check an external CA and relies on its own CA chain for client certificate validation.

The space on the AP for the local certificate and the CA certificate is around 7 Kb, which means that only short chains are adapted. Longer chains or multiple chains are not supported.


Note


This feature can be used with the FlexConnect backup RADIUS server feature. If a FlexConnect is configured with both a backup RADIUS server and local authentication, the FlexConnect access point always attempts to authenticate clients using the primary backup RADIUS server first, followed by the secondary backup RADIUS server (if the primary is not reachable), and finally the FlexConnect access point itself (if the primary and secondary are not reachable).


For information about the number of FlexConnect groups and access point support for a controller model, see the data sheet of the respective controller model.

Default FlexGroup

Default FlexGroup is a container where FlexConnect access points (APs), which are not a part of an administrator-configured FlexConnect group, are added automatically when they join the Cisco Wireless Controller. The Default FlexGroup is created and stored when the controller comes up (after upgrading from an earlier release. Note that a reload of the 8.3 will not create the group again. It will only restore the existing Default FlexGroup configuration.) This group cannot be deleted or added manually. Also, you cannot manually add or delete APs to the Default FlexGroup. The APs in the Default FlexGroup inherit the common configuration of the group. Any change in the group configuration is propagated to all the APs in the group.

When a group created by an admin is deleted, all the APs from that group are moved to the Default FlexGroup and inherit the configuration of this group. Similarly, APs that are removed manually from other groups are also added to the Default FlexGroup.

When an AP from the Default FlexGroup is added to a customized group, the existing configuration (from the Default FlexGroup) is deleted and the configuration from the customized group is pushed to the AP. If there is a standby controller, the Default FlexGroup and its configuration are also synchronized to it.

The AP provides FlexConnect group name during the join process. The AP could have received this group name either through cloud provisioning or through controller configuration. There are various scenarios involved in deciding the final FlexConnect group, when an AP joins and they are listed in the table below:

FlexConnect Group Received from AP

Status in Controller

Final Group Information/Configuration Setn to AP

Type of Entry (Based on Priority)

Group1

Group1 not present; AP entry not present in any group

Default FlexGroup

Admin

Group1

Group1 present but maximum entries reached; AP entry not present in any group

Default FlexGroup

Admin

Group1

Group1 present, but AP entry not present in any group

Group1

Cloud

Group1

Group1 present, but AP entry present as part of a different group, Group2 (added by admin)

Group2

Admin

Group1

Group1 present, but AP entry exists in a different group, Group2 learnt earlier through cloud

Group1

Cloud

No Group/Default Group

AP entry exists as part of Group2 (either through admin configuration or learnt via cloud)

Group2

Admin/Cloud

Whenever the final type of entry is cloud, the AP entry gets added to the corresponding FlexConnect group. Also, when the FlexConnect group received from AP is different from the resultant group, a trap is raised to inform the admin about the conflict. The show flexconnect group detail group-name aps command displays the conflict value.

The following features are not supported in default Flex Group:

  • Efficient image upgrade

  • PMK cache distribution

  • Fast Roaming

The following features are supported in default Flex Group:

  • VLAN support (native VLAN, WLAN-VLAN mapping)

  • VLAN ACL mapping

  • WebAuth, web policy, local split mapping

  • Local authentication users

  • RADIUS authentication

  • Central DHCP or NAT-PAT

  • Flex AVC

  • VLAN name ID mapping

  • Multicast override

Restrictions

  • You cannot use the following CLIs to add or delete a Defaut FlexGroup or AP to a group:

    • config flexconnect group default-flexgroup{ add | delete}

    • config flexconnect group default-flexgroup ap{ add | delete}

  • The Defaut FlexGroup does not have a default configuration.

  • When you delete an AP from the customized flex group, the VLAN support is also deleted from that AP.
Configuring FlexConnect Groups (GUI)


Note


If the same IPv4 ACLs is mapped to a FlexConnect group and to an AP, then the controller uses the Flex group ACL. However, if the controller is downgraded to an older version, the AP reboots to the older version and pushes the AP specific ACL. This time the controller uses the AP specific ACL ignoring the FlexConnect Group ACL.


Procedure


Step 1

Choose Wireless > FlexConnect Groups to open the FlexConnect Groups page.

This page lists any FlexConnect groups that have already been created.

Note

 
If you want to delete an existing group, hover your cursor over the blue drop-down arrow for that group and choose Remove.

Step 2

Click New to create a new FlexConnect Group.

Step 3

On the FlexConnect Groups > New page, enter the name of the new group in the Group Name text box. You can enter up to 32 alphanumeric characters.

Step 4

Click Apply. The new group appears on the FlexConnect Groups page.

Step 5

To edit the properties of a group, click the name of the desired group. The FlexConnect Groups > Edit page appears.

Step 6

If you want to configure a primary RADIUS server for this group (for example, the access points are using 802.1X authentication), choose the desired server from the Primary RADIUS Server drop-down list. Otherwise, leave the text box set to the default value of None.

Note

 
IPv6 RADIUS Server is not configurable. Only IPv4 configuration is supported.

Step 7

If you want to configure a secondary RADIUS server for this group, choose the server from the Secondary RADIUS Server drop-down list. Otherwise, leave the field set to the default value of None.

Step 8

Configure the RADIUS server for the FlexConnect group by doing the following:

  1. Enter the RADIUS server IP address.

  2. Choose the server type as either Primary or Secondary.

  3. Enter a shared secret to log on to the RADIUS server and confirm it.

    The maximum number of characters allowed for the shared secret is 63.

  4. Enter the port number.

  5. Click Add.

Step 9

To add an access point to the group, click Add AP. Additional fields appear on the page under Add AP.

Step 10

Perform one of the following tasks:

  • To choose an access point that is connected to this controller, select the Select APs from Current Controller check box and choose the name of the access point from the AP Name drop-down list.

    Note


    If you choose an access point on this controller, the MAC address of the access point is automatically entered in the Ethernet MAC text box to prevent any mismatches from occurring.

  • To choose an access point that is connected to a different controller, leave the Select APs from Current Controller check box unselected and enter its MAC address in the Ethernet MAC text box.

    Note


    If the FlexConnect access points within a group are connected to different controllers, all of the controllers must belong to the same mobility group.

Step 11

Click Add to add the access point to this FlexConnect group. The access point’s MAC address, name, and status appear at the bottom of the page.

Note


If you want to delete an access point, hover your cursor over the blue drop-down arrow for that access point and choose Remove.

Step 12

Click Apply.

Step 13

(Optional) To configure the FlexConnect APs as local authentication (RADIUS) servers, configure the FlexConnect Group as follows:

  1. Ensure that the Primary RADIUS Server and Secondary RADIUS Server parameters are set to None.

  2. Select the Enable AP Local Authentication check box to enable local authentication for this FlexConnect Group. The default value is unselected.

  3. Click Apply.

  4. Choose the Local Authentication tab to open the FlexConnect > Edit (Local Authentication > Local Users) page.

  5. To add clients that you want to be able to authenticate using LEAP, EAP-FAST, PEAP, or EAP-TLS, perform one of the following:

  6. Upload a comma-separated values (CSV) file by selecting the Upload CSV File check box, clicking the Browse button to browse to an CSV file that contains usernames and passwords (each line of the file needs to be in the following format: username, password), and clicking Add to upload the CSV file. The clients’ names appear on the left side of the page under the “User Name” heading.

  7. Add clients individually by entering the client’s username in the User Name text box and a password for the client in the Password and Confirm Password text boxes, and clicking Add to add this client to the list of supported local users. The client name appears on the left side of the page under the “User Name” heading.

    Note

     
    You can add up to 100 clients.
  8. Click Apply.

  9. Choose the Protocols tab to open the FlexConnect > Edit (Local Authentication > Protocols) page.

  10. To allow a FlexConnect access point to authenticate clients using LEAP, select the Enable LEAP Authentication check box.

  11. To allow a FlexConnect access point to authenticate clients using EAP-FAST, select the Enable EAP-FAST Authentication check box. The default value is unselected.

  12. To allow a FlexConnect access point to authenticate clients using PEAP Authentication, select the Enable PEAP Authentication check box.

    You can configure PEAP authentication only when AP local authentication is configured.

  13. To allow a FlexConnect access point to authenticate clients using EAP-TLS, select the Enable EAP TLS Authentication check box.

    You can configure EAP-TLS authentication only when AP local authentication is configured.

    Enabling the EAP-TLS authentication results in enabling the downloading of EAP root and device certificate to the access point. You can unselect the EAP TLS Certificate download check box if you do not want to download the certificate.

  14. Perform one of the following, depending on how you want protected access credentials (PACs) to be provisioned:

    • To use manual PAC provisioning, enter the server key used to encrypt and decrypt PACs in the Server Key and Confirm Server Key text boxes. The key must be 32 hexadecimal characters.

    • To allow PACs to be sent automatically to clients that do not have one during PAC provisioning, select the Enable Auto Key Generation check box

  15. In the Authority ID text box, enter the authority identifier of the EAP-FAST server. The identifier must be 32 hexadecimal characters.

  16. In the Authority Info text box, enter the authority identifier of the EAP-FAST server in text format. You can enter up to 32 hexadecimal characters.

  17. To specify a PAC timeout value, select the PAC Timeout check box and enter the number of seconds for the PAC to remain viable in the text box. The default value is unselected, and the valid range is 2 to 4095 seconds when enabled.

  18. Click Apply.

Step 14

(Optional) To configure the FlexConnect APs as local 802.1X authenticators (RADIUS clients), configure the FlexConnect Group as follows:

  1. Under the General tab, check the Enable AP Local Authentication check box to enable local authentication for this FlexConnect Group. By default, it is unchecked.

  2. Click Apply.

  3. In the AAA section, enter the server IP address, server type primary, shared secret, and optionally port number.

  4. Click Add.

  5. (Optional) If you are using secondary RADIUS server, repeat these steps.

  6. Click Apply.

Step 15

In the WLAN-ACL Mapping tab, you can do the following:

  1. Under Web Auth ACL Mapping, enter the WLAN ID, choose the WebAuth ACL, and click Add to map the web authentication ACL and the WLAN.

  2. Under Local Split ACL Mapping, enter the WLAN ID, and choose the Local Split ACL, and click Add to map the Local Split ACL to the WLAN.

    Note


    You can configure up to 16 WLAN-ACL combinations for local split tunneling. Local split tunneling does not work for clients with static IP address.

Step 16

In the Central DHCP tab, you can do the following:

  1. In the WLAN Id box, enter the WLAN ID with which you want to map Central DHCP.

  2. Select or unselect the Central DHCP check box to enable or disable Central DHCP for the mapping.

  3. Select or unselect the Override DNS check box to enable or disable overriding of DNS for the mapping.

  4. Select or unselect the NAT-PAT check box to enable or disable network address translation and port address translation for the mapping.

  5. Click Add to add the Central DHCP - WLAN mapping.

Note


When the overridden interface is enabled for the FlexConnect Group DHCP, the DHCP broadcast to unicast is optional for locally switched clients.

Step 17

Click Save Configuration.

Step 18

Repeat this procedure if you want to add more FlexConnects.

Note


To see if an individual access point belongs to a FlexConnect Group, you can choose Wireless > Access Points > All APs > the name of the desired access point in the FlexConnect tab. If the access point belongs to a FlexConnect, the name of the group appears in the FlexConnect Name text box.


Configuring FlexConnect Groups (CLI)


Note


If the same IPv4 ACLs is mapped to a FlexConnect group and to an AP, then the controller uses the Flex group ACL. However, if the controller is downgraded to an older version, the AP reboots to the older version and pushes the AP specific ACL. This time the controller uses the AP specific ACL ignoring the FlexConnect Group ACL.


Procedure


Step 1

Add add or delete a FlexConnect Group by entering this command:

config flexconnect group group_name {add | delete}

Step 2

Configure a primary or secondary RADIUS server for the FlexConnect group by entering this command:

config flexconect group group-name radius server auth {{add {primary | secondary} ip-addr auth-port secret} | {delete {primary | secondary}}}

The maximum number of characters allowed for the shared secret is 63.

Step 3

Add an access point to the FlexConnect Group by entering this command:

config flexconnect group_name ap {add | delete} ap_mac

Step 4

(Optional) To configure the FlexConnect APs as local authentication (RADIUS) servers, configure the FlexConnect Group as follows:

  1. Make sure that a primary and secondary RADIUS server are not configured for the FlexConnect Group.

  2. To enable or disable local authentication for this FlexConnect group, enter this command:

    config flexconnect group group_name radius ap {enable | disable}

  3. Enter the username and password of a client that you want to be able to authenticate using LEAP, EAP-FAST, PEAP, or EAP-TLS by entering this command:

    config flexconnect group group_name radius ap user add username password password

    Note

     
    You can add up to 100 clients.
  4. Allow a FlexConnect access point group to authenticate clients using LEAP or to disable this behavior by entering this command:

    config flexconnect group group_name radius ap leap {enable | disable}

  5. Allow a FlexConnect access point group to authenticate clients using EAP-FAST or to disable this behavior by entering this command:

    config flexconnect group group_name radius ap eap-fast {enable | disable}

  6. To download EAP Root and Device certificate to AP, enter this command:

    config flexconnect group group_name radius ap eap-cert download

  7. Allow a FlexConnect access point group to authenticate clients using EAP-TLS or to disable this behavior by entering this command:

    config flexconnect group group_name radius ap eap-tls {enable | disable}

  8. Allow a FlexConnect access point group to authenticate clients using PEAP or to disable this behavior by entering this command:

    config flexconnect group group_name radius ap peap {enable | disable}

  9. Allow a FlexConnect access point group to authenticate clients using PEAP or to disable this behavior by entering this command:

    config flexconnect group group_name radius ap peap {enable | disable}

  10. Allow a FlexConnect access point group to authenticate clients using EAP-TLS or to disable this behavior by entering this command:

    config flexconnect group group_name radius ap eap-tls {enable | disable}

  11. Download the EAP root and device certificate by entering this command:

    config flexconnect group group_name radius ap eap-cert download

  12. Enter one of the following commands, depending on how you want PACs to be provisioned:

    • config flexconnect group group_name radius ap server-key key —Specifies the server key used to encrypt and decrypt PACs. The key must be 32 hexadecimal characters.

    • config flexconnect group group_name radius ap server-key auto —Allows PACs to be sent automatically to clients that do not have one during PAC provisioning.

  13. To specify the authority identifier of the EAP-FAST server, enter this command:

    config flexconnect group group_name radius ap authority id id

    where id is 32 hexadecimal characters.

  14. To specify the authority identifier of the EAP-FAST server in text format, enter this command:

    config flexconnect group group_name radius ap authority info info

    where info is up to 32 hexadecimal characters.

  15. To specify the number of seconds for the PAC to remain viable, enter this command:

    config flexconnect group group_name radius ap pac-timeout timeout

    where timeout is a value between 2 and 4095 seconds (inclusive) or 0. A value of 0, which is the default value, disables the PAC timeout.

Step 5

(Optional) To configure the FlexConnect APs as local 802.1X authenticators (RADIUS clients), configure the FlexConnect Group as follows:

  1. To enable or disable local authentication for this FlexConnect group, enter this command:

    config flexconnect group group_name radius ap {enable | disable}

Step 6

Configure a Web Policy ACL on a FlexConnect group by entering this command:

config flexconnect group group-name web-policy policy acl {add | delete} acl-name

Step 7

Configure local split tunneling on a per-FlexConnect group basis by entering this command:

config flexconnect group group_name local-split wlan wlan-id acl acl-name flexconnect-group-name {enable | disable}

Step 8

To set multicast/broadcast across L2 broadcast domain on overridden interface for locally switched clients, enter this command:

config flexconnect group group_name multicast overridden-interface {enable | disable}

Step 9

Configure central DHCP per WLAN by entering this command:

config flexconnect group group-name central-dhcp wlan-id {enable override dns | disable | delete}

Step 10

Configure the DHCP overridden interface for FlexConnect group, use the config flexconnect group flexgroup dhcp overridden-interface enable command.

Step 11

Configure policy acl on FlexConnect group by entering this command:

config flexconnect group group_name policy acl {add | delete} acl-name

Step 12

Configure web-auth acl on flexconnect group by entering this command:

config flexconnect group group_name web-auth wlan wlan-id acl acl-name {enable | disable}

Step 13

Configure wlan-vlan mapping on flexconnect group by entering this command:

config flexconnect group group_name wlan-vlan wlan wlan-id{add | delete}vlan vlan-id

Step 14

To set efficient upgrade for group, enter this command:

config flexconnect group group_name predownload {enable | disable | master | slave} ap-name retry-count maximum retry count ap-name ap-name

Step 15

Save your changes by entering this command:

save config

Step 16

See the current list of flexconnect groups by entering this command:

show flexconnect group summary

Step 17

See the details for a specific FlexConnect Groups by entering this command:

show flexconnect group detail group_name


Moving APs from a Default FlexConnect Group to Another FlexConnect Group (GUI)

Procedure


Step 1

Choose Wireless > FlexConnect Groups. The FlexConnect Groups window is displayed.

Step 2

Click the Group Name link of a FlexConnect Group. The FlexConnect Groups > Edit window is displayed.

Step 3

Click FlexConnect AP link. The FlexConnect Group AP List window is displayed.

Step 4

To move an AP that is currently in Default FlexGroup, select the corresponding Group Name from the New Group Name drop-down list, after selecting the APs from the FlexConnect APs list.

Step 5

To add an AP to the new group, click Move.

Step 6

Click Apply.

Step 7

Click Save Configuration.


Viewing APs in a Default FlexGroup (GUI)

Procedure


Step 1

Choose Wireless > FlexConnect Groups. The FlexConnect Groups window, which contains the following details, is displayed:

  • Group Name—Number of FlexConnect groups that are configured.

  • Number of APs—Number of APs in each FlexConnect group.

Step 2

Click a Group Name. The FlexConnect Groups > Edit window, which displays the FlexConnect Group details, is displayed.


Viewing Default FlexGroup Details (CLI)

Procedure


Step 1

show flexconnect group detail default-flexgroup

Displays the configuration of the Default FlexGroup and the APs that are a part of it.

Example:

(Cisco Controller) >show flexconnect group detail default-flex-group

Number of APs in Group: 1
AP Ethernet MAC Name Status Mode
-------------------- -------------------- --------------- ----------------
a8:9d:21:b2:26:88 APa89d.21b2.2688 Joined Flexconnect
Efficient AP Image Upgrade ..... Disabled
Master-AP-Mac Master-AP-Name Model Manual
Group Radius Servers Settings:
Type Server Address Port
------------- ---------------- -------
Primary Unconfigured Unconfigured
Secondary Unconfigured Unconfigured
Group Radius AP Settings:
AP RADIUS server............ Disabled
EAP-FAST Auth............... Disabled
LEAP Auth................... Disabled
EAP-TLS Auth................ Disabled
--More-- or (q)uit
EAP-TLS CERT Download....... Disabled
PEAP Auth................... Disabled
Server Key Auto Generated... No
Server Key.................. <hidden>
Authority ID................ 436973636f0000000000000000000000
Authority Info.............. Cisco A_ID
PAC Timeout................. 0
HTTP-Proxy Ip Address....... 0.0.0.0
HTTP-Proxy Port............. 0
Multicast on Overridden interface config: Disabled
DHCP Broadcast Overridden interface config: Disabled
Number of User's in Group: 0
FlexConnect Vlan-name to Id Template name: none
Group-Specific Vlan Config:
Vlan Mode.................... Disabled
Override AP Config........... Disabled
Group-Specific FlexConnect Wlan-Vlan Mapping:
WLAN ID Vlan ID
-------- --------------------
WLAN ID SSID Central-Dhcp Dns-Override Nat-Pat

Step 2

show ap config general ap-name

Shows a FlexConnect AP’s FlexConnect group membership.

Example:

(Cisco Controller) >show ap config general APa89d.21b2.2688

Cisco AP Identifier.............................. 0
Cisco AP Name.................................... APa89d.21b2.2688
Universal AP..................................... Yes
Universal AP Prime Status........................ NDP
Country code..................................... US - United States
Regulatory Domain allowed by Country............. 802.11bg:-A 802.11a:-AB
AP Country code.................................. US - United States
AP Regulatory Domain............................. 802.11bg:-A 802.11a:-A
Switch Port Number .............................. 2
MAC Address...................................... a8:9d:21:b2:26:88
IP Address Configuration......................... DHCP
IP Address....................................... 8.1.2.186
IP NetMask....................................... 255.255.255.0
Gateway IP Addr.................................. 8.1.2.1
NAT External IP Address.......................... None
CAPWAP Path MTU.................................. 1485
DHCP Release Override............................ Disabled
Telnet State..................................... Globally Disabled
Ssh State........................................ Globally Disabled
Cisco AP Location................................ default location
Cisco AP Floor Label............................. 0
Cisco AP Group Name.............................. default-group
Primary Cisco Switch Name........................
Primary Cisco Switch IP Address.................. 8.1.2.2
Secondary Cisco Switch Name......................
Secondary Cisco Switch IP Address................ Not Configured
Tertiary Cisco Switch Name.......................
Tertiary Cisco Switch IP Address................. Not Configured
Administrative State ............................ ADMIN_ENABLED
Operation State ................................. REGISTERED
Mirroring Mode .................................. Disabled
AP Mode ......................................... FlexConnect
Public Safety ................................... Disabled
ATF Mode ........................................ Disable
AP SubMode ...................................... Not Configured
Rogue Detection ................................. Enabled
AP Vlan Trunking ................................ Disabled
Remote AP Debug ................................. Disabled
Logging trap severity level ..................... informational
Logging syslog facility ......................... kern
S/W Version .................................... 8.3.15.64
Boot Version ................................... 15.2.4.0
Mini IOS Version ................................ 8.0.115.0
Stats Reporting Period .......................... 180
Stats Collection Mode ........................... normal
LED State........................................ Enabled
PoE Pre-Standard Switch.......................... Disabled
PoE Power Injector MAC Addr...................... Disabled
Power Type/Mode.................................. PoE/Full Power
Number Of Slots.................................. 2

AP Model......................................... AIR-AP3702E-UXK9
AP Image......................................... C3700-K9W8-M
IOS Version...................................... 15.3(20160217:163330)$
Reset Button..................................... Enabled
AP Serial Number................................. FCW1905N1CX
AP Certificate Type.............................. Manufacture Installed
AP LAG Configuration Status ..................... Disabled
LAG Support for AP .............................. No
Native Vlan Inheritance: ........................ AP
FlexConnect Vlan mode :.......................... Disabled
FlexConnect Group................................ default-flex-group
Group VLAN ACL Mappings
Group VLAN Name to Id Mappings
AP-Specific FlexConnect Policy ACLs :
L2Acl Configuration ............................. Not Available
FlexConnect Local-Split ACLs :
WLAN ID PROFILE NAME ACL TYPE
------- -------------------------------- --------------------------------- -------
Flexconnect Central-Dhcp Values :
WLAN ID PROFILE NAME Central-Dhcp DNS Override Nat-Pat
Type
------- --------------------------------- -------------- -------------- ---------
------
FlexConnect Backup Auth Radius Servers :
Primary Radius Server........................... Disabled
Secondary Radius Server......................... Disabled
AP User Mode..................................... AUTOMATIC
AP User Name..................................... Cisco
AP Dot1x User Mode............................... Not Configured
AP Dot1x User Name............................... Not Configured
Cisco AP system logging host..................... 255.255.255.255
AP Up Time....................................... 0 days, 19 h 26 m 09 s
AP LWAPP Up Time................................. 0 days, 15 h 28 m 46 s
Join Date and Time............................... Thu Feb 18 18:58:54 2016
Join Taken Time.................................. 0 days, 00 h 07 m 02 s
GPS Present...................................... NO
Ethernet Vlan Tag................................ Disabled
Ethernet Port Duplex............................. Auto
Ethernet Port Speed.............................. Auto
AP Link Latency.................................. Disabled
Rogue Detection.................................. Enabled
AP TCP MSS Adjust................................ Disabled
Hotspot Venue Group.............................. Unspecified
Hotspot Venue Type............................... Unspecified
DNS server IP ............................. 255.255.255.255

Step 3

show flexconnect group detail groupname aps

Displays the APs that are part of a specific group.

Example:

(Cisco Controller) >show flexconnect group detail default-flex-group aps

Number of APs in Group: 1
AP Ethernet MAC Name Status Mode
-------------------- -------------------- --------------- ----------------
a8:9d:21:b2:26:88 APa89d.21b2.2688 Joined Flexconnect

VLAN-ACL Mapping

Configuring VLAN-ACL Mapping on FlexConnect Groups (GUI)

Procedure


Step 1

Choose Wireless > FlexConnect Groups.

The FlexConnect Groups page appears. This page lists the access points associated with the controller.

Step 2

Click the Group Name link of the FlexConnect Group for which you want to configure VLAN-ACL mapping.

Step 3

Click the VLAN-ACL Mapping tab.

The VLAN-ACL Mapping page for that FlexConnect group appears.

Step 4

Enter the Native VLAN ID in the VLAN ID text box.

Step 5

From the Ingress ACL drop-down list, choose the Ingress ACL.

Step 6

From the Egress ACL drop-down list, choose the Egress ACL.

Step 7

Click Add to add this mapping to the FlexConnect Group.

The VLAN ID is mapped with the required ACLs. To remove the mapping, hover your mouse over the blue drop-down arrow and choose Remove.

Note

 
The Access Points inherit the VLAN-ACL mapping on the FlexConnect groups if the WLAN VLAN mapping is also configured on the groups.

Configuring VLAN-ACL Mapping on FlexConnect Groups (CLI)

Procedure

  • config flexconnect group group-name vlan add vlan-id acl ingress-acl egress acl

    Add a VLAN to a FlexConnect group and map the ingress and egress ACLs by entering this command:

Viewing VLAN-ACL Mappings (CLI)

Procedure

  • show flexconnect group detail group-name

    View FlexConnect group details.
  • show ap config general ap-name

    View VLAN-ACL mappings on the AP.

WLAN-VLAN Mapping

Configuring WLAN-VLAN Mapping on FlexConnect Groups (GUI)

Following are a few guidelines:
  • The individual AP settings have precedence over FlexConnect group and global WLAN settings. The FlexConnect group settings have precedence over global WLAN settings.

  • The AP level configuration is stored in flash; WLAN and FlexConnect group configuration is stored in RAM.

  • When an AP moves from one controller to another, the AP can keep its individual VLAN mappings. However, the FlexConnect group and global mappings will be from the new controller. If the WLAN SSID differs between the two controllers, then the WLAN-VLAN mapping is not applied.

  • In a downstream traffic, VLAN ACL is applied first and then the client ACL is applied. In an upstream traffic, the client ACL is applied first and then the VLAN ACL is applied.

  • The ACL must be present on the AP at the time of 802.1X authentication. If the ACL is not present on the AP, a client might be denied authentication by the AP even if the client successfully passes 802.1X authentication.

    ACL Present on AP ACL Name sent from AAA Result of 802.1X Authentication
    No No Authenticated, no ACL applied
    No Yes Authentication Denied
    Yes No Authenticated, no ACL applied
    Yes Yes Authenticated, client ACL applied
  • After client authentication, if the ACL name is changed in the RADIUS server, the client must go through a full authentication again to get the correct client ACL.

  • The WLAN-VLAN mapping on FlexConnect groups is not supported on Cisco APs 1131 and 1242.

Before you begin

Ensure that the WLAN is locally switched. The configuration is applied to the AP only if the WLAN is broadcast on the AP.

Procedure


Step 1

Choose Wireless > FlexConnect Groups.

Step 2

Click the group name.

The FlexConnect Groups > Edit page is displayed.

Step 3

Click the WLAN VLAN Mapping tab.

Step 4

Enter the WLAN ID and the VLAN ID and click Add.

The mapping is displayed in the same tab.

Step 5

Select the VLAN Support check box and specify the Native VLAN ID.

Step 6

Select the Override Native VLAN on AP check box.

  • Overrides the VLAN Support and Native VLAN ID previously configured on the access points

  • Changes the inheritance level at the AP to "Group Specific"

  • Removes AP-specific WLAN-VLAN VLAN-ACL mappings

  • Pushes the group-specific configuration including WLAN-VLAN mapping configured on the group to all the APs in the group.

Step 7

To verify that the inheritance level is Group Specific:

  1. Choose Wireless > Access Points > All APs and click the name of the AP.

  2. In the FlexConnect tab, view the Inheritance Level field.

  3. Click VLAN Mappings to view the details of WLAN-VLAN mappings.

Step 8

Click Apply.

Step 9

Click Save Configuration.


Configuring WLAN-VLAN Mapping on FlexConnect Groups (CLI)

Before you begin

Ensure that the WLAN is locally switched. The configuration is applied to the AP only if the WLAN is broadcast on the AP.

Procedure

  • config flexconnect group group-name wlan-vlan wlan wlan-id {add | delete} vlan vlan-id

    Configure WLAN-VLAN mapping on a FlexConnect group by entering this command.

OfficeExtend Access Points

A Cisco OfficeExtend access point (Cisco OEAP) provides secure communications from a controller to a Cisco AP at a remote location, seamlessly extending the corporate WLAN over the Internet to an employee’s residence. The user’s experience at the home office is exactly the same as it would be at the corporate office. Datagram Transport Layer Security (DTLS) encryption between the access point and the controller ensures that all communications have the highest level of security.


Note


DTLS is permanently enabled on the Cisco OEAP. You cannot disable DTLS on this access point.


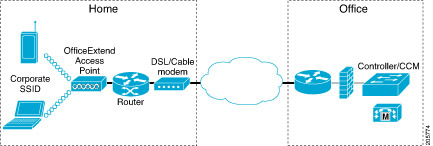
Figure 2. Typical OfficeExtend Access Point Setup.

The following figure shows a typical OfficeExtend access point setup.


Note


Cisco OEAPs are designed to work behind a router or other gateway device that is using network address translation (NAT). NAT allows a device, such as a router, to act as an agent between the Internet (public) and a personal network (private), enabling an entire group of computers to be represented by a single IP address. In Release 8.5, only one OEAP is supported behind a NAT device, but in Release 8.10, multiple OEAPs are supported behind a NAT device.


All the supported indoor AP models with integrated antenna can be configured as OEAP except the AP-700I, AP-700W, and AP802 series access points.


Note


All OfficeExtend access points should be in the same access point group, and that group should contain no more than 15 WLANs. A controller with OfficeExtend access points in an access point group publishes only up to 15 WLANs to each connected OfficeExtend access point because it reserves one WLAN for the personal SSID.


Additional References

Implementing Security


Note


The LSC configuration is optional.


  1. (Optional) Use local significant certificates (LSCs) to authorize your OfficeExtend access points, by following the instructions in the "Authorizing Access Points Using LSCs" sectionn.

  2. (Optional) Implement AAA server validation using the access point’s MAC address, name, or both as the username in authorization requests, by entering this command:

    config auth-list ap-policy authorize-ap username {ap_mac | Cisco_AP | both}

    Using the access point name for validation can ensure that only the OfficeExtend access points of valid employees can associate with the controller. To implement this security policy, ensure that you name each OfficeExtend access point with an employee ID or employee number. When an employee is terminated, run a script to remove this user from the AAA server database, which prevents that employee’s OfficeExtend access point from joining the network.

  3. Save your changes by entering this command:

    save config

Configuring OfficeExtend Access Points

After Cisco Aironet access point has associated with the controller, you can configure it as an OfficeExtend access point.

Configuring OfficeExtend Access Points (GUI)

Procedure

Step 1

Choose Wireless to open the All APs page.

Step 2

Click the name of the desired access point to open the All APs > Details page.

Step 3

Enable FlexConnect on the access point as follows:

  1. In the General tab, choose FlexConnect from the AP Mode drop-down list to enable FlexConnect for this access point.

Step 4

Configure one or more controllers for the access point as follows:

  1. Click the High Availability tab.

  2. Enter the name and IP address of the primary controller for this access point in the Primary Controller Name and Management IP Address text boxes.

    Note


    You must enter both the name and IP address of the controller. Otherwise, the access point cannot join this controller.

  3. If desired, enter the name and IP address of a secondary or tertiary controller (or both) in the corresponding Controller Name and Management IP Address text boxes.

  4. Click Apply. The access point reboots and then rejoins the controller.

    Note


    The names and IP addresses must be unique for the primary, secondary, and tertiary controllers.

Step 5

Enable OfficeExtend access point settings as follows:

  1. Click the FlexConnect tab.

  2. Select the Enable OfficeExtend AP check box to enable the OfficeExtend mode for this access point. The default value is selected.

    Unselecting this check box disables OfficeExtend mode for this access point. It does not undo all of the configuration settings on the access point. If you want to clear the access point’s configuration and return it to the factory-default settings, enter clear ap config Cisco_AP on the controller CLI. If you want to clear only the access point’s personal SSID, click Reset Personal SSID.

    Note

     
    The OfficeExtend AP feature is supported on all internal antenna AP models.

    Note

     
    Rogue detection is disabled automatically when you enable the OfficeExtend mode for an access point. However, you can enable or disable rogue detection for a specific access point by selecting the Rogue Detection check box on the All APs > Details for (Advanced) page. Rogue detection is disabled by default for OfficeExtend access points because these access points, which are deployed in a home environment, are likely to detect a large number of rogue devices.

    Note


    DTLS data encryption is enabled automatically when you enable the OfficeExtend mode for an access point. However, you can enable or disable DTLS data encryption for a specific access point by selecting the Data Encryption check box on the All APs > Details for (Advanced) page.

    Note


    Telnet and SSH access are disabled automatically when you enable the OfficeExtend mode for an access point. However, you can enable or disable Telnet or SSH access for a specific access point by selecting the Telnet or SSH check box on the All APs > Details for (Advanced) page.

    Note


    Link latency is enabled automatically when you enable the OfficeExtend mode for an access point. However, you can enable or disable link latency for a specific access point by selecting the Enable Link Latency check box on the All APs > Details for (Advanced) page.

  3. Check the Enable Least Latency Controller Join check box if you want the access point to choose the controller with the least latency when joining. Otherwise, leave this check box unchecked, which is the default value. When you enable this feature, the access point calculates the time between the discovery request and discovery response and joins the controller that responds first.

  4. Click Apply.

    The OfficeExtend AP text box on the All APs page shows which access points are configured as OfficeExtend access points.

Step 6

Configure a specific username and password for the OfficeExtend access point so that the user at home can log into the GUI of the OfficeExtend access point:

  1. Click the Credentials tab.

  2. Select the Over-ride Global Credentials check box to prevent this access point from inheriting the global username, password, and enable password from the controller. The default value is unselected.

  3. In the Username, Password, and Enable Password text boxes, enter the unique username, password, and enable password that you want to assign to this access point.

    Note


    The information that you enter is retained across controller and access point reboots and if the access point joins a new controller.

  4. Click Apply.

    Note


    If you want to force this access point to use the controller’s global credentials, uncheck the Over-ride Global Credentials check box.

    These credentials are valid for Telnet/SSH and not for GUI of Wave 2 Cisco OEAP. For the GUI of Wave 2 Cisco OEAP, the default username of admin and the default password of admin can be used upon the first login and you are prompted to change the credentials locally on the Cisco OEAP.

Step 7

Configure access to local GUI, LAN ports, and local SSID of the OfficeExtend access points:

  1. Choose Wireless > Access Points > Global Configuration to open the Global Configuration page.

  2. Under OEAP Config Parameters, select or unselect the Disable Local Access check box to enable or disable local access of the OfficeExtend access points.

    Note

     
    By default, the Disable Local Access check box is unselected and therefore the Ethernet ports and personal SSIDs are enabled. This configuration does not affect remote LAN. The port is enabled only when you configure a remote LAN.

Step 8

Configure split tunneling for the OfficeExtend access points as follows:

  1. Choose Wireless > Access Points > Global Configuration.

  2. In the OEAP Config Parameters area, select or unselect the Disable Split Tunnel check box.

    Disabling split tunneling here disables split tunneling for all the WLANs and remote LANs. You can also disable split tunneling on a specific WLAN or remote LAN.

  3. Click Apply.

Step 9

Click Save Configuration.

Step 10

If your controller supports only OfficeExtend access points, see the Configuring RRM section for instructions on setting the recommended values for the DCA interval, channel scan duration, and neighbor packet frequency.


Configuring OfficeExtend Access Points (CLI)

Procedure
  • Enable FlexConnect on the access point by entering this command:

    config ap mode flexconnect Cisco_AP

  • Configure one or more controllers for the access point by entering one or all of these commands:

    config ap primary-base controller_name Cisco_AP controller_ip_address

    config ap secondary-base controller_name Cisco_AP controller_ip_address

    config ap tertiary-base controller_name Cisco_AP controller_ip_address


    Note


    You must enter both the name and IP address of the controller. Otherwise, the access point cannot join this controller.


    Note


    The names and IP addresses must be unique for the primary, secondary, and tertiary controllers.


  • Enable the OfficeExtend mode for this access point by entering this command:

    config flexconnect office-extend {enable | disable} Cisco_AP

    The default value is enabled. The disable parameter disables OfficeExtend mode for this access point. It does not undo all of the configuration settings on the access point. If you want to clear the access point’s configuration and return it to the factory-default settings, enter this command:

    clear ap config cisco-ap

    If you want to clear only the access point’s personal SSID, enter this command:

    config flexconnect office-extend clear-personalssid-config Cisco_AP


    Note


    Rogue detection is disabled automatically when you enable the OfficeExtend mode for an access point. However, you can enable or disable rogue detection for a specific access point or for all access points using the config rogue detection {enable | disable} {Cisco_AP | all} command. Rogue detection is disabled by default for OfficeExtend access points because these access points, which are deployed in a home environment, are likely to detect a large number of rogue devices.


    Note


    DTLS data encryption is enabled automatically when you enable the OfficeExtend mode for an access point. However, you can enable or disable DTLS data encryption for a specific access point or for all access points using the config ap link-encryption {enable | disable} {Cisco_AP | all} command.


    Note


    Telnet and SSH access are disabled automatically when you enable the OfficeExtend mode for an access point. However, you can enable or disable Telnet or SSH access for a specific access point using the config ap {telnet | ssh} {enable | disable} Cisco_AP command.


    Note


    Link latency is enabled automatically when you enable the OfficeExtend mode for an access point. However, you can enable or disable link latency for a specific access point or for all access points currently associated to the controller using the config ap link-latency {enable | disable} {Cisco_AP | all} command.


  • Enable the access point to choose the controller with the least latency when joining by entering this command:

    config flexconnect join min-latency {enable | disable} Cisco_AP

    The default value is disabled. When you enable this feature, the access point calculates the time between the discovery request and discovery response and joins the controller that responds first.

  • Configure a specific username and password that users at home can enter to log into the GUI of the OfficeExtend access point by entering this command:

    config ap mgmtuser add username user password password enablesecret enable_password Cisco_AP

    The credentials that you enter in this command are retained across controller and access point reboots and if the access point joins a new controller.


    Note


    If you want to force this access point to use the controller’s global credentials, enter the config ap mgmtuser delete Cisco_AP command. The following message appears after you execute this command: “AP reverted to global username configuration.”


  • To configure access to the local network for the Cisco OfficeExtend access points, enter the following command:

    config network oeap local-network {enable | disable}

    When disabled, the local SSIDs, local ports are inoperative; and the console is not accessible. When reset, the default restores local access. This configuration does not affect the remote LAN configuration if configured on the access points.

  • Configure the Dual R-LAN Ports feature, which allows the Ethernet port 3 of Cisco OfficeExtend access points to operate as a remote LAN by entering this command:

    config network oeap dual-rlan-ports {enable | disable}

    This configuration is global to the controller and is stored by the AP and the NVRAM variable. When this variable is set, the behavior of the remote LAN is changed. This feature supports different remote LANs per remote LAN port.

    The remote LAN mapping is different depending on whether the default group or AP Groups is used:
    • Default Group—If you are using the default group, a single remote LAN with an even numbered remote LAN ID is mapped to port 4. For example, a remote LAN with remote LAN ID 2 is mapped to port 4. The remote LAN with an odd numbered remote LAN ID is mapped to port 3. For example, a remote LAN with remote LAN ID 1 is mapped to port 3.

    • AP Groups—If you are using an AP group, the mapping to the OEAP ports is determined by the order of the AP groups. To use an AP group, you must first delete all remote LANs and WLANs from the AP group leaving it empty. Then, add the two remote LANs to the AP group adding the port 3 AP remote LAN first, and the port 4 remote group second, followed by any WLANs.

  • Enable or disable split tunneling by entering this command:

    config network oeap split-tunnel {enable | disable}

    Disabling split tunneling here disables split tunneling for all the WLANs and remote LANs. You can also disable split tunneling on a specific WLAN or remote LAN.

  • Enable split tunneling without gateway override by entering this command:

    config wlan split-tunnel wlan-id enabled apply-acl acl name
  • Enable split tunneling with gateway override by entering this command:

    config wlan split-tunnel wlan-id enabled override gateway gateway ip mask subnet mask apply-acl acl name
  • Save your changes by entering this command:

    save config

    Note


    If your controller supports only OfficeExtend access points, see the Configuring Radio Resource Management section for instructions on setting the recommended value for the DCA interval.


Configuring a Personal SSID on an OfficeExtend Access Point

Procedure


Step 1

Find the IP address of your OfficeExtend access point by doing one of the following:

  • Log on to your home router and look for the IP address of your OfficeExtend access point.

  • Ask your company’s IT professional for the IP address of your OfficeExtend access point.

  • Use an application such as Network Magic to detect devices on your network and their IP addresses.

Step 2

With the OfficeExtend access point connected to your home router, enter the IP address of the OfficeExtend access point in the Address text box of your Internet browser and click Go.

Note


Make sure that you are not connected to your company’s network using a virtual private network (VPN) connection.

Step 3

When prompted, enter the username and password to log into the access point.

Step 4

On the OfficeExtend Access Point Welcome page, click Enter. The OfficeExtend Access Point Home page appears.

For the GUI of Wave 2 Cisco OEAP, the default username of admin and the default password of admin can be used upon the first login and you are prompted to change the credentials locally on the Cisco OEAP. For more information, see https://www.cisco.com/c/dam/m/zh_cn/solutions/enterprise-networks/mobility-express/office-extend/office-extend-deployment-guide.pdf.

Step 5

Choose Configuration to open the Configuration page.

Step 6

In the SSID text box, enter the personal SSID that you want to assign to this access point. This SSID is locally switched.

Note


A controller with an OfficeExtend access point publishes only up to 15 WLANs to each connected access point because it reserves one WLAN for the personal SSID.

Step 7

From the Security drop-down list, choose Open, WPA2/PSK (AES), or 104 bit WEP to set the security type to be used by this access point.

Note


If you choose WPA2/PSK (AES), make sure that the client is configured for WPA2/PSK and AES encryption.

Step 8

If you chose WPA2/PSK (AES) in Step 8, enter an 8- to 38-character WPA2 passphrase in the Secret text box. If you chose 104 bit WEP, enter a 13-character ASCII key in the Key text box.

Step 9

Click Apply.

Note


If you want to use the OfficeExtend access point for another application, you can clear this configuration and return the access point to the factory-default settings by clicking Clear Config. You can also clear the access point’s configuration from the controller CLI by entering the clear ap config Cisco_AP command.

These steps can be used for configuring a personal SSID on OfficeExtend access points only.


Viewing OfficeExtend Access Point Statistics

Use these commands to view information about the OfficeExtend access points on your network:

  • See a list of all OfficeExtend access points by entering this command:

    show flexconnect office-extend summary

  • See the link delay for OfficeExtend access points by entering this command:

    show flexconnect office-extend latency

  • See the encryption state of all access points or a specific access point by entering this command:

    show ap link-encryption {all | Cisco_AP}

    This command also shows authentication errors, which track the number of integrity check failures, and replay errors, which track the number of times that the access point receives the same packet. See the data plane status for all access points or a specific access point by entering this command:

    show ap data-plane {all | Cisco_AP}

Viewing Voice Metrics on OfficeExtend Access Points

Use this command to view information about voice metrics on the OfficeExtend access points in your network:

show ap stats 802.11{a | b} Cisco_AP
Information similar to the following appears:
OEAP WMM Stats :
  Best Effort:
    Tx Frame Count............................... 0
    Tx Failed Frame Count........................ 0
    Tx Expired Count............................. 0
    Tx Overflow Count............................ 0
    Tx Queue Count............................... 0
    Tx Queue Max Count........................... 0
    Rx Frame Count............................... 0
    Rx Failed Frame Count........................ 0
  Background:
    Tx Frame Count............................... 0
    Tx Failed Frame Count........................ 0
    Tx Expired Count............................. 0
    Tx Overflow Count............................ 0
    Tx Queue Count............................... 0
    Tx Queue Max Count........................... 0
    Rx Frame Count............................... 0
    Rx Failed Frame Count........................ 0
  Video:
    Tx Frame Count............................... 0
    Tx Failed Frame Count........................ 0
    Tx Expired Count............................. 0
    Tx Overflow Count............................ 0
    Tx Queue Count............................... 0
    Tx Queue Max Count........................... 0
    Rx Frame Count............................... 0
    Rx Failed Frame Count........................ 0
  Voice:
    Tx Frame Count............................... 0
    Tx Failed Frame Count........................ 0
    Tx Expired Count............................. 0
    Tx Overflow Count............................ 0
    Tx Queue Count............................... 0
    Tx Queue Max Count........................... 0
    Rx Frame Count............................... 0
    Rx Failed Frame Count........................ 0

View the voice metrics on the OfficeExtend access points in your network using the controller GUI as follows:

  • ChooseWireless > Access Points > Radios > 802.11a/n/ac or 802.11b/g/n. The 802.11a/n/ac Radios or 802.11b/g/n Radios page appears.

  • Hover your cursor over the blue drop-down arrow for the desired access point and click the Detail link for the desired client to open the Radio > Statistics page.

    This page shows the OEAP WMM counters for this access point.

Network Diagnostics

Network Diagnostics determines the non-DTLS throughput of the system by running a speed test on demand. Network Diagnostics allows troubleshooting of root causes leading to failures. It also determines the link latency and jitter by running a test on demand or periodically.

This section contains the following subsections:

Running Network Diagnostics (GUI)

Procedure

Step 1

Choose WAN > Network Diagnostics.

The Network Diagnostics page is displayed.

Step 2

Click Start Diagnostics.

The diagnostics page is displayed.

Running Network Diagnostics on the Controller
Procedure

Step 1

Choose Wireless > All APs > Details.

Step 2

Choose the Network Diagnostics tab.

The Network Diagnostics page is displayed.

Step 3

Click Start Network Diagnostics.

The diagnostics page is displayed.

Running Network Diagnostics (CLI)

Procedure
  • To run network diagnostics, enter this command on the controller:

    show ap network-diagnostics ap-name

Remote LANs

This section describes how to configure remote LANs.

Prerequisites

Guidelines and Restrictions

This section contains the following subsections:

Configuring a Remote LAN (GUI)

Procedure

Step 1

Choose WLANs to open the WLANs page.

This page lists all of the WLANs and remote LANs currently configured on the controller. For each WLAN, you can see its WLAN/remote LAN ID, profile name, type, SSID, status, and security policies.

The total number of WLANs/Remote LANs appears in the upper right-hand corner of the page. If the list of WLANs/Remote LANs spans multiple pages, you can access these pages by clicking the page number links.

Note


If you want to delete a Remote LAN, hover your cursor over the blue drop-down arrow for that WLAN and choose Remove, or select the check box to the left of the row, choose Remove Selected from the drop-down list, and click Go. A message appears asking you to confirm your decision. If you proceed, the remote LAN is removed from any access point group to which it is assigned and from the access point’s radio.

Step 2

Create a new Remote-LAN by choosing Create New from the drop-down list and clicking Go. The WLANs > New page appears.

Step 3

From the Type drop-down list, choose Remote LAN to create a remote LAN.

Step 4

In the Profile Name text box, enter up to 32 alphanumeric characters for the profile name to be assigned to this Remote WLAN. The profile name must be unique.

Step 5

From the WLAN ID drop-down list, choose the ID number for this WLAN.

Step 6

Click Apply to commit your changes. The WLANs > Edit page appears.

Note


You can also open the WLANs > Edit page from the WLANs page by clicking the ID number of the WLAN that you want to edit.

Step 7

Use the parameters on the General, Security, and Advanced tabs to configure this remote LAN. See the sections in the rest of this chapter for instructions on configuring specific features.

Step 8

On the General tab, select the Status check box to enable this remote LAN. Be sure to leave it unselected until you have finished making configuration changes to the remote LAN.

Note


You can also enable or disable remote LANs from the WLANs page by selecting the check boxes to the left of the IDs that you want to enable or disable, choosing Enable Selected or Disable Selected from the drop-down list, and clicking Go.

Step 9

Click Apply to commit your changes.

Step 10

Click Save Configuration to save your changes.


Configuring a Remote LAN (CLI)

Procedure
  • See the current configuration of the remote LAN by entering this command:

    show remote-lan remote-lan-id

  • Enable or disable remote LAN by entering this command:

    config remote-lan {enable | disable} remote-lan-id

  • Enable or disable 802.1X authentication for remote LAN by entering this command:

    config remote-lan security 802.1X {enable | disable} remote-lan-id


    Note


    The encryption on a remote LAN is always “none.”
  • Enable or disable local EAP with the controller as an authentication server by entering this command:

    config remote-lan local-auth enable profile-name remote-lan-id

  • If you are using an external AAA authentication server, use the following command:

    config remote-lan radius_server auth {add | delete} remote-lan-id server id

    config remote-lan radius_server auth {add | delete} remote-lan-id

Configuring IEEE 802.1X Authentication Modes (CLI)

You can configure three different authentications modes:

  • Single-host

  • Multi-host

  • Violation-mode

Procedure

Perform one of the following tasks to configure authentication:

  • config remote-lan host-mode singlehost remote-lan-id

    Example:

    (Cisco Controller) > config remote-lan host-mode singlehost 7


    Configures a remote LAN single-host mode. In single-host mode, violation is triggered when more than one device is detected in data VLAN.

  • config remote-lan host-mode multihost remote-lan-id

    Example:

    (Cisco Controller) > config remote-lan host-mode multihost 8


    Configuresa remote LAN multi-host mode. In multi-host mode, a violation is triggered when more than one device is detected in data or voice VLAN. Note that security violation cannot be triggered in multi-host mode.

  • config remote-lan violation-mode {protect | replace | shutdown}remote-lan-id

    Example:

    (Cisco Controller) > config remote-lan violation-mode protect 7 


    Configures violation mode for remote LAN.


Enabling IEEE 802.1X Authentication in Controller (GUI)

Procedure

Step 1

Choose WLANs.

The WLANs window is displayed.

Step 2

Click the ID number of the corresponding WLAN.

The WLANs > Edit window is displayed.

Step 3

Click the Security > Layer 2 tab.

Step 4

From the Layer 2 Security drop-down list, choose 802.1X.

The IEEE 802.1X parameters are displayed.

  1. Select Host Mode from the drop-down list.

  2. Select Violation Mode from the drop-down list.

  3. Select the Pre Authentication check box and enter pre-authentication VLAN identifier in the Pre Auth Vlan field.

Step 5

Click Apply.


FlexConnect AP Image Upgrades

Normally, when upgrading the image of an AP, you can use the preimage download feature to reduce the amount of time the AP is unavailable to serve clients. However, it also increases the downtime because the AP cannot serve clients during an upgrade. The preimage download feature can be used to reduce this downtime. However, in the case of a branch office set up, the upgrade images are still downloaded to each AP over the WAN link, which has a higher latency.

A more efficient way is to use the FlexConnect AP Image Upgrade feature. When this feature is enabled, one access point of each model in the local network first downloads the upgrade image over the WAN link. It works similarly to the primary-subordinate or client-server model. This access point then becomes the primary for the remaining access point of the similar model. The remaining access points then download the upgrade image from the primary access point using the pre-image download feature over the local network, which reduces the WAN latency.

Restrictions on FlexConnect AP Image Upgrades

  • The primary and secondary controllers in the network must have the same set of primary and backup images.

  • If you configured a FlexConnect group, all access points in that group must be reachable between these access points and firewall must not be deployed.

  • A FlexConnect group can have one primary AP per AP model. If a primary AP is not selected manually, the AP that has the least MAC address value is automatically chosen as the primary AP for that model.

  • A maximum of 3 subordinate APs of the same model can download the image from their primary AP (a maximum of 3 TFTP connections can serve at a time). The rest of the subordinate APs use the random back-off timer to retry for the primary AP to download the image. The random back-off value is more than 100 seconds. After a subordinate AP downloads the image, the AP informs the controller about the completion of the download. After random back-off, the waiting subordinate AP can occupy the empty TFTP slot at the primary AP.

    If a subordinate AP fails to download the image from its primary AP even after the subordinate retry count that you have configured is exhausted, the subordinate AP reaches out to the controller to fetch the new image.

  • This feature works only with CAPWAP APs.

  • This feature does not work if a primary AP is connected over CAPWAP over IPv6.

  • A Cisco Wave 2 AP working as the primary AP downloads the software image from the controller, even if the software image version is the same.

Configuring FlexConnect AP Upgrades (GUI)

Procedure


Step 1

Choose Wireless > FlexConnect Groups.

The FlexConnect Groups page appears. This page lists the FlexConnect Groups configured on the controller.

Step 2

Click the Group Name link on which you want to configure the image upgrade.

Step 3

Click the Image Upgrade tab.

Step 4

Check the FlexConnect AP Upgrade check box to enable a FlexConnect AP Upgrade.

Step 5

If you enabled the FlexConnect AP upgrade in the previous step, you must enable the following parameters:

  • Slave Maximum Retry Count—The number of attempts the subordinate access point must try to connect to the primary access point for downloading the upgrade image. If the image download does not occur for the configured retry attempts, the image is upgraded over the WAN. The default value is 44; the valid range is between 1 and 63.
  • Upgrade Image—Select the upgrade image. The options are Primary, Backup, and Abort.

Step 6

From the AP Name drop-down list, click Add Master to add the primary access point.

You can manually assign primary access points in the FlexConnect group by selecting the access points.

Step 7

Click Apply.

Step 8

Click FlexConnect Upgrade to upgrade.


Configuring FlexConnect AP Upgrades (CLI)

  • config flexconnect group group-name predownload {enable | disable} —Enables or disables the FlexConnect AP upgrade.

  • config flexconnect group group-name predownload master ap-name —Sets the AP as the primary AP for the model.

  • config flexconnect group group-name predownload slave ap-name ap-name —Sets the AP as a subordinate AP.

  • config flexconnect group group-name predownload slave retry-count max-retry-count —Sets the retry count for subordinate APs.

  • config flexconnect group group-name predownload start {abort | primary | backup} —Initiates the image (primary or backup) download on the access points in the FlexConnect group, or terminates an image download process.

  • show flexconnect group group-name —Displays the summary of the FlexConnect group configuration.

  • show ap image all —Displays the details of the images on the access point.

FlexConnect AP Easy Admin

The FlexConnect AP Easy Admin enables unified AP GUI access and configure the following parameters to connect to the controller:

  • AP IP address: Static or DHCP IP address.

  • Controller IP address priming: Ablity to configure the primary, secondary, and tertiary controller, and their IP addresses.

  • CAPWAP preferred DNS configuration.

  • PPPoE: Enabling of FlexConnect submode and configuring the username and password for PPPoE server authentication.

  • TFTP: AP image upgrade through TFTP.

Configuring FlexConnect AP Easy Admin on the Controller (GUI)

Procedure


Step 1

Choose Wireless > Access Points > Global Configuration.

The Global Configuration page is displayed.

Step 2

In the AP Easy Configuration section, check the Enable Global AP Easy Configuration check box.

Note


Easy Configuration is only applicable to the following Cisco Wave 1 (IOS-based) APs: 702, 1530, 1700, 2700, and 3700.

Step 3

Click Apply.


Configuring FlexConnect AP Easy Admin on the Controller (CLI)

Procedure


Step 1

Enable or disable AP Easy Admin on the controller by entering this command:

config network ap-easyadmin {enable| disable}

Step 2

View the network summary and to verify the status of AP easy admin feature by entering this command:

show network summary

WeChat Client Authentication

The WeChat messaging service is a cross platform communication software which supports text messages, audio calls, video calls, games. WeChat also offers full fledged m-commerce capabilities in their app using which you can do purchases, make bill payments within the WeChat app. This app has a large customer base in China and is gaining popularity in rest of the world. This feature gives WeChat users access to wireless internet service using their smartphones or PC. The authentication of the account is done by the WeChat servers. This is a simple process and requires little user inputs.

This platform benefits both, the customer and the merchant. The customer gets access to the Internet and the merchant gets a customer engaging platform to advertise merchandise and services.

Restrictions on WeChat Client Authentication

  • This feature is supported on Cisco Wave 1 APs in FlexConnect mode only.

  • Downgrading a controller running a release with QR-Scan or WeChat specific configuration to an older release which does not support this feature leads to XML validation errors for the Layer 3 security type during the downgrade process.

    The errors do not have any impact on the functioning of the controller.

Configuring WeChat Client Authentication on Controller (GUI)

Before you begin

The AP SSID and the controller MAC address needs be configured in the Baitone server database.

Procedure


Step 1

Log in to the controller GUI interface.

Step 2

Choose WLANs > WLAN ID > Security to open the WLANs Edit page.

Step 3

In the Security tab, configure the following parameters:

  1. Set the Layer 2 Security to None from the drop-down list on the Layer 2 tab.

  2. Set the Layer 3 Security to Web Policy from the drop-down list on the Layer 3 tab.

  3. Choose Passthrough

  4. Select the Qr Code Scanning check box.

  5. Enter the portal web page address in the Redirect URL text box and Shared Key (Preconfigured on the external authentication server).

  6. From the Preauthentication ACL > WebAuth FlexAcl drop-down list, choose the Acl option that you want to apply to the WLAN.

    Before the client is authenticated, this Acl allows the authentication traffic to pass through to the WeChat authentication servers.

Step 4

In the Advanced tab, select the FlexConnect Local Switching check box.

Step 5

(Optional) Enable local authentication by configuring the following parameters:

  1. Under the Security tab, select the Web policy done locally on AP check box.

    This enables local authentication at the AP and the central authentication at the controller is disabled.

  2. In the Advanced tab, select the FlexConnect Local Auth check box.

    Set this option to enable if Web policy done locally on AP is enabled

Step 6

On the Wireless tab, follow the steps:

  1. Select the FlexConnect ACLs.

    Choose an existing Acl or create a new Acl

  2. Add the portal page IP address and the WeChat authentication server IP address with permit action as new rules.

Step 7

In the Wireless > Global Configuration page, configure the following parameter:

  1. Enter the virtual IP address in the AP Virtual IP address text box.

    The default Virtual AP IP address is: 10.1.0.6. The controller and the client interact with the AP using this AP virtual IP address.

Step 8

Choose Security > Web Auth > Web Login Page. Enter the values for:

  1. QrCode Scanning Bypass Timer. The valid range is between 5 and 60 seconds to allow traffic temporary.

  2. QrCode Scanning Bypass Count. The valid range is between 1 to 9 retries to bypass for authentication.


Configuring WeChat Client Authentication on Controller (CLI)

Before you begin

The AP SSID and the controller MAC address needs be configured in the external authentication server database.

Procedure


Step 1

Configure the WLAN:

  1. Create a WLAN, by entering this command:

    config wlan create wlan-id profile-name ssid-name

  2. Disable L2 security by entering this command:

    config wlan security wpa disable wlan-id

  3. Enable WLAN L3 passthrough by entering this command:

    config wlan security web-passthroughenable wlan-id

Step 2

Enable FlexConnect mode in a Cisco AP by entering this command:

config ap mode flexconnect Cisco-AP

Step 3

Enable or disable QR code scanning support for clients on the controller by entering this command:

config wlan security web-passthrough qr-scan { enable | disable} wlan-id

Step 4

Configure the QR-scan DES key for the WLAN by entering this command:

config wlan security web-auth des key string wlan-id

Step 5

Configure the QR scan authentication options - timer, and count by entering this command:

config custom-web qrscan-bypass-opt timer count

Step 6

Configure the external Web Authentication URL by entering this command:

config custom-web ext-webauth-url ext-webauth-url

Step 7

Configure flex-acl and attach to WLAN in L3 security

Step 8

Configure virtual IP of Controller with the same IP which is configured on Baitone

Step 9

Enable or disable QR code scanning support for clients on the controller:

  • Enable or disable central authentication QR code scanning support for clients on the controller by entering this command:

    config wlan security web-passthrough qr-scan{enable | disable} wlan-id

  • Enable or disable local authentication QR code scanning support for clients on the controller by entering this command:

    config wlan security web-passthrough qr-scan local{enable | disable} wlan-id

Step 10

Configure virtual IP for an AP by entering this command:

config ap virtual_ip {enable | disable} ip address

Step 11

See the state of WeChat QR scan feature for specific WLAN by entering this command:

show wlan wlan-id

Step 12

See the QR scan bypass options by entering this command:

show custom-web all


Authenticating Client Using WeChat App for Mobile Internet Access (GUI)

Before you begin

The WeChat App must be installed in the smartphone.

Procedure


Step 1

Connect the smartphone to the WeChat enabled SSID.

  1. IPhone—Opens the portal page automatically.

  2. Android—Open a URL using a browser which will redirect to the portal page.

Once connected to the SSID, you have 60 seconds to validate the WeChat account.

Step 2

Click the green button displayed to validate the WeChat account.

Step 3

Click the green connect button to connect to WeChat over Wi-Fi.

The merchant page is displayed which confirms the user is connected to the Internet.


Authenticating Client Using WeChat App for PC Internet Access (GUI)

Before you begin

The customer's mobile must have the WeChat app installed and have access to the Internet to authenticate the WeChat account.

Procedure


Step 1

Connect the PC to the WeChat enabled SSID.

The server identifies the client and displays the portal web page with a QR code.

Step 2

Scan the QR code using the WeChat app on the mobile.

The WeChat account authentication success is displayed.

Step 3

The PC browser displays the merchant page and is able to access the Internet.