Configuring NVMeoF with RoCEv2 in Linux

Guidelines for using NVMe over Fabrics (NVMeoF) with RoCE v2 on Linux

General Guidelines and Limitations:

  • Cisco recommends you check UCS Hardware and Software Compatibility to determine support for NVMeoF. NVMeoF is supported on Cisco UCS B-Series, C-Series, and X-Series servers.

  • NVMe over RDMA with RoCE v2 is supported with the Cisco UCS VIC 1400, VIC 14000, and VIC 15000 Series adapters.

  • When creating RoCE v2 interfaces, use Cisco Intersight provided Linux-NVMe-RoCE adapter policy.

  • In the Ethernet Adapter policy, do not change values of Queue Pairs, Memory Regions, Resource Groups, and Priority settings other than to Cisco provided default values. NVMeoF functionality may not be guaranteed with different settings for Queue Pairs, Memory Regions, Resource Groups, and Priority.

  • When configuring RoCE v2 interfaces, use both the enic and enic_rdma binary drivers downloaded from Cisco.com and install the matched set of enic and enic_rdma drivers. Attempting to use the binary enic_rdma driver downloaded from Cisco.com with an inbox enic driver will not work.

  • RoCE v2 supports maximum two RoCE v2 enabled interfaces per adapter.

  • Booting from an NVMeoF namespace is not supported.

  • Layer 3 routing is not supported.

  • RoCE v2 does not support bonding.

  • Saving a crashdump to an NVMeoF namespace during a system crash is not supported.

  • NVMeoF cannot be used with usNIC, VxLAN, VMQ, VMMQ, NVGRE, GENEVE Offload, and DPDK features.

  • Cisco Intersight does not support fabric failover for vNICs with RoCE v2 enabled.

  • The Quality of Service (QoS) no drop class configuration must be properly configured on upstream switches such as Cisco Nexus 9000 series switches. QoS configurations will vary between different upstream switches.

  • Spanning Tree Protocol (STP) may cause temporary loss of network connectivity when a failover or failback event occurs. To prevent this issue from occurring, disable STP on uplink switches.
Linux Requirements

Configuration and use of RoCE v2 in Linux requires the following:

  • InfiniBand kernel API module ib_core

  • A storage array that supports NVMeoF connection

Configuring RoCE v2 for NVMeoF on Cisco Intersight

Use these steps to configure the RoCE v2 interface on Cisco Intersight.

To avoid possible RDMA packet drops, ensure same no-drop COS is configured across the network. The following steps allows you to configure a no-drop class in System QoS policies and use it for RDMA supported interfaces.

Procedure


Step 1

Navigate to CONFIGURE > Policies. Click Create Policy, select UCS Domain platform type, search or choose System QoS, and click Start.

Step 2

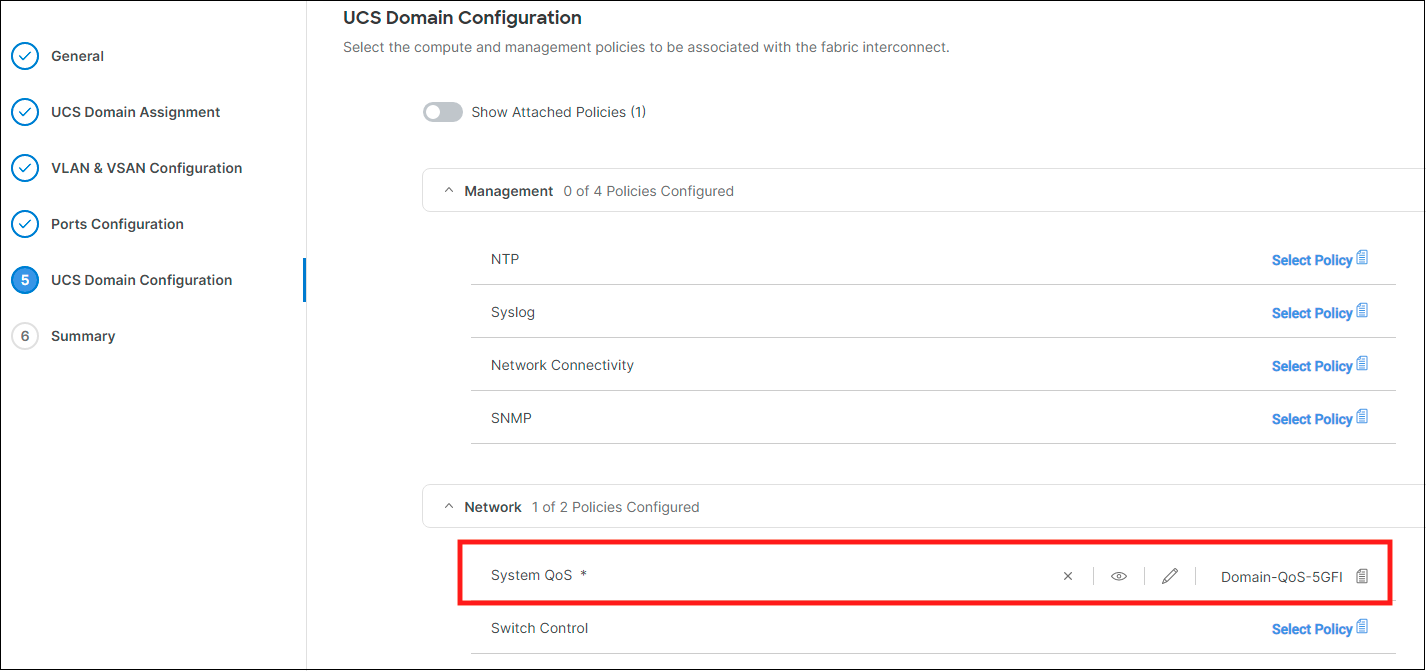
In the General page, enter the policy name and click Next, and then in the Policy Details page, configure the property setting for System QoS policy as follows:

  • For Priority, choose Platinum

  • For Allow Packet Drops, uncheck the check box.

  • For MTU, set the value as 9216.

Step 3

Click Create.

Step 4

Associate the System QoS policy to the Domain Profile.

Note


For more information, see Creating System QoS Policy in Configuring Domain Policies and Configuring Domain Profiles.


The System QoS Policy is successfully created and deployed to the Domain Profile.

What to do next

Configure the server profile with RoCE v2 vNIC settings in LAN Connectivity policy.

Enabling RoCE Settings in LAN Connectivity Policy

Use the following steps to configure the RoCE v2 vNIC. In Cisco Intersight LAN Connectivity policy, you can enable the RoCE settings on Ethernet Adapter policy for Linux configuration as follows:

Procedure


Step 1

Navigate to CONFIGURE > Policies. Click Create Policy, select UCS Server platform type, search or choose LAN Connectivity policy, and click Start.

Step 2

In the policy General page, enter the policy name, select the Target Platform as UCS Server (Standalone) or UCS Server (FI-Attached), and click Next.

Step 3

In the Policy Details page, click Add vNIC to create a new vNIC.

Step 4

In the Add vNIC page, follow the configuration parameters to enable the RoCE v2 vNIC:

  1. In the General section, provide a name for virtual ethernet interface.

  2. In the Consistent Device Naming (CDN) section of the Standalone server or the Failover section of FI-attached server, do the following:

    • Click Select Policy under Ethernet Adapter.

    • In the Select Policy window, click Create New to create an Ethernet Adapter policy.

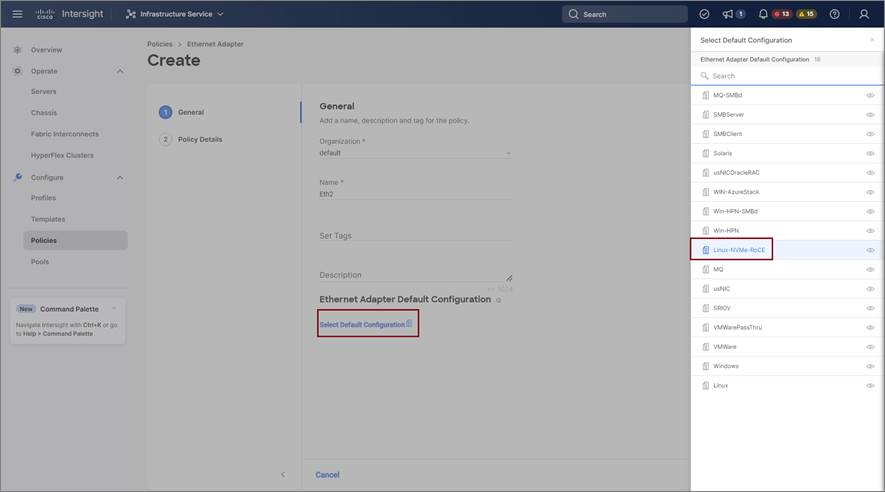
    • On the General page, enter the policy name and click Select Default Configuration. Search and select Linux-NVMe-RoCE in the Default Configuration window and click Next.

    • On the Policy Details, verify the default configuration parameters for RoCE and click Create.

    • Click Add to save the setting and add the new vNIC.

      Note


      All the fields with * are mandatory and ensure it is filled out or selected with appropriate policies.

Step 5

Click Create to complete the LAN Connectivity policy with RoCE v2 settings.

Step 6

Associate the LAN Connectivity policy to the Server Profile.

Note


For more information, see Creating a LAN Connectivity Policy and Creating an Ethernet Adapter Policy in Configuring UCS Server Policies and Configuring UCS Server Profiles.


The LAN Connectivity Policy with the Ethernet Adapter policy vNIC setting is successfully created and deployed to enable RoCE v2 configuration.

What to do next

Once the policy configuration for RoCE v2 is complete, proceed to enable IOMMU in the BIOS policy.

Enabling an IOMMU BIOS Settings

Use the following steps to configure the server profile with the RoCE v2 vNIC and enable the IOMMU BIOS policy before enabling the IOMMU in the Linux kernel.

Procedure


Step 1

Navigate to CONFIGURE > Policies. Click Create Policy, select UCS Server platform type, search or choose BIOS, and click Start.

Step 2

On the General page, enter the policy name and click Next.

Step 3

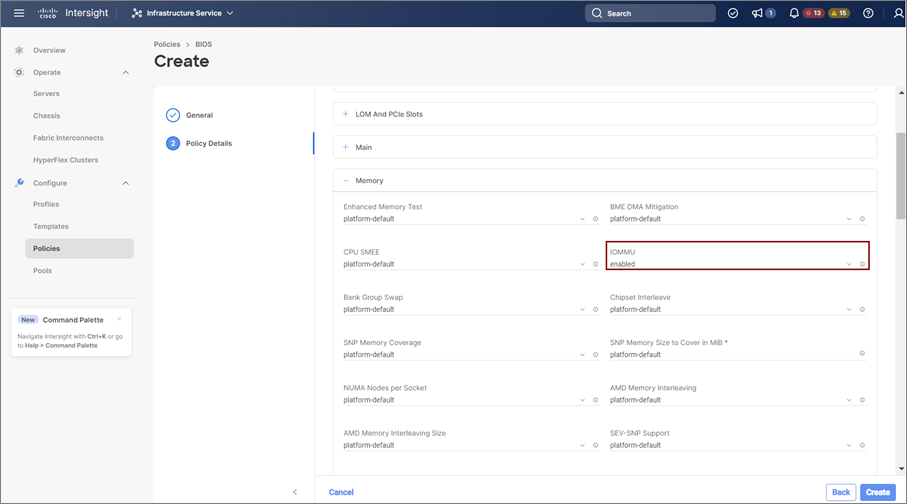
On the Policy Details page, configure the following BIOS:

  1. Select All Platforms.

  2. Expand the Memory group.

  3. In the IOMMU drop-down list, select the BIOS value enabled for setting IOMMU configuration.

Step 4

Click Create.

Step 5

Associate the BIOS policy to the server profile and reboot the server.

Note


For more information, see Creating a BIOS Policy in Configuring Server Policies and Configuring Server Profile.


The BIOS Policy is successfully created and deployed on the server profile.

What to do next

Configure RoCE v2 for NVMeoF on the Host System.

Configuring RoCE v2 for NVMeoF on the Host System

Before you begin

Configure the Server Profile with RoCE v2 vNIC and the IOMMU enabled BIOS policy.

Procedure


Step 1

Open the /etc/default/grub file for editing.

Step 2

Add intel_iommu=on to the end of GRUB_CMDLINE_LINUX.

sample /etc/default/grub configuration file after adding intel_iommu=on:
# cat /etc/default/grub
GRUB_TIMEOUT=5
GRUB_DISTRIBUTOR="$(sed 's, release .*$,,g' /etc/system-release)"
GRUB_DEFAULT=saved
GRUB_DISABLE_SUBMENU=true
GRUB_TERMINAL_OUTPUT="console"
GRUB_CMDLINE_LINUX="crashkernel=auto rd.lvm.lv=rhel/root rd.lvm.lv=rhel/swap biosdevname=1 rhgb quiet intel_iommu=on
GRUB_DISABLE_RECOVERY="true"

Step 3

After saving the file, generate a new grub.cfg file.

For Legacy boot:

# grub2-mkconfig -o /boot/grub2/grub.cfg

For UEFI boot:

# grub2-mkconfig -o /boot/grub2/efi/EFI/redhat/grub.cfg

Step 4

Reboot the server. You must reboot your server for the changes to take after enabling IOMMU.

Step 5

Verify the server is booted with intel_iommu=on option.

cat /proc/cmdline | grep iommu

Note its inclusion at the end of the output.


What to do next

Download the enic and enic_rdma drivers.

Installing Cisco enic and enic_rdma Drivers

The enic_rdma driver requires enic driver. When installing enic and enic_rdma drivers, download and use the matched set of enic and enic_rdma drivers on Cisco.com. Attempting to use the binary enic_rdma driver downloaded from Cisco.com with an inbox enic driver, will not work.

Procedure


Step 1

Install the enic and enic_rdma rpm packages:

# rpm -ivh kmod-enic-<version>.x86_64.rpm kmod-enic rdma-<version>.x86_64.rpm

Note


During enic_rdma installation, the enic_rdmalibnvdimm module may fail to install on RHEL 7.7 because the nvdimm-security.conf dracut module needs spaces in the add_drivers value. For workaround, please follow the instruction from the following links:

https://access.redhat.com/solutions/4386041

https://bugzilla.redhat.com/show_bug.cgi?id=1740383

Step 2

The enic_rdma driver is now installed but not loaded in the running kernel. Reboot the server to load enic_rdma driver into the running kernel.

Step 3

Verify the installation of enic_rdma driver and RoCE v2 interface:

Step 4

Load the nvme-rdma kernel module:

# modprobe nvme-rdma
After server reboot, nvme-rdma kernel module is unloaded. To load nvme-rdma kernel module every server reboot, create nvme_rdma.conf file using:
# echo nvme_rdma > /etc/modules-load.d/nvme_rdma.conf

Note


For more information about enic_rdma after installation, use the rpm -q -l kmod-enic_rdma command to extract the README file.


What to do next

Discover targets and connect to NVMe namespaces. If your system needs multipath access to the storage, go to the section for Setting Up Device Mapper Multipath.

Discovering the NVMe Target

Use this procedure to discover the NVMe target and connect NVMe namespaces.

Before you begin

Install nvme-cli version 1.6 or later if it is not installed already.


Note


Skip to Step 2 below if nvme-cli version 1.7 or later is installed.


Configure the IP address on the RoCE v2 interface and make sure the interface can ping the target IP.

Procedure


Step 1

Create an nvme folder in /etc, then manually generate host nqn.

# mkdir /etc/nvme
# nvme gen-hostnqn > /etc/nvme/hostnqn

Step 2

Create a settos.sh file and run the script to set priority flow control (PFC) in IB frames.

Note


To avoid failure of sending NVMeoF traffic, you must create and run this script after every server reboot.

# cat settos.sh
#!/bin/bash
for f in `ls /sys/class/infiniband`;
do
        echo "setting TOS for IB interface:" $f
        mkdir -p /sys/kernel/config/rdma_cm/$f/ports/1
        echo 186 > /sys/kernel/config/rdma_cm/$f/ports/1/default_roce_tos
done

Step 3

Discover the NVMe target by entering the following command.

nvme discover --transport=rdma --traddr=<IP address of transport target port>
For example, to discover the target at 50.2.85.200:
# nvme discover --transport=rdma --traddr=50.2.85.200

Discovery Log Number of Records 1, Generation counter 2
=====Discovery Log Entry 0======
trtype:  rdma
adrfam:  ipv4
subtype: nvme subsystem
treq:    not required
portid:  3
trsvcid: 4420
subnqn:  nqn.2010-06.com.purestorage:flasharray.9a703295ee2954e
traddr:  50.2.85.200
rdma_prtype: roce-v2
rdma_qptype: connected
rdma_cms:    rdma-cm
rdma_pkey: 0x0000

Note


To discover the NVMe target using IPv6, put the IPv6 target address next to the traddr option.

Step 4

Connect to the discovered NVMe target by entering the following command.

nvme connect --transport=rdma --traddr=<IP address of transport target port>> -n <subnqn value from nvme discover>
For example, to discover the target at 50.2.85.200 and the subnqn value found above:
# nvme connect --transport=rdma --traddr=50.2.85.200 -n nqn.2010-06.com.purestorage:flasharray.9a703295ee2954e

Note


To connect to the discovered NVMe target using IPv6, put the IPv6 target address next to the traddr option.

Step 5

Use the nvme list command to check mapped namespaces:

# nvme list
Node             SN                   Model                                    Namespace Usage                      Format           FW Rev
---------------- -------------------- ---------------------------------------- --------- -------------------------- ---------------- --------
/dev/nvme0n1     09A703295EE2954E     Pure Storage FlashArray                  72656       4.29  GB /   4.29  GB    512   B +  0 B   99.9.9
/dev/nvme0n2     09A703295EE2954E     Pure Storage FlashArray                  72657       5.37  GB /   5.37  GB    512   B +  0 B   99.9.9

Setting Up Device Mapper Multipath

If your system is configured with Device Mapper multipathing (DM Multipath), use the following steps to set up Device Mapper multipath.

Procedure


Step 1

Install the device-mapper-multipath package if it is not installed already

Step 2

Enable and start multipathd:

# mpathconf --enable --with_multipathd y

Step 3

Edit the etc/multipath.conf file to use the following values :

Step 4

Flush with the updated multipath device maps.

# multipath -F

Step 5

Restart multipath service:

# systemctl restart multipathd.service

Step 6

Rescan multipath devices:

# multipath -v2

Step 7

Check the multipath status:

# multipath -ll

Deleting the RoCE v2 Interface Using Cisco Intersight

Use these steps to remove the RoCE v2 interface.

Procedure


Step 1

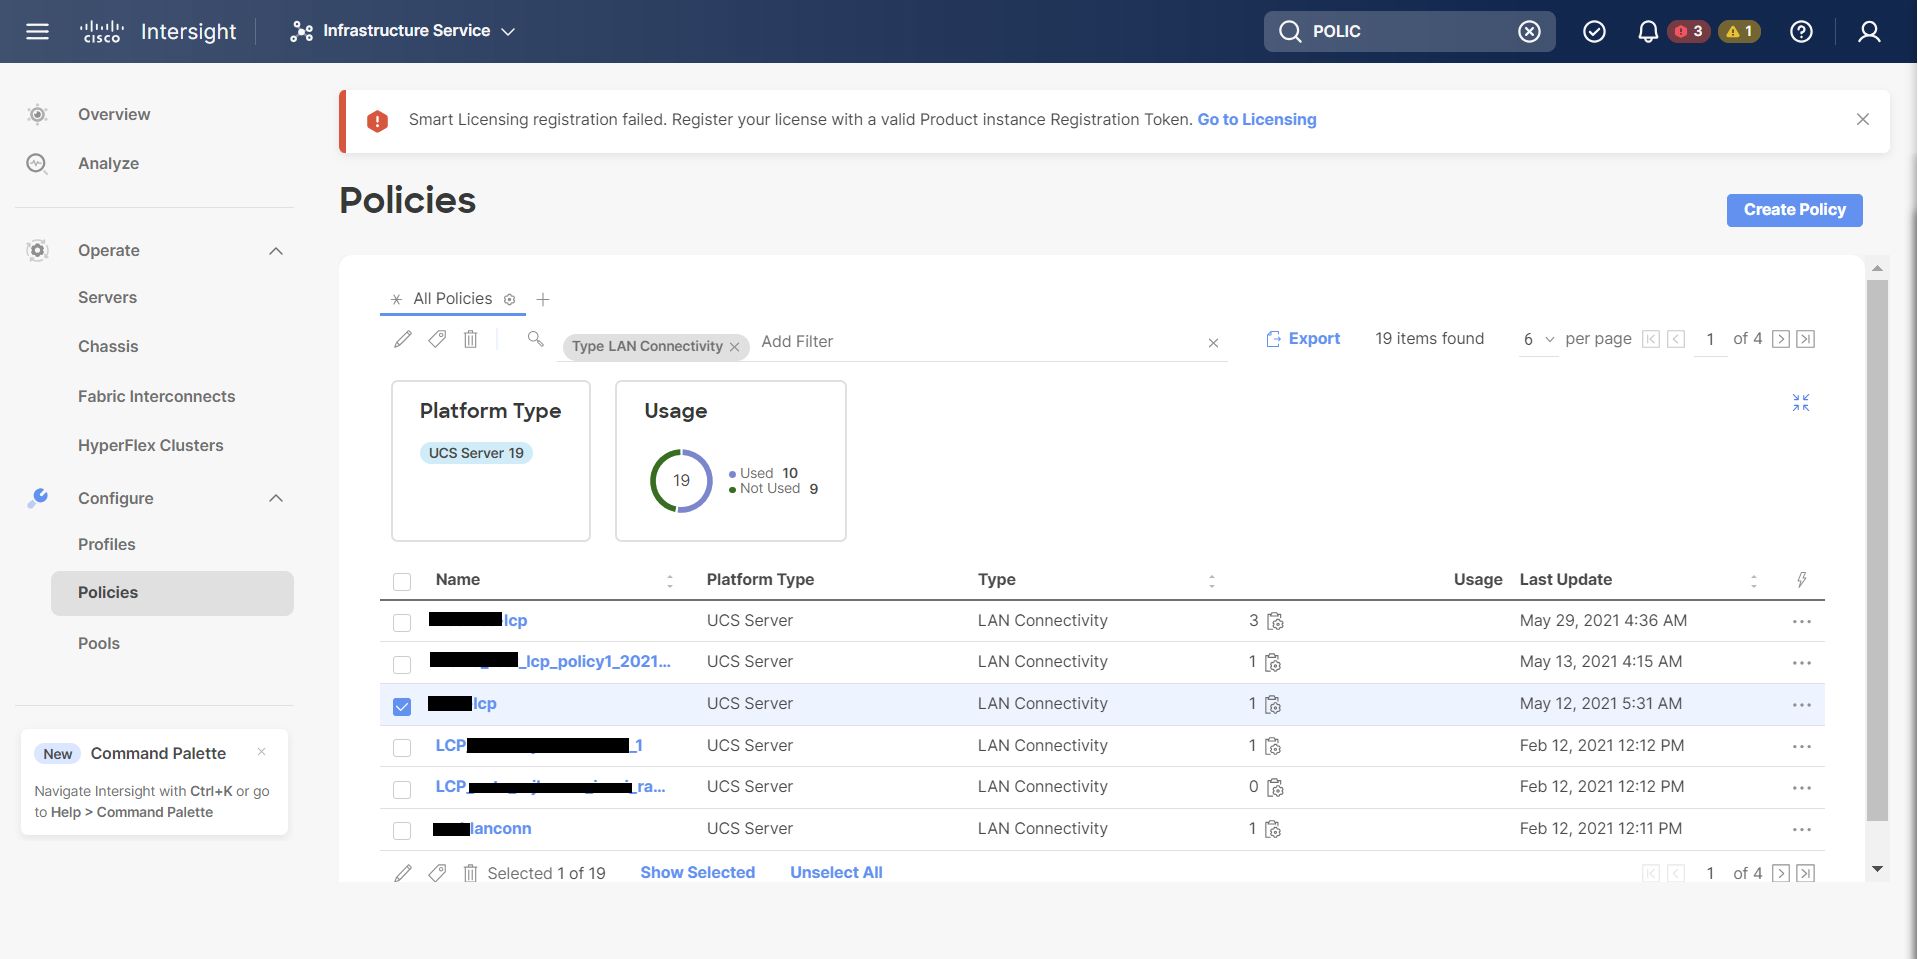
Navigate to CONFIGURE > Policies. In the Add Filter field, select Type: LAN Connectivity.

Step 2

Select the appropriate LAN Connectivity policy created for RoCE V2 configuration and use the delete icon on the top or bottom of the policy list.

Step 3

Click Delete to delete the policy.

Step 4

Upon deleting the RoCE v2 configuration, re-deploy the server profile and reboot the server.