Before You Start
Deploy and perform initial configuration of the management center. See the Cisco Firepower Management Center 1600, 2600, and 4600 Hardware Installation Guide or Cisco Secure Firewall Management Center Virtual Getting Started Guide.
The documentation set for this product strives to use bias-free language. For the purposes of this documentation set, bias-free is defined as language that does not imply discrimination based on age, disability, gender, racial identity, ethnic identity, sexual orientation, socioeconomic status, and intersectionality. Exceptions may be present in the documentation due to language that is hardcoded in the user interfaces of the product software, language used based on RFP documentation, or language that is used by a referenced third-party product. Learn more about how Cisco is using Inclusive Language.
Is This Chapter for You?
This chapter describes how to deploy a standalone threat defense logical device with the management center. To deploy a High Availability pair or a cluster, see the Firepower Management Center Configuration Guide.
In a typical deployment on a large network, you install multiple managed devices on network segments. Each device controls, inspects, monitors, and analyzes traffic, and then reports to a managing the management center. The management center provides a centralized management console with a web interface that you can use to perform administrative, management, analysis, and reporting tasks in service to securing your local network.
For networks that include only a single device or just a few, where you do not need to use a high-powered multiple-device manager like the management center, you can use the integrated device manager. Use the device manager web-based device setup wizard to configure the basic features of the software that are most commonly used for small network deployments.
Privacy Collection Statement—The Firepower 9300 does not require or actively collect personally-identifiable information. However, you can use personally-identifiable information in the configuration, for example for usernames. In this case, an administrator might be able to see this information when working with the configuration or when using SNMP.
Deploy and perform initial configuration of the management center. See the Cisco Firepower Management Center 1600, 2600, and 4600 Hardware Installation Guide or Cisco Secure Firewall Management Center Virtual Getting Started Guide.
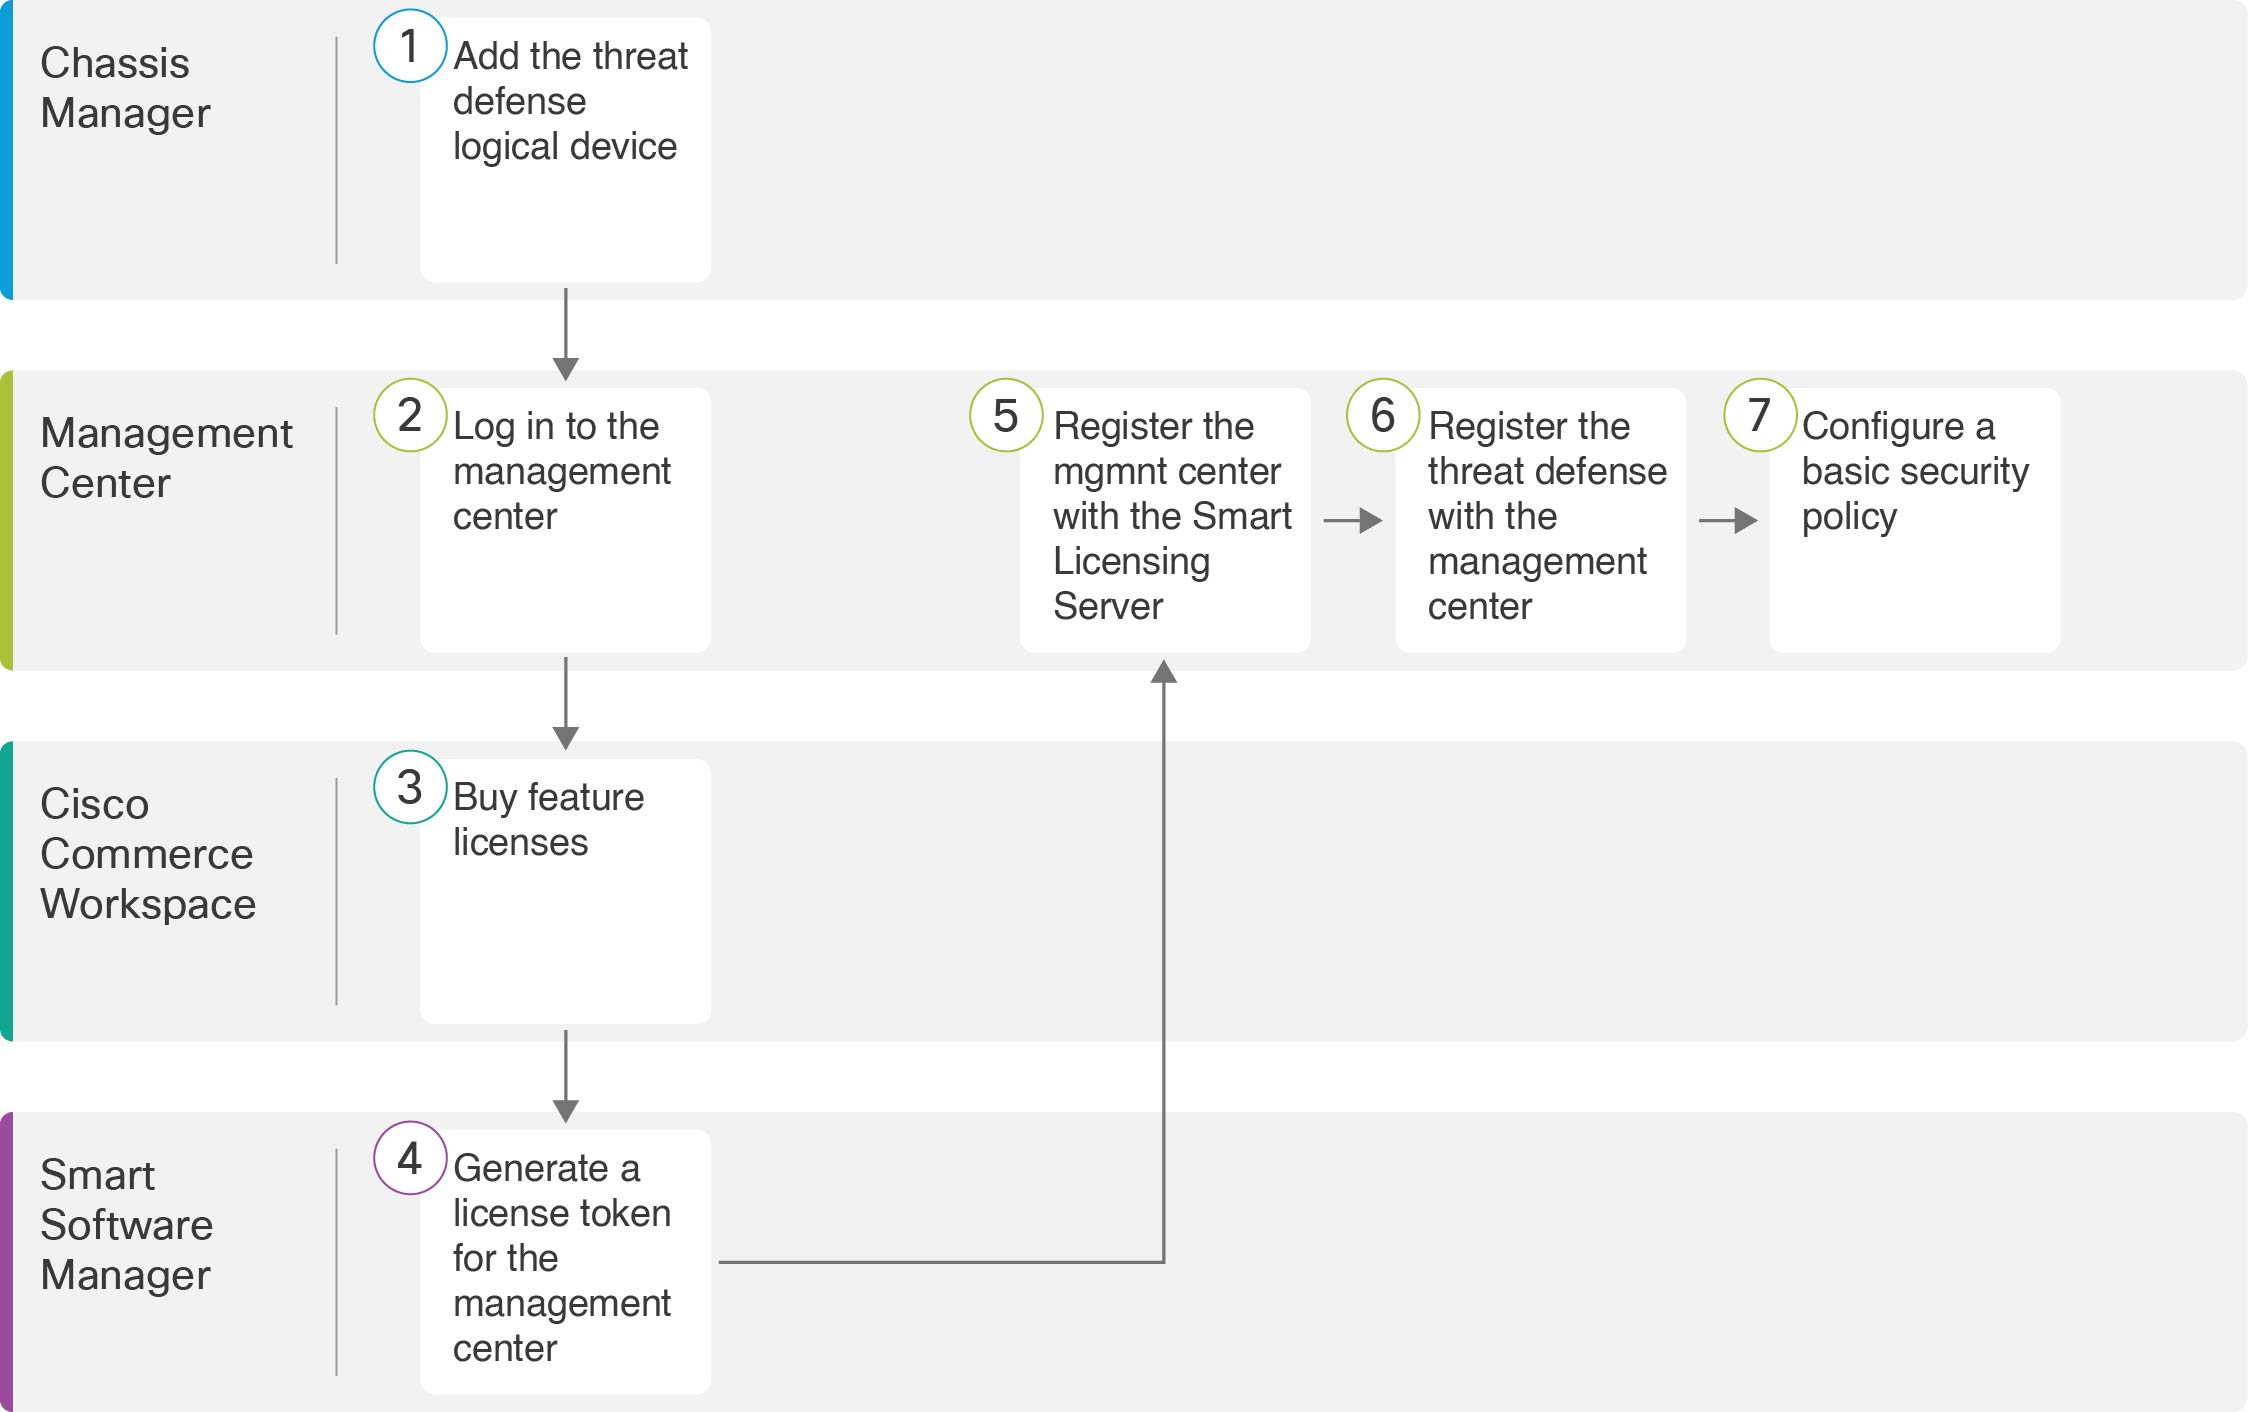
See the following tasks to deploy and configure the threat defense on your chassis.
|
Workspace |
Steps |
|
|---|---|---|
|
|
Chassis Manager |
|
|
|
Management Center |
|
|
|
Cisco Commerce Workspace |
Obtain Licenses for the Management Center: Buy feature licenses. |
|
|
Smart Software Manager |
Obtain Licenses for the Management Center: Generate a license token for the management center. |
|
|
Management Center |
Obtain Licenses for the Management Center: Register the management center with the Smart Licensing server. |
|
|
Management Center |
|
|
|
Management Center |
You can deploy the threat defense from the Firepower 9300 as either a native or container instance. You can deploy multiple container instances per security module, but only one native instance. See Logical Device Application Instances: Container or Native for the maximum container instances per model. You can use a native instance on some modules, and container instances on the other module(s).
To add a High Availability pair or a cluster, see the Firepower Management Center Configuration Guide.
This procedure lets you configure the logical device characteristics, including the bootstrap configuration used by the application.
Configure a Management interface to use with the threat defense; see Configure Interfaces. The Management interface is required. In 6.7 and later, you can later enable management from a data interface; but you must assign a Management interface to the logical device even if you don't intend to use it after you enable data management. Note that this Management interface is not the same as the chassis management port that is used only for chassis management (and that appears at the top of the Interfaces tab as MGMT).
You must also configure at least one Data interface.
For container instances, if you do not want to use the default profile, which uses the minimum resources, add a resource profile on .
For container instances, before you can install a container instance for the first time, you may need to reinitialize the
security module so that the disk has the correct formatting. If this action is required, you will not be able to save your logical device.
Click Security Modules, and then click the Reinitialize icon ( ).
).
Gather the following information:
Interface IDs for this device
Management interface IP address and network mask
Gateway IP address
Management Center IP address and/or NAT ID of your choosing
DNS server IP address
|
Step 1 |
In the chassis manager, choose Logical Devices. |
|
Step 2 |
Click , and set the following parameters: 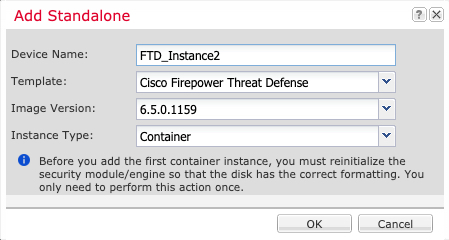 |
|
Step 3 |
Expand the Data Ports area, and click each interface that you want to assign to the device. 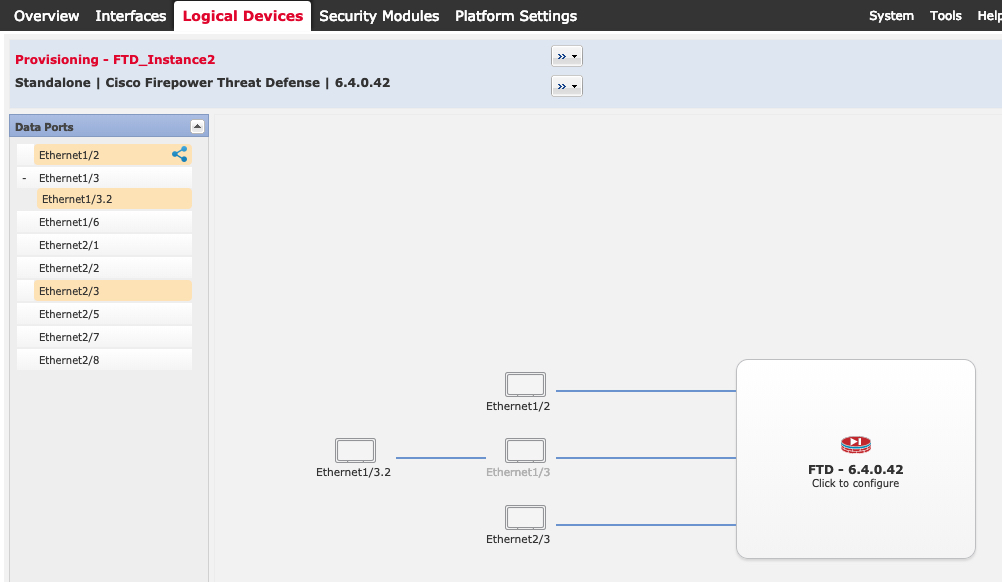 You can only assign Data and Data-sharing interfaces that you previously enabled on the Interfaces page. You will later enable and configure these interfaces in the management center, including setting the IP addresses. You can only assign up to 10 Data-sharing interfaces to a container instance. Also, each Data-sharing interface can be assigned
to at most 14 container instances. A Data-sharing interface is indicated by the sharing icon ( Hardware Bypass–capable ports are shown with the following icon: |
|
Step 4 |
Click the device icon in the center of the screen. A dialog box appears where you can configure initial bootstrap settings. These settings are meant for initial deployment only, or for disaster recovery. For normal operation, you can later change most values in the application CLI configuration. |
|
Step 5 |
On the General Information page, complete the following: 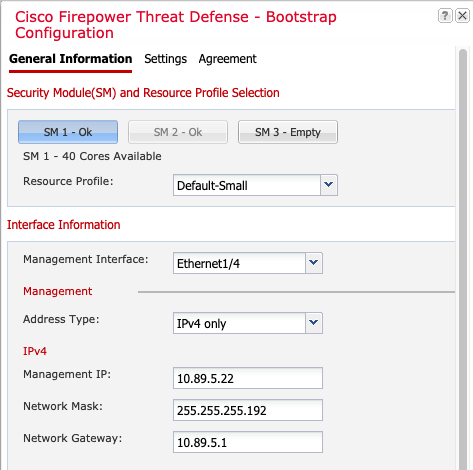 |
|
Step 6 |
On the Settings tab, complete the following: 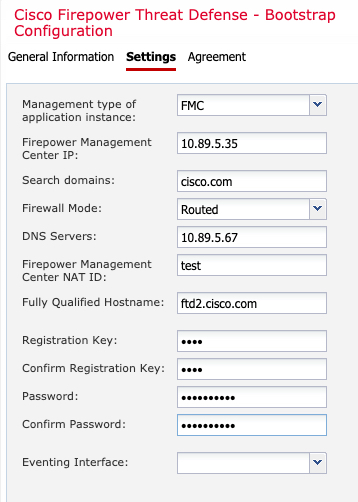 |
|
Step 7 |
On the Agreement tab, read and accept the end user license agreement (EULA). |
|
Step 8 |
Click OK to close the configuration dialog box. |
|
Step 9 |
Click Save. The chassis deploys the logical device by downloading the specified software version and pushing the bootstrap configuration and management interface settings to the application instance. Check the Logical Devices page for the status of the new logical device. When the logical device shows its Status as online, you can start configuring the security policy in the application. 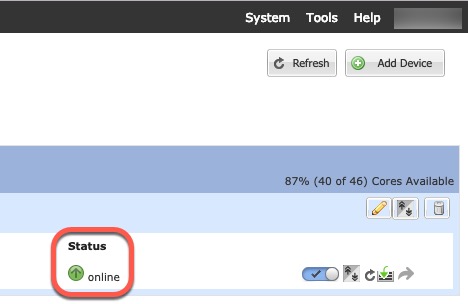 |
Use the management center to configure and monitor the threat defense.
For information on supported browsers, refer to the release notes for the version you are using (see https://www.cisco.com/go/firepower-notes).
|
Step 1 |
Using a supported browser, enter the following URL. https://fmc_ip_address |
|
Step 2 |
Enter your username and password. |
|
Step 3 |
Click Log In. |
All licenses are supplied to the threat defense by the management center. You can purchase the following licenses:
IPS—Security Intelligence and Next-Generation IPS
Malware Defense—Malware defense
URL—URL Filtering
Cisco Secure Client—Secure Client Advantage, Secure Client Premier, or Secure Client VPN Only
Carrier—Diameter, GTP/GPRS, M3UA, SCTP
For a more detailed overview on Cisco Licensing, go to cisco.com/go/licensingguide
Have a master account on the Smart Software Manager.
If you do not yet have an account, click the link to set up a new account. The Smart Software Manager lets you create a master account for your organization.
Your Smart Software Licensing account must qualify for the Strong Encryption (3DES/AES) license to use some features (enabled using the export-compliance flag).
|
Step 1 |
Make sure your Smart Licensing account contains the available licenses you need. When you bought your device from Cisco or a reseller, your licenses should have been linked to your Smart Software License account. However, if you need to add licenses yourself, use the Find Products and Solutions search field on the Cisco Commerce Workspace. Search for the following license PIDs: 
|
||
|
Step 2 |
If you have not already done so, register the management center with the Smart Licensing server. Registering requires you to generate a registration token in the Smart Software Manager. See the Cisco Secure Firewall Management Center Administration Guide for detailed instructions. |
Register each logical device individually to the same management center.
Make sure the threat defense logical device Status is online on the chassis manager Logical Devices page.
Gather the following information that you set in the threat defense initial bootstrap configuration (see Chassis Manager: Add the Threat Defense Logical Device):
The threat defense management IP address or hostname, and NAT ID
The management center registration key
In 6.7 and later, if you want to use a data interface for management, use the configure network management-data-interface command at the threat defense CLI. See the Cisco Secure Firewall Threat Defense Command Reference for more information.
|
Step 1 |
In the management center, choose . |
||
|
Step 2 |
From the Add drop-down list, choose Add Device. 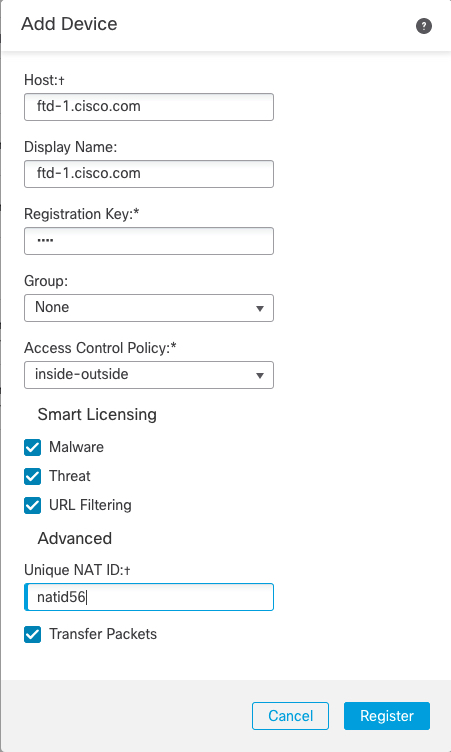 Set the following parameters:
|
||
|
Step 3 |
Click Register, or if you want to add another device, click Register and Add Another and confirm a successful registration. If the registration succeeds, the device is added to the list. If it fails, you will see an error message. If the threat defense fails to register, check the following items:
For more troubleshooting information, see https://cisco.com/go/fmc-reg-error. |
This section describes how to configure a basic security policy with the following settings:
Inside and outside interfaces—Assign a static IP address to the inside interface, and use DHCP for the outside interface.
DHCP server—Use a DHCP server on the inside interface for clients.
Default route—Add a default route through the outside interface.
NAT—Use interface PAT on the outside interface.
Access control—Allow traffic from inside to outside.
To configure a basic security policy, complete the following tasks.
|
|
|
|
|
|
|
|
|
|
|
|
|
|
|
|
|
Enable the threat defense interfaces, assign them to security zones, and set the IP addresses. Typically, you must configure at least a minimum of two interfaces to have a system that passes meaningful traffic. Normally, you would have an outside interface that faces the upstream router or internet, and one or more inside interfaces for your organization’s networks. Some of these interfaces might be “demilitarized zones” (DMZs), where you place publically-accessible assets such as your web server.
A typical edge-routing situation is to obtain the outside interface address through DHCP from your ISP, while you define static addresses on the inside interfaces.
The following example configures a routed mode inside interface with a static address and a routed mode outside interface using DHCP.
|
Step 1 |
Choose , and click the Edit ( |
||
|
Step 2 |
Click Interfaces.  |
||
|
Step 3 |
Click Edit ( The General tab appears. 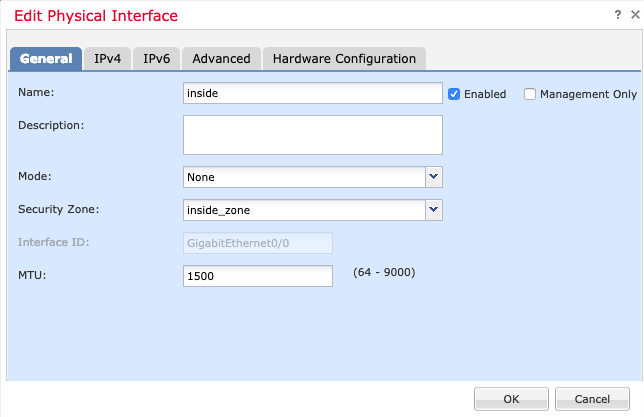 |
||
|
Step 4 |
Click the Edit ( The General tab appears. 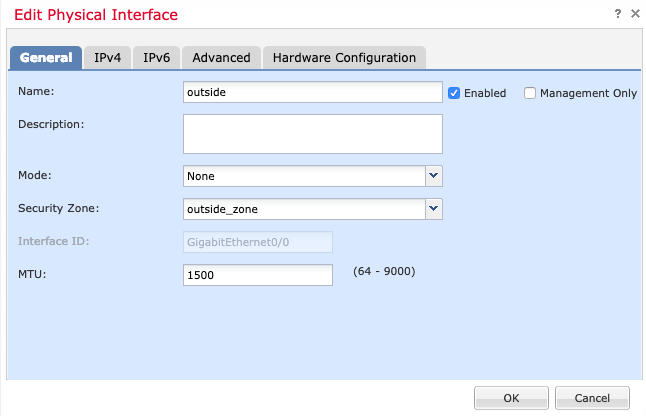
|
||
|
Step 5 |
Click Save. |
Enable the DHCP server if you want clients to use DHCP to obtain IP addresses from the threat defense.
|
Step 1 |
Choose , and click the Edit ( |
|
Step 2 |
Choose . |
|
Step 3 |
On the Server page, click Add, and configure the following options: 
|
|
Step 4 |
Click OK. |
|
Step 5 |
Click Save. |
The default route normally points to the upstream router reachable from the outside interface. If you use DHCP for the outside interface, your device might have already received a default route. If you need to manually add the route, complete this procedure. If you received a default route from the DHCP server, it will show in the IPv4 Routes or IPv6 Routes table on the page.
|
Step 1 |
Choose , and click the Edit ( |
|
Step 2 |
Choose , click Add Route, and set the following: 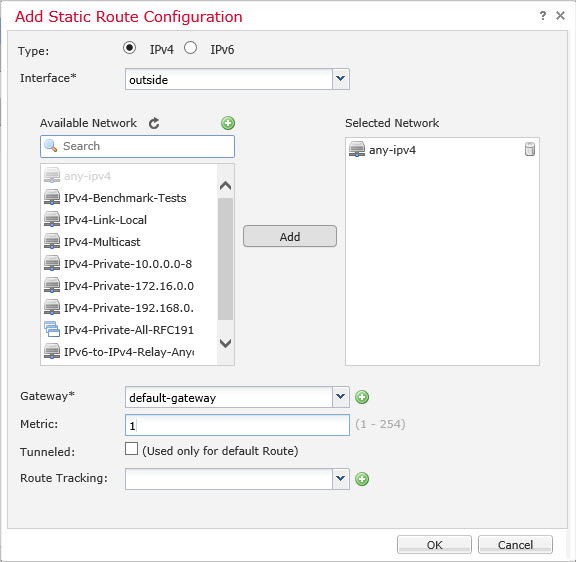
|
|
Step 3 |
Click OK. The route is added to the static route table.  |
|
Step 4 |
Click Save. |
A typical NAT rule converts internal addresses to a port on the outside interface IP address. This type of NAT rule is called interface Port Address Translation (PAT).
|
Step 1 |
Choose , and click . |
||
|
Step 2 |
Name the policy, select the device(s) that you want to use the policy, and click Save. 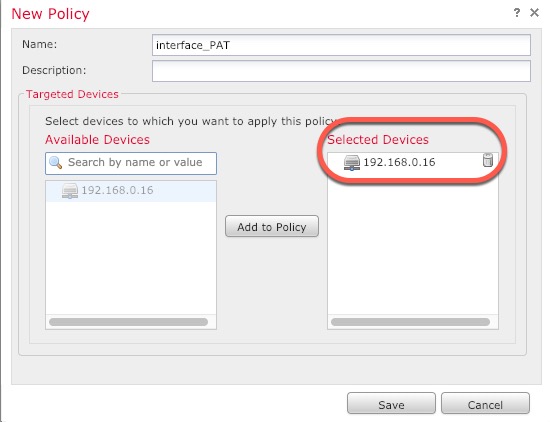 The policy is added the management center. You still have to add rules to the policy. |
||
|
Step 3 |
Click Add Rule. The Add NAT Rule dialog box appears. |
||
|
Step 4 |
Configure the basic rule options: 
|
||
|
Step 5 |
On the Interface Objects page, add the outside zone from the Available Interface Objects area to the Destination Interface Objects area. 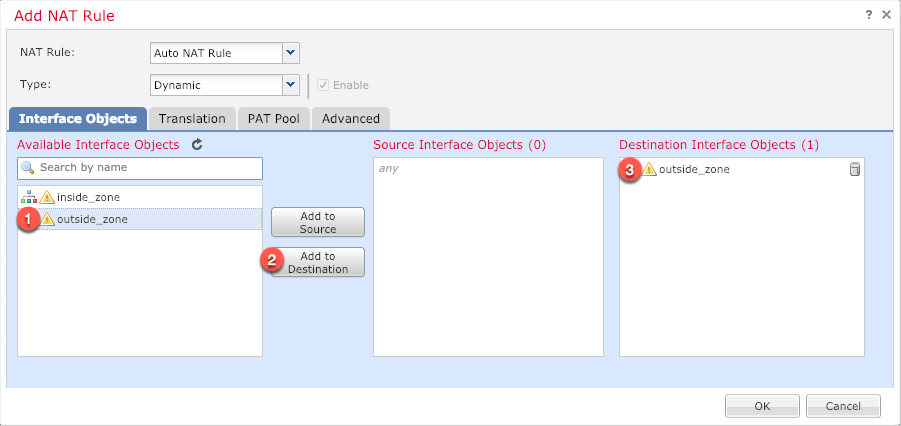 |
||
|
Step 6 |
On the Translation page, configure the following options: 
|
||
|
Step 7 |
Click Save to add the rule. The rule is saved to the Rules table.  |
||
|
Step 8 |
Click Save on the NAT page to save your changes. |
If you created a basic Block all traffic access control policy when you registered the threat defense, then you need to add rules to the policy to allow traffic through the device. The following procedure adds a rule to allow traffic from the inside zone to the outside zone. If you have other zones, be sure to add rules allowing traffic to the appropriate networks.
|
Step 1 |
Choose , and click the Edit ( |
|
Step 2 |
Click Add Rule, and set the following parameters: 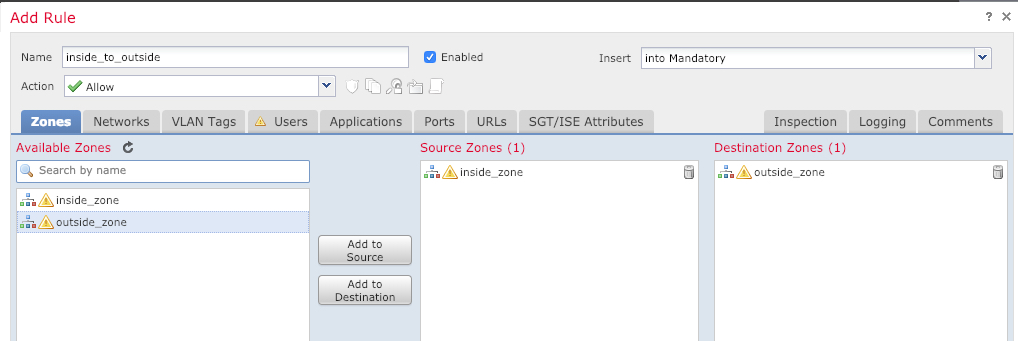
Leave the other settings as is. |
|
Step 3 |
Click Add. The rule is added to the Rules table.  |
|
Step 4 |
Click Save. |
Deploy the configuration changes to the threat defense; none of your changes are active on the device until you deploy them.
|
Step 1 |
Click Deploy in the upper right. 
|
|
Step 2 |
Either click Deploy All to deploy to all devices or click Advanced Deploy to deploy to selected devices. 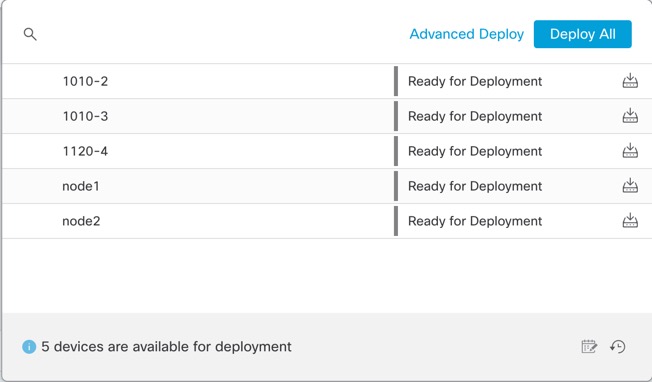

|
|
Step 3 |
Ensure that the deployment succeeds. Click the icon to the right of the Deploy button in the menu bar to see status for deployments. 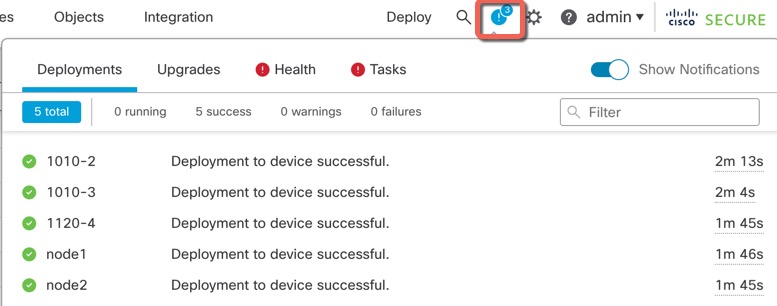
|
You can use the threat defense CLI to change management interface parameters and for troubleshooting purposes. You can access the CLI using SSH to the Management interface, or by connecting from the FXOS CLI.
|
Step 1 |
(Option 1) SSH directly to the threat defense management interface IP address. You set the management IP address when you deployed the logical device. Log into the threat defense with the admin account and the password you set during initial deployment. If you forgot the password, you can change it by editing the logical device in the chassis manager. |
|
Step 2 |
(Option 2) From the FXOS CLI, connect to the module CLI using a console connection or a Telnet connection. |
The following example connects to the threat defense on security module 1 and then exits back to the supervisor level of the FXOS CLI.
Firepower# connect module 1 console
Telnet escape character is '~'.
Trying 127.5.1.1...
Connected to 127.5.1.1.
Escape character is '~'.

CISCO Serial Over LAN:
Close Network Connection to Exit

Firepower-module1>connect ftd FTD_Instance1
============================= ATTENTION ==============================
You are connecting to ftd from a serial console. Please avoid
executing any commands which may produce large amount of output.
Otherwise, data cached along the pipe may take up to 12 minutes to be
drained by a serial console at 9600 baud rate after pressing Ctrl-C.
To avoid the serial console, please login to FXOS with ssh and use
'connect module <slot> telnet' to connect to the security module.
======================================================================
Connecting to container ftd(FTD_Instance1) console... enter "exit" to return to bootCLI
> ~
telnet> quit
Connection closed.
Firepower#
To continue configuring your threat defense, see the documents available for your software version at Navigating the Cisco Firepower Documentation.
For information related to using the management center, see the Firepower Management Center Configuration Guide.
|
Feature Name |
Version |
Feature Information |
||
|---|---|---|---|---|
|
Support for ASA and threat defense on separate modules of the same Firepower 9300 |
6.4 |
You can now deploy the ASA and the threat defense logical devices on the same Firepower 9300.
|
||
|
Multi-instance capability for threat defense on the Firepower 4100/9300 |
6.3.0 |
You can now deploy multiple logical devices, each with the threat defense container instance, on a single security engine/module. Formerly, you could only deploy a single native application instance. To provide flexible physical interface use, you can create VLAN subinterfaces in FXOS and also share interfaces between multiple instances. Resource management lets you customize performance capabilities for each instance. You can use High Availability using a container instance on 2 separate chassis. Clustering is not supported.
New/Modified management center screens:
New/Modified chassis manager screens:
|