VPN Basics
Tunneling makes it possible to use a public TCP/IP network, such as the Internet, to create secure connections between remote users and private corporate networks. Each secure connection is called a tunnel.
IPsec-based VPN technologies use the Internet Security Association and Key Management Protocol (ISAKMP, or IKE) and IPsec tunneling standards to build and manage tunnels. ISAKMP and IPsec accomplish the following:
-
Negotiate tunnel parameters.
-
Establish tunnels.
-
Authenticate users and data.
-
Manage security keys.
-
Encrypt and decrypt data.
-
Manage data transfer across the tunnel.
-
Manage data transfer inbound and outbound as a tunnel endpoint or router.
A device in a VPN functions as a bidirectional tunnel endpoint. It can receive plain packets from the private network, encapsulate them, create a tunnel, and send them to the other end of the tunnel where they are unencapsulated and sent to their final destination. It can also receive encapsulated packets from the public network, unencapsulate them, and send them to their final destination on the private network.
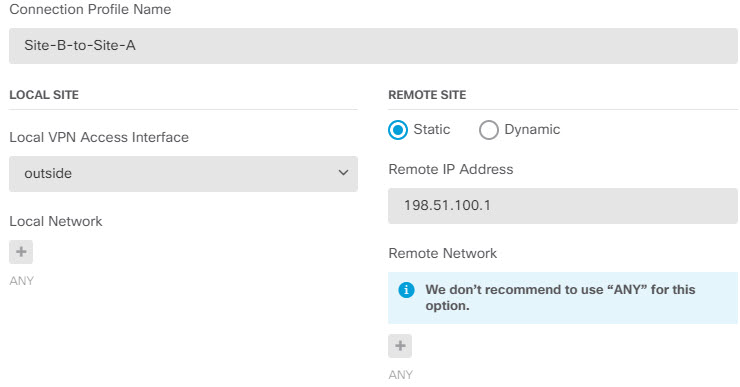
After the site-to-site VPN connection is established, the hosts behind the local gateway can connect to the hosts behind the remote gateway through the secure VPN tunnel. A connection consists of the IP addresses and hostnames of the two gateways, the subnets behind them, and the method the two gateways use to authenticate to each other.
Internet Key Exchange (IKE)
Internet Key Exchange (IKE) is a key management protocol that is used to authenticate IPsec peers, negotiate and distribute IPsec encryption keys, and to automatically establish IPsec security associations (SAs).
The IKE negotiation comprises two phases. Phase 1 negotiates a security association between two IKE peers, which enables the peers to communicate securely in Phase 2. During Phase 2 negotiation, IKE establishes SAs for other applications, such as IPsec. Both phases use proposals when they negotiate a connection.
An IKE policy is a set of algorithms that two peers use to secure the IKE negotiation between them. IKE negotiation begins by each peer agreeing on a common (shared) IKE policy. This policy states which security parameters protect subsequent IKE negotiations. For IKE version 1 (IKEv1), IKE policies contain a single set of algorithms and a modulus group. Unlike IKEv1, in an IKEv2 policy, you can select multiple algorithms and modulus groups from which peers can choose during the Phase 1 negotiation. It is possible to create a single IKE policy, although you might want different policies to give higher priority to your most desired options. For site-to-site VPNs, you can create a single IKE policy.
To define an IKE policy, specify:
-
A unique priority (1 to 65,543, with 1 the highest priority).
-
An encryption method for the IKE negotiation, to protect the data and ensure privacy.
-
A Hashed Message Authentication Codes (HMAC) method (called integrity algorithm in IKEv2) to ensure the identity of the sender, and to ensure that the message has not been modified in transit.
-
For IKEv2, a separate pseudorandom function (PRF) used as the algorithm to derive keying material and hashing operations required for the IKEv2 tunnel encryption. The options are the same as those used for the hash algorithm.
-
A Diffie-Hellman group to determine the strength of the encryption-key-determination algorithm. The device uses this algorithm to derive the encryption and hash keys.
-
An authentication method, to ensure the identity of the peers.
-
A limit to the time the device uses an encryption key before replacing it.
When IKE negotiation begins, the peer that starts the negotiation sends all of its enabled policies to the remote peer, and the remote peer searches for a match with its own policies, in priority order. A match between IKE policies exists if they have the same encryption, hash (integrity and PRF for IKEv2), authentication, and Diffie-Hellman values, and an SA lifetime less than or equal to the lifetime in the policy sent. If the lifetimes are not identical, the shorter lifetime, obtained from the remote peer, applies. By default, a simple IKE policy that uses DES is the only enabled policy. You can enable other IKE policies at higher priorities to negotiate stronger encryption standards, but the DES policy should ensure a successful negotiation.
How Secure Should a VPN Connection Be?
Because a VPN tunnel typically traverses a public network, most likely the Internet, you need to encrypt the connection to protect the traffic. You define the encryption and other security techniques to apply using IKE polices and IPsec proposals.
If your device license allows you to apply strong encryption, there is a wide range of encryption and hash algorithms, and Diffie-Hellman groups, from which to choose. However, as a general rule, the stronger the encryption that you apply to the tunnel, the worse the system performance. Find a balance between security and performance that provides sufficient protection without compromising efficiency.
We cannot provide specific guidance on which options to choose. If you operate within a larger corporation or other organization, there might already be defined standards that you need to meet. If not, take the time to research the options.
The following topics explain the available options.
Deciding Which Encryption Algorithm to Use
When deciding which encryption algorithms to use for the IKE policy or IPsec proposal, your choice is limited to algorithms supported by the devices in the VPN.
For IKEv2, you can configure multiple encryption algorithms. The system orders the settings from the most secure to the least secure and negotiates with the peer using that order. For IKEv1, you can select a single option only.
For IPsec proposals, the algorithm is used by the Encapsulating Security Protocol (ESP), which provides authentication, encryption, and anti-replay services. ESP is IP protocol type 50. In IKEv1 IPsec proposals, the algorithm name is prefixed with ESP-.
If your device license qualifies for strong encryption, you can choose from the following encryption algorithms. If you are not qualified for strong encryption, you can select DES only.
 Note |
If you are qualified for strong encryption, before upgrading from the evaluation license to a smart license, check and update your encryption algorithms for stronger encryption so that the VPN configuration works properly. Choose AES-based algorithms. DES is not supported if you are registered using an account that supports strong encryption. After registration, you cannot deploy changes until you remove all uses of DES. |
-
AES-GCM—(IKEv2 only.) Advanced Encryption Standard in Galois/Counter Mode is a block cipher mode of operation providing confidentiality and data-origin authentication, and provides greater security than AES. AES-GCM offers three different key strengths: 128-, 192-, and 256-bit keys. A longer key provides higher security but a reduction in performance. GCM is a mode of AES that is required to support NSA Suite B. NSA Suite B is a set of cryptographic algorithms that devices must support to meet federal standards for cryptographic strength. .
-
AES—Advanced Encryption Standard is a symmetric cipher algorithm that provides greater security than DES and is computationally more efficient than 3DES. AES offers three different key strengths: 128-, 192-, and 256-bit keys. A longer key provides higher security but a reduction in performance.
-
DES—Data Encryption Standard, which encrypts using 56-bit keys, is a symmetric secret-key block algorithm. If your license account does not meet the requirements for export controls, this is your only option.
-
Null, ESP-Null—Do not use. A null encryption algorithm provides authentication without encryption. This is not supported on most platforms.
Deciding Which Hash Algorithms to Use
In IKE policies, the hash algorithm creates a message digest, which is used to ensure message integrity. In IKEv2, the hash algorithm is separated into two options, one for the integrity algorithm, and one for the pseudo-random function (PRF).
In IPsec proposals, the hash algorithm is used by the Encapsulating Security Protocol (ESP) for authentication. In IKEv2 IPsec Proposals, this is called the integrity hash. In IKEv1 IPsec proposals, the algorithm name is prefixed with ESP-, and there is also an -HMAC suffix (which stands for “hash method authentication code”).
For IKEv2, you can configure multiple hash algorithms. The system orders the settings from the most secure to the least secure and negotiates with the peer using that order. For IKEv1, you can select a single option only.
You can choose from the following hash algorithms.
-
SHA (Secure Hash Algorithm)—Standard SHA (SHA1) produces a 160-bit digest.
The following SHA-2 options, which are even more secure, are available for IKEv2 configurations. Choose one of these if you want to implement the NSA Suite B cryptography specification.
-
SHA256—Specifies the Secure Hash Algorithm SHA 2 with the 256-bit digest.
-
SHA384—Specifies the Secure Hash Algorithm SHA 2 with the 384-bit digest.
-
SHA512—Specifies the Secure Hash Algorithm SHA 2 with the 512-bit digest.
-
-
Null or None (NULL, ESP-NONE)—(IPsec Proposals only.) A null Hash Algorithm; this is typically used for testing purposes only. However, you should choose the null integrity algorithm if you select one of the AES-GCM options as the encryption algorithm. Even if you choose a non-null option, the integrity hash is ignored for these encryption standards.
Deciding Which Diffie-Hellman Modulus Group to Use
You can use the following Diffie-Hellman key derivation algorithms to generate IPsec security association (SA) keys. Each group has a different size modulus. A larger modulus provides higher security, but requires more processing time. You must have a matching modulus group on both peers.
If you select AES encryption, to support the large key sizes required by AES, you should use Diffie-Hellman (DH) Group 5 or higher. IKEv1 policies do not support all of the groups listed below.
To implement the NSA Suite B cryptography specification, use IKEv2 and select one of the elliptic curve Diffie-Hellman (ECDH) options: 19, 20, or 21. Elliptic curve options and groups that use 2048-bit modulus are less exposed to attacks such as Logjam.
For IKEv2, you can configure multiple groups. The system orders the settings from the most secure to the least secure and negotiates with the peer using that order. For IKEv1, you can select a single option only.
-
14—Diffie-Hellman Group 14: 2048-bit modular exponential (MODP) group. Considered good protection for 192-bit keys.
-
15—Diffie-Hellman Group 15: 3072-bit MODP group.
-
16—Diffie-Hellman Group 16: 4096-bit MODP group.
-
19—Diffie-Hellman Group 19: National Institute of Standards and Technology (NIST) 256-bit elliptic curve modulo a prime (ECP) group.
-
20—Diffie-Hellman Group 20: NIST 384-bit ECP group.
-
21—Diffie-Hellman Group 21: NIST 521-bit ECP group.
-
31—Diffie-Hellman Group 31: Curve25519 256-bit EC Group.
Deciding Which Authentication Method to Use
You can use the following methods to authenticate the peers in a site-to-site VPN connection.
- Preshared Keys
-
Preshared keys are secret key strings configured on each peer in the connection. These keys are used by IKE during the authentication phase. For IKEv1, you must configure the same preshared key on each peer. For IKEv2, you can configure unique keys on each peer.
Preshared keys do not scale well compared to certificates. If you need to configure a large number of site-to-site VPN connections, use the certificate method instead of the preshared key method.
- Certificates
-
Digital certificates use RSA key pairs to sign and encrypt IKE key management messages. When you configure each end of the site-to-site VPN connection, you select the local device’s identity certificate, so the remote peer can authenticate the local peer.
To use the certificate method, you need to do the following:
-
Enroll your local peer with a Certificate Authority (CA) and obtain a device identity certificate. Upload this certificate to the device. For more information, see Uploading Internal and Internal CA Certificates.
If you also are responsible for the remote peer, also enroll that peer. Although using the same CA for the peers is convenient, it is not a requirement.
You cannot use a self-signed certificate to establish a VPN connection. You must enroll the device with a Certificate Authority.
If you use a Windows Certificate Authority (CA) to create certificates for site-to-site VPN endpoints, you must use a certificate that specifies IP security end system for the Application Policies extension. You can find this on the certificate's Properties dialog box on the Extensions tab (on the Windows CA server). The default for this extension is IP security IKE intermediate, which does not work for a site-to-site VPN configured using FDM.
-
Upload the trusted CA certificate that was used to sign the local peer’s identity certificate. If you used an intermediate CA, upload the full chain, including the root and intermediate certificates. For more information, see Uploading Trusted CA Certificates.
-
If the remote peer was enrolled with a different CA, also upload the trusted CA certificate used to sign the remote peer’s identity certificate. Obtain the certificate from the organization that controls the remote peer. If they used an intermediate CA, upload the full chain, including the root and intermediate certificates.
-
When you configure the site-to-site VPN connection, select the certificate method, and then select the local peer’s identity certificate. Each end of the connection specifies the certificate for the local end of the connection; you do not specify the certificate for the remote peer.
-
VPN Topologies
You can configure only point-to-point VPN connections using FDM. Although all connections are point-to-point, you can link into larger hub-and-spoke or meshed VPNs by defining each of the tunnels in which your device participates.
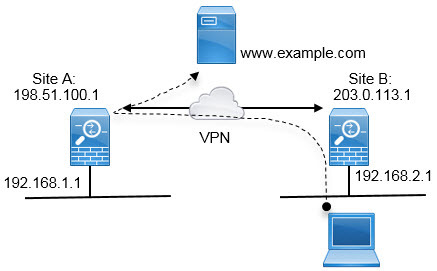
The following diagram displays a typical point-to-point VPN topology. In a point-to-point VPN topology, two endpoints communicate directly with each other. You configure the two endpoints as peer devices, and either device can start the secured connection.

Establishing Site-to-Site VPN Connections with Dynamically-Addressed Peers
You can create site-to-site VPN connections to peers even when you do not know the peer’s IP address. This can be useful in the following situations:
-
If the peer obtains its address using DHCP, you cannot depend on the remote endpoint having a specific static IP address.
-
When you want to allow an indeterminate number of remote peers to establish a connection with the device, which will serve as a hub in a hub-and-spoke topology.
When you need to establish a secure connection to a dynamically-addressed peer B, you need to ensure that your end of the connection, A, has a static IP address. Then, when you create the connection on A, specify that the peer’s address is dynamic. However, when you configure the connection on the peer B, ensure that you enter the IP address for A as the remote-peer address.
When the system establishes site-to-site VPN connections, any connections where the peer has a dynamic address will be response-only. That is, the remote peer must be the one that initiates the connection. When the remote peer attempts to establish the connection, your device validates the connection using the preshared key or the certificate, whichever method you defined in the connection.
Because the VPN connection is established only after the remote peer initiates the connection, any outbound traffic that matches access control rules that allow traffic in the VPN tunnel will be dropped until that connection is established. This ensures that data does not leave your network without the appropriate encryption and VPN protection.
Virtual Tunnel Interfaces and Route-Based VPN
Traditionally, you configure a site-to-site VPN connection by defining the specific local and remote networks that will be encrypted over the VPN tunnel. These are defined in a crypto map that is part of the VPN connection profile. This type of site-to-site VPN is called policy-based.
Alternatively, you can configure a route-based site-to-site VPN. In this case, you create a Virtual Tunnel Interface (VTI), which is a virtual interface that is associated with a specific physical interface, typically the outside interface. Then, you use the routing table, with static and dynamic routes, to direct desirable traffic to the VTI. Any traffic routed through the VTI (egressing) is encrypted over the VPN tunnel that you configure for the VTI.
Thus, with route-based site-to-site VPN, you can manage the protected networks in a given VPN connection by simply changing the routing table, without altering the VPN connection profile at all. You do not need to keep track of remote networks and update the VPN connection profile to account for these changes. This simplifies VPN management for cloud service providers and large enterprises.
In addition, you can create access control rules for the VTI to fine-tune the types of traffic allowed in the tunnel. For example, you can apply intrusion inspection, and URL and application filtering.
Overview Process for Configuring Route-Based VPNs
As an overview, the process for setting up a route-based site-to-site VPN includes the following steps:
Procedure
|
Step 1 |
Create the IKEv1/2 policy and IPsec proposal for the local endpoint. |
|
Step 2 |
Create a Virtual Tunnel Interface (VTI) associated with the physical interface that faces the remote peer. |
|
Step 3 |
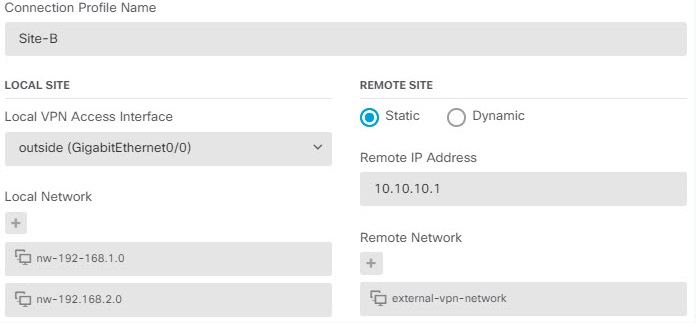
Create the site-to-site VPN connection profile that uses the VTI, IKE policy, and IPsec proposal. |
|
Step 4 |
Create the same IKE and IPsec proposals on the remote peer, and a remote VTI, and the site-to-site VPN connection profile that specifies this local VTI as the remote endpoint (from the point of view of the remote peer). |
|
Step 5 |
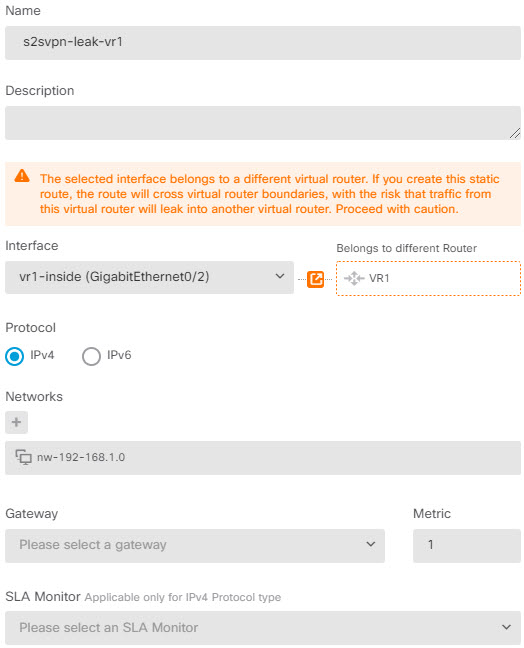
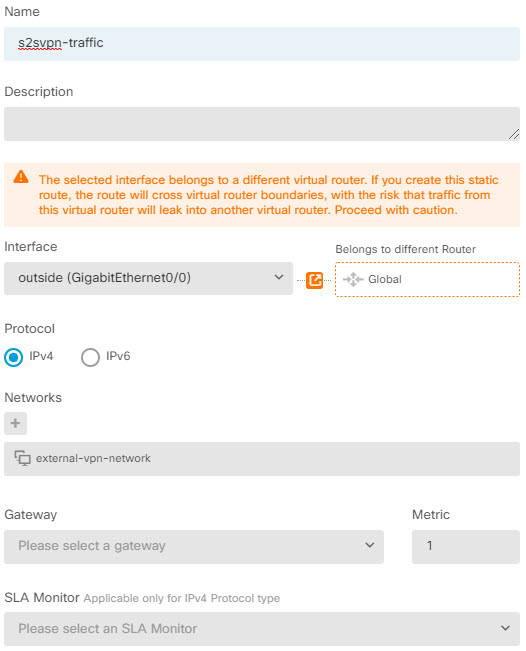
Create routes and access control rules on both peers to send the appropriate traffic through the tunnel. Ensure that the routes and access control on each endpoint mirror each other, to allow traffic to flow in both directions. Static routes would have these general characteristics:
|
Guidelines for Virtual Tunnel Interfaces and Route-Based VPN
IPv6 Guidelines
Virtual tunnel interfaces support IPv4 addresses only. You cannot configure an IPv6 address on a VTI.
Additional Guilelines
-
You can create a maximum of 1024 VTIs.
-
You cannot configure reverse route injection, either static or dynamic, on a VTI route-based VPN. (You can configure reverse route injection using the FTD API only.)
-
You cannot configure a dynamic peer address when you select a VTI as the local interface.
-
You cannot configure remote backup peers when you select a VTI as the local interface.
-
You cannot create a VTI for a source interface that is assigned to a custom virtual router. When using virtual routers, you can configure VTIs on interfaces in the global virtual router only.
-
IKE and IPsec security associations will be re-keyed continuously regardless of data traffic in the tunnel. This ensures that VTI tunnels are always up.
-
You cannot configure both IKEv1 and IKEv2 on a route-based connection profile: you must configure one IKE version only.
-
You can configure different VTI and policy-based (crypto map) configurations on the same physical interface provided that the peer address configured in the crypto map and the tunnel destination for the VTI are different.
-
Only the BGP routing protocol is supported over the VTI.
-
If the system is terminating IOS IKEv2 VTI clients, disable the config-exchange request on IOS, because the system cannot retrieve the mode-CFG attributes for the session initiated by an IOS VTI client.
-
Route-based site-to-site VPNs are configured as bidirectional, meaning that either endpoint of the VPN tunnel can initiate the connection. After you create the connection profile, you can change this endpoint to be either the sole initiator (INITIATE_ONLY) or exclusively the responder (RESPOND_ONLY). Ensure that you modify the remote endpoint to use the complementary connection type. To make this change, you must go to the API explorer and use GET /devices/default/s2sconnectionprofiles to find the connection profile. You can then copy/paste the body content to the PUT /devices/default/s2sconnectionprofiles/{objId} method, update connectionType to specify the desired type, and run the method.



 Feedback