SSL/TLS Proxy for Decryption of TLS Traffic

Table 1. Feature History
Feature Name

Release Information

Description

SSL/TLS Proxy

Cisco IOS XE Catalyst SD-WAN Release 17.2.1r

The SSL/TLS Proxy feature allows you to configure an edge device as a transparent SSL/TLS proxy. Such proxy devices can then decrypt incoming and outgoing TLS traffic to enable their inspection by Unified Threat Defense (UTD) and identify risks that are hidden by end-to-end encryption.

This feature is part of the Cisco Catalyst SD-WAN Application Quality of Experience (AppQoE) and UTD solutions.

Information about SSL/TLS Proxy

Overview of SSL/TLS Proxy


Note


TLS is the successor of SSL. This document uses the term TLS to refer to both SSL and TLS.


Today more and more apps and data reside in the cloud. As a result, majority of internet traffic is encrypted. This may lead to malware remaining hidden and lack of control over security. The TLS proxy feature allows you to configure edge devices as transparent TLS proxy. This feature has been integrated with Cisco Unified Threat Defense (UTD).

TLS proxy devices act as man-in-the-middle (MitM) to decrypt encrypted TLS traffic traveling across WAN, and send it to (UTD) for inspection. TLS Proxy thus allows devices to identify risks that are hidden by end-to-end encryption over TLS channels. The data is re-encrypted post inspection before being sent to its final destination.

Benefits of TLS Proxy

  • Monitoring of TLS traffic for any threats through transparent inspection

  • Enforcement of security polices based on the inspection of the decrypted traffic

  • Threat and malware protection for TLS traffic

Traffic Flow with TLS Proxy

A typical TLS handshake involves authentication using certificates signed by trusted, third-party Certificate Authorities (CAs). The clients and servers must trust these CAs in order to establish trust. TLS Proxy acts as MitM and runs a CA to issue proxy certificates for the connection dynamically.

This is how traffic flows when TLS proxy is enabled:

  1. A TCP connection is established between the client and the proxy, and the proxy and the server.

  2. If a decryption policy is enabled for the flow, a client Hello packet is sent to UTD to determine the decryption action.

  3. Based on the UTD verdict, one of the following actions takes place:

    • drop: If the verdict is drop, the hello packet from the client is dropped and the connection is reset.

    • do-not-decrypt: If the verdict is do-not-decrypt, the hello packet bypasses TLS proxy.

    • decrypt: If the verdict is decrypt, the packet is forwarded to the client and goes through the following:

      1. TCP optimization for optimization of traffic

      2. Decryption of encrypted traffic through TLS proxy

      3. Threat inspection through UTD

      4. Re-encryption of decrypted traffic through TLS proxy


Note


If there is a delay in determining the decrypt status of the flow, the UTD configuration for fail-decrypt is exercised.


The following image shows the TLS handshake process.
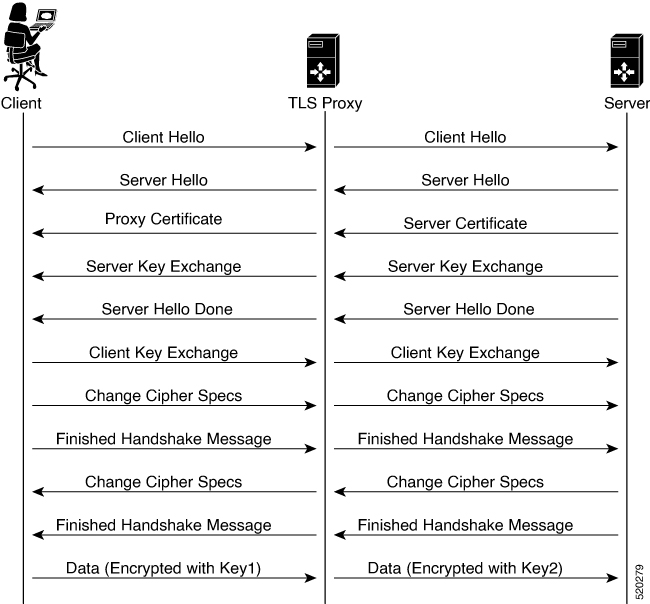
Figure 1. TLS Handshake Process

Role of Certificate Authorities in TLS Proxy

About Certificate Authorities (CAs)

A CA manages certificate requests and issue certificates to participating entities such as hosts, network devices, or users. A CA provides centralized identity management for the participating entities.

Digital signatures, based on public key cryptography, digitally authenticate devices and individual users. In public key cryptography, such as the RSA encryption system, each device or user has a key-pair containing both a private key and a public key. The private key is kept secret and is known only to the owning device. The public key, however, can be known to everybody. The keys act as complements. Anything encrypted with one of the keys can be decrypted with the other. A signature is formed when data is encrypted with a sender’s private key. The receiver verifies the signature by decrypting the message with the sender’s public key. This process relies on the receiver having a copy of the sender’s public key and knowing with a high degree of certainty that it really does belong to the sender and not to someone pretending to be the sender.

How CA and TLS Proxy Work Together

Once you configure a CA for TLS proxy, the CA issues signing certificates to the TLS proxy device. The device then securely stores the subordinate CA keys, and dynamically generates and signs the proxy certificates. The TLS proxy device then performs the following certification tasks:

CA Options for Configuring TLS Proxy

The following CA options are supported for configuring TLS proxy:

  • Enterprise CA

  • Enterprise CA with SCEP Enabled

  • Cisco SD-WAN Manager as CA

  • Cisco SD-WAN Manager as Intermediate CA

In the subsequent sections, we have listed the benefits and limitations of each of the supported CA options to help you make an informed decision about choosing the CA for TLS proxy.

Enterprise CA

Use this option to manage issuing certificates through an Enterprise CA or your own internal CA. For Enterprise CA that does not support Simple Certificate Enrollment Protocol (SCEP), manual enrollment is required. Manual enrollment involves downloading a Certificate Signing Request (CSR) for your device, getting it signed by your CA, and then uploading the signed certificate to the device through Cisco SD-WAN Manager.

Table 2. Enterprise CA: Benefits and Limitations

Benefits

Limitations

  • Can use your existing enterprise CA and certificate management infrastructure for monitoring the usage, expiry, and validity of certificates

  • The client trust-store need not be updated

  • Provides a single location for managing all certificates issued

  • Certificates can be revoked and tracked through your own CA

  • Maintenance creates an administrative overload.

  • Manual certificate deployment is required for TLS proxy

  • Out-of-band management is required for tracking the usage and expiry of certificates

  • Requires manual re-issuance of expired proxy certificates

  • If an enterprise CA certificate is revoked or compromised, all certificates it issued are invalidated

Enterprise CA with SCEP

Use this option to manage issuing certificates through an Enterprise CA or your own internal CA. If your CA supports SCEP, you can configure it to automate the certificate management process.

Table 3. Enterprise CA with SCEP: Benefits and Limitations

Benefits

Limitations

  • Can use your existing enterprise CA and certificate management infrastructure for monitoring the usage, expiry, and validity of certificates

  • The client trust-store need not be updated

  • Provides a single location for managing all certificates issued

  • Certificates can be revoked and tracked through your own CA

  • Certificate deployment to TLS Proxy can be automated

  • Maintenance creates an administrative overload.

  • If an enterprise CA certificate is revoked or compromised, all certificates it issued are invalidated

  • Offers limited visibility through Cisco SD-WAN Manager

  • Enterprise CA have limited support for SCEP

Cisco SD-WAN Manager as CA

Use this option if you don't have an enterprise CA and want to use Cisco SD-WAN Manager to issue trust certificates.

Table 4. Cisco SD-WAN Manager as CA: Benefits and Limitations

Benefits

Limitations

  • Certificate deployment to proxy devices is automated

  • Certificates are reissued and revalidated before they expire

  • Certificates can be monitored, tracked, and validated through Cisco SD-WAN Manager

  • Cisco SD-WAN Manager certificate needs to be pushed to the client trust store

Cisco SD-WAN Manager as Intermediate CA: Benefits and Limitations

Use this option if you have an internal enterprise CA, but would like to use Cisco SD-WAN Manager as intermediate CA to issue and manage subordinate CA certificates.

Table 5. Cisco SD-WAN Manager as Intermediate CA: Benefits and Limitations

Benefits

Limitations

  • Certificate deployment to proxy devices is automated

  • Certificates are reissued and revalidated before they expire

  • The risk associated with certificates being compromised is limited as compromised proxy certificates are revoked

  • Certificates can be monitored, tracked, and validated through Cisco SD-WAN Manager

  • No other certificates, besides your enterprise CA certificate, need to be pushed to your client trust-store

  • Requires manual deployment

  • Maintaining two CAs causes administrative overload

  • Cisco SD-WAN Manager certificate usage is tracked through the enterprise CA

  • Deployment can be complex if your network has multiple Cisco SD-WAN Manager controllers for clustering or redundancy

Supported Devices and Device Requirements

The following devices support the SSL/TLS Proxy feature.

Table 6. Supported Devices and Releases

Release

Supported Devices

Cisco IOS XE Catalyst SD-WAN Release 17.2.1r

  • Cisco 4331 Integrated Services Router (ISR 4331)

  • Cisco 4351 Integrated Services Router (ISR 4351)

  • Cisco 4431 Integrated Services Router (ISR 4431)

  • Cisco 4451 Integrated Services Router (ISR 4451)

  • Cisco 4461 Integrated Services Router (ISR 4461)

  • Cisco CSR 1000v Cloud Services Router (CSR1000v)

Cisco IOS XE Catalyst SD-WAN Release 17.3.2

  • Cisco Catalyst 8300 Series Edge Platforms

Cisco IOS XE Catalyst SD-WAN Release 17.4.1a

  • Cisco Catalyst 8000V Edge Software

  • Cisco Catalyst 8200 Series Edge Platforms

Minimum Device Requirements

  • The device must have a minimum of 8 GB of DRAM; 16 GB for Cisco Catalyst 8300 Series Edge Platforms.

  • The device must have a minimum of 8 vCPUs.

Supported Cipher Suites

The TLS Proxy feature in Cisco Catalyst SD-WAN supports the following cipher suites.

  • TLS_RSA_WITH_3DES_EDE_CBC_SHA

  • TLS_DHE_RSA_WITH_3DES_EDE_CBC_SHA

  • TLS_RSA_WITH_AES_128_CBC_SHA

  • TLS_DHE_RSA_WITH_AES_128_CBC_SHA

  • TLS_RSA_WITH_AES_256_CBC_SHA

  • TLS_DHE_RSA_WITH_AES_256_CBC_SHA

  • TLS_RSA_WITH_AES_128_CBC_SHA256

  • TLS_RSA_WITH_AES_256_CBC_SHA256

  • TLS_RSA_WITH_CAMELLIA_128_CBC_SHA

  • TLS_DHE_RSA_WITH_CAMELLIA_128_CBC_SHA

  • TLS_DHE_RSA_WITH_AES_128_CBC_SHA256

  • TLS_DHE_RSA_WITH_AES_256_CBC_SHA256

  • TLS_RSA_WITH_CAMELLIA_256_CBC_SHA

  • TLS_DHE_RSA_WITH_CAMELLIA_256_CBC_SHA

  • TLS_RSA_WITH_SEED_CBC_SHA

  • TLS_DHE_RSA_WITH_SEED_CBC_SHA

  • TLS_RSA_WITH_AES_128_GCM_SHA256

  • TLS_RSA_WITH_AES_256_GCM_SHA384

  • TLS_DHE_RSA_WITH_AES_128_GCM_SHA256

  • TLS_DHE_RSA_WITH_AES_256_GCM_SHA384

  • TLS_ECDHE_RSA_WITH_AES_128_CBC_SHA256

  • TLS_ECDHE_RSA_WITH_AES_128_CBC_SHA

  • TLS_ECDHE_RSA_WITH_AES_256_CBC_SHA

  • TLS_ECDHE_RSA_WITH_3DES_EDE_CBC_SHA

  • TLS_ECDHE_RSA_WITH_AES_256_GCM_SHA384

  • TLS_ECDHE_RSA_WITH_AES_128_GCM_SHA256

  • TLS_ECDHE_RSA_WITH_AES_256_CBC_SHA384

Prerequisites for TLS Proxy

  • Flow symmetry is required for branches with dual routers.

  • If you have multiple internet links, the flows must be pinned to only one of them. This ensures that the sites that require an SSL client have the same source IP address.

  • TLS proxy devices and the clients must have their times in sync. See Configure NTP to learn how to synchronize all devices in the Cisco Catalyst SD-WAN solution.


Note


Cisco recommends enabling TLS decryption only for encrypted traffic (for example HTTPS, SFTP) by creating a specific rule in the NG firewall policy. Unencrypted traffic should not be subjected to TLS decryption.


Limitations and Restrictions

  • Only RSA and its variant cipher suites are supported.

  • Certificate Revocation List (CRL) check is not supported for server certificate validation. However, you can enable OCSP from Advanced Settings in SSL Decryption policy.

  • When a Cisco public key (PKI) certificate is installed on a device, and you want to make changes to the certificate, detach the security template from the device template and push the device template to the device. This will remove the existing PKI certificate and configuration. After you have made changes to the PKI certificate, re-attach the security template and then push the device template to the device. This process updates the device for any the changes to the Cisco PKI certificate.

  • OCSP stapling is not supported and must be explicitly disabled on the browser for the TLS session to be established.

  • For branch-to-branch and branch-to-data center traffic scenarios that support service nodes, the SSL decryption security policy must be applied in a way that prevents the SSL flow from being inspected on both the devices.

  • IPv6 traffic is not supported.

  • TLS session resumption, renegotiation and client certificate authentication are not supported.

  • If TLS proxy crashes, it takes up to two minutes for it to be ready to serve as proxy for TLS flows again. During this time, depending upon your security settings, the flows are either bypassed or dropped.
Configure Cisco IOS XE Catalyst SD-WAN Devices as TLS Proxy

High-level Steps for Configuring a Device as TLS Proxy

  1. Configure certificate authority (CA) for the TLS proxy: Enterprise CA, Cisco SD-WAN Manager as CA, or Cisco SD-WAN Manager as Intermediate CA.

  2. The next step differs based on the CA option you configure. See the task flows in the following section for Enterprise CA, and Cisco SD-WAN Manager as CA and Cisco SD-WAN Manager as Intermediate CA.

  3. Create and attach SSL decryption security policy to the device.

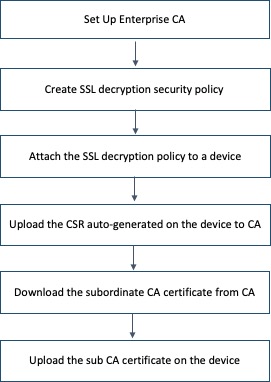
Task Flow: Set up TLS Proxy with Enterprise CA

If you configure Enterprise CA to enable TLS proxy on your devices, go through the following steps to complete the TLS proxy setup.

Figure 2. Use Enterprise CA to Configure TLS Proxy on a Device

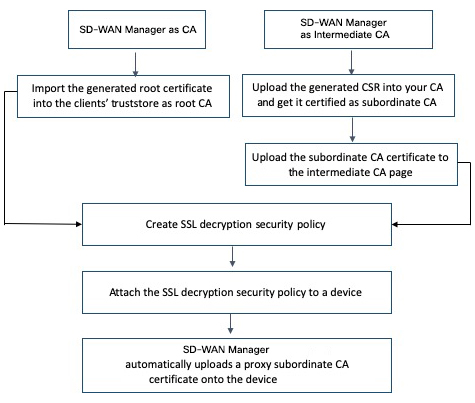
Task Flow: of Set Up TLS Proxy with Cisco SD-WAN Manager as CA or Cisco SD-WAN Manager as Intermediate CA

If you configure up Cisco SD-WAN Manager as CA or Cisco SD-WAN Manager as Intermediate CA to enable TLS proxy on your devices, go through the following steps to complete the TLS proxy setup.

Figure 3. Use Cisco SD-WAN Manager as CA or Cisco SD-WAN Manager as Intermediate CA to Configure TLS Proxy on a Device

The subsequent topics provide a step-by-step procedure to complete the configuration of a Cisco IOS XE Catalyst SD-WAN device as SSL/TLS Proxy.

Configure CA for TLS Proxy

Cisco SD-WAN Manager offers the following options to set up a CA.

Configure Enterprise CA

Configure Enterprise CA to issue subordinate CA certificates to the proxy device at the edge of the network.

Prerequisites to Set Up CA for SSL/TLS Proxy
  • Time synchronization:

    To be able to configure CA certificates, ensure that the system time is synchronized for the CA server and the device seeking the certificate. See Configure NTP to learn how to coordinate and synchronize time across all devices in the Cisco Catalyst SD-WAN overlay network.

  • Basic Constraint CA parameter for certificates:

    Ensure that the CA server is configured to issue certificates with the CA parameter of the X.509v3 Basic Constraints extension set to true.

Configure Enterprise CA

Note


When configuring TLS/SSL proxy feature, trust point allows only two certificates; root certificate and certificate signed by root certificate. You cannot upload cert chain.


  1. Download a CA certificate from your CA server in PEM or Base 64 format.

  2. From the Cisco SD-WAN Manager menu, choose Configuration > TLS/SSL Proxy.

  3. Choose Enterprise CA.

  4. [Optional, but recommended] Check the Simple Certificate Enrollment Protocol (SCEP) check box.

    1. Enter the SCEP server URL in the URL Base field.

    2. [Optional] Enter the Challenge Password/Phrase if you have one configured.


    Note


    If Enterprise CA is configured with SCEP, the Enterprise SCEP CA server should be reachable from transport VPN (VPN 0).


  5. To upload your PEM-encoded CA certificate. click Select a file.

    OR

    Paste the CA certificate in the Root Certificates box.

  6. Verify that the fingerprint, which auto-populates after you upload the certificate, matches your CA.

  7. Click Save Certificate Authority.


    Note


    This step concludes configuring enterprise CA. However, you must complete steps 8, 9, and 10 to complete setting up the device as TLS proxy.


  8. Configure a security policy with SSL decryption enabled

  9. Attach the policy to the device that you want to set as SSL proxy.

  10. Upload a Subordinate CA Certificate to TLS Proxy

Configure Cisco SD-WAN Manager as CA

Configure Cisco SD-WAN Manager as CA to issue subordinate CA certificates to the proxy device at the edge of the network.

Use SD-WAN as CA if your enterprise does not have an internal CA. With this option, Cisco SD-WAN Manager is used as a root CA and is authorized to issue subordinate CAs to the proxy devices at the edge of the network. The certificates issued by Cisco SD-WAN Manager as CA can be managed through Cisco SD-WAN Manager.

Prerequisites to Set Up CA for SSL/TLS Proxy
  • Time synchronization:

    To be able to configure CA certificates, ensure that the system time is synchronized for the CA server and the device seeking the certificate. See Configure NTP to learn how to coordinate and synchronize time across all devices in the Cisco Catalyst SD-WAN overlay network.

  • Basic Constraint CA parameter for certificates:

    Ensure that the CA server is configured to issue certificates with the CA parameter of the X.509v3 Basic Constraints extension set to true.

  1. From the Cisco SD-WAN Manager menu, choose Configuration > TLS/SSL Proxy.

  2. Choose SD-WAN as CA.


    Note


    Leave the Set SD-WAN as Intermediate CA check box not checked if you want to set Cisco SD-WAN Manager as CA.


  3. Enter the requested details: Common Name, Organization, Organizational Unit, Locality, State/Province, Country Code, and Email.

  4. Choose the certificate validity period from the drop-down list.

  5. Click Save Certificate Authority.

  6. Click the Download option on the Cisco SD-WAN Manager as CA page to download the root certificate generated.

  7. Import the downloaded certificate into your client's trustStore as a trusted root CA.


    Note


    This step concludes configuring Cisco SD-WAN Manager as CA. However, you must complete steps 8, 9, and 10 to complete setting up a device as TLS proxy.


  8. Configure TLS/SSL Decryption security policy.

  9. Configure a security policy with SSL decryption enabled

  10. Attach the policy to the device that you want to set as SSL proxy.

    When TLS/SSL decryption is applied to a Cisco IOS XE Catalyst SD-WAN device, Cisco SD-WAN Manager automatically issues a subordinate CA for the proxy and imports it to the device.

Configure Cisco SD-WAN Manager as Intermediate CA

Configure Cisco SD-WAN Manager as Intermediate CA to enable a TLS proxy device to use subordinate CA certificates issued by Cisco SD-WAN Manager.

When Cisco SD-WAN Manager is set as intermediate CA, your enterprise CA acts as the root CA and Cisco SD-WAN Manager is designated as the preferred intermediate CA to issue and manage subordinate CA certificates for a proxy device. This option is suitable for enterprises that have their own internal CA but would like to use Cisco SD-WAN Manager to automate and manage certificate issuance and renewal.

  1. From the Cisco SD-WAN Manager menu, choose Configuration > TLS/SSL Proxy.

  2. Choose SD-WAN as CA.

  3. Check the Set SD-WAN as Intermediate CA check box.

  4. Upload the CA certificate using the Select a file option.

    OR

    Paste the content of the PEM-encoded CA certificate file in the Root Certificate text box.

  5. Click Next.

  6. Under the Generate CSR area, enter the requested details, and click Generate CSR.

    The CSR field on the screen populates with the Certificate Signing Request (CSR).

  7. Copy or download the CSR and upload it to the enterprise CA server to get it signed by the CA server as the subordinate CA certificate.


    Note


    The process to get a CSR signed by a CA server may differ from one CA to another. Follow your standard procedure to get a CSR signed by your CA.


  8. Click Next.

  9. In the Intermediate Certificate text box, paste the content of the signed Cisco SD-WAN Manager certificate, and click Upload.

    OR

    Click Select a file and upload the CSR generated in the previous step, and click Upload.

  10. Verify that the finger print, which auto-populates after you upload the CSR, matches your CA certificate.

  11. Click Save Certificate Authority.


    Note


    This step concludes configuring Cisco SD-WAN Manager as intermediate CA. However, you must complete steps 12 and 13 to complete the configuration for setting up a device as TLS proxy.


  12. Configure a security policy with SSL decryption enabled

  13. Attach the policy to the device that you want to set as SSL proxy.

    When the SSL/TLS decryption security policy is attached to the device, Cisco SD-WAN Manager automatically issues a subordinate, proxy CA certificate and imports it on the device.

Configure SSL Decryption

The SSL decryption policy provides the following ways to divert traffic for decryption:

  • Network-based rules: Diverts traffic on the basis of the source or destination IP address, port, VPNs, and application.

  • URL-based rules: Decide whether to decrypt based on the URL category or reputation of the URL.The decision is made based on the Client Hello packet.

For URL-based rules, note the following:

  • A NAT direct internet access route is necessary to implement TLS/SSL decryption.

  • You can set blocked list URLs to always be decrypted

  • You can set allowed list URLs to never be decrypted.

  • If a URL lookup to the cloud takes too long, the user can set one of the following:

    • Decrypt the traffic

    • Skip decryption for this traffic temporarily

To configure SSL decryption through a security policy, use the Cisco SD-WAN Manager security configuration wizard:

  1. From the Cisco SD-WAN Manager menu, choose Configuration > Security.

  2. Click Add Security Policy. The Add Security Policy wizard opens, and various use-case scenarios are displayed.

  3. In Add Security Policy, choose a scenario that supports the TLS/SSL Decryption feature (Compliance, Guest Access, Direct Cloud Access, Direct Internet Access, or Custom).

  4. Click Proceed to add an SSL decryption policy in the wizard.

    • If this is the first time you're creating a TLS/SSL decryption policy, then you must create and apply a policy to the device before creating security policies that can use a security policy (such as Intrusion Prevention, URL Filtering, or Advanced Malware Protection). In the Add Security Policy wizard, click Next until the TLS/SSL Decryption screen is displayed.

    • If you want to use TLS/SSL decryption along with other security features such as Intrusion Prevention, URL Filtering, or Advanced Malware Protection, add those features as described in this book. Once you've configured those features, click Next until the TLS/SSL Decryption screen is displayed.

  5. Click the Add TLS/SSL Decryption Policy drop-down menu and choose Create New to create a new SSL decryption policy. The TLS/SSL Decryption Policy Configuration wizard appears.

  6. Ensure that SSL Decryption is Enabled.

  7. In the Policy Name field, enter the name of the policy.

  8. Click Add Rule to create a rule.

    The New Decryption Rule window is displayed.


    Note


    For branch-to-branch and branch-to-data center traffic scenarios that support service nodes, the SSL decryption security policy must be applied in a way that prevents the SSL flow from being inspected on both the devices.


  9. Choose the order for the rule that you want to create.

  10. In the Name field, enter the name of the rule.

  11. You can choose to decrypt traffic based on source / destination which is similar to the firewall rules or applications which is similar to URL-Filtering rules.

    • If you choose Source / Destination, enter any of the following conditions:

      • Source VPNs

      • Source Networks

      • Source Ports

      • Destination VPNs

      • Destination Networks

      • Destination Port

      • Application/Application Family List

    • If you choose URLs, enter the following:

      • VPNs

      • TLS/SSL profile.

        1. Enter a name for the profile.

        2. Choose Decrypt, No Decrypt or Pass Through. Alternatively, you can choose multiple categories and set the action for all of them using the actions drop-down menu.

  12. (Optional) To configure advanced settings such as server certificate checks, minimum TLS version, and so on, expand Advanced Settings


    Note


    By default, Cisco SD-WAN Manager configures the default values for each advanced setting. If you change any of these settings, it may affect the behaviour of the decryption security policies.


    • Under the Server Certificate Checks section, you can configure the following:

      Field Name

      Description

      Options

      Expired Certificate

      Defines what the policy should do if the server certificate is expired

      • Drop the traffic

      • Decrypt the traffic

      Untrusted Certificate

      Defines what the policy should do if the server certificate is not trusted

      • Drop the traffic

      • Decrypt the traffic

      Certificate Revocation Status

      Defines whether Online Certificate Status Protocol (OCSP) should be used to check the revocation status of the server certificate

      Enabled or Disabled

      Unknown Revocation Status

      Defines what the policy should do, if the OCSP revocation status is unknown

      • Drop the traffic

      • Decrypt the traffic

    • Under the Proxy Certificate Attributes section, you can configure the following:

      Field Name

      Description

      Options

      RSA Keypair Modules

      Defines the Proxy Certificate RSA Key modulus

      • 1024 bit RSA

      • 2048 bit RSA

      • 4096 bit RSA

      Certificate Lifetime (in Days)

      Sets the lifetime of the proxy certificate in days.

      Minimum TLS Version Revocation Status

      Sets the minimum version of TLS that the proxy should support.

      • TLS 1.0

      • TLS 1.1

      • TLS 1.2

    • Under the Unsupported Mode Checks section, you can configure the following:

      Field Name

      Description

      Options

      Unsupported Protocol Versions

      Defines what the policy should do if an unsupported protocol version is detected.

      • Drop the traffic

      • No Decrypt: The proxy does not decrypt this traffic.

      Unsupported Cipher Suites

      Defines what the policy should do if unsupported cipher suites are detected.

      • Drop the traffic

      • No Decrypt: The proxy does not decrypt this traffic.

      Failure Mode

      Defines what the policy should do in the case of a failure.

      • Close: Sets the mode as fail-close

      • Open: Sets the mode as fail-open.

      Certificate Bundle

      Defines whether the policy should use the default CA certificate bundle or not

      You can choose or not choose this option. If you do not choose this option, the Custom Certificate Bundle option appears and you must upload a certificate by clicking Select a file.

      Note


      If you choose to use or update a custom certificate bundle for SSL decryption, ensure that the same certificate bundle is used across all devices in the network that have SSL decryption enabled.

  13. Click Save TLS/SSL Decryption Policy.

  14. Click Next.

  15. Enter Security Policy Name and Security Policy Description in the respective fields.

  16. Click Save Policy to configure the Security policy.

  17. To edit the existing SSL decryption policy, click Custom Options in the Security wizard.

Apply a Security Policy to an Cisco IOS XE Catalyst SD-WAN Device

  1. From the Cisco SD-WAN Manager menu, choose Configuration > Templates.

  2. If you are creating a new device template:

    1. Click Device Templates, and click Create Template.


      Note


      In Cisco vManage Release 20.7.1 and earlier releases, Device Templates is called Device.


    2. From the Create Template drop-down menu, choose From Feature Template.

    3. From the Device Model drop-down menu, choose one of the devices.

    4. In the Template Name field, enter a name for the device template. This field is mandatory and can contain only uppercase and lowercase letters, the digits 0 through 9, hyphens (–), and underscores (_). It cannot contain spaces or any other characters.

    5. In the Description field, enter a description for the device template. This field is mandatory, and it can contain any characters and spaces.

    6. Continue with Step 4.

  3. If you are editing an existing device template:

    1. Click Device, and click ... and click Edit.

    2. Click Additional Templates. The screen scrolls to the Additional Templates section.

    3. From the Policy drop-down menu, choose the name of a policy you have configured.

  4. Click Additional Templates located directly beneath the Description field. The screen scrolls to the Additional Templates section.

  5. From the Security Policy drop-down menu, choose the name of the security policy you configured in the above procedure.

  6. Click Create (for a new template) or Update (for an existing template).

Upload a Subordinate CA Certificate to TLS Proxy


Note


This procedure is applicable only if you configure the Enterprise CA for TLS proxy.

Prerequisites to Generate a CSR from the TLS Proxy Device

  1. Configure Enterprise CA

  2. Configure SSL decryption

  3. Apply the security policy to an XE SD-WAN device

Generate CSR and Upload Subordinate CA Certificate to TLS Proxy

  1. From the Cisco SD-WAN Manager menu, choose Configuration > Certificates.

  2. Choose TLS Proxy. The page shows a list of devices on which a CA certificate has been installed and the status of the certificates.

  3. Choose the device for which you want to generate CSR and click Download CSR at the top of the page.

    A dialog box is displayed. You can copy or download the CSR. Ensure that the certificate that you request is downloaded in PEM format.

  4. On your CA server, request a certificate and upload or paste the CSR file you generated in the previous step.

  5. Download the certificate issued by your CA in PEM format.


    Important


    Ensure that the certificate you generate is a subordinate or an intermediate CA certificate. The procedure to generate a subordinate CA certificate may differ from one enterprise CA to another. The certificate generated in this step must have its constraint set as CA: TRUE.

    Cisco IOS CA can’t be used for the TLS proxy feature as it doesn’t support generating a certificate with the constraint set as CA: TRUE.


  6. Repeat steps 1 and 2.

  7. Choose the device and click Upload Certificate at the top of the page.

  8. In the dialog box, upload or paste the PEM-encoded certificate that you generated from your CA server in step 5.

  9. Click Upload and Save.

  10. Verify that the certificate is installed on the device by running the command show crypto pki trustpoint PROXY-SIGNING-CA status on your device CLI.

    Device#show crypto pki trustpoint PROXY-SIGNING-CA status
    Trustpoint PROXY-SIGNING-CA:
      Issuing CA certificate configured:
        Subject Name:
         e=appqoe@cisco.com,cn=server-name,ou=AppQoE,o=CISCO,l=Blr,st=KA,c=IN
        Fingerprint MD5: 755C9485 DDACC0BD B5ED93E6 4E8A7DEB 
        Fingerprint SHA1: 4D4380EA 07392044 6A5BF891 938AC610 C0C0AA6D 
      Router General Purpose certificate configured:
        Subject Name:
         cn=sign
        Fingerprint MD5: 1956194E FEC057A3 8FE5BFA5 DD84662B 
        Fingerprint SHA1: 864A8126 EBC780E2 D958AD86 93CB8923 3EF3B7FF 
      State:
        Keys generated ............. Yes (General Purpose, non-exportable)
        Issuing CA authenticated ....... Yes
        Certificate request(s) ..... Yes
    

Verify Configuration

Use the following commands to verify the configuration for TLS proxy.

  • show sdwanrunning : In Cisco SD-WAN Manager, run this command in CLI mode to verify if your configuration is applied.

  • show sdwan running-config : In Cisco SD-WAN Manager, run this command by connecting to the device CLI through SSH.

  • show crypto pki status : On your device CLI, run this command to verify that the PROXY-SIGNING-CA is present and configured correctly on the device.

  • show sslproxy statistics : On your device CLI, run this command to view TLS proxy statistics.

  • show sslproxy status : On your device CLI, run this command to verify whether TLS proxy was successfully configured and is enabled on Cisco SD-WAN Manager.

    In the output below, Clear Mode: FALSE denotes that TLS proxy was successfully configured and enabled on Cisco SD-WAN Manager

    Configuration
    -------------
    CA Cert Bundle                 : /bootflash/vmanage-admin/sslProxyDefaultCAbundle.pem
    CA TP Label                    : PROXY-SIGNING-CA
    Cert Lifetime                  : 730
    EC Key type                    : P256
    RSA Key Modulus                : 2048
    Cert Revocation                : NONE
    Expired Cert                   : drop
    Untrusted Cert                 : drop
    Unknown Status                 : drop
    Unsupported Protocol Ver       : drop
    Unsupported Cipher Suites      : drop
    Failure Mode Action            : close
    Min TLS Ver                    : TLS Version 1.1
    
    Status
    ------
    SSL Proxy Operational State    : RUNNING
    TCP Proxy Operational State    : RUNNING
    Clear Mode                     : FALSE
  • show platform hardware qfp active feature utd config : On your device CLI, run this command to verify the UTD data plane configuration. For more information on this command, see the Qualifed Command Reference.

  • show sdwan running-configuration | section utd-tls-decrypt : On your device CLI, run this command to verify the UTD data plane configuration.

  • show utd engine standard config : On your device CLI, run this command to verify the UTD service plane configuration.

  • show utd engine standard status : On your device CLI, run this command to verify the UTD service plane configuration.

Monitor TLS Proxy Performance

This section describes how to monitor various parameters related to the performance of TLS proxy and TLS decryption.

Monitor TLS Proxy

  1. From the Cisco SD-WAN Manager menu, choose Monitor > Devices.

    Cisco vManage Release 20.6.x and earlier: From the Cisco SD-WAN Manager menu, choose Monitor > Network.

  2. Choose a device from the list of devices that displays.

  3. Click SSL Proxy in the left pane.

  4. The right pane has the following options to choose from.

    • Traffic View: From the drop-down menu, choose one of the following–All Policy Actions, Encrypted, Un-encrypted, Decrypted.

    • Filter: You have the option to filter the traffic statistics by VPN, TLOC, Remote TLOC, and Remote System IP.

    • SSL Proxy View Format: You can choose to view the SSL proxy information in form of a line graph, bar chart, or a pie chart.

    • Time Range: Choose to view the information for a specified time range (1h, 3h, 6h, and so on) or click Custom to define a time range.

  5. Based on your choice, the information displays. Additional information is displayed in tabular format.

Monitor SSL Decryption Statistics

  1. From the Cisco SD-WAN Manager menu, choose Monitor > Devices.

    Cisco vManage Release 20.6.x and earlier: From the Cisco SD-WAN Manager menu, choose Monitor > Network.

  2. Choose a device from the list of devices that displays.

  3. Under the Security Monitoring pane, click TLS/SSL Decryption in the left pane.

  4. The the right pane has the following options to choose from.

    • Network Policy: You can view the traffic information for an applied network policy.

    • URL Policy: You can view the traffic information of a URL policy.

    • Time Range: Choose to view the information for a specified time range (1h, 3h, 6h, and so on) or click Custom to define a time range.

  5. Based on your choice, the information displays.

    Additionally, from the Security Monitoring pane, you can also view information for other Security features such as Firewall, Intrusion Prevention, URL Filtering, and so on.

Revoke and Renew Certificates

This section describes how to revoke and renew certificates issued by Enterprise CA, Cisco SD-WAN Manager as CA, and Cisco SD-WAN Manager as Subordinate CA.

Revoke Enterprise CA Certificate

Follow these steps to revoke, renew, or revoke and renew a certificate for a device configured as TLS proxy using Enterprise CA.

Revoke and Renew Certificate

  1. From the Cisco SD-WAN Manager menu, choose Configuration > Certificates.

  2. Click TLS Proxy.

    You will see a list of devices configured as CA.

  3. Choose the device (configured as Enterprise CA) for which you want to revoke or revoke and renew the certificate.

  4. Click Revoke Certificate. A pop-up window opens.

  5. From the drop-down menu, choose a reason for revoking the certificate. Check the check box.

  6. Revoke: To revoke the certificate, click Revoke. Beware that the revocation is permanent and cannot be rolled back. If you choose to revoke the certificate, no additional steps are required after this step.


    Note


    Revoking the certificate through Cisco SD-WAN Manager only removes the certificate from the device and invalidates the private key. You also need to revoke this certificate from your Enterprise CA.


    Revoke and Renew: To revoke the existing certificate and upload a new one to replace it, click the Revoke and Renew. To renew a certificate after revoking it, see steps 6-11 in the Renew Certificate section of this topic.

Renew Certificate

  1. From the Cisco SD-WAN Manager menu, choose Configuration > Certificates.

  2. Click the TLS Proxy.

    You will see a list of devices configured as CA.

  3. Choose the device (configured as Enterprise CA) for which you want to revoke or revoke and renew the certificate.

  4. Click Renew Certificate. A pop-up window opens.

  5. Click Yes to continue with the renewal.

    In the status column, the status of the certificate changes to CSR_Generated.

  6. Click Download CSR.

    A pop-up window opens. You can copy or download the CSR. Ensure that the certificate that you request is downloaded in PEM format.

  7. On your CA server, request a certificate and upload or paste the CSR file you generated in the previous step.

  8. Download the certificate issued by your CA in PEM format.


    Important


    Ensure that the certificate you generate is a subordinate or an intermediate CA certificate. The procedure to generate a subordinate CA certificate may differ from one enterprise CA to another. The certificate generated in this step must have its constraint set as CA: TRUE.

    Cisco IOS CA can’t be used for the TLS proxy feature as it doesn’t support generating a certificate with the constraint set as CA: TRUE.


  9. Click Upload Certificate.

  10. In the pop-up window that opens, upload or paste the PEM-encoded certificate that you generated from your CA server in step 9.

  11. Click Upload and Save.

Cisco SD-WAN Manager as CA or Cisco SD-WAN Manager as Intermediate CA

If you have configured Cisco SD-WAN Manager as CA or Cisco SD-WAN Manager as Intermediate CA, follow the steps below to revoke or renew a certificate.

  1. From the Cisco SD-WAN Manager menu, choose Configuration > Certificates.

  2. Click TLS Proxy.

    You will see a list of devices configured as CA.

  3. Choose the device.

  4. Click Revoke Certificate or Renew Certificate to revoke or renew the certificate respectively.

Configure TLS/SSL Decryption Policy for Unified Security Policy

You can create a TLS/SSL Decryption policy specifically for use in a unified security policy. When created, the TLS/SSL Decryption policy is included in the advanced inspection profile and applied to the unified security policy for implementation on Cisco IOS XE Catalyst SD-WAN devices.


Note


Configuring a TLS/SSL Decryption policy is mandatory in a unified security policy, especially if you choose to use the TLS action as Decrypt while creating an advanced inspection profile.


To configure TLS/SSL Decryption for a unified security policy, perform the following steps:

  1. From the Cisco SD-WAN Manager menu, choose Configuration > Security.

  2. Click Custom Options.

  3. Click Policies/Profiles.

  4. Click TLS/SSL Decryption in the left pane.

  5. Click Add TLS/SSL Decryption Policy, and choose Create New.

  6. Ensure that SSL Decryption is set to Enabled.

  7. Click Policy Mode to enable the unified mode. This implies that you are creating a TLS/SSL Decryption policy for use in the unified security policy.

  8. Enter a policy name in the Policy Name field.

  9. (Optional) To configure advanced settings such as server certificate checks, minimum TLS version, and so on, expand Advanced Settings


    Note


    By default, Cisco SD-WAN Manager configures the default values for each advanced setting. If you change any of these settings, it may affect the behaviour of the decryption security policies. The Policy Mode can only be set at time of creation and cannot be modified after the policy has been saved.


    • In Server Certificate Checks, configure the following:

      Field Name

      Description

      Options

      Expired Certificate

      Defines what the policy should do if the server certificate has expired

      • Drop the traffic by clicking Drop

      • Decrypt the traffic by clicking Decrypt

      Untrusted Certificate

      Defines what the policy should do if the server certificate is not trusted

      • Drop the traffic by clicking Drop

      • Decrypt the traffic by clicking Decrypt

      Certificate Revocation Status

      Defines whether Online Certificate Status Protocol (OCSP) should be used to check the revocation status of the server certificate

      Enabled or Disabled

      Unknown Revocation Status

      Defines what the policy should do, if the OCSP revocation status is unknown

      • Drop the traffic by clicking Drop

      • Decrypt the traffic by clicking Decrypt

    • In Proxy Certificate Attributes, configure the following:

      Field Name

      Description

      Options

      RSA Keypair Modules

      Defines the Proxy Certificate RSA Key modulus

      • 1024 bit RSA

      • 2048 bit RSA

      • 4096 bit RSA

      Certificate Lifetime (in Days)

      It is the in-built lifetime of the proxy certificate, in days.

      Life of CA certificate is valid only for 24 Hrs (1 Day) only.

      Minimum TLS Version Revocation Status

      Sets the minimum version of TLS that the proxy should support.

      • TLS 1.0

      • TLS 1.1

      • TLS 1.2

    • In Unsupported Mode Checks, configure the following:

      Field Name

      Description

      Options

      Unsupported Protocol Versions

      Defines what the policy should do if an unsupported protocol version is detected.

      • Drop the traffic by clicking Drop

      • Click No Decrypt so that the proxy does not decrypt this traffic.

      Unsupported Cipher Suites

      Defines what the policy should do if unsupported cipher suites are detected.

      • Drop the traffic by clicking Drop

      • Click No Decrypt so that the proxy does not decrypt this traffic.

      Failure Mode

      Defines what the policy should do in case of a failure.

      • Close: Sets the mode as fail-close

      • Open: Sets the mode as fail-open.

      Certificate Bundle

      Defines whether the policy should use the default CA certificate bundle or not

      You can choose or not choose this option. If you do not choose this option, the Custom Certificate Bundle option appears and you must upload a certificate by clicking Select a file.

  10. Click Save TLS/SSL Decryption Policy.

  11. From the Cisco SD-WAN Manager menu, choose Configuration > Security.

  12. Edit the newly created policy.

  13. Choose NG Firewall. Click Add NG Firewall Policy > Create New.

  14. Click Add Rule/Rule Set Rule. In the Action field, click Inspect.

  15. In the Advanced Inspection Profile field, select New Advanced Inspection Profile List. Set TLS Action to Decrypt.

  16. Select the TLS/SSL Decryption.

  17. Click Save in the Advanced Inspection Profile.

  18. Click Save in the New Firewall Rule/Rule Set.

  19. Click Save Unified Security Policy.

  20. Choose Policy Summary and select the newly created TLS/SSL Decryption Policy.

  21. Click Save Policy Changes.

Configure TLS/SSL Profile for Unified Security Policy

You can create a TLS/SSL profile specifically for use in a unified security policy. When created, the TLS/SSL profile is included in the advanced inspection profile and applied to the unified security policy for implementation on Cisco IOS XE Catalyst SD-WAN devices.

To configure TLS/SSL Decryption for a unified security policy, perform the following steps:

  1. From the Cisco SD-WAN Manager menu, choose Configuration > Security.

  2. Click Custom Options.

  3. Click Policies/Profiles.

  4. Click TLS/SSL Profile in the left pane.

  5. Click New TLS/SSL Profile.

  6. In Profile Name, enter the name of the profile.

  7. Click policy mode to enable unified mode. This implies that you are creating a TLS/SSL profile for use in the unified security policy.

  8. In the Policy Name field, enter the name of the policy.

  9. Click Decrypt, No Decrypt or Pass Through. Alternatively, choose multiple categories and set the action for all of them using the Actions drop-down list.

  10. Click Save.


Note


The Policy Mode can only be set at time of creation and cannot be modified after the policy has been saved.