Upgrading or Downgrading Orchestrator Deployments in Application Service Engine

This chapter contains the following sections:

Prerequisites and Guidelines

This section describes how to upgrade or downgrade a 3-node Cisco ACI Multi-Site Orchestrator cluster that was deployed in Cisco Application Service Engine. If your Orchestrator cluster was deployed in VMware ESX VMs, see the Upgrading Orchestrator Deployments in VMware ESX chapter. If you deployed a single-node Orchestrator (for example, for testing purposes), the upgrade procedure differs slightly and is described in Installing Single Node Orchestrator chapter instead.

Before you upgrade or downgrade your Cisco ACI Multi-Site Orchestrator cluster:
  • Ensure that your current Cisco ACI Multi-Site Orchestrator installation is running properly.

  • If you are running Cisco ACI Multi-Site Orchestrator, Release 3.0(2) or later, follow the procedure described in Upgrading Multi-Site Orchestrator, Release 3.0(2) or Later.

    That section provide steps specific to upgrading, however the same procedure can be used to switch to an earlier image to downgrade your installation. However, we do not recommend downgrading MSO deployments in Application Services Engine to releases prior to Release 3.0(2).


    Note

    If you plan to downgrade from Release 3.1(1) or later and have Cloud APIC sites with Infra Tenant configuration, you must have a back up the configuration from the earlier release.

    Due to Infra Tenant VRF changes, stateful downgrade from Release 3.1(1) is not supported and you will need to restore your configuration from the backup.


  • If you are running Cisco ACI Multi-Site Orchestrator, Release 2.2(3)-3.0(1), follow the procedure described in Upgrading Multi-Site Orchestrator, Release 3.0(1) or Earlier.

  • If you are running a release prior to Release 2.2(3), your cluster was deployed in VMware ESX VMs and you must follow the Upgrading Orchestrator Deployments in VMware ESX chapter instead.

Multi-Site Orchestrator and Cisco APIC Interoperability Support

Multi-Site Orchestrator (MSO) does not require a specific version of APIC to be running in all sites. The APIC clusters in each site as well as the MSO itself can be upgraded independently of each other and run in mixed operation mode as long as each fabric is running APIC Release 3.2(6) or later. As such, we recommend that you always upgrade to the latest release of the Multi-Site Orchestrator.

However, keep in mind that if you upgrade the MSO before upgrading the APIC clusters in one or more sites, some of the new MSO features may not yet be supported by an earlier APIC release. In that case a check is performed on each template to ensure that every configured option is supported by the target sites.

The check is performed when you save a template or deploy a template. If the template is already assigned to a site, any unsupported configuration options will not be saved; if the template is not yet assigned, you will be able to assign it to a site, but not be able to save or deploy the schema if it contains configuration unsupported by that site.

In case an unsupported configuration is detected, an error message will show, for example: This APIC site version <site-version> is not supported by MSO. The minimum version required for this <feature> is <required-version> or above.

The following table lists the features and the minimum required APIC release for each one:

Feature

Minimum APIC Version

ACI Multi-Pod Support

Release 3.2(6)

Service Graphs (L4-L7 Services)

Release 3.2(6)

External EPGs

Release 3.2(6)

ACI Virtual Edge VMM Support

Release 3.2(6)

DHCP Support

Release 3.2(6)

Consistency Checker

Release 3.2(6)

vzAny

Release 3.2(6)

Host Based Routing

Release 4.0(1)

CloudSec Encryption

Release 4.0(1)

Layer 3 Multicast

Release 4.0(1)

MD5 Authentication for OSPF

Release 4.0(1)

EPG Preferred Group

Release 4.0(2)

Intersite L3Out

Release 4.2(1)

Upgrading Multi-Site Orchestrator, Release 3.0(2) or Later

This section describes how to upgrade Cisco ACI Multi-Site Orchestrator, Release 3.0(2) or later that is deployed on Cisco Application Service Engine.

Before you begin

Procedure


Step 1

Download the Cisco ACI Multi-Site Orchestrator application.

You can download the required MSO image in one of the following two ways:

  1. Browse to the Software Download link:

    https://software.cisco.com/download/home/285968390/type
  2. Click ACI Multi-Site Software.

  3. From the left sidebar, choose the Cisco ACI Multi-Site Orchestrator release version.

  4. Download the ACI Multi-Site App Image file (Cisco-MSO-<version>.aci) for the release.

Alternatively, you can download the image from the Cisco DC App Center:

  1. Browse to the Multi-Site Orchestrator app page on DC App Center:

    https://dcappcenter.cisco.com/multi-site-orchestrator.html
  2. From the left sidebar Version dropdown, choose the Cisco ACI Multi-Site Orchestrator release version.

  3. Click the Download button.

  4. Click Agree and download to accept the license agreement and download the image.

Step 2

Log in to your current Multi-Site Orchestrator GUI as a power user.

Step 3

Add a new image.

  1. Navigate to Operations > Firmware Management.

  2. Click Add Image.

Step 4

Select the new image.

  1. In the Add Images window, select Local.

    Alternatively, if you hosted the image on a web server, choose Remote instead.

  2. Click Select file and select the ACI image you downloaded in the first step.

    If you chose to upload a remote image, provide the file path for the image on the remote server.

  3. Click Upload to add the image.

    The image will be uploaded to the MSO Application Services Engine cluster, unpacked, processed, and made available for the upgrade or downgrade. The whole process may take several minutes and you will be able to see the status of the image.

    Wait for the status to change to Available before proceeding to the next step.

Step 5

Activate the new image.

Ensure that the new image's status is Available.

  1. In the main window, click the actions menu next to the image you added.

  2. Then click Activate.

  3. In the Activation Confirmation window, click Continue.

    It may take up to 20 additional minutes for all the application services to start and the GUI to become available. The page will automatically reload when the process is completed.

Step 6

If you downgraded to an earlier release and had Cloud APIC sites with Infra Tenant configuration, restore the configuration from backup.

If you had Cloud APIC sites with Infra Tenant configuration, you will see schemas in an error state due to Infra Tenant VRF changes in Release 3.1(1). You will need to restore your configuration from the backup as you typically would to resolve these issues.


Upgrading Multi-Site Orchestrator, Release 3.0(1) or Earlier

If you are running a release prior to Release 3.0(2) of Multi-Site Orchestrator in Application Services Engine, the upgrade process to Release 3.0(2) or later involves parallel deployment of a new cluster and manual transfer of the current configuration database from the existing MSO cluster.

Procedure


Step 1

Deploy a brand new Orchestrator cluster in Application Service Engine.

The procedure is described in the Deploying Multi-Site Orchestrator in Application Services Engine section.

Step 2

Backup existing deployment configuration.

  1. Log in to your existing Cisco ACI Multi-Site Orchestrator.

  2. From the left navigation pane, select Operations > Backups & Restore.

  3. In the main window, click New Backup.

    A New Backup window opens.

  4. In the Name field, provide the name for the backup file.

    The name can contain up to 10 alphanumeric characters, but no spaces or underscores (_).

  5. Choose the Backup Location.

    You can save the backup file locally on the Orchestrator nodes or export it to a remote location.

    If you want to save the backup file locally, choose Local.

    Otherwise, if you want to save the backup file to a remote location, choose Remote and provide the following:

    • From the Remote Location dropdown menu, select the remote location.

    • In the Remote Path, either leave the default target directory or you can choose to append additional subdirectories to the path. However, the directories must be under the default configured path and must have been already created on the remote server.

  6. Click Save to create the backup.

Step 3

Copy the configuration backup file from the existing Orchestrator.

If you created the backup using a remote location, you can skip this step.

Otherwise, in the main window, click the actions (
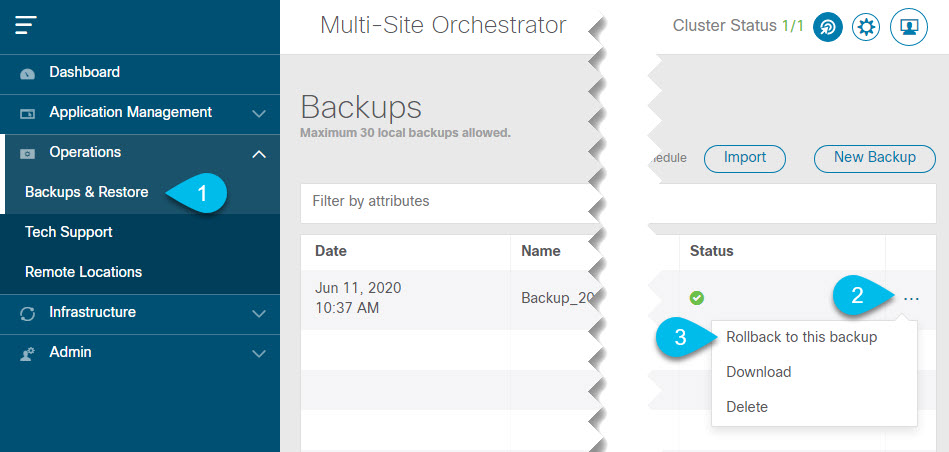
) icon next to the backup and select
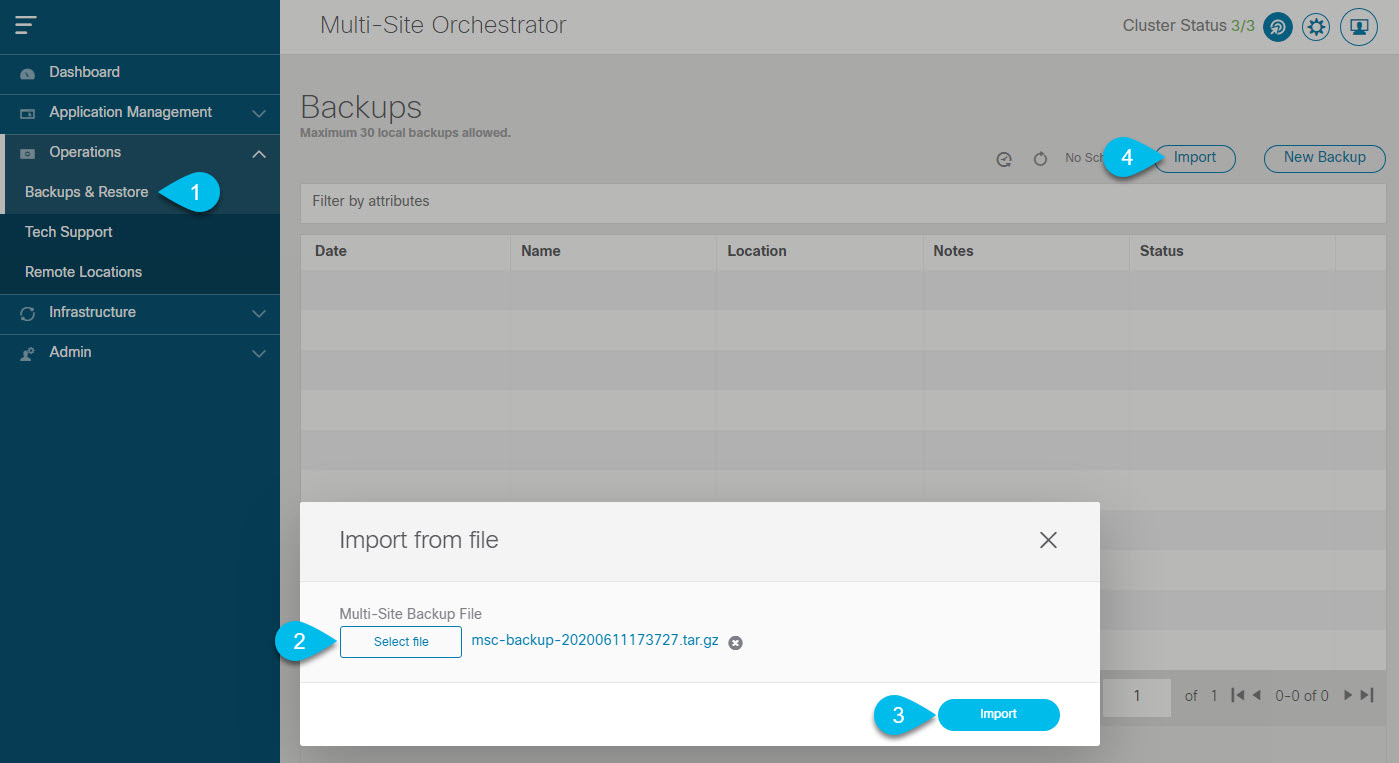
 Download. This will download the backup file to your system.

Step 4

Bring down the existing Multi-Site Orchestrator cluster VMs.

Step 5

Import the backup file to your new Orchestrator cluster deployed on the Application Service Engine.

If you saved the backup locally, simply import the file:

  1. Log in to your existing Cisco ACI Multi-Site Orchestrator.

  2. From the left navigation pane, select Operations > Backups & Restore.

  3. In the main window, click Import.

  4. In the Import from file window that opens, click Select File and choose the backup file you want to import.

    Importing a backup will add it to the list of the backups displayed the Backups page.

If you saved the backup to a remote location, add the remote location to the new Multi-Site Orchestrator:

  1. Log in to your Cisco ACI Multi-Site Orchestrator.

  2. From the left navigation pane, select Admin > Remote Locations.

  3. In the top right of the main window, click Add Remote Location.

    An Add New Remote Location screen appears.

  4. Provide the same information for the remote location that you used in your old Orchestrator.

  5. Click Save to add the remote server.

Step 6

Restore the configuration.

  1. From the left navigation menu, select Admin > Backups.

  2. In the main window, click the actions () icon next to the backup you want to restore and select Rollback to this backup.

    If the version of the selected backup is different from the running Multi-Site version, the rollback could cause a removal of the features that are not present in the backup version.

  3. Click Yes to confirm that you want to restore the backup you selected.

    If you click Yes, the system terminates the current session and the user is logged out.