Deploying in Cisco Application Services Engine

This chapter contains the following sections:

Prerequisites and Guidelines

This chapter covers production deployment of a 3-node Multi-Site Orchestrator cluster. If you want to set up a single-node Multi-Site Orchestrator (for example, for testing purposes), follow the instruction in the Installing Single Node Orchestrator chapter instead.

Application Services Engine

You must have Cisco Application Services Engine installed and the cluster configured in Fabric External Mode as described in Cisco Application Services Engine Deployment Guide.

Cisco Application Service Engine itself can be deployed using a number of different form factors, such as a Cisco Application Service physical appliance (.iso), in a VMware ESX virtual machine (.ova), in Amazon Web Services (.ami), or in Linux KVM (.qcow), all of which are supported for Multi-Site Orchestrator installations. Keep in mind however, you must use the same form factor Service Engine for all Orchestrator nodes, mixing different form factors within the same Orchestrator cluster is not supported.

Note

AWS deployments of Multi-Site Orchestrator support managing only public cloud sites and not on-premises fabrics.


If you are deploying Services Engine in AWS, by default only PEM-based login is enabled for each node. If you'd like to be able to SSH into the nodes using a password, you will need to explicitly enable password-based logins. You can do that by logging into each node separately using the PEM file the first time, then executing the # acidiag loginprompt enable command. After you run the command, you will be logged out and be able to log back in using either the PEM file or password.

Application Services Engine Networks

When first configuring Application Services Engine, two of the parameters that you provide are the Data Network and the Management Network. The data network is used for the nodes' clustering and Cisco ACI sites traffic. The management network is used to connect to the Cisco Application Services Engine GUI, CLI, or API. You can choose to connect the two interfaces to the same subnet and network, like the Out-of-Band network.

When Multi-Site Orchestrator app is deployed in Application Services Engine, it uses each of the two networks for different purposes as shown in the following table:

Traffic type

Network

  • Cisco APIC

  • Cloud APIC

  • Any other remote devices or controllers

Data network

Intra-cluster communication

Data network

Audit log streaming (Splunk/syslog)

Management network

Remote authentication (LDAP/TACACS)

Management network

Remote backup

Management network

Network Time Protocol (NTP)

Multi-Site Orchestrator uses NTP for clock synchronization, so you must have an NTP server configured in your environment.

Deployment Requirements

The following table summarizes the Application Services Engine requirements for Cisco ACI Multi-Site Orchestrator.

Orchestrator Version Requirements

Release 3.0(2) and later*

*We do not recommend deploying Release 3.0(1)

Cisco Application Services Engine, Release 1.1.3d.

If the Application Services Engine is deployed in an ESX or KVM virtual machine, the following additional requirements apply:

  • For VMware ESX: ESXi 6.0 or later

  • For Linux KVM: Linux Kernel 3.10.0-957.el7.x86_64 or later with KVM libvirt-4.5.0-23.el7_7.1.x86_64 or later

  • 16 vCPUs

    10 GHz CPU reservation is applied automatically

  • 48 GB of RAM

    36 GB reservation is applied automatically

  • 100 GB disk

    We recommend thin provisioning with a maximum size of 620 GB with each Application Services Engine VM running on its own disk.

  • We recommend that each Multi-Site Orchestrator node is deployed in a different ESX or KVM server.

Deploying Multi-Site Orchestrator in Application Services Engine

This section describes how to install Cisco ACI Multi-Site Orchestrator application in Cisco Application Services Engine cluster that was deployed previously. This scenario applies if you have purchased the Cisco Application Services Engine cluster or deployed it separately from an ISO image.

Before you begin

Procedure


Step 1

Download the Cisco ACI Multi-Site Orchestrator application.

You can download the required MSO image in one of the following two ways:

  1. Browse to the Software Download link:

    https://software.cisco.com/download/home/285968390/type
  2. Click ACI Multi-Site Software.

  3. From the left sidebar, choose the Cisco ACI Multi-Site Orchestrator release version.

  4. Download the ACI Multi-Site App Image file (Cisco-MSO-<version>.aci) for the release.

Alternatively, you can download the image from the Cisco DC App Center:

  1. Browse to the Multi-Site Orchestrator app page on DC App Center:

    https://dcappcenter.cisco.com/multi-site-orchestrator.html
  2. From the left sidebar Version dropdown, choose the Cisco ACI Multi-Site Orchestrator release version.

  3. Click the Download button.

  4. Click Agree and download to accept the license agreement and download the image.

Step 2

Log in to your Cisco Application Services Engine dashboard.

When deploying an app, you need to install it in only one of the Application Services Engine nodes, the application will be replicated to the other nodes in the cluster automatically. So you can log in to any one of your Application Services Engine nodes using its management IP address, for example htts://10.23.237.160.

Step 3

Add the app.

  1. In the left navigation bar, click Apps.

  2. In the main pane, click Actions.

  3. Choose Upload App.

Step 4

Upload the image file to the Application Services Engine cluster.

  1. Choose the location of the image.

    If you downloaded the application image to your system, choose Local.

    If you are hosting the image on a server, choose Remote.

  2. Choose the file.

    If you chose Local in the previous step, click Select File and select the Cisco-MSO-<version>.aci you downloaded.

    If you chose Remote, provide the full URL to the image file, for example http://<ip-address>:<port>/<full-path>/Cisco-MSO-<version>.aci.

  3. Click Upload to add the app to the cluster.

Step 5

Enable the app.

After installation is complete, the application will remain in the Disabled state by default and you must enable it.

To enable the app, click the ... menu on the app and select Enable.

Step 6

Launch the app.

It may take up to 20 minutes for the application to replicate to all nodes and all services to fully deploy.

To launch the app, simply click Launch App.

Step 7

Log in to the Cisco ACI Multi-Site Orchestrator GUI.

After you launch the app from the Application Services Engine dashboard, you will be prompted to log in to your new Multi-Site Orchestrator cluster.

The default log in is admin and the default password is We1come2msc!.

When you first log in, you will be prompted to change the password.


What to do next

For information on migrating your existing Mutli-Site Orchestrator configuration deployed in VMware ESX to Cisco Application Services Engine cluster, see Migrating Existing Cluster to Application Service Engine.

For more information about Day-0 Operations, see the Day-0 Operations section of the document.

Migrating Existing Cluster to Application Service Engine

This section provides an overview of how to migrate your existing Multi-Site deployment to a new cluster deployed in Cisco Application Service Engine.

Because the two platforms are vastly different in how they implement clustering and infrastructure, the migration process involves parallel deployment of the new platform and manual transfer of the current configuration database from the existing Orchestrator cluster.

Procedure


Step 1

Deploy a brand new Orchestrator cluster in Application Service Engine.

The procedure is described in the Deploying Multi-Site Orchestrator in Application Services Engine section.

Step 2

Backup existing deployment configuration.

  1. Log in to your existing Cisco ACI Multi-Site Orchestrator.

  2. From the left navigation pane, select Operations > Backups & Restore.

  3. In the main window, click New Backup.

    A New Backup window opens.

  4. In the Name field, provide the name for the backup file.

    The name can contain up to 10 alphanumeric characters, but no spaces or underscores (_).

  5. Choose the Backup Location.

    You can save the backup file locally on the Orchestrator nodes or export it to a remote location.

    If you want to save the backup file locally, choose Local.

    Otherwise, if you want to save the backup file to a remote location, choose Remote and provide the following:

    • From the Remote Location dropdown menu, select the remote location.

    • In the Remote Path, either leave the default target directory or you can choose to append additional subdirectories to the path. However, the directories must be under the default configured path and must have been already created on the remote server.

  6. Click Save to create the backup.

Step 3

Copy the Backup file from the existing Orchestrator.

If you created the backup using a remote location, you can skip this step.

Otherwise, in the main window, click the actions (
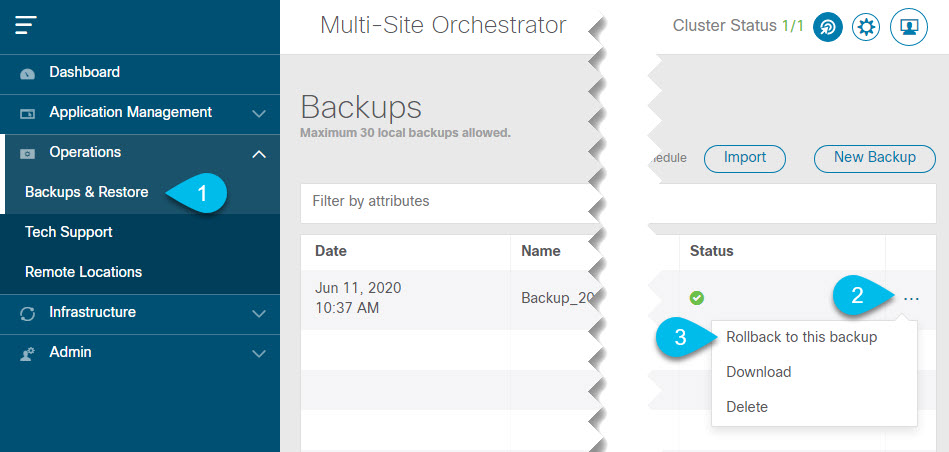
) icon next to the backup and select Download. This will download the backup file to your system.

Step 4

Bring down the existing Multi-Site Orchestrator cluster VMs.

Step 5

Import the backup file to your new Orchestrator cluster deployed on the Application Service Engine.

If you saved the backup locally, simply import the file:

  1. Log in to your existing Cisco ACI Multi-Site Orchestrator.

  2. From the left navigation pane, select Operations > Backups & Restore.

  3. In the main window, click Import.

  4. In the Import from file window that opens, click Select File and choose the backup file you want to import.

    Importing a backup will add it to the list of the backups displayed the Backups page.

If you saved the backup to a remote location, add the remote location to the new Multi-Site Orchestrator:

  1. Log in to your Cisco ACI Multi-Site Orchestrator.

  2. From the left navigation pane, select Admin > Remote Locations.

  3. In the top right of the main window, click Add Remote Location.

    An Add New Remote Location screen appears.

  4. Provide the same information for the remote location that you used in your old Orchestrator.

  5. Click Save to add the remote server.

Step 6

Restore the configuration.

  1. From the left navigation menu, select Admin > Backups.

  2. In the main window, click the actions () icon next to the backup you want to restore and select Rollback to this backup.

    If the version of the selected backup is different from the running Multi-Site version, the rollback could cause a removal of the features that are not present in the backup version.

  3. Click Yes to confirm that you want to restore the backup you selected.

    If you click Yes, the system terminates the current session and the user is logged out.