簡介
本文檔演示了使用Python程式設計在服務提供商邊緣(PE)路由器上使用REST API調配MPLS L3VPN的方法。此範例使用Cisco CSR1000v(IOS-XE)路由器作為PE路由器。
撰稿人:Anuradha Perera
編輯者:Kumar Sridhar
必要條件
- 對CSR1000v路由器的REST API管理訪問(請參閱本文檔末尾的參考資料)。
- Python(版本2.x或3.x)和「請求」安裝在用於配置路由器的電腦上Python庫。
- Python程式設計的一些基礎知識。
組態
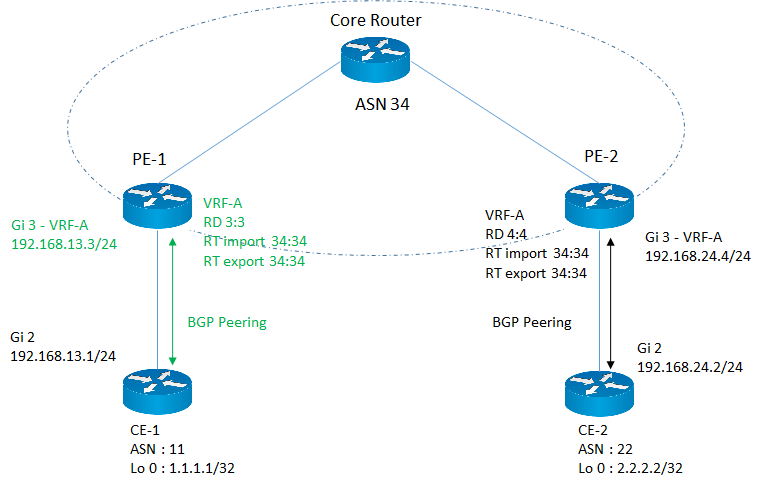
網路圖表

在本示例中,重點介紹如何在PE-1路由器上配置所需的MPLS L3VPN服務引數,這些引數以粉紅色突出顯示。
設定程式
配置任務被劃分為多個子任務,並且每個子任務在使用者定義的函式下實現。這樣,在需要時可以重複使用功能。
所有函式都使用「請求」庫訪問路由器上的REST API,資料格式為JSON。 在HTTP請求中,「verify」引數設定為「False」以忽略驗證SSL證書。
1.檢索令牌ID
在路由器上繼續進行任何配置之前,您需要從路由器獲取有效的令牌ID。此功能發起HTTP請求以驗證和獲取令牌ID,以便使用該令牌呼叫其他API。此請求的響應包括令牌ID。
#-----------------------------------
def getToken(ip、埠、使用者名稱、密碼):
匯入請求
匯入base64
url = "https://" + ip + ":"+ port + "/api/v1/auth/token-services"
標頭= {
'content-type': "application/json",
'authorization': "基本" + base64.b64encode((使用者名稱+ ":" + password)。encode('UTF-8'))。decode('ascii'),
'cache-control': "no-cache"
}
response = requests.request("POST", url, headers=headers, verify=False)
如果response.status_code == 200:
return response.json()['token-id']
else:
返回 "失敗"
#-----------------------------------
2.建立VRF
此功能將在PE路由器上建立具有所需路由識別符號(RD)和匯入/匯出路由目標(RT)的VRF
#-----------------------------------
def createVRF(ip、port、tokenID、vrfName、RD、importRT、exportRT):
匯入請求
url = "https://" + ip + ":"+ port + "/api/v1/vrf"
標頭= {
'content-type':"application/json",
'X-auth-token':令牌ID,
'cache-control': "no-cache"
}
data = {
'name': vrfName,
第三,
'route-target' : [
{
'action' : "import",
'社群' :importRT
},
{
'action' : "export",
'社群':exportRT
}
]
}
response = requests.request("POST", url, headers=headers, json=data, verify=False)
如果response.status_code == 201:
返回 "成功"
else:
返回 "失敗"
#-----------------------------------
3. 將介面移入VRF
此功能會將給定介面移動到VRF中。
#-----------------------------------
def addInterfacetoVRF(ip、port、tokenID、vrfName、interfaceName、RD、importRT、exportRT):
匯入請求
url = "https://" + ip + ":"+ port + "/api/v1/vrf/" + vrfName
標頭= {
'content-type': "application/json",
'X-auth-token':令牌ID,
'cache-control': "no-cache"
}
data = {
第三,
'forwarding': [ interfaceName ],
'route-target' : [
{
'操作':"匯入",
'社群' :importRT
},
{
'action': "export",
'社群':exportRT
}
]
}
response = requests.request("PUT", url, headers=headers, json=data, verify=False)
如果response.status_code == 204:
返回 "成功"
else:
返回 "失敗"
#-----------------------------------
4.為介面分配IP地址
此功能將為介面分配ip地址。
#-----------------------------------
def assignInterfaceIP(ip、port、tokenID、interfaceName、interfaceIP、interfaceSubnet):
匯入請求
url = "https://" + ip + ":"+ port + "/api/v1/interfaces/" + interfaceName
標頭= {
'content-type': "application/json",
'X-auth-token':令牌ID,
'cache-control': "no-cache"
}
data = {
'type':"ethernet",
'if-name': interfaceName,
'ip-address':interfaceIP,
'subnet-mask': interfaceSubnet
}
response = requests.request("PUT", url, headers=headers, json=data, verify=False)
如果response.status_code == 204:
返回「成功」
else:
返回「失敗」
#-----------------------------------
5.建立VRF感知bgp
這將啟用VRF地址系列ipv4。
#-----------------------------------
def createVrfBGP(ip、port、tokenID、vrfName、ASN):
匯入請求
url = "https://" + ip + ":"+埠+ "/api/v1/vrf/" + vrfName + "/routing-svc/bgp"
標頭= {
'content-type':"application/json",
'X-auth-token':令牌ID,
'cache-control': "no-cache"
}
data = {
'routing-protocol-id':ASN
}
response = requests.request("POST", url, headers=headers, json=data, verify=False)
如果response.status_code == 201:
返回 "成功"
else:
返回 "失敗"
#-----------------------------------
6.在VRF地址系列下定義BGP鄰居
此功能將在VRF地址系列IPV4下定義BGP鄰居。
#-----------------------------------
def defineVrfBGPNeighbor(ip、port、tokenID、vrfName、ASN、neighborIP、remoteAS):
匯入請求
url = "https://" + ip + ":"+ port + "/api/v1/vrf/" + vrfName + "/routing-svc/bgp/" + ASN +/neighbors"
標頭= {
'content-type': "application/json",
'X-auth-token':令牌ID,
'cache-control': "no-cache"
}
data = {
'routing-protocol-id': ASN,
'address':neighborIP,
'remote-as': remoteAS
}
response = requests.request("POST", url, headers=headers, json=data, verify=False)
如果response.status_code == 201:
返回 "成功"
else:
返回 "失敗"
#-----------------------------------
輸入引數的說明和值
ip = "10.0.0.1 " # ip路由器地址
埠= "55443" 路由器上的REST API埠數
使用者名稱= "思科" #要登入的使用者名稱。這應該配置為許可權級別15。
密碼= "思科" #與使用者名稱關聯的密碼
tokenID = <返回值> #使用getToken函式從路由器獲取的令牌ID
vrfName = "VRF-A" #VRF的名稱
RD = "3:3"#用於VRF的路由區分器
importRT = "34:34" #匯入路由目標
exportRT = "34:34" #匯出路由目標
interfaceName = "GigabitEthernet3" #面向客戶邊緣(CE)的介面的名稱
interfaceIP = "192.168.13.3" # CE面向介面的IP地址
interfaceSubnet = "255.255.255.0" # subnet of CE facing interface
ASN = "34" # BGP AS的PE路由器數量
neighborIP = "192.168.13.1" # CE路由器的BGP對等IP
remoteAS = "11" # AS路由器數量
在上述所有函式中,為每個配置步驟呼叫了專用API。以下示例演示了如何在REST API呼叫主體中通常傳遞IOS-XE CLI。這可用作在特定API不可用時實現自動化的解決方法。在上述函式中,「content-type」設定為「application/json」,但在下面的示例中,「content-type」設定為「text/plain」,因為它正在分析標準CLI輸入。
本示例定義介面GigabitEthernet3的介面描述。 可通過更改「cliInput」引數自定義配置。
#-----------------------------------
def passCLInput(ip、port、tokenID):
匯入請求
url = "https://" + ip + ":"+ port + "/api/v1/global/running-config"
標頭= {
'content-type':"text/plain",
'X-auth-token':令牌ID,
'cache-control': "no-cache"
}
line1 = "Interface GigabitEthernet 3"
line2 = "description Customer Facing Interface"
cliInput = line1 + "\r\n" + line2
response = requests.request("PUT", url, headers=headers, data=cliInput, verify=False)
print(response.text)
如果response.status_code == 204:
返回 "成功"
else:
返回 "失敗"
#-----------------------------------
參考資料
- Cisco CSR 1000v系列雲服務路由器軟體配置指南
https://www.cisco.com/c/en/us/td/docs/routers/csr1000/software/configuration/b_CSR1000v_Configuration_Guide /b_CSR1000v_Configuration_Guide_chapter_01101.html
- Cisco IOS XE REST API管理參考指南
https://www.cisco.com/c/en/us/td/docs/routers/csr1000/software/restapi/restapi.html
使用的縮寫:
MPLS — 多重協定標籤交換
L3 — 第3層
VPN — 虛擬私人網路
VRF — 虛擬路由轉送
BGP — 邊界閘道通訊協定
REST — 代表狀態傳輸
API — 應用程式介面
JSON - Java指令碼對象表示法
HTTP — 超文本傳輸協定