在Firepower 4100系列中配置ASA主用/主用故障切换
下载选项
非歧视性语言
此产品的文档集力求使用非歧视性语言。在本文档集中,非歧视性语言是指不隐含针对年龄、残障、性别、种族身份、族群身份、性取向、社会经济地位和交叉性的歧视的语言。由于产品软件的用户界面中使用的硬编码语言、基于 RFP 文档使用的语言或引用的第三方产品使用的语言,文档中可能无法确保完全使用非歧视性语言。 深入了解思科如何使用包容性语言。
关于此翻译
思科采用人工翻译与机器翻译相结合的方式将此文档翻译成不同语言,希望全球的用户都能通过各自的语言得到支持性的内容。 请注意:即使是最好的机器翻译,其准确度也不及专业翻译人员的水平。 Cisco Systems, Inc. 对于翻译的准确性不承担任何责任,并建议您总是参考英文原始文档(已提供链接)。
目录
简介
本文档介绍如何在Cisco Firepower 4145 NGFW设备中配置主用/主用故障切换。
先决条件
要求
Cisco 建议您了解以下主题:
- 思科自适应安全设备(ASA)中的主用/备用故障切换。
使用的组件
本文档中的信息基于以下软件和硬件版本:
- 思科Firepower 4145 NGFW设备(ASA) 9.18(3)56
- Firepower可扩展操作系统(FXOS) 2.12(0.498)
- Windows 10
本文档中的信息都是基于特定实验室环境中的设备编写的。本文档中使用的所有设备最初均采用原始(默认)配置。如果您的网络处于活动状态,请确保您了解所有命令的潜在影响。
背景信息
主用/主用故障切换仅适用于在多情景模式下运行的安全设备。在此模式下,ASA在逻辑上划分为多个虚拟设备,称为情景。每个情景都作为独立设备运行,具有自己的安全策略、接口和管理员。
主用/主用故障切换是自适应安全设备(ASA)的一项功能,它允许两个Firepower设备同时传输流量。 此配置通常用于负载均衡场景,在该场景中,您希望在两台设备之间拆分流量以最大化吞吐量。它还用于冗余目的,因此,如果一个ASA发生故障,另一个可以接管,而不会导致服务中断。
ASA主用/主用故障转移机制
主用/主用故障转移中的每个情景手动分配给以太网组1或组2。默认情况下,管理情景分配给组1。两个机箱(单元)中的同一组(组1或组2)形成故障转移对,从而实现冗余功能。每个故障切换对的行为基本上与主用/备用故障切换中的行为相同。有关活动/备用故障切换的详细信息,请参阅配置活动/备用故障切换。在主用/主用故障转移中,除了每个机箱的角色(主要或辅助)外,每个组还具有角色(主要或辅助)。这些角色由用户手动预设置,用于决定每个故障切换组的高可用性(HA)状态(活动或备用)。
管理情景是处理基本机箱管理(例如SSH)连接的特殊情景。这是主用/主用故障转移的映像。
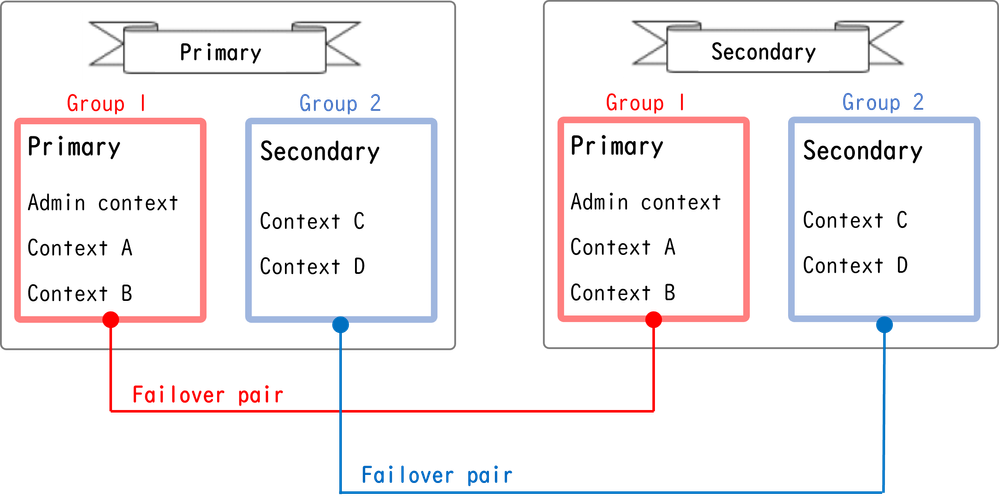 主用/主用故障转移中的故障转移对
流量传输
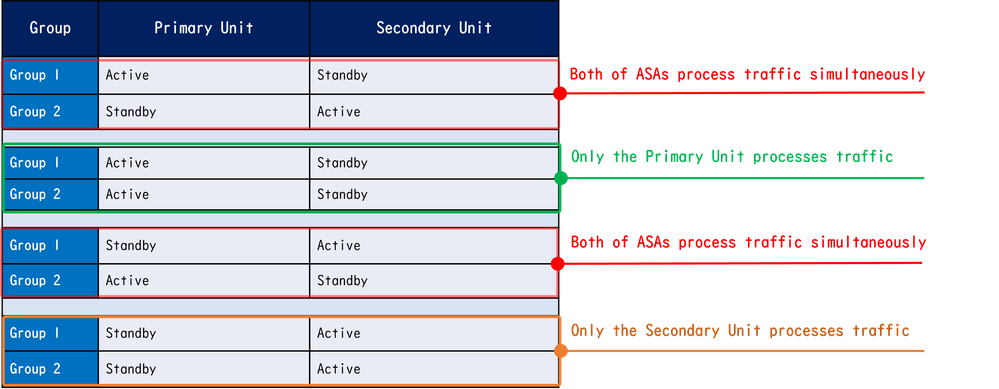
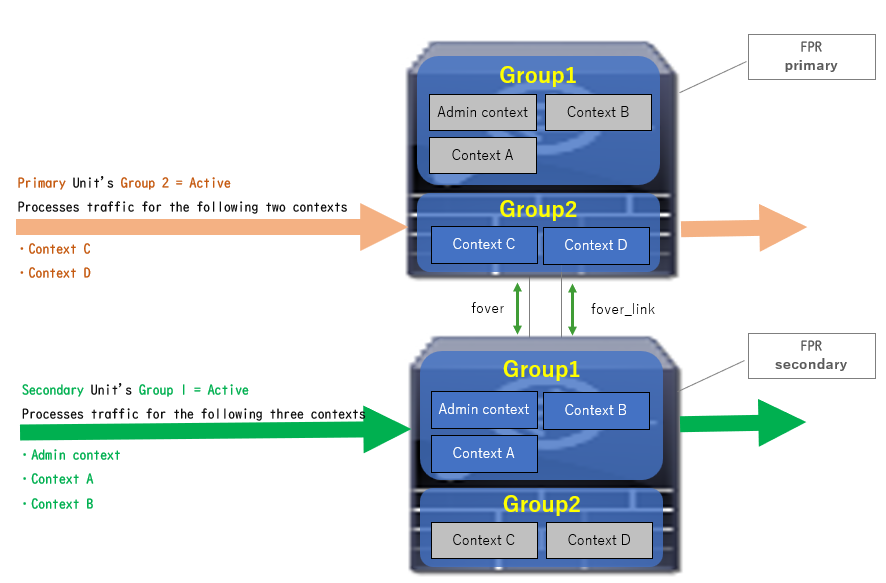
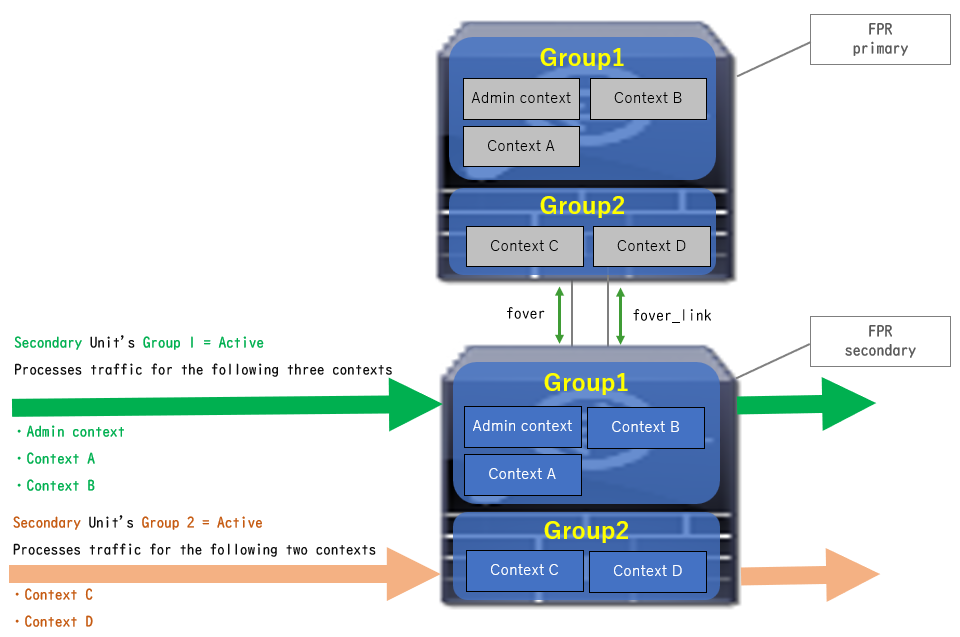
在主用/主用故障转移中,可以采用多种模式处理流量,如下图所示。
 流量传输
流量传输
流量传输条件1
- 主设备:组1 =主用,组2 =备用
- 辅助设备:组1 =备用,组2 =主用
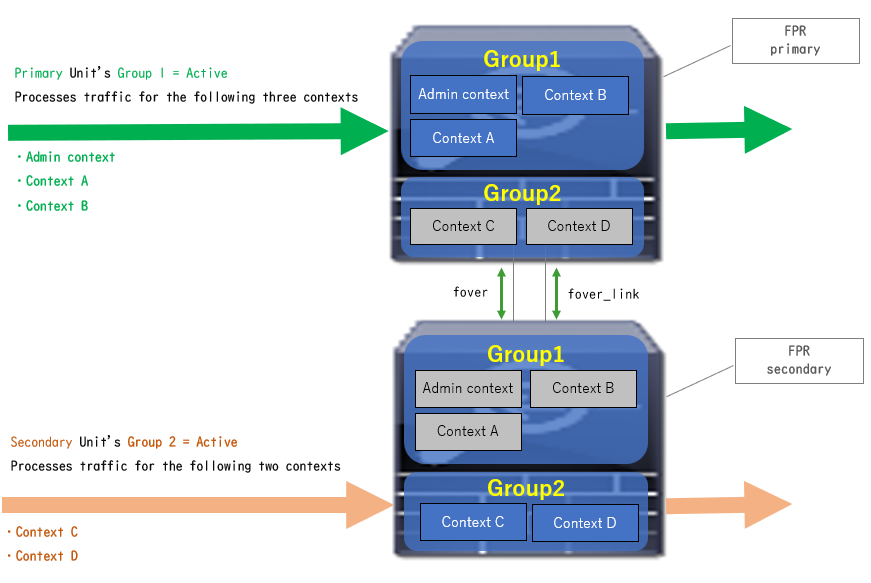 流量传输条件1
流量条件2
- 主设备:组1 =活动,组2 =活动
- 辅助设备:组1 =备用,组2 =备用
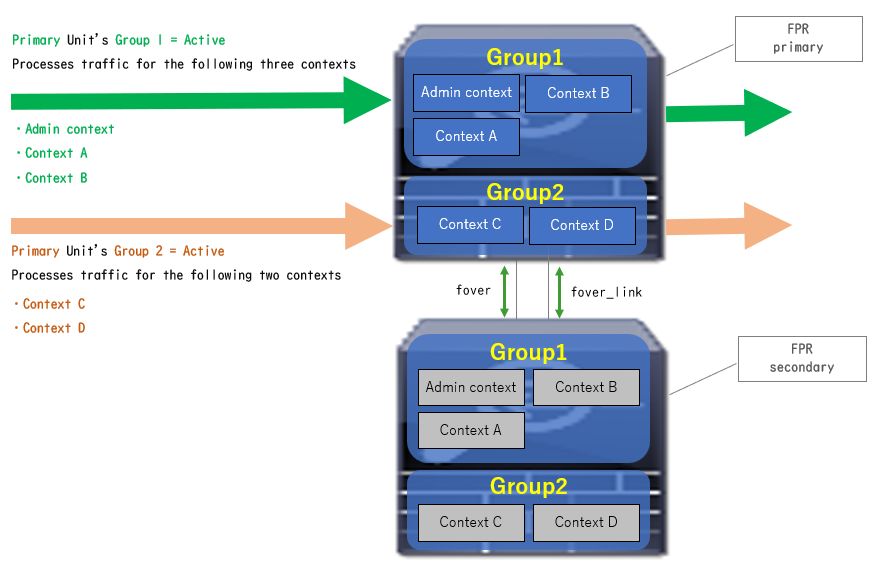 流量条件2
流量条件2
流量条件3
- 主设备:组1 =备用,组2 =主用
- 辅助设备:组1 =主用,组2 =备用
 流量条件3
流量条件3
流量条件4
- 主设备:组1 =备用,组2 =备用
- 辅助设备:组1 =活动,组2 =活动
 流量条件4
流量条件4
主用/备用模式的选择规则
在主用/主用故障转移中,每个组的状态(主用/备用)由以下规则确定:
- 假定2个设备几乎同时启动,则其中一个单元(主或辅助)首先变为活动状态。
- 当抢占时间过去时,在机箱和组中具有相同角色的组将变为活动状态。
- 发生故障切换事件(如接口关闭)时,组的状态更改的方式与主用/备用故障切换相同。
- 执行手动故障切换后,抢占时间不起作用。
这是状态更改的示例。
- 两台设备几乎同时启动。状态A →
- 抢占时间已过。状态B →
- 主设备故障(触发故障切换)。状态C →
- 自主设备从故障中恢复以来经过的抢占时间。状态D →
- 手动触发故障切换。状态E
有关故障切换触发器和运行状况监控的详细信息,请参阅故障切换事件。
1. 两台设备几乎同时启动。
 状态A
状态A
2. 抢占时间(本文档中为30秒)已过。
 状态B
状态B
3. 主设备的组1发生故障(例如接口关闭)。
 状态C
状态C
4. 从主设备组1从故障中恢复后经过的抢占时间(本文档中为30)。
 状态D
状态D
5. 将主设备的组2手动设置为活动。
 状态E
状态E
网络图
本文档介绍了基于此图的主用/主用故障切换的配置和验证。
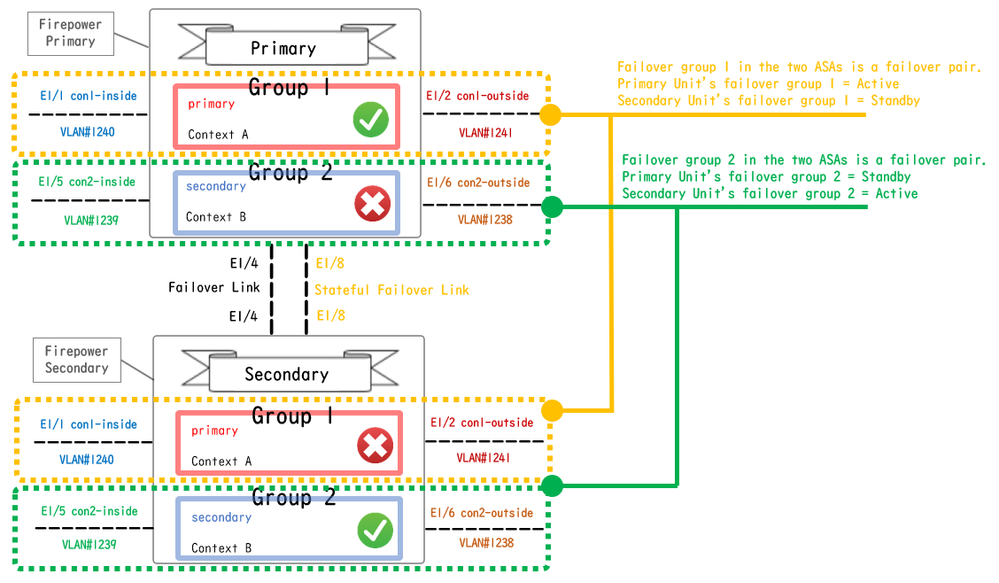 逻辑配置图
逻辑配置图
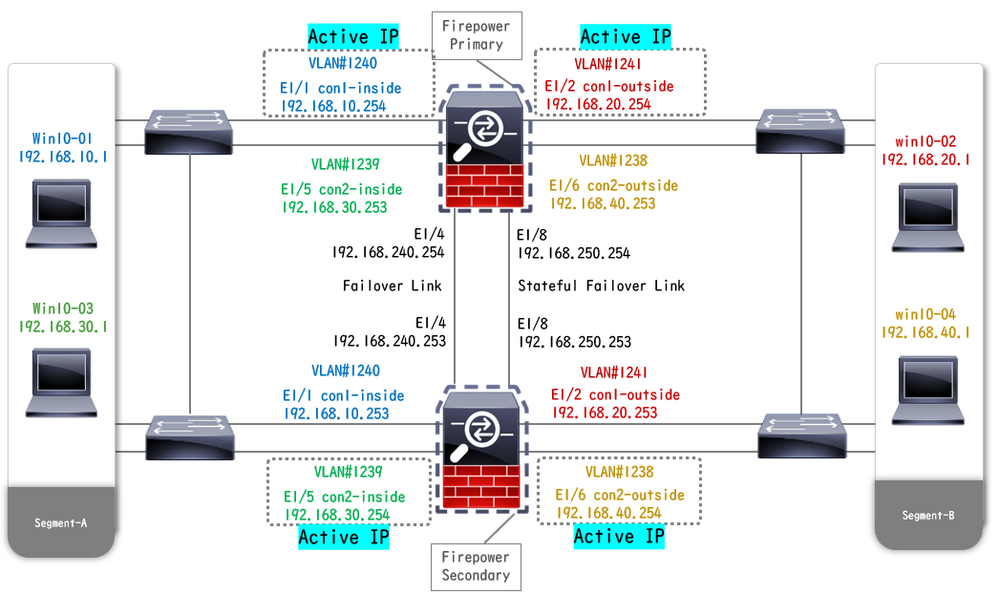 物理配置图
物理配置图
配置
步骤1:预配置接口
对于两个Firepower,请登录FCM GUI。导航到逻辑设备 > 编辑。将数据接口添加到ASA,如图所示。
 预配置接口
预配置接口
第二步:主设备上的配置
通过SSH或控制台连接到主FXOS CLI。运行 connect module 1 console 和 connect asa命令以进入ASA CLI。
a.在主设备上配置故障切换(在主设备的系统上下文中运行该命令)。
failover lan unit primary failover lan interface fover E1/4 failover link fover_link E1/8 failover interface ip fover 192.168.240.254 255.255.255.0 standby 192.168.240.253 failover interface ip fover_link 192.168.250.254 255.255.255.0 standby 192.168.250.253 failover group 1 <--- group 1 is assigned to primary by default preempt 30 failover group 2 secondary preempt 30 failover prompt hostname state priority contextb.配置情景的故障切换组(在主设备的系统情景中运行命令)。
admin-context admin context admin <--- admin context is assigned to group 1 by default allocate-interface E1/3 config-url disk0:/admin.cfg context con1 allocate-interface E1/1 allocate-interface E1/2 config-url disk0:/con1.cfg join-failover-group 1 <--- add con1 context to group 1 ! context con2 allocate-interface E1/5 allocate-interface E1/6 config-url disk0:/con2.cfg join-failover-group 2 <--- add con2 context to group 2c.运行 changeto context con1以从系统上下文连接con1上下文。为con1情景的接口配置IP(在主设备的con1情景中运行命令)。
interface E1/1 nameif con1-inside ip address 192.168.10.254 255.255.255.0 standby 192.168.10.253 security-level 100 no shutdown interface E1/2 nameif con1-outside ip address 192.168.20.254 255.255.255.0 standby 192.168.20.253 no shutdownd.运行 changeto context con2以从系统上下文连接con2上下文。为con2情景的接口配置IP(在主设备的con2情景中运行命令)。
interface E1/5 nameif con2-inside ip address 192.168.30.254 255.255.255.0 standby 192.168.30.253 security-level 100 no shutdown interface E1/6 nameif con2-outside ip address 192.168.40.254 255.255.255.0 standby 192.168.40.253 no shutdown第三步:辅助设备上的配置
第三步:辅助设备上的配置a.通过SSH或控制台连接到辅助FXOS CLI。在辅助设备上配置故障切换(在辅助设备的系统上下文中运行该命令)。
failover lan unit secondary failover lan interface fover E1/4 failover link fover_link E1/8 failover interface ip fover 192.168.240.254 255.255.255.0 standby 192.168.240.253 failover interface ip fover_link 192.168.250.254 255.255.255.0 standby 192.168.250.253b.运行 failover命令(在辅助单元的系统上下文中运行)。
failover 第四步:成功完成同步后确认故障切换状态
第四步:成功完成同步后确认故障切换状态a.在辅助单元的系统上下文中运行show failover。
asa# show failover Failover On Failover unit Secondary Failover LAN Interface: fover Ethernet1/4 (up) Version: Ours 9.18(3)56, Mate 9.18(3)56 Serial Number: Ours FCH23157YFY, Mate FCH23037U8R Group 1 last failover at: 17:00:56 JST Jan 11 2024 Group 2 last failover at: 17:00:56 JST Jan 11 2024 This host: Secondary <--- group 1 and group 2 are Standby status in Secondary Unit Group 1 State: Standby Ready Active time: 0 (sec) Group 2 State: Standby Ready Active time: 945 (sec) con1 Interface con1-inside (192.168.10.253): Unknown (Waiting) con1 Interface con1-outside (192.168.20.253): Unknown (Waiting) con2 Interface con2-inside (192.168.30.253): Unknown (Waiting) con2 Interface con2-outside (192.168.40.253): Normal (Waiting) Other host: Primary <--- group 1 and group 2 are Active status in Primary Unit Group 1 State: Active Active time: 1637 (sec) Group 2 State: Active Active time: 93 (sec) con1 Interface con1-inside (192.168.10.254): Normal (Monitored) con1 Interface con1-outside (192.168.20.254): Normal (Monitored) con2 Interface con2-inside (192.168.30.254): Normal (Waiting) con2 Interface con2-outside (192.168.40.254): Normal (Waiting) Stateful Failover Logical Update Statistics Link : fover_link Ethernet1/8 (up)b.(可选)运行 no failover active group 2 命令,将主设备的组2手动切换到备用状态(在主设备的系统上下文中运行)。这样可以平衡通过防火墙的流量负载。
no failover active group 2
注意:如果运行此命令,则故障切换状态将与流量条件1匹配。
验证
验证当E1/1关闭时,会触发组1的故障切换,备用端(辅助单元)的数据接口会接管原始主用接口的IP和MAC地址,从而确保ASA持续传递流量(本文档中的FTP连接)。
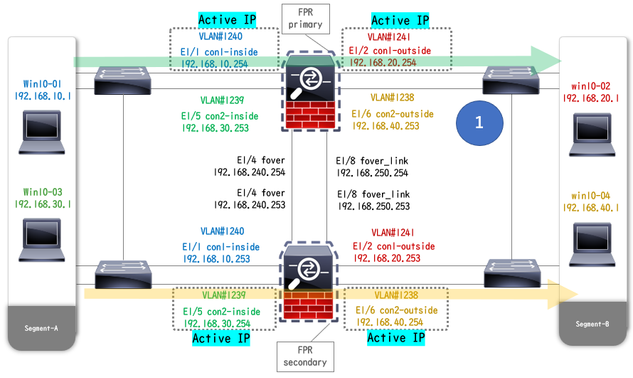 链路断开前
链路断开前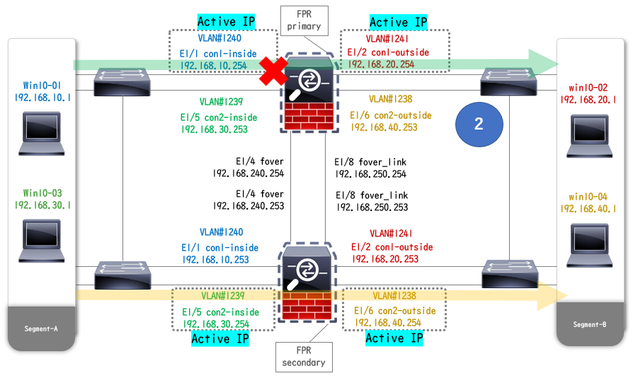 链路断开期间
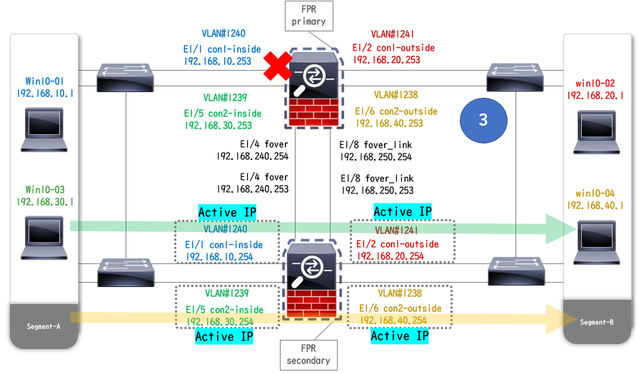 故障转移已触发
步骤1:启动从Win10-01到Win10-02的FTP连接
步骤1:启动从Win10-01到Win10-02的FTP连接第二步:在故障转移前确认FTP连接
第二步:在故障转移前确认FTP连接运行 changeto context con1可从系统上下文连接con1上下文。确认已在两个ASA设备中建立FTP连接。
asa/act/pri/con1# show conn 5 in use, 11 most used
 ! --- Confirm the connection in Primary Unit TCP con1-outside 192.168.20.1:21 con1-inside 192.168.10.1:49703, idle 0:00:11, bytes 528, flags UIO asa/stby/sec/con1# show conn 5 in use, 11 most used
 ! --- Confirm the connection in Secondary Unit TCP con1-outside 192.168.20.1:21 con1-inside 192.168.10.1:49703, idle 0:00:14, bytes 528, flags UIO
第三步:主设备的LinkDOWN E1/1
第三步:主设备的LinkDOWN E1/1第四步:确认故障转移状态
第四步:确认故障转移状态在系统情景中,确认故障切换发生在组1中。

注意:故障切换状态与流量条件4匹配。
asa/act/sec# show failover Failover On Failover unit Secondary Failover LAN Interface: fover Ethernet1/4 (up) ...... Group 1 last failover at: 20:00:16 JST Jan 11 2024 Group 2 last failover at: 17:02:33 JST Jan 11 2024 This host: Secondary Group 1 State: Active <--- group 1 of Secondary Unit is Switching to Active Active time: 5 (sec) Group 2 State: Active Active time: 10663 (sec) con1 Interface con1-inside (192.168.10.254): Normal (Waiting) con1 Interface con1-outside (192.168.20.254): Normal (Waiting) con2 Interface con2-inside (192.168.30.254): Normal (Monitored) con2 Interface con2-outside (192.168.40.254): Normal (Monitored) Other host: Primary Group 1 State: Failed <--- group 1 of Primary Unit is Switching to Failed status Active time: 434 (sec) Group 2 State: Standby Ready Active time: 117 (sec) con1 Interface con1-inside (192.168.10.253): Failed (Waiting) con1 Interface con1-outside (192.168.20.253): Normal (Waiting) con2 Interface con2-inside (192.168.30.253): Normal (Monitored) con2 Interface con2-outside (192.168.40.253): Normal (Monitored)第五步:在故障转移后确认FTP连接
第五步:在故障转移后确认FTP连接运行 changeto context con1从系统上下文连接con1上下文,确认FTP连接未中断。
asa/act/sec# changeto context con1 asa/act/sec/con1# show conn 11 in use, 11 most used
! --- Confirm the target FTP connection exists in group 1 of the Secondary Unit TCP con1-outside 192.168.20.1:21 con1-inside 192.168.10.1:49703, idle 0:00:09, bytes 529, flags UIO
第六步:确认抢占时间的行为
第六步:确认抢占时间的行为LinkUP E1/1,并等待30秒(抢占时间),故障切换状态返回原始状态(匹配模式1中的流量)。
asa/stby/pri# Group 1 preempt mate <--- Failover is triggered automatically, after the preempt time has passed asa/act/pri# show failover Failover On Failover unit Primary Failover LAN Interface: fover Ethernet1/4 (up) ...... Group 1 last failover at: 11:02:33 UTC Jan 11 2024 Group 2 last failover at: 08:02:45 UTC Jan 11 2024 This host: Primary Group 1 State: Active <--- group 1 of Primary Unit is switching to Active status Active time: 34 (sec) Group 2 State: Standby Ready Active time: 117 (sec) con1 Interface con1-inside (192.168.10.254): Normal (Monitored) con1 Interface con1-outside (192.168.20.254): Normal (Monitored) con2 Interface con2-inside (192.168.30.253): Normal (Monitored) con2 Interface con2-outside (192.168.40.253): Normal (Monitored) Other host: Secondary Group 1 State: Standby Ready <---- group 1 of Secondary Unit is switching to Standby status Active time: 125 (sec) Group 2 State: Active Active time: 10816 (sec) con1 Interface con1-inside (192.168.10.253): Normal (Monitored) con1 Interface con1-outside (192.168.20.253): Normal (Monitored) con2 Interface con2-inside (192.168.30.254): Normal (Monitored) con2 Interface con2-outside (192.168.40.254): Normal (Monitored)虚拟MAC地址
虚拟MAC地址在主用/主用故障转移中,始终使用虚拟MAC地址(手动设置值、自动生成的值或默认值)。活动虚拟MAC地址与活动接口相关联。
手动设置虚拟MAC地址
手动设置虚拟MAC地址为了手动设置物理接口的虚拟MAC地址,可以使用 mac address命令或 mac-address命令(在I/F设置模式下)。以下是手动设置物理接口E1/1的虚拟MAC地址的示例。

注意:请避免在同一设备中使用这两种类型的命令。
asa/act/pri(config)# failover group 1 asa/act/pri(config-fover-group)# mac address E1/1 1234.1234.0001 1234.1234.0002 asa/act/pri(config-fover-group)# changeto context con1 asa/act/pri/con1(config)# show interface E1/1 | in MAC MAC address 1234.1234.0001, MTU 1500 <--- Checking virtual MAC on the Primary Unit(con1) side asa/stby/sec# changeto context con1 asa/stby/sec/con1# show interface E1/1 | in MAC MAC address 1234.1234.0002, MTU 1500 <--- Checking virtual MAC on the Secondary Unit(con1) side或者
asa/act/pri(config)# changeto context con1 asa/act/pri/con1(config)# int E1/1 asa/act/pri/con1(config-if)# mac-addr 1234.1234.0001 standby 1234.1234.0002 asa/act/pri/con1(config)# show interface E1/1 | in MAC MAC address 1234.1234.0001, MTU 1500 <--- Checking virtual MAC on the Primary Unit(con1) side asa/stby/sec# changeto context con1 asa/stby/sec/con1# show interface E1/1 | in MAC MAC address 1234.1234.0002, MTU 1500<--- Checking virtual MAC on the Secondary Unit(con1) side 自动设置虚拟MAC地址
还支持自动生成虚拟MAC地址。这可以通过使用 mac-address auto <prefix prefix>命令来实现。虚拟MAC地址的格式为A2 xx.yyzz.zzzz,它正在自动生成。
A2:固定值
xx.yy :由命令选项中指定的<prefix prefix>生成(前缀转换为十六进制,然后按反向顺序插入)。
zz.zzzz:由内部计数器生成
下面是通过 mac-address auto 命令为接口生成虚拟MAC地址的示例。
asa/act/pri(config)# mac-address auto
INFO: Converted to mac-address auto prefix 31
asa/act/pri(config)# show run all context con1 <--- Checking the virtual MAC addresses generated on con1 context
allocate-interface Ethernet1/1
mac-address auto Ethernet1/1 a21f.0000.0008 a21f.0000.0009
allocate-interface Ethernet1/2
mac-address auto Ethernet1/2 a21f.0000.000a a21f.0000.000b
config-url disk0:/con1.cfg
join-failover-group 1
asa/act/pri(config)# show run all context con2 <--- Checking the virtual MAC addresses generated on con2 context
context con2
allocate-interface Ethernet1/5
mac-address auto Ethernet1/5 a21f.0000.000c a21f.0000.000d
allocate-interface Ethernet1/6
mac-address auto Ethernet1/6 a21f.0000.000e a21f.0000.000f
config-url disk0:/con2.cfg
join-failover-group 2
      虚拟MAC地址的默认设置
      如果未设置自动生成或手动生成虚拟MAC地址,则使用默认虚拟MAC地址。
有关默认虚拟MAC地址的详细信息,请参阅“Cisco安全防火墙ASA系列命令参考指南”中的mac地址的默认命令。
升级
升级 您可以使用CLI或ASDM实现主用/主用故障转移对的零停机时间升级。有关详细信息,请参阅升级活动/活动故障切换对。
修订历史记录
| 版本 | 发布日期 | 备注 |
|---|---|---|
1.0 |
07-Feb-2024 |
初始版本 |
 反馈
反馈