Get to Know Your Switch

This chapter contains the following sections:

Introduction

Thank you for purchasing the Cisco CBS 220 Series Switch. The Cisco CBS 220 Series Switches are the next generation of affordable smart switches that combine powerful network performance and reliability with a complete suite of network features that you need for a solid business network. These expandable Gigabit Ethernet switches, with Gigabit or 10-Gigabit uplinks, provide multiple management options, and rich security capabilities. With an easy-to-use web user interface and Power over Ethernet Plus capability, you can deploy and configure a complete business network in minutes.

Before You Begin

Before you begin installing your device, ensure that the following items are available:

  • RJ-45 Ethernet cables for connecting network devices. A category 6a and higher cable is required for 10G ports; a category 5e and higher cable is required for all other ports.

  • Tools for installing the hardware.

    • The rack-mount kit packed with the switch contains four rubber feet for desktop placement, and two brackets and twelve screws for rack mounting.

    • If the supplied screws are lost, use replacement screws in the following size:

      • Diameter of the screw head: 6.9 mm

      • Length of face of screw head to base of screw: 5.9 mm

      • Shaft diameter: 3.94 mm


    Warning

    To prevent airflow restriction, allow clearance around the ventilation openings to be at least 3 inches (7.6 cm).


  • A computer to manage the device either via the console port or via the web-based interface. for web based interface the computer needs to support one of the following browsers:

    • Microsoft Edge

    • Firefox (version 82 or 81 or higher)

    • Chrome (version 86 or 85 or higher)

    • Safari over MAC (version 14.0 and higher)


Warning

Suitable for installation in information Technology Rooms in accordance with Article 645 of the national Electric Code and NFPA 75.


Rack Mounting Switch

You can mount the switches on any standard size, 19-inch (about 48 cm) wide rack. The switch requires 1 rack unit (RU) of space, which is 1.75 inches (44.45 mm) high.


Caution

For stability, load the rack from the bottom to the top, with the heaviest devices on the bottom. A top-heavy rack is likely to be unstable and might tip over.


To install the switch into a 19-inch standard chassis:

Procedure


Step 1

Place one of the supplied brackets on the side of the switch so that the four holes of the brackets align to the screw holes, and then use the four supplied screws to secure it.

Step 2

Repeat the previous step to attach the other bracket to the opposite side of the switch.

Step 3

After the brackets are securely attached, the switch is now ready to be installed into a standard 19-inch rack.


Wall Mounting a Switch

You can mount the switches on a wall, using wall studs or to a firmly attached plywood mounting backboard.


Caution

Read these instructions carefully before beginning installation. Failure to use the correct hardware or to follow the correct procedures could result in a hazardous situation to people and damage to the system.


Caution

Do not wall-mount the switch with its front panel facing up. Following safety regulations, wallmount the switch with its front panel facing down or to the side to prevent airflow restriction and to provide easier access to the cables.


To wall-mount a 24-port switch using brackets:

Procedure


Step 1

Attach a 19-inch bracket to one side of the switch.

Step 2

Repeat the previous step to attach the other bracket to the opposite side of the switch.

Step 3

After the brackets are securely attached, mount the switch with the front panel facing down. Make sure that the switch is attached securely to wall studs or to a firmly attached plywood-mounting backboard. Wall-mounting a 24-port switch.

Wall-mounting a 24-port


Wall Mount an 8 Port Switch

To wall-mount a 8-port switch using mounting screws, follow these steps:

Procedure


Step 1

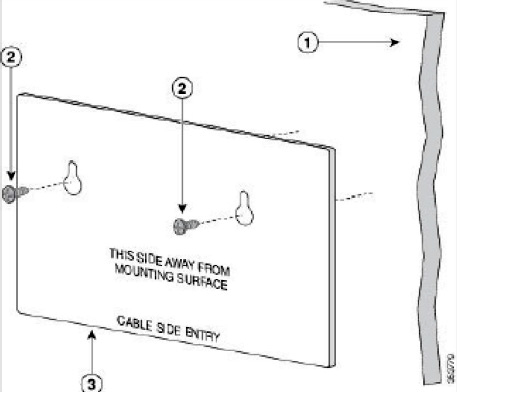
Locate the screw template. The template is used to align the mounting screw holes.

Step 2

Position the screw template so that the edge that is marked as CABLE SIDE ENTRY faces toward the floor. Make sure that the switch is attached securely to wall studs or to a firmly attached plywoodmounting backboard.

Step 3

Peel the adhesive strip off the bottom of the screw template.

Step 4

Attach the screw template to the wall.

Step 5

Use a 0.144-inch (3.7 mm) or a #27 drill bit to drill a 1/2-inch (12.7 mm) hole in the two screw template slots.

Step 6

Insert two screws in the slots on the screw template, and tighten them until they touch the top of the screw template. Installing the mounting screws on the wall

Figure 3 Installing the mounting screws on the wall

Step 7

Remove the screw template from the wall.

Step 8

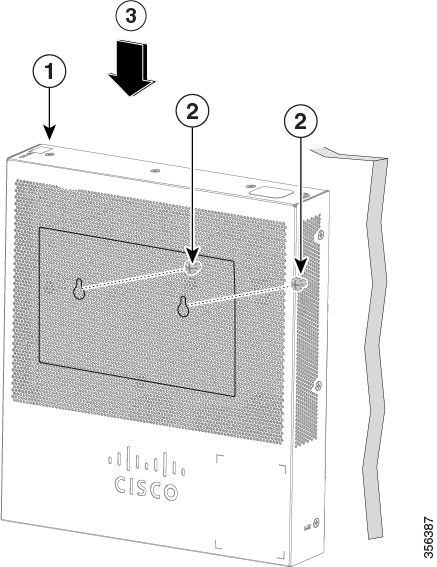
Place the switch onto the mounting screws, and slide it down until it locks in place.Wall-mounting an 8-port switch

Figure 4 Wall-mounting an 8-port switch


PoE Consideration

Some switches support PoE while others do not. The switch models that support PoE have a P in their model number, such as: CBSxxx-xxP-xx. If your switch is one of the Power over Ethernet (PoE) models, consider the following power requirement.

DANGER

The switch is to be connected only to PoE networks without routing to the outside plant.


Table 1. Switches with Power Over Ethernet

SKU Name

Description

PoE PD Chipset Type

PoE PSE Support

CBS220-8P-E-2G

10-Port Gigabit PoE Smart Switch

1*69208M

AF/AT

CBS220-8FP-E-2G 10-Port Gigabit PoE Smart Switch 1*69208M

AF/AT

CBS220-16P-2G

18-Port Gigabit PoE Smart Switch

2*69208M

AF/AT

CBS220-24P-4G

24-Port Gigabit PoE Smart Switch

3*69208M

AF/AT

CBS220-24FP-4G

24-Port Gigabit PoE Smart Switch

3*69208M

AF/AT

CBS220-48P-4G

48-Port Gigabit PoE Smart Switch

6*69208M

AF/AT

CBS220-48P-4X

48-Port Gigabit PoE Smart Switch

6*69208M

AF/AT

CBS220-48FP-4X

48-Port Gigabit PoE Smart Switch

6*69208M

AF/AT


Note

Consider the following when connecting a PoE switch. The PoE switches are PSE (Power Sourcing Equipment) that are capable of supplying DC power to attaching powered devices (PD). These devices include VoIP phones, IP cameras, and wireless access points. The PoE switches can detect and supply power to pre-standard legacy PoE PD. Due to the PoE legacy support, it is possible that a PoE switch acting as a PSE may mistakenly detect and supply power to an attaching PSE, including other PoE switches, as a legacy PD. Even though PoE switches are PSE, and as such should be powered by AC, they could be powered up as a legacy PD by another PSE due to false detection. When this happens, the PoE switch may not operate properly and may not be able to properly supply power to its attaching PDs.

To prevent false detection, you should disable PoE on the ports on the PoE switches that are used to connect to PSEs. You should also first power up a PSE device before connecting it to a PoE switch. When a device is being falsely detected as a PD, you should disconnect the device from the PoE port and power recycle the device with AC power before reconnecting its PoE ports.


Front Panel

The ports, LEDs, and Reset button are located on the front panel of the switch, as well as the following components:

Cisco Business 220 Series Model


Note

Models may differ within the CBS 220 series and this is just a representation of a model within the series.


  • Console port with RJ-45. The console connects a serial cable to a computer serial port so that it can be configured using a terminal emulation program.


    Note

    Only certain models support this feature.


  • RJ-45 Ethernet Ports—The RJ-45 Ethernet ports connect network devices, such as computers, printers, and access points, to the switch.

  • SFP+ Port (if present)—The small form-factor pluggable plus (SFP+) are connection points for modules so that the switch can link to other switches. These ports are also commonly referred to as mini 10 GigaBit Interface Converter ports. The term SFP+ is used in this guide.

    • The SFP+ ports are compatible with the following Cisco SFP 1G optical modules MGBSX1, MGBLX1, MGBLH1, MGBT1, as well as other brands.

    • The Cisco SFP+ Copper Cable modules that are supported in the Cisco switches are: SFP-H10GB-CU1M, SFP-H10GB-CU3M, and SFP-H10GB-CU5M.

    • Small form-factor pluggable (SFP) ports are connection points for modules, so the switch can link to other switches.

  • Reset button is used to reset or reboot the switch. To reboot the switch, press the Reset button for less than 10 seconds.

Front Panel LEDs

The following are the global LEDs found on the devices:

  • System—(Green) The LED lights steady when the switch is powered on, and flashes when booting, performing self-tests, or acquiring an IP address. If the LED flashes Amber, the switch has detected a hardware or firmware failure, and/or a configuration file error.

The following are per port LEDs:

  • LINK/ACT—(Green) Located on the left of each port. The LED lights steady when a link between the corresponding port and another device is detected, and flashes when the port is passing traffic.

  • XG—(Green) (if present) Located on the right of a 10G port. The LED lights steady when another device is connected to the port, is powered on, and a 10 Gbps link is established between the devices. When the LED is off, the connection speed is under 10 Gbps or nothing is cabled to the port.

  • Gigabit—(Green) (if present) Located on the right of the 1G port. The LED lights steady when another device is connected to the port, is powered on, and a 1000 Mbps link is established between the devices. When the LED is off, the connection speed is under 1000 Mbps or nothing is cabled to the port.

  • PoE (if present)—(Amber) Located on the right of the port. The LED lights steady when power is being supplied to a device attached to the corresponding port.

Configuring Switches

The switch can be accessed and managed by two different methods; over your IP network using the web-based interface, or by using the switch’s command-line interface through the console port. Using the console port requires advanced user skills.

The following table shows the default settings used when configuring your switch for the first time.

Parameter

Default Value

Username

cisco

Password

cisco

LAN IP

192.168.1.254

Configuring Your Switch Using the Web-based Interface

To access the switch with a web-based interface, you must know the IP address that the switch is using. The switch uses the factory default IP address of 192.168.1.254, with a subnet of /24. When the switch is using the factory default IP address, the System LED flashes continuously. When the switch is using a DHCP server-assigned IP address or an administrator has configured a static IP address, the System LED is a steady green (DHCP is enabled by default).

If you are managing the switch through a network connection and the switch IP address is changed, either by a DHCP server or manually, your access to the switch will be lost. You must enter the new IP address that the switch is using into your browser to use the web-based interface. If you are managing the switch through a console port connection, the link is retained.

To configure the switch using the web-based interface:

Procedure


Step 1

Power on the computer and your switch.

Step 2

Connect the computer to any network port.

Step 3

Set up the IP configuration on your computer.

  1. If the switch is using the default static IP address of 192.168.1.254/24, you must choose an IP address for the computer in the range of 192.168.1.2 to 192.168.1.253 that is not already in use.

  2. If the IP addresses will be assigned by DHCP, make sure that your DHCP server is running and can be reached from the switch and the computer. You may need to disconnect and reconnect the devices for them to discover their new IP addresses from the DHCP server.

    Note 

    Details on how to change the IP address on your computer depend upon the type of architecture and operating system that you are using. Use your computers local Help and Support functionality and search for “IP Addressing.”

Step 4

Open a web browser window.

Step 5

Enter the switch IP address in the address bar and press Enter. For example,
http://192.168.1.254.

Step 6

When the login page appears, choose the language that you prefer to use in the web-based interface and enter the username and password.

The default username is cisco. The default password is cisco. Usernames and passwords are both case sensitive.

Step 7

Click Log In.

If this is the first time that you have logged on with the default username and password, the Change username and Password page opens. The rules for constructing a new password are displayed on the page.

Step 8

Enter a new username and password and confirm.

Note 

Password complexity is enabled by default. The password must comply with the default complexity rules.

Step 9

Click Apply.

Caution 

Make sure that any configuration changes made are saved before exiting from the web-based interface by clicking on the Save icon. Exiting before you save your configuration results in all changes being lost.

The Getting Started page opens. You are now ready to configure the switch. Refer to the Administration Guide or see the help pages for further information.


Configuring Your Switch Using the Console Port

To configure the switch using the console port, proceed with the following steps:

Procedure


Step 1

Connect a computer to the switch console port using a Cisco console cable (purchased separately) or a cable with mini USB connector.

Step 2

Start a console port utility such as HyperTerminal on the computer.

Step 3

Configure the utility with the following parameters:

  • 115200 bits per second

  • 8 data bits

  • no parity

  • 1 stop bit

  • no flow control

Step 4

Enter a username and password. The default username is cisco, and the default password is cisco. Usernames and passwords are both case sensitive.

If this is the first time that you have logged on with the default username and password, the following message appears:

Please change your username AND password from the default settings. Change of credentials is required for better protection of your network.
Please note that new password must follow password complexity rules
Step 5

Set a new administrator username and password.

Caution 

Make sure that any configuration changes made are saved before exiting.

You are now ready to configure the switch. See the CLI Guide for your switch.

Note 

If you are not using DHCP on your network, set the IP address type on the switch to Static and change the static IP address and subnet mask to match your network topology. Failure to do so may result in multiple switches using the same factory default IP address of 192.168.1.254.

Console access also provides additional interfaces for debug access which are not available via the web interface. These debug access interfaces are intended to be used by a Cisco Support Team personnel, in cases where it is required to debug device’s behavior. These interfaces are password protected. The passwords are held by the Cisco support team. The device supports the following debug access interfaces:

  • U-BOOT access during boot sequence

  • Linux Kernel access during boot sequence

  • Run time debug modes - allows Cisco support team to view device settings and apply protocol and layer 1 debug commands and settings. The run time debug mode is accessible over telnet and SSH terminals in addition to console.