Configure the ACI Endpoint Update App

The following task enables you to configure the ACI endpoint update app to communicate with the management center, ASA, and dynamic objects.

Prerequisites for Configuration

The following topics discuss prerequisite tasks you must complete before configuring the ACI Endpoint Update App.

Configure the Management Center Domains and Subdomains

This section applies to management center devices only. ASA devices don't have domains.

Data in one APIC tenant is pushed and merged to one particular management center domain you configure. APIC does not modify or delete any other object in another management center domain. Note that objects defined in a domain are visible and usable in an management center's subdomains, and that can be a way to share an object across subdomains.

For more information about domains, see the chapter on domain management in the Cisco Secure Firewall Management Center Configuration Guide.

Create domains and subdomains

Before you continue, make sure you have created all users, domains, and subdomains on the management center. Subdomain users must be created in the correct domain (System (system gear icon) > Users > Create User. If necessary, click Add Domain to add the user to the desired domain.)

To create a domain on the management center:

  1. Log in to the management center.

  2. Click System (system gear icon) > Domains > Add Domain.

  3. Enter the required information.

  4. Click Save.

  5. Click Save.

Examples

When you create a device in the ACI Endpoint Update App:

  • Enter a username only to push and merge the configuration to the default Global domain on the management center.

  • In the FMC Domain Name field, enter a domain in the format domain1 \domain2 to get dynamic data from the tenant and access the management center and update the objects of the subdomain named domain1 \domain2 of the Global domain..

  • In the FMC Username field, enter the username of a user with privileges to update objects in the management center.

For example, to push the APIC configuration for a tenant named ExampleTenant to the Global \ domain1 \ domain2 domain on an management center with IP address 192.0.2.25 as a user named SampleUser:

  1. Log in to APIC.

  2. Click Apps > Apps.

  3. Under management center Endpoint Update, click Open.

  4. Click (Config Devices) > Add Device > FMC.

  5. Add the device as discussed in Configure the ACI Endpoint Update App; the following figure shows an example of adding an management center.

  6. Add the following row to the table.

Create Users for the ACI Endpoint Update App

You must create one dedicated management center user for the ACI Endpoint Update App to update network object and dynamic object configuration:

  • The dedicated user is exclusively for the ACI endpoint update app to update the network object and dynamic object configuration

  • In addition, you must have a second administative user that can be shared between the ACI endpoint update app and other management center functions. (This can be an existing user or a new user.)

Each management center user must have the Administrator role. Each ASA user must have privilege level 15. It's necessary to have to users to avoid the ACI endpoint update app logging out the administrator unexpectedly.

The task that follows discusses how to create users on the management center only. To create ASA users, see the Cisco ASA Series General Operations ASDM Configuration Guide.

Procedure


Step 1

Log in to the management center if you haven't done so already.

Step 2

Click System > Users > Users.

Step 3

Click Create User.

Step 4

Under User Role Configuration, check Administrator.

Step 5

(Optional.) Click Add Domain to give the user access to a particular domain.

Both management center users must be administrators in the same domains.

Step 6

Enter the other information required to configure the user; consult the online help for assistance.


What to do next

See Configure the ACI Endpoint Update App.

Configure the ACI Endpoint Update App

To configure the ACI endpoint update app, complete the following procedure:

Before you begin

Before you configure and use the ACI Endpoint Update App, complete all of the following tasks:

Procedure


Step 1

Log in to APIC.

Step 2

Click Apps > Apps > ACI Endpoint Update.

Step 3

Locate the ACI endpoint update app.

Step 4

Click Open.

Step 5

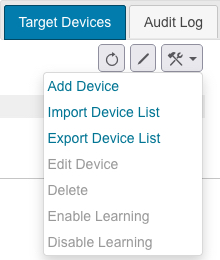
Click (Config Devices) > Add Device.

The following figure shows an example.

Step 6

For Type, click either FMC or ASA.

Step 7

Enter or edit the following information.

Item Description

Tenant Name

Click the name of a tenant to which to add the device. (To select multiple tenants, hold down the Control key while clicking.)

IP

Enter the management center's or ASA's IP address or fully-qualified host name. If your management center or ASA is behind a NAT device, separate the IP address from the port with a colon character; for example, 192.2.0.9:5001.

Username

Enter the user name of an management center or ASA user that is an Administrator in the domain (management center) or user context (ASA).

Password

Enter the user's password.

Confirm Password

Re-enter the user's password.

Domain

(Management Center only.)

Enter the alphanumeric username used by the app to sign in to the management center. The username must be different than the username you use to sign in to the management center. Otherwise, if they're the same, your sessions might get disconnected.

Enter the domain and subdomain name, if any, to which to push data. Domain names can consist of alphanumeric characters or the \ and / characters only. For more information, see Configure the Management Center Domains and Subdomains.

Network Groups

(Management Center only.) Check the box to deploy the network object configuration to the management center at the interval you select.

(Management Center only.) Uncheck the box if you don't want to push dynamic EPG data as network objects. Dynamic objects will be pushed to the configured management center if the management center version is 7.0 and later.

Automatic Deploy

Management Center Check the box to start an management center policy deployment after the app completes a periodic endpoint update. Consider disabling this option during periods of desired manual control of management center configuration, such as during a maintenance window for management center policy changes.

Step 8

After you’ve configured all your management centers or ASAs, click Submit.


JSON Configuration Reference

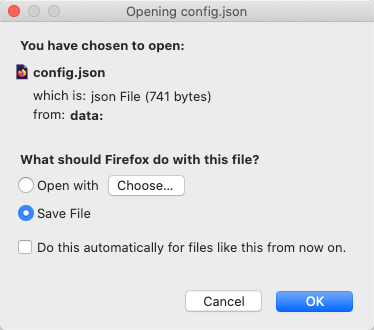
You can optionally upload and download the ACI endpoint update app in JSON format. This might be useful to create a large configuration at once and then to back up that configuration later.

All devices are exported when you request it but for easier reading, the following formats are split between management center and ASA.

Management Center:

{"interval":"value","site_prefix":"prefix","ip_1":"host or ip","user_1":"username","password_1":"<hidden>","tenant_1":"tenant name","type_1":"FMC","networkgroup_1":true,
"deploy_1":true|false,"status_1":"enabled|unreachable|Connectivity is not OK","domain_1":"name"}

ASA:

{"interval":"value","site_prefix":"prefix","ip_1":host or ip","user_1":"name","password_1":"<hidden>","tenant_1":"tenant name","type_1":"ASA","networkgroup_1":null,deploy_1":null,
"status_1":"enabled|reachable|Connectivity is OK","domain_1":null}

We recommend you download a configuration (even an empty one), edit the JSON file, then upload it.

Disable Learning Reference

You can optionally clean up the APIC configuration pushed to the management center or ASA in the event any of the following occur:

  • You remove the APIC application entirely.

  • You move the APIC configuration to another management center or ASA.

The ACI endpoint update app cleans up the management center object group configuration only for the site that is displayed in the app. No other configuration is removed either; for examle, if Domain1 is defined for Site 1 and Domain2 is defined for Site 2, if you clean the configuration of Site 2, Domain 1 is not affected.


Note

Domains are supported on the management center only.


When disabling learning, check Erase all objects to erase the pushed object information on configured devices.To avoid configuration conflicts, we prevent pushing a new configuration to the management center or ASA at the same time as cleaning up an existing configuration.

If the object group you clean up is used in any access control rule on the management center or ASA, the following happens:

  • The management center network object or ASA network object group is not deleted.

  • The IP address is replaced by 127.0.0.1.

Global and Device-Specific Options

This topic discusses how to set device-specific options for all configured devices.

Test connections to devices

You can test the connectivity to your configured devices; devices with connection issues have an orange background in the Status column.

To perform a connection test:

  1. Log in to APIC.

  2. Click Apps > Apps > ACI Endpoint Update.

  3. Locate the ACI endpoint update app.

  4. Click Open.

  5. On the right side of the page, click (Test Connectivity).

    Devices that have connectivity issues have an orange background in the Status column; the following figure shows an example.

Edit global options

Global options consist of:

  • Update interval: The interval, in seconds, to update the management center or ASA. Default is 60. The minimum interval is 10 seconds because updating too frequently might negatively impact system performance with a large number of the management centers or ASA.

  • Site prefix: Enter a unique alphanumeric string to create a network group object on the management center or ASA. In a multi-tenant environment, different network group objects prevent the configuration sent by APIC from being confused with any other configuration.

To edit global options:

  1. Log in to APIC.

  2. Click Apps > Apps > ACI Endpoint Update.

  3. Locate the ACI endpoint update app.

  4. Click Open.

  5. Click (Global Settings).

  6. Enter or edit the following information:

    Option Description
    Update interval is Enter the update interval, in seconds. Default is 60. Minimum is 10.
    and Site Prefix Enter a unique alphanumeric site prefix. Maximum of 10 characters.
  7. Click Submit.

Edit device-specific options

Device-specific options include the following:

  • Import or export a JSON file with device information: see JSON Configuration Reference.

  • Edit a device's configuration: see Configure the ACI Endpoint Update App.

  • Enable or disable learning: Endpoint groups (EPGs) or Endpoint Security Groups (ESGs) act as containers for collections of applications, or application components and tiers, that can be used to apply forwarding and policy logic.

    EPG or ESG data includes network objects and dynamic objects.

    • Dynamic objects are pushed to management centers with version 7.0 or later.

    • Dynamic objects are pushed to ASAs with version 9.3.1 or later.


    Note

    If you choose to disable learning, you have the option of erasing data on a configured management center or ASA device.


To edit device-specific options:

  1. Log in to APIC.

  2. Click Apps > Apps > ACI Endpoint Update.

  3. Locate the ACI endpoint update app.

  4. Click Open.

  5. Select the check box next to an management center or ASA device.

  6. Click (Config Devices) then click one of the following options:

    • Import Device List: See JSON Configuration Reference.

    • Export Device List: See JSON Configuration Reference.

    • Enable Learning: Start learning on the selected device. You are required to confirm the selection.

    • Disable Learning: Stop learning on the selected device. If you click this option, a checkbox is displayed that enables you to optionally erase all existing learning objects on the device.

  7. Follow the prompts on your screen to complete the action.