ASA Deployment with ASDM

Is This Chapter for You?

The Cisco ISA 3000 is a powerful, rack-mountable, hardened firewall. This chapter describes how to deploy the ISA 3000 ASA in your network and how to perform initial configuration. This chapter does not cover the following deployments, for which you should refer to the ASA configuration guide:

  • Failover

  • CLI configuration

  • (9.16 and earlier) FirePOWER Module

This chapter also walks you through configuring a basic security policy; if you have more advanced requirements, refer to the configuration guide.

The ISA 3000 hardware can run either ASA software or threat defense software. Switching between ASA and threat defense requires you to reimage the device. See Reimage the Cisco ASA or Firepower Threat Defense Device.

Privacy Collection Statement—The ISA 3000 does not require or actively collect personally-identifiable information. However, you can use personally-identifiable information in the configuration, for example for usernames. In this case, an administrator might be able to see this information when working with the configuration or when using SNMP.

About the ASA

The ASA provides advanced stateful firewall and VPN concentrator functionality in one device.

You can manage the ASA using one of the following managers:

  • ASDM (covered in this guide)—A single device manager included on the device.

  • CLI

  • CDOf—A simplified, cloud-based multi-device manager

  • Cisco Security Manager—A multi-device manager on a separate server.
End-to-End Procedure

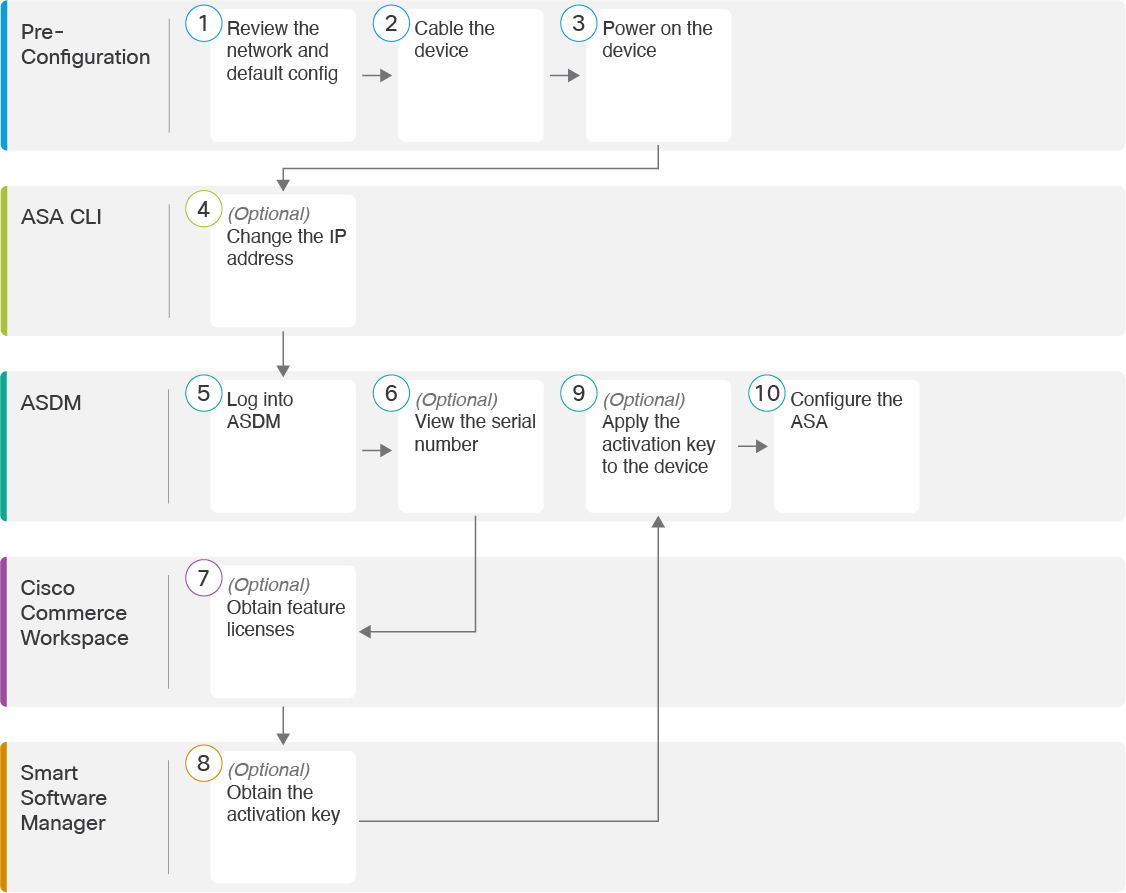
See the following tasks to deploy and configure the ASA on your chassis.

Figure 1. End-to-End Procedure
End-to-End Procedure

Pre-Configuration

Review the Network Deployment and Default Configuration.

Pre-Configuration

Cable the Firewall.

Pre-Configuration

Power on the Device.

ASA CLI

(Optional) Change the IP Address.

ASDM

Log Into the ASDM.

ASDM

(Optional) Configure ASA Licensing: View the serial number.

Cisco Commerce Workspace

(Optional) Configure ASA Licensing: Obtain feature licenses.

Smart Software Manager

(Optional) Configure ASA Licensing: Obtain the activation key.

ASDM

(Optional) Configure ASA Licensing: Apply the activation key to the device.

ASDM

Configure the ASA.

Review the Network Deployment and Default Configuration

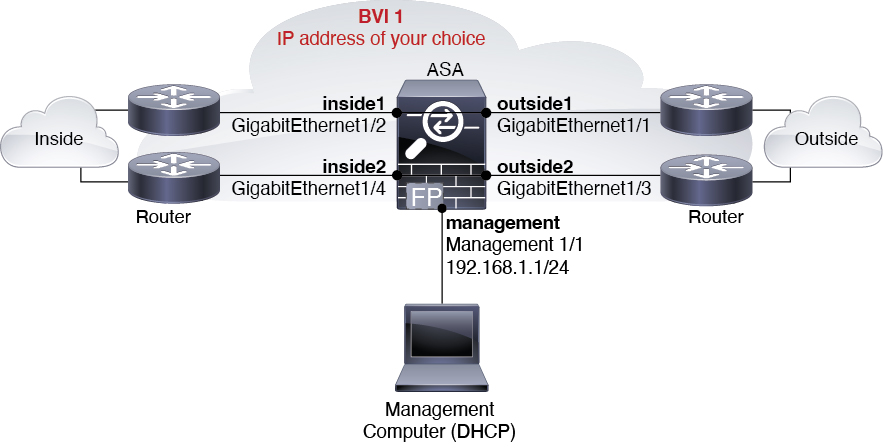
The following figure shows the recommended network deployment for the ISA 3000.


Note

If you cannot use the default Management IP address for ASDM access, you can set the Management IP address at the ASA CLI. See (Optional) Change the IP Address.


Figure 2. ISA 3000 Network
ISA 3000 Network

ISA 3000 Default Configuration

The default factory configuration for the ISA 3000 configures the following:

  • Transparent firewall mode—A transparent firewall is a Layer 2 firewall that acts like a “bump in the wire,” or a “stealth firewall,” and is not seen as a router hop to connected devices.

  • 1 Bridge Virtual Interface—All member interfaces are in the same network (IP address not pre-configured; you must set to match your network): GigabitEthernet 1/1 (outside1), GigabitEthernet 1/2 (inside1), GigabitEthernet 1/3 (outside2), GigabitEthernet 1/4 (inside2)

  • All inside and outside interfaces can communicate with each other.

  • Management 1/1 interface—192.168.1.1/24 for ASDM access.

  • DHCP for clients on management.

  • ASDM access—Management hosts allowed.

  • Hardware bypass is enabled for the following interface pairs: GigabitEthernet 1/1 & 1/2; GigabitEthernet 1/3 & 1/4


    Note

    When the ISA 3000 loses power and goes into hardware bypass mode, only the above interface pairs can communicate; inside1 and inside2, and outside1 and outside2 can no longer communicate. Any existing connections between these interfaces will be lost. When the power comes back on, there is a brief connection interruption as the ASA takes over the flows.


The configuration consists of the following commands:


firewall transparent

interface GigabitEthernet1/1
 	bridge-group 1
 	nameif outside1
 	security-level 0
		no shutdown
interface GigabitEthernet1/2
	 bridge-group 1
 	nameif inside1
 	security-level 100
 	no shutdown
interface GigabitEthernet1/3
	 bridge-group 1
	 nameif outside2
	 security-level 0
 	no shutdown
interface GigabitEthernet1/4
 	bridge-group 1
 	nameif inside2
 	security-level 100
 	no shutdown
interface Management1/1
		management-only
		no shutdown
		nameif management
		security-level 100
		ip address 192.168.1.1 255.255.255.0
interface BVI1
		no ip address

access-list allowAll extended permit ip any any
access-group allowAll in interface outside1
access-group allowAll in interface outside2

same-security-traffic permit inter-interface

hardware-bypass GigabitEthernet 1/1-1/2
hardware-bypass GigabitEthernet 1/3-1/4

http server enable
http 192.168.1.0 255.255.255.0 management

dhcpd address 192.168.1.5-192.168.1.254 management
dhcpd enable management


Cable the Firewall

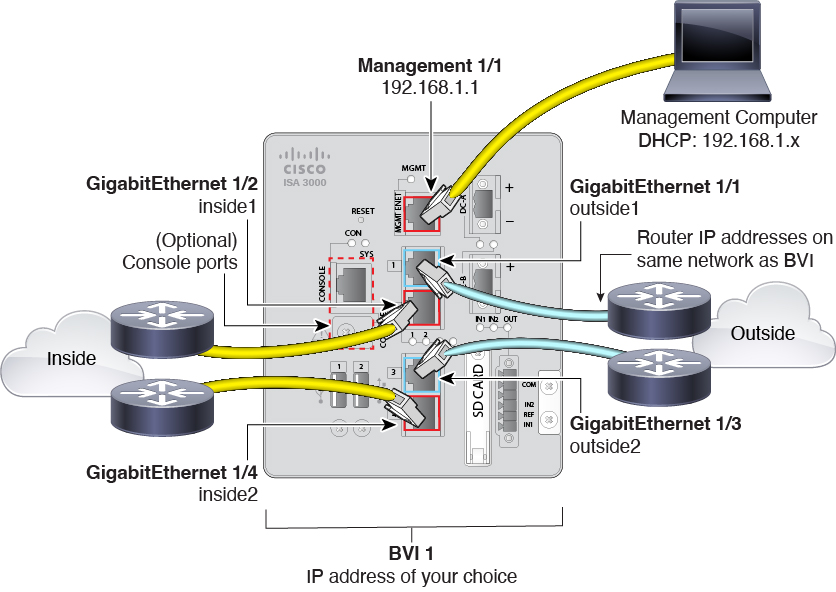
Figure 3. Cable the Firewall
Cable the Firewall
Manage the ISA 3000 on the Management 1/1 interface.

Procedure


Step 1

Connect GigabitEthernet 1/1 to an outside router, and GigabitEthernet 1/2 to an inside router.

These interfaces form a hardware bypass pair.

Step 2

Connect GigabitEthernet 1/3 to a redundant outside router, and GigabitEthernet 1/4 to a redundant inside router.

These interfaces form a hardware bypass pair. These interfaces provide a redundant network path if the other pair fails. All 4 of these data interfaces are on the same network of your choice. You will need to configure the BVI 1 IP address to be on the same network as the inside and outside routers.

Step 3

Connect Management 1/1 to your management computer (or network).

Step 4

(Optional) Connect the management computer to the console port.

If you need to change the management IP address from the default, you must also cable your management computer to the console port. See (Optional) Change the IP Address.


Power on the Device

System power is controlled by DC power; there is no power button.

Procedure


Step 1

Attach the power plug to the ISA 3000 after wiring it to the DC power source.

Refer to “Connecting to DC Power” in the hardware installation guide for instructions on proper wiring of the power plug.

Step 2

Check the System LED on the front panel of the ISA 3000 device; if it is steady green, the device is powered on. If it is flashing green, the device is in Boot up phase and POST.

Refer to “Verifying Connections” in the hardware installation guide to verify that all devices are properly connected to the ISA 3000.


(Optional) Change the IP Address

If you cannot use the default IP address for ASDM access, you can set the IP address of the management interface at the ASA CLI.


Note

This procedure restores the default configuration and also sets your chosen IP address, so if you made any changes to the ASA configuration that you want to preserve, do not use this procedure.


Procedure


Step 1

Connect to the ASA console port, and enter global configuration mode. See Access the ASA CLI for more information.

Step 2

Restore the default configuration with your chosen IP address.

configure factory-default [ip_address [mask]]

Example:


ciscoasa(config)# configure factory-default 10.1.1.151 255.255.255.0
Based on the management IP address and mask, the DHCP address
pool size is reduced to 103 from the platform limit 256

WARNING: The boot system configuration will be cleared.
The first image found in disk0:/ will be used to boot the
system on the next reload.
Verify there is a valid image on disk0:/ or the system will
not boot.

Begin to apply factory-default configuration:
Clear all configuration
Executing command: interface management1/1
Executing command: nameif management
INFO: Security level for "management" set to 0 by default.
Executing command: ip address 10.1.1.151 255.255.255.0
Executing command: security-level 100
Executing command: no shutdown
Executing command: exit
Executing command: http server enable
Executing command: http 10.1.1.0 255.255.255.0 management
Executing command: dhcpd address 10.1.1.152-10.1.1.254 management
Executing command: dhcpd enable management
Executing command: logging asdm informational
Factory-default configuration is completed
ciscoasa(config)# 

Step 3

Save the default configuration to flash memory.

write memory


Log Into the ASDM

Launch the ASDM so you can configure the ASA.

Before you begin

Procedure


Step 1

Enter the following URL in your browser.

  • https://192.168.1.1 —Management interface IP address.

Note 

Be sure to specify https://, and not http:// or just the IP address (which defaults to HTTP); the ASA does not automatically forward an HTTP request to HTTPS.

The Cisco ASDM web page appears. You may see browser security warnings because the ASA does not have a certificate installed; you can safely ignore these warnings and visit the web page.

Step 2

Click one of these available options: Install ASDM Launcher or Run ASDM.

Step 3

Follow the onscreen instructions to launch ASDM according to the option you chose.

The Cisco ASDM-IDM Launcher appears.

Step 4

Leave the username and password fields empty, and click OK.

The main ASDM window appears.


(Optional) Configure ASA Licensing

The ISA 3000 includes the Base or Security Plus license, depending on the version you ordered. The Security Plus license provides more firewall connections, VPN connections, failover capability, and VLANs.

It also comes pre-installed with the Strong Encryption (3DES/AES) license if you qualify for its use; this license is not available for some countries depending on United States export control policy. The Strong Encryption license allows traffic with strong encryption, such as VPN traffic.

This procedure describes how to obtain and activate additional licenses. You do not need to follow this procedure unless you obtain new licenses.

If you need to manually request the Strong Encryption license (which is free), see https://www.cisco.com/go/license.

You can optionally purchase an AnyConnect Plus or Apex license, which allows AnyConnect VPN client connections.

To install additional ASA licenses, perform the following steps.

Procedure


Step 1

Obtain the serial number for your ASA in ASDM by choosing Configuration > Device Management > Licensing > Activation Key.

Note 

The serial number used for licensing is different from the chassis serial number printed on the outside of your hardware. The chassis serial number is used for technical support, but not for licensing. To view the licensing serial number, enter the show version | grep Serial command or see the ASDM Configuration > Device Management > Licensing Activation Key page.

Step 2

See http://www.cisco.com/go/ccw to purchase the Security Plus license using the following PID: L-ISA3000SEC+-K9=.

For AnyConnect License PIDs, see the Cisco AnyConnect Ordering Guide and the AnyConnect Licensing Frequently Asked Questions (FAQ).

After you order a license, you will then receive an email with a Product Authorization Key (PAK) so you can obtain the license activation key. For the AnyConnect licenses, you receive a multi-use PAK that you can apply to multiple ASAs that use the same pool of user sessions. The PAK email can take several days in some cases.

Step 3

Obtain the activation key from the following licensing website: https://www.cisco.com/go/license

Enter the following information, when prompted:

  • Product Authorization Keys

  • The serial number of your ASA

  • Your e-mail address

An activation key is automatically generated and sent to the e-mail address that you provide. This key includes all features you have registered so far for permanent licenses.

Step 4

On the ASDM Configuration > Device Management > Licensing > Activation Key pane, enter the New Activation Key.

The key is a five-element hexadecimal string with one space between each element. The leading 0x specifier is optional; all values are assumed to be hexadecimal. For example:


ASA0xd11b3d48 0xa80a4c0a 0x48e0fd1c 0xb0443480 0x843fc490

Step 5

Click Update Activation Key.


Configure the ASA

Using ASDM, you can use wizards to configure basic and advanced features. You can also manually configure features not included in wizards. You must set the BVI 1 IP address to match your network.

Procedure


Step 1

Choose Wizards > Startup Wizard, and click the Modify existing configuration radio button.

Step 2

The Startup Wizard walks you through configuring:

  • The enable password

  • Interfaces, including setting the inside and outside interface IP addresses and enabling interfaces.

  • Static routes

  • The DHCP server

  • And more...

Step 3

(Optional) From the Wizards menu, run other wizards.

Step 4

To continue configuring your ASA, see the documents available for your software version at Navigating the Cisco ASA Series Documentation.


Access the ASA CLI

You can use the ASA CLI to troubleshoot or configure the ASA instead of using ASDM. You can access the CLI by connecting to the console port. You can later configure SSH access to the ASA on any interface; SSH access is disabled by default. See the ASA general operations configuration guide for more information.

Procedure


Step 1

Connect your management computer to the console port, either the RJ-45 port or the mini-USB port.Be sure to install any necessary USB serial drivers for your operating system. Use the following serial settings:

  • 9600 baud

  • 8 data bits

  • No parity

  • 1 stop bit

You connect to the ASA CLI. There are no user credentials required for console access by default.

Step 2

Access privileged EXEC mode.

enable

You are prompted to change the password the first time you enter the enable command.

Example:


ciscoasa> enable
Password:
The enable password is not set. Please set it now.
Enter Password: ******
Repeat Password: ******
ciscoasa#

All non-configuration commands are available in privileged EXEC mode. You can also enter configuration mode from privileged EXEC mode.

To exit privileged EXEC mode, enter the disable , exit , or quit command.

Step 3

Access global configuration mode.

configure terminal

Example:


ciscoasa# configure terminal
ciscoasa(config)#

You can begin to configure the ASA from global configuration mode. To exit global configuration mode, enter the exit , quit , or end command.