Traffic Profiling

The following topics describe how to configure traffic profiles:

Introduction to Traffic Profiles

A traffic profile is a graph of network traffic based on connection data collected over a profiling time window (PTW). This measurement presumably represents normal network traffic. After the learning period, you can detect abnormal network traffic by evaluating new traffic against your profile.

The default PTW is one week, but you can change it to be as short as an hour or as long as several weeks. By default, traffic profiles generate statistics on connection events generated by the system over five-minute intervals. However, you can increase this sampling rate to as long as an hour.


Tip


Cisco recommends that the PTW include at least 100 data points. Configure your PTW and sampling rate so that your traffic profiles contain enough data to be statistically meaningful.


The following graphic shows a traffic profile with a PTW of one day and a sampling rate of five minutes.

Screenshot of a traffic profile with a PTW of one day and sampling rate of five minutes

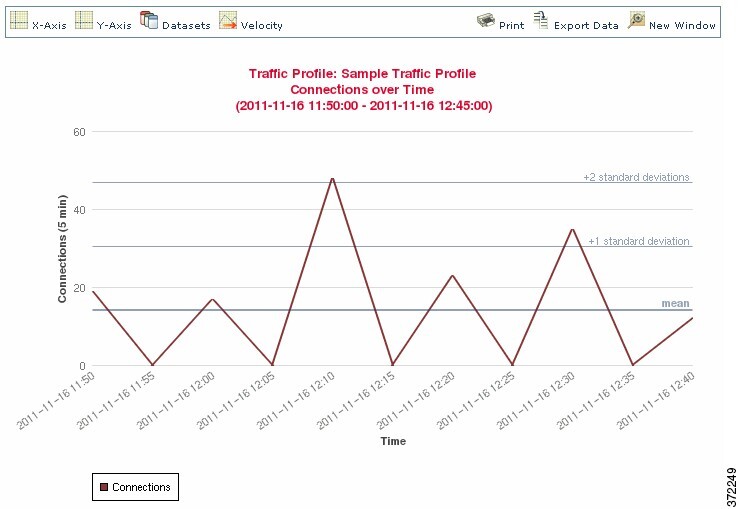
You can also set up inactive periods in traffic profile. Traffic profiles collect data during inactive periods, but do not use that data when calculating profile statistics. Traffic profile graphs plotted over time show inactive periods as a shaded region.

For example, consider a network infrastructure where all the workstations are backed up at midnight every night. The backup takes about 30 minutes and spikes the network traffic. You could configure recurring inactive period for your traffic profile to coincide with the scheduled backups.


Note


The system uses end-of-connection data to create connection graphs and traffic profiles. To use traffic profiles, make sure you log end-of-connection events to the Firepower Management Center database.


Implementing Traffic Profiles

When you activate a traffic profile, the system collects and evaluates connection data for the learning period (PTW) you configured. After the learning period, the system evaluates correlation rules written against the traffic profile.

For example, you could write a rule that triggers if the amount of data traversing your network (measured in packets, KBytes, or number of connections) suddenly spikes to three standard deviations above the mean amount of traffic, which could indicate an attack or other security policy violation. Then, you could include that rule in a correlation policy to alert you of the traffic spike or to perform a remediation in response.

Targeting Traffic Profiles

Profile conditions and host profile qualifications constrain traffic profiles.

Using profile conditions, you can profile all network traffic, or you can restrict the traffic profile to monitoring a domain, subnets within or across domains, or individual hosts. In a multidomain deployment:

  • Leaf-domain administrators can profile network traffic within their leaf domains.

  • Higher-level domain administrators can profile traffic within or across domains.

Profile conditions can also constrain traffic profiles using criteria based on connection data. For example, you could set the profile conditions so that the traffic profile only profiles sessions using a specific port, protocol, or application.

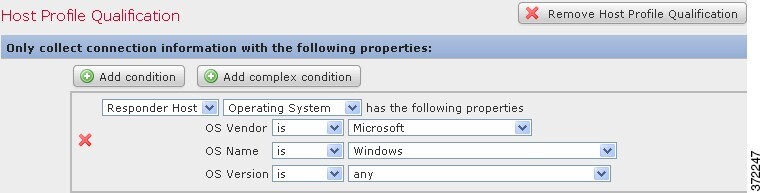
Finally, you can also constrain traffic profiles using information about the tracked hosts. This constraint is called a host profile qualification. For example, you could collect connection data only for hosts with high criticality.


Note


Constraining a traffic profile to a higher-level domain aggregates and profiles the same type of traffic in each of the descendant leaf domains. The system builds a separate network map for each leaf domain. In a multidomain deployment, profiling traffic across domains can have unexpected results.


Traffic Profile Conditions

You can create simple traffic profile conditions and host profile qualifications, or you can create more elaborate constructs by combining and nesting conditions.

Conditions have three parts: a category, an operator, and a value:

  • The categories you can use depend on whether you are building traffic profile conditions or a host profile qualification.

  • The operators you can use depend on the category you choose.

  • The syntax you can use to specify a condition’s value depends on the category and operator. Sometimes you must enter the value in a text field. Other times, you can pick one or more values from a drop-down list.

For a host profile qualification, you must also specify whether you are constraining the traffic profile using information data about the initiating or responding hosts.

When your construct includes more than one condition, you must link them with an AND or an OR operator. Conditions on the same level are evaluated together:

  • The AND operator requires that all conditions on the level it controls must be met.

  • The OR operator requires that at least one of the conditions on the level it controls must be met.

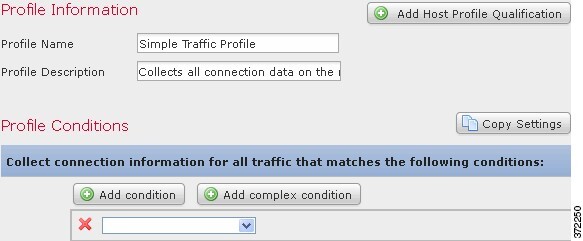
Unconstrained Traffic Profile

If you want to create a traffic profile that collects data for your entire monitored network segment, you can create a very simple profile with no conditions, as shown in the following graphic.

Screenshot of a simple traffic profile with no conditions

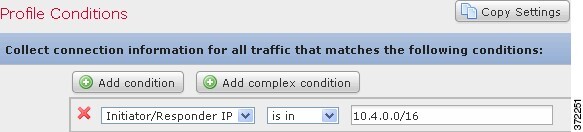
Simple Traffic Profile

If you wanted to constrain the profile and collect data only for a subnet, you can add a single condition, as shown in the following graphic.

Screenshot of a single traffic profile condition

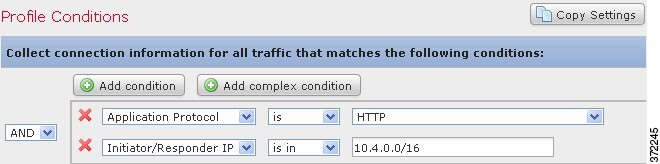
Complex Traffic Profile

The following traffic profile contains two conditions linked by AND. This means that the traffic profile collects connection data only if both conditions are true. In this example, it collects HTTP connections for all hosts with IP addresses in a specific subnet.

Screenshot of traffic profile collecting data for hosts with an IP address in the 10.4.x.x subnet

In contrast, the following traffic profile, which collects connection data for HTTP activity in either of two subnets, has three conditions, with the last constituting a complex condition.

Screenshot of a traffic profile which collects connection data for HTTP activity in the 10.4.x.x network or the 192.168.x.x network

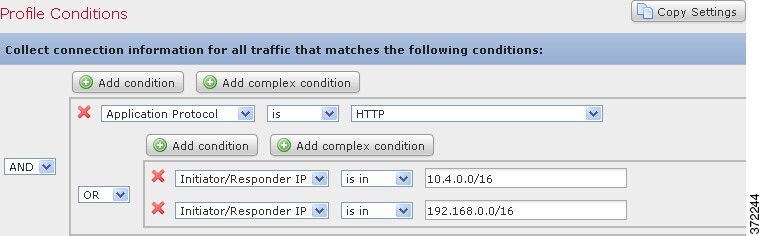
Logically, the above traffic profile is evaluated as follows:


(A and (B or C))

Where...

Is the condition that states...

A

Application Protocol Name is HTTP

B

IP Address is in 10.4.0.0/16

C

IP Address is in 192.168.0.0/16

Requirements and Prerequisites for Traffic Profiles

Model Support

Any

Supported Domains

Any

User Roles

  • Admin

  • Discovery Admin

Managing Traffic Profiles

Only rules written against active, complete traffic profiles can trigger a correlation policy violation. A slider next to each traffic profile indicates whether the profile is active and collecting data. A progress bar shows the status of the traffic profile’s learning period.

In a multidomain deployment, the system displays traffic profiles created in the current domain, which you can edit. It also displays selected traffic profiles from ancestor domains, which you cannot edit. To view and edit traffic profiles created in a lower domain, switch to that domain.


Note


The system does not display traffic profiles from ancestor domains if the profiles' conditions expose information about unrelated domains, including names, managed devices, and so on.


Procedure


Step 1

Choose Policies > Correlation, then click Traffic Profiles.

Step 2

Manage your traffic profiles:

  • Activate/Deactivate — To activate or deactivate a traffic profile, click the slider. Deactivating a traffic profile deletes its associated data. If you reactivate the profile, you must wait the length of its PTW before rules written against it will trigger.
  • Create — To create a new traffic profile, click New Profile and proceed as described in Configuring Traffic Profiles. You can also click Copy (copy icon) to edit a copy of an existing traffic profile.
  • Delete — To delete a traffic profile, click Delete (delete icon), then confirm your choice.
  • Edit — To modify an existing traffic profile, click Edit (edit icon) and proceed as described in Configuring Traffic Profiles. If a traffic profile is active you can only change its name and description.
  • Graph — To view the traffic profile as a graph, click Graph (graph icon). In a multidomain deployment, you cannot view the graph for a traffic profile that belongs to an ancestor domain if the graph exposes information about unrelated domains.

Configuring Traffic Profiles

Constraining a traffic profile to a higher-level domain aggregates and profiles the same type of traffic in each of the descendant leaf domains. The system builds a separate network map for each leaf domain. In a multidomain deployment, profiling traffic across domains can have unexpected results.

Procedure


Step 1

Choose Policies > Correlation, then click Traffic Profiles.

Step 2

Click New Profile.

Step 3

Enter a Profile Name, and optionally, a Profile Description.

Step 4

Optionally, constrain the traffic profile:

  • Copy Settings — To copy settings from an existing traffic profile, click Copy Settings, choose the traffic profile you want to use, and click Load.
  • Profile Conditions — To constrain the traffic profile using information from tracked connections, proceed as described in Adding Traffic Profile Conditions.
  • Host Profile Qualification — To constrain the traffic profile using information from tracked hosts, proceed as described in Adding Host Profile Qualifications to a Traffic Profile.
  • Profiling Time Window (PTW) — To change the Profiling Time Window, enter a time unit, then choose hour(s), day(s), or week(s).
  • Sampling Rate — Choose a Sampling Rate, in minutes.
  • Inactive Period — Click Add Inactive Period and use the drop-down lists to specify when and how often you want the traffic profile remain inactive. Inactive traffic profiles do not trigger correlation rules. Traffic profiles do not include data from inactive periods in profile statistics.

Step 5

Save the traffic profile:

  • To save the profile and start collecting data immediately, click Save & Activate.
  • To save the profile without activating it, click Save.

Adding Traffic Profile Conditions

Procedure


Step 1

In the traffic profile editor, under Profile Conditions, click Add condition or Add complex condition for each condition you want to add. Conditions on the same level are evaluated together.

  • To require that all conditions on the level that the operator controls are met, choose AND.
  • To require that only one of the conditions on the level that the operator controls is met, choose OR.

Step 2

Specify a category, operator, and value for each condition as described in Syntax for Traffic Profile Conditions and Traffic Profile Conditions.

If you choose is in or is not in as the operator, you can select multiple values in a single condition as described in Using Multiple Values in a Traffic Profile Condition.

When the category represents an IP address, choosing is in or is not in as the operator allows you to specify whether the IP address is in or is not in a range of IP addresses.


Example

The following traffic profile collects information on a specific subnet. The category of the condition is Initiator/Responder IP, the operator is is in, and the value is 10.4.0.0/16.

Screenshot of a traffic profile collecting information on the 10.4.x.x network

Adding Host Profile Qualifications to a Traffic Profile

Procedure


Step 1

In the traffic profile editor, click Add Host Profile Qualification.

Step 2

Under Host Profile Qualification, click Add condition or Add complex condition for each condition you want to add. Conditions on the same level are evaluated together.

  • To require that all conditions on the level that the operator controls are met, choose AND.
  • To require that only one of the conditions on the level that the operator controls is met, choose OR.

Step 3

Specify a host type, category, operator, and value for each condition as described in Syntax for Host Profile Qualifications in a Traffic Profileand Traffic Profile Conditions.

If you choose is in or is not in as the operator, you can select multiple values in a single condition as described in Using Multiple Values in a Traffic Profile Condition.


Example

The following host profile qualification constrains a traffic profile such that it collects connection data only if the responding host in the detected connection is running a version of Microsoft Windows.

Screenshot of a host profile qualification configured to search for hosts running Microsoft Windows

Syntax for Traffic Profile Conditions

The following table describes how to build a traffic profile condition. Keep in mind the connection data available to build a traffic profile depends on several factors, including traffic characteristics and detection method.

Table 1. Syntax for Traffic Profile Conditions

If you choose...

Choose an operator, then...

Application Protocol

Choose one or more application protocols.

Application Protocol Category

Choose one or more application protocol categories.

Client

Choose one or more clients.

Client Category

Choose one or more client categories.

Connection Type

Choose whether the profile uses connection data from traffic monitored by Firepower System managed devices or from exported NetFlow records.

If you do not specify a connection type, the traffic profile includes both.

Destination Country or Source Country

Choose one or more countries.

Domain

Choose one or more domains. In a multidomain deployment, constraining by an ancestor domain matches data reported by that domain's descendants.

Initiator IP,
Responder IP, or Initiator/Responder IP

Enter an IP address or range of IP addresses.

The system builds a separate network map for each leaf domain. In a multidomain deployment, using literal IP addresses to constrain this configuration can have unexpected results.

NetFlow Device

Choose the NetFlow exporter whose data you want to use to create the traffic profile.

Responder Port/ICMP Code

Enter the port number or ICMP code.

Security Intelligence Category

Choose one or more a Security Intelligence categories.

To use a Security Intelligence category for a traffic profile condition, that category must be set to Monitor instead of Block in your access control policy.

SSL Encrypted Session

Choose Successfully Decrypted.

Transport Protocol

Enter TCP or UDP as the transport protocol.

Web Application

Choose one or more web applications.

Web Application Category

Choose one or more web application categories.

Syntax for Host Profile Qualifications in a Traffic Profile

When you build a host profile qualification condition, you must first choose the host you want to use to constrain your traffic profile. You can choose either Responder Host or Initiator Host. After you choose the host role, continue building your host profile qualification condition.

Although you can add hosts to the network map using NetFlow records, the available information about these hosts is limited. For example, there is no operating system data available for these hosts, unless you provide it using the host input feature. In addition, if your traffic profile uses connection data from exported NetFlow records, keep in mind that NetFlow records do not contain information about which host in the connection is the initiator and which is the responder. When the system processes NetFlow records, it uses an algorithm to determine this information based on the ports each host is using, and whether those ports are well-known.

To match against implied or generic clients, create a host profile qualification based on the application protocol used by the server responding to the client. When the client list on a host that acts as the initiator or source of a connection includes an application protocol name followed by client, that client may actually be an implied client. In other words, the system reports that client based on server response traffic that uses the application protocol for that client, not on detected client traffic.

For example, if the system reports HTTPS client as a client on a host, create a host profile qualification for Responder Host where Application Protocol is set to HTTPS, because HTTPS client is reported as a generic client based on the HTTPS server response traffic sent by the responder or destination host.

Table 2. Syntax for Host Profile Qualifications

If you choose...

Choose an operator, then...

Application Protocol >
Application Protocol

Choose one or more application protocols.

Application Protocol >
Application Port

Enter the application protocol port number.

Application Protocol >
Protocol

Choose the protocol.

Application Protocol Category

Choose one or more application protocol categories.

Client > Client

Choose one or more clients.

Client > Client Version

Enter the client version.

Client Category

Choose one or more client categories.

Domain

Choose one or more domains. In a multidomain deployment, constraining by an ancestor domain matches data reported by that domain's descendants.

Hardware

Enter a mobile device hardware model. For example, to match all Apple iPhones, enter iPhone.

Host Criticality

Choose a host criticality.

Host Type

Choose one or more host types. You can choose between a normal host or one of several types of network device.

IOC Tag

Choose one or more IOC tags.

Jailbroken

Choose Yes to indicate that the host in the event is a jailbroken mobile device or No to indicate that it is not.

MAC Address > MAC Address

Enter all or part of the MAC address of the host.

MAC Address > MAC Type

Choose whether the MAC type is ARP/DHCP Detected, that is, whether:

  • The system positively identified the MAC address as belonging to the host (is ARP/DHCP Detected)

  • The system is seeing many hosts with that MAC address because, for example, there is a router between the device and the host (is not ARP/DHCP Detected)

  • The MAC type is irrelevant (is any)

MAC Vendor

Enter all or part of the MAC vendor of hardware used by the host.

Mobile

Choose Yes to indicate that the host in the event is a mobile device or No to indicate that it is not.

NETBIOS Name

Enter the NetBIOS name of the host.

Network Protocol

Enter the network protocol number as listed in http://www.iana.org/assignments/ethernet-numbers.

Operating System > OS Vendor

Choose one or more operating system vendor names.

Operating System > OS Name

Choose one or more operating system names.

Operating System > OS Version

Choose one or more operating system versions.

Transport Protocol

Enter the name or number of the transport protocol as listed in http://www.iana.org/assignments/protocol-numbers.

VLAN ID

Enter the VLAN ID number of the host.

The system builds a separate network map for each leaf domain. In a multidomain deployment, using literal VLAN tags to constrain this configuration can have unexpected results.

Web Application

Choose one or more web applications.

Web Application Category

Choose one or more web application categories.

any available host attribute, including the default compliance white list host attribute

Specify the appropriate value, which depends on the type of host attribute you choose:

  • If the host attribute type is Integer, enter an integer value in the range defined for the attribute.

  • If the host attribute type is Text, enter a text value.

  • If the host attribute type is List, choose a valid list string.

  • If the host attribute type is URL, enter a URL value.

Using Multiple Values in a Traffic Profile Condition

When you are building a condition, and the condition syntax allows you to pick a value from a drop-down list, you can often use multiple values from the list.

For example, if you want to add a host profile qualification to a traffic profile that requires that a host be running some flavor of UNIX, instead of constructing multiple conditions linked with the OR operator, use the following procedure.

Procedure


Step 1

While building a traffic profile or host profile qualification condition, choose is in or is not in as the operator.

The drop-down list changes to a text field.

Step 2

Click anywhere in the text field or on the Edit link.

Step 3

Under Available, choose multiple values.

Step 4

Click the right arrow to move the selected entries to Selected.

Step 5

Click OK.