Enterprise Firewall

Cisco’s Enterprise Firewall uses a flexible and easily understood zone-based model for traffic inspection, compared to the older interface-based model.

A firewall policy is a type of localized security policy that allows stateful inspection of TCP, UDP, and ICMP data traffic flows. Traffic flows that originate in a given zone are allowed to proceed to another zone based on the policy between the two zones. A zone is a grouping of one or more VPNs. Grouping VPNs into zones allows you to establish security boundaries in your overlay network so that you can control all data traffic that passes between zones.

Zone configuration consists of the following components:

  • Source zone—A grouping of VPNs where the data traffic flows originate. A VPN can be part of only one zone.

  • Destination zone—A grouping of VPNs where the data traffic flows terminate. A VPN can be part of only one zone.

  • Firewall policy—A security policy, similar to a localized security policy, that defines the conditions that the data traffic flow from the source zone must match to allow the flow to continue to the destination zone. Firewall policies can match IP prefixes, IP ports, the protocols TCP, UDP, and ICMP. Matching flows for prefixes, ports, and protocols can be accepted or dropped, and the packet headers can be logged. Nonmatching flows are dropped by default.

  • Zone pair—A container that associates a source zone with a destination zone and that applies a firewall policy to the traffic that flows between the two zones.

Matching flows that are accepted can be processed in two different ways:

  • Inspect—The packet's header can be inspected to determine its source address and port. 

  • Pass—Allow the packet to pass to the destination zone without inspecting the packet's header at all. 

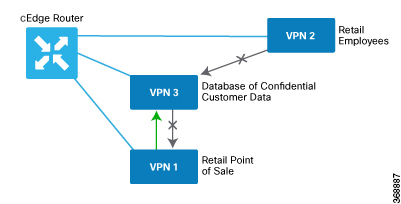
The following figure shows a simple scenario in which three VPNs are configured on a XE SD-WAN Router. One of the VPNs, VPN 3, has shared resources that you want to restrict access to. These resources could be printers or confidential customer data. For the remaining two VPNs in this scenario, only users in one of them, VPN 1, are allowed to access the resources in VPN 3, while users in VPN 2 are denied access to these resources. In this scenario, we want data traffic to flow from VPN 1 to VPN 3, but we do not want traffic to flow in the other direction, from VPN 3 to VPN 1.

Firewall policies perform stateful inspection of TCP, UDP, and ICMP flows between zones. They examine the source and destination IP addresses and ports in the packet headers, as well as the packet's protocol. Then, based on the configured zone-based policy, they allow traffic to pass between the zones or they drop the traffic.

The implementation of firewall policies varies slightly to that of localized security policy. Where you configure and apply localized security policy based only on VPNs, you configure and apply firewall policies to one or more VPNs that have been grouped into a zone. You activate localized security policy by applying it to individual interfaces on the XE SD-WAN Routers. When you activate firewall policies, they apply to the specific VPNs in the zones, without regard to any specific interfaces.

vEdge routers provide Application Layer Gateway (ALG) FTP support with Network Address Translation – Direct Internet Access (NAT-DIA), Service NAT, and Enterprise Firewall. Service NAT support is added for FTP ALG on the client and not on the FTP Server.

Configure Firewall Policies

In Cisco vManage, you configure firewall policies from the Configuration > Security screen, using a policy configuration wizard. In the CLI, you configure these firewalls on the router.

General Cisco vManage Configuration Procedure

To configure firewall policies, use the policy configuration wizard. The wizard is a UI policy builder that lets you configure policy components:

  • Create Lists—Create lists that group together related items and that you call in the match condition of a firewall policy.

  • Firewall Policy—Define the match and action conditions of the firewall policy.

  • Apply Configuration—Define zone pairs.

You must configure all these components to create a firewall policy. If you are modifying an existing firewall, you can skip a component by clicking the Next button at the bottom of the screen. To return to a component, click the Back button at the bottom of the screen.

Monitor Enterprise Firewall

You can monitor Enterprise Firewall by using the statistics created for the firewall.

To monitor Enterprise Firewall and view statistics:

  1. Cisco vManage, navigate to Monitor > Network.

  2. Select a device from the list of devices.

  3. Under the Security Monitoring pane on the left, click Real Time. A pop-up screen appears with Device Options.

  4. Click on the Search tab, and choose Policy Zone Based Firewall Statistics from the list to view the statistics for the firewall policies.


    Note

    Firewall Charts and Policy statistics are not currently supported for Cisco vEdge devices from Network > Firewall dashboard. However, detailed statistics are available when you navigate to Network > Real Time.

Zone-Based Firewall Configuration Examples

This topic provides an example of configuring a simple zone-based firewall using the CLI or vManage.

Isolating Two VPNs

In this zone-based firewall configuration example, we have a scenario where a router is connected to three service-side networks:

  • Guest network that provides point-of-sale (PoS) services

  • Employee network

  • Network that provides shared services, including shared printers and the customer database

We want users in the employee and guest networks to be able to access the shared services, but we do not want any traffic to be exchanged between the employee and guest networks. Similarly, we do not want any traffic that originates in the shared services network to enter into either the employee network or the guest network. The following figure illustrates this scenario:

In this figure:

  • VPN 1 is the guest network used for PoS services.

  • VPN 2 is the network used by the enterprise's employees.

  • VPN 3 contains the shared services, including printers and customer databases.

The configuration consists of three sections:

  • Define the zones.

  • Define the zone-based firewall policy.

  • Apply the zone-based firewall policy to a source zone and destination zone pair.

CLI Configuration

First, we define the zones for this scenario:

vEdge(config)# policy
vEdge(config-policy)# zone pos-zone vpn 1
vEdge(config-policy)# zone employee-zone vpn 2
vEdge(config-policy)# zone services-zone vpn 3

In this simple example, each zone corresponds to a single VPN. If you were to later add a second VPN for a discrete group of employees (let's say this is VPN 20) and you wanted this VPN to be subject to the same firewall policy, you could simply add this VPN to the employee zone:

vEdge(config-policy)# zone employee-zone vpn 20
vEdge(config-policy)# show full-configuration
policy zone employee-zone
  vpn 2
  vpn 20
 !
!

Next, we configure the zone-based firewall policy. The policy matches all traffic that is destined for VPN 3, which is the services zone, and which has an IP prefix of 10.2.2.0/24. Because we want the policy to allow traffic to flow from VPN 1 and VPN 2 to VPN 3, but we do not want traffic to flow in the reverse direction, we set the action to pass.

vEdge(config-policy)# zone-based-policy vpn-isolation-policy(config-zone-based-policy)# sequence 10(config-sequence)# match destination-ip 10.2.2.0/24
vEdge(config-sequence)# action pass

We want to drop any traffic that does not match the zone-based filrewall policy:

vEdge(config-zone-based-policy)# default-action drop

In the final step of the configuration process, we apply the zone-based firewall policy to the zones. Here is the zone pairing between the guest and PoS zone and the services zone:

vEdge(config-policy)# zone-pair pos-services-pairing
vEdge(config-zone-pair)# source-zone pos-zone
vEdge(config-zone-pair)# destination-zone services-zone
vEdge(config-zone-pair)# zone-policy vpn-isolation-policy
            

And here is the pairing between the employee zone and the services zone:

vEdge(config-policy)# zone-pair employee-services-pairing
vEdge(config-zone-pair)# source-zone employee-zone
vEdge(config-zone-pair)# destination-zone services-zone
vEdge(config-zone-pair)# zone-pair employee-services-pairing
            

Here is a view of the entire policy:

vEdge(config-policy)# show full-configuration
 policy
 zone employee-zone
  vpn 2 
! zone pos-zone
  vpn 1
 ! zone services-zone
  vpn 3 
! 
zone-pair employee-services-pairing
  source-zone      employee-zone
  destination-zone services-zone
  zone-policy      vpn-isolation-policy
 ! 
zone-pair services-pairing
  source-zone      pos-zone
  destination-zone services-zone
  zone-policy      vpn-isolation-policy
 ! 
zone-based-policy vpn-isolation-policy
  sequence 10
   match 
   destination-ip 10.2.2.0/24 
  !
   action pass 
  !  
! 
 default-action drop 
!
!

vManage Configuration

To configure this zone-based firewall policy in vManage NMS:

  1. Select Configuration > Security.

  2. Click Add Policy. The zone-based firewall configuration wizard opens.

Configure data prefix groups and zones in the Create Groups of Interest screen:

  1. In the left pane, select Data Prefix.

  2. In the right pane, click New Data Prefix List.

  3. Enter a name for the list.

  4. Enter the data prefix or prefixes to include in the list.

  5. Click Add.

Configure zones in the Create Groups of Interest screen:

  1. In the left pane, select Zones.

  2. In the right pane, click New Zone List.

  3. Enter a name for the list.

  4. Enter the number of the zone or zones to include in the list. Separate numbers with a comma.

  5. Click Add.

  6. Click Next to move to Zone-Based Firewall in the zone-based firewall configuration wizard.

Configure zone-based firewall policies:

  1. Click Add Configuration, and select Create New.

  2. Enter a name and description for the policy.

  3. In the left pane, click Add Sequence.

  4. In the right pane, click Add Sequence Rule.

  5. Select the desired match and action conditions.

  6. Click Same Match and Actions.

  7. In the left pane, click Default Action.

  8. Select the desired default action.

  9. Click Save Zone-Based Policy.

Click Next to move to the Apply Configuration in the zone-based firewall configuration wizard.

  1. Enter a name and description for the zone-based firewall zone pair.

  2. Click Add Zone Pair.

  3. In the Source Zone drop-down, select the zone from which data traffic originates.

  4. In the Destination Zone drop-down, select the zone to which data traffic is sent.

  5. Click Add.

  6. Click Save Policy. The Configuration > Security screen is then displayed, and the zone-based firewalls table includes the newly created policy.