Establish a Model-Driven Telemetry Session from a Router to a Collector

Streaming telemetry is a new paradigm in monitoring the health of a network. It provides a mechanism to efficiently stream configuration and operational data of interest from Cisco IOS XR routers. This streamed data is transmitted in a structured format to remote management stations for monitoring and troubleshooting purposes.

With telemetry data, you create a data lake. Analyzing this data, you proactively monitor your network, monitor utilization of CPU and memory, identify patterns, troubleshoot your network in a predictive manner, and devise strategies to create a resilient network using automation.

Telemetry works on a Subscription model where you subscribe to the data of interest in the form of Sensor Path. The sensor paths describe native Cisco data models. You can access the Native data models for telemetry from Github, a software development platform that provides hosting services for version control. You choose who initiates the subscription by establishing a telemetry session between the router and the receiver. The session is established using a Dial-Out Mode.


Note

Watch this video to discover the power of real-time network management using model-driven telemetry.


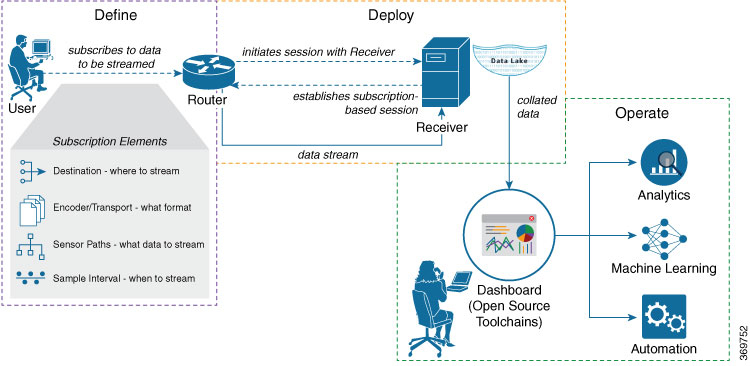
This article describes the dial-out mode where the router dials out to the receiver to establish a telemetry session. In this mode, destinations and sensor-paths are configured and bound together into one or more subscriptions. The router continually attempts to establish a session with each destination in the subscription, and streams data to the receiver. The dial-out mode of subscriptions is persistent. Even when a session terminates, the router continually attempts to re-establish a new session with the receiver at regular intervals.

The following image shows a high-level overview of the dial-out mode:

Figure 1. Dial-Out Mode

This article describes, with a use case that illustrates the monitoring of CPU utilization, how streaming telemetry data helps you gain better visibility of your network, and make informed decisions to stabilize your network.

Monitor CPU Utilization Using Telemetry Data to Plan Network Infrastructure

The use case illustrates how, with the Dial-Out Mode, you can use telemetry data to proactively monitor CPU utilization. Monitoring CPU utilization ensures efficient storage capabilities in your network. This use case describes the tools used in the open-sourced collection stack to store and analyse telemetry data.


Note

Watch this video to see how you configure model-driven telemetry to take advantage of data models, open source collectors, encodings and integrate into monitoring tools.


Telemetry involves the following workflow:
  • Define: You define a subscription to stream data from the router to the receiver. To define a subscription, you create a destination-group and a sensor-group.

  • Deploy: The router establishes a subscription-based telemetry session and streams data to the receiver. You verify subscription deployment on the router.

  • Operate: You consume and analyse telemetry data using open-source tools, and take necessary actions based on the analysis.

Before you begin

Make sure you have L3 connectivity between the router and the receiver.

Define a Subscription to Stream Data from Router to Receiver

Create a subscription to define the data of interest to be streamed from the router to the destination.

Procedure


Step 1

Create one or more destinations to collect telemetry data from a router. Define a destination-group to contain the details about the destinations. Include the destination address (ipv4 or ipv6), or FQDN, port, transport, and encoding format in the destination-group.

Example:

Create a destination-group using data model

This example uses the native data model Cisco-IOS-XR-um-telemetry-model-driven-cfg.yang.


<rpc xmlns="urn:ietf:params:xml:ns:netconf:base:1.0" message-id="101">
  <get-config>
    <source>
      <candidate/>
    </source>
    <filter>
      <telemetry-model-driven xmlns="http://cisco.com/ns/yang/Cisco-IOS-XR-um-telemetry-model-driven-cfg">
        <destination-groups>
          <destination-group>
            <destination-id>CPU-Health</destination-id>
            <ipv4-destinations>
              <ipv4-destination>
                <ipv4-address>209.165.201.1</ipv4-address>
                <destination-port>4321</destination-port>
                <encoding>json</encoding>
                <protocol>
                  <protocol>tcp</protocol>
                </protocol>
              </ipv4-destination>
            </ipv4-destinations>
          </destination-group>
        </destination-groups>
      </telemetry-model-driven>
    </filter>
  </get-config>
</rpc>

Create a destination group using CLI


RP/0/RP1:SIT#configure
Sun Sep  6 19:32:59.258 IST
RP/0/RP1:SIT(config)#telemetry model-driven
RP/0/RP1:SIT(config-model-driven)#des
describe  destination-group
RP/0/RP1:SIT(config-model-driven)#destination-group CPU-Health
RP/0/RP1:SIT(config-model-driven-dest)#address-family ipv4 209.165.201.1 port 4321
RP/0/RP1:SIT(config-model-driven-dest-addr)#en
encoding  end
RP/0/RP1:SIT(config-model-driven-dest-addr)#encoding json
RP/0/RP1:SIT(config-model-driven-dest-addr)#protocol tcp
RP/0/RP1:SIT(config-model-driven-dest-addr)#commit
Sun Sep  6 19:34:08.748 IST
RP/0/RP1:SIT(config-model-driven-dest-addr)#end
where -
  • CPU-Health is the name of the destination-group

  • 209.165.201.1 is the IP address of the destination where data is to be streamed

    Note 

    To avoid hard-coding IP address, the router can chose any of the configured ipv4 or ipv6 address using domain name service. If an established connections fails, the router connects to another resolved IP address, and streams data to that IP address.

  • 4321 is the port number of the destination

  • json is the format in which data is encoded and streamed to the destination

  • tcp is the protocol through which data is transported to the destination.

The destination for dial-out configuration supports IP address (Ipv4 or IPv6), and fully qualified domain name (FQDN) using domain name services (DNS). To use FQDN, you must assign IP address to the domain name.The domain name is limited to 128 characters. If DNS lookup fails for the provided domain name, the internal timer is activated for 30 sec. With this, the connectivity is continually tried every 30 sec until the domain named is looked-up successfully. DNS provides an address list depending on the address-family being requested. For example, on the router, the IP address for domain name is set using the following commands for ipv4 and ipv6 respectively:
domain ipv4 host abcd 172.x.x.1 172.x.x.2
domain ipv6 host abcd fd00:xx:xx:xx:1::1 fd00:xx:xx:xx:1::3
Step 2

Specify the subset of the data that you want to stream from the router using sensor paths. The Sensor Path represents the path in the hierarchy of a YANG data model. Create a sensor-group to contain the sensor paths.

Example:

Create a sensor-group for CPU utilization using data model
<rpc xmlns="urn:ietf:params:xml:ns:netconf:base:1.0" message-id="101">
  <edit-config>
    <target>
      <candidate/>
    </target>
    <config>
      <telemetry-model-driven xmlns="http://cisco.com/ns/yang/Cisco-IOS-XR-um-telemetry-model-driven-cfg">
        <sensor-groups>
          <sensor-group>
            <sensor-group-identifier>CPU-MONITORING</sensor-group-identifier>
            <sensor-paths>
              <sensor-path>
                <telemetry-sensor-path>Cisco-IOS-XR-wdsysmon-fd-oper:system-monitoring</telemetry-sensor-path>
              </sensor-path>
            </sensor-paths>
          </sensor-group>
        </sensor-groups>
      </telemetry-model-driven>
    </config>
  </edit-config>
</rpc>
Create a sensor-group for CPU utilization using CLI

RP/0/RP1:SIT#configure
Sun Sep  6 19:37:17.898 IST
RP/0/RP1:SIT(config)#telemetry model-driven
RP/0/RP1:SIT(config-model-driven)#sensor-group CPU-MONITORING
RP/0/RP1:SIT(config-model-driven-snsr-grp)#sensor-path Cisco-IOS-XR-wdsysmon-fd-oper:system-monitoring
RP/0/RP1:SIT(config-model-driven-snsr-grp)#commit
Sun Sep  6 19:38:01.372 IST
RP/0/RP1:SIT(config-model-driven-snsr-grp)#end
where -
  • CPU-MONITORING is the name of the sensor-group

  • Cisco-IOS-XR-wdsysmon-fd-oper:system-monitoring is the sensor path from where data is streamed.

Step 3

Subscribe to telemetry data that is streamed from a router. A Subscription binds the destination-group with the sensor-group and sets the streaming method. The streaming method can be Cadence-driven Telemetry or Event-driven Telemetry.

Example:

Note 

The configuration for event-driven telemetry is similar to cadence-driven telemetry, with only the sample interval as the differentiator. Configuring the sample interval value to 0, zero, sets the subscription for event-driven telemetry, while configuring the interval to any non-zero value sets the subscription for cadence-driven telemetry.

Create a subscription using data model

<rpc xmlns="urn:ietf:params:xml:ns:netconf:base:1.0" message-id="101">
  <edit-config>
    <target>
      <candidate/>
    </target>
    <config>
      <telemetry-model-driven xmlns="http://cisco.com/ns/yang/Cisco-IOS-XR-um-telemetry-model-driven-cfg">
        <subscriptions>
          <subscription>
            <subscription-identifier>CPU-Utilization</subscription-identifier>
            <sensor-profiles>
              <sensor-profile>
                <sensorgroupid>CPU-MONITORING</sensorgroupid>
                <sample-interval>6000</sample-interval>
              </sensor-profile>
            </sensor-profiles>
            <destination-profiles>
              <destination-profile>
                <destination-id>CPU-Health</destination-id>
              </destination-profile>
            </destination-profiles>
          </subscription>
        </subscriptions>
      </telemetry-model-driven>
    </config>
  </edit-config>
</rpc>

Create a subscription using CLI


RP/0/RP1:SIT#configure
Sun Sep  6 19:39:17.564 IST
RP/0/RP1:SIT(config)#telemetry model-driven
RP/0/RP1:SIT(config-model-driven)#subscription CPU-Utilization
RP/0/RP1:SIT(config-model-driven-subs)#sensor-group-id CPU-MONITORING sample-interval  6000
RP/0/RP1:SIT(config-model-driven-subs)#des
describe  destination-id
RP/0/RP1:SIT(config-model-driven-subs)#destination-id CPU-Health
RP/0/RP1:SIT(config-model-driven-subs)#commit
Sun Sep  6 19:40:31.221 IST
RP/0/RP1:SIT(config-model-driven-subs)#end
where -
  • CPU-Utilization is the name of the subscription

  • CPU-MONITORING is the name of the sensor-group

  • CPU-Health is the name of the destination-group

  • 6000 is the sample interval in milliseconds. The sample interval is the time interval between two streams of data.


Verify Deployment of the Subscription

The router dials out to the receiver to establish a session with each destination in the subscription. After the session is established, the router streams data to the receiver to create a data lake.

You can verify the deployment of the subscription on the router.

Procedure


Step 1

View the model-driven telemetry configuration on the router.

Example:

Router#show running-config telemetry model-driven
Sun Sep  6 19:46:25.869 IST
telemetry model-driven
destination-group CPU-Health
  address-family ipv4 209.165.201.1 port 4321
   encoding json
   protocol tcp
  !
!
sensor-group CPU-MONITORING
  sensor-path Cisco-IOS-XR-wdsysmon-fd-oper:system-monitoring
!
subscription CPU-Utilization
  sensor-group-id CPU-MONITORING sample-interval 6000
  destination-id CPU-Health
!
!
Step 2

Verify the state of the subscription. An Active state indicates that the router is ready to stream data to the receiver based on the subscription.

Example:


Router# show telemetry model-driven subscription CPU-Utilization
Sun Sep  6 19:44:07.659 IST
Subscription:  CPU-Utilization
-------------
  State:       NA
  Sensor groups:
  Id: CPU-MONITORING
    Sample Interval:      6000 ms
    Sensor Path:          Cisco-IOS-XR-wdsysmon-fd-oper:system-monitoring
    Sensor Path State:    Resolved

  Destination Groups:
  Group Id: CPU-Health
    Destination IP:       209.165.201.1
    Destination Port:     4321
    Encoding:             json
    Transport:            tcp
    State:                NA
    No TLS

  Collection Groups:
  ------------------
  No active collection groups

The router streams data to the receiver using the subscription-based telemetry session and creates a data lake in the receiver.


Operate on Telemetry Data for In-depth Analysis of the Network

You can start consuming and analyzing telemetry data from the data lake using an open-sourced collection stack. This use case uses the following tools from the collection stack:
  • Pipeline is a lightweight tool used to collect data. You can download Network Telemetry Pipeline from Github. You define how you want the collector to interact with routers and where you want to send the processed data using pipeline.conf file.

  • Telegraph (plugin-driven server agent) and InfluxDB (a time series database (TSDB)) stores telemetry data, which is retrieved by visualization tools. You can download InfluxDB from Github. You define what data you want to include into your TSDB using the metrics.json file.

  • Grafana is a visualization tool that displays graphs and counters for data streamed from the router.

In summary, Pipeline accepts TCP telemetry stream, converts data and pushes data to the InfluxDB database. Grafana uses the data from InfluxDB database to build dashboards and graphs. Pipeline and InfluxDB may run on the same server or on different servers.

Consider that the router is streaming data of approximately 350 counters every 5 seconds, and Telegraf requests information from the Pipeline at 1 second intervals. The CPU usage is analysed in three stages using:

  • a single router to get initial values

  • two routers to find the difference in values and understand the pattern

  • five routers to arrive at a proof-based conclusion

This helps you make informed business decisions about deploying the infrastructure; in this case, the CPU.

Procedure


Step 1

Start Pipeline, and enter your router credentials.

Note 

The IP address and port that you specify in the destination-group must match the IP address and port on which Pipeline is listening.

Example:


$ bin/pipeline -config pipeline.conf 

Startup pipeline 
Load config from [pipeline.conf], logging in [pipeline.log] 

CRYPT Client [mymdtrouter], [http://172.0.0.0:5432]
 Enter username: <username>
 Enter password: <password>
Wait for ^C to shutdown
Step 2

In the Telegraph configuration file, add the following values to read the metrics about CPU usage.

Example:


[[inputs.cpu]]
  ## Whether to report per-cpu stats or not
  percpu = true
  ## Whether to report total system cpu stats or not
  totalcpu = true
  ## If true, collect raw CPU time metrics.
  collect_cpu_time = false
  ## If true, compute and report the sum of all non-idle CPU states.
  report_active = false
Step 3

Use Grafana to create a dashboard and visualize data about CPU usage.

One router

The router pushes the counters every five seconds.

All CPU cores are loaded equally, and there are spikes up to approximately 10 or 11 percent.

Figure 2. CPU Usage Graph with a Single Router

Two routers

The second router is added at 14:00 in the timeline, and shows an increase in the spikes to around 25 percent with midpoint value at 15 percent.
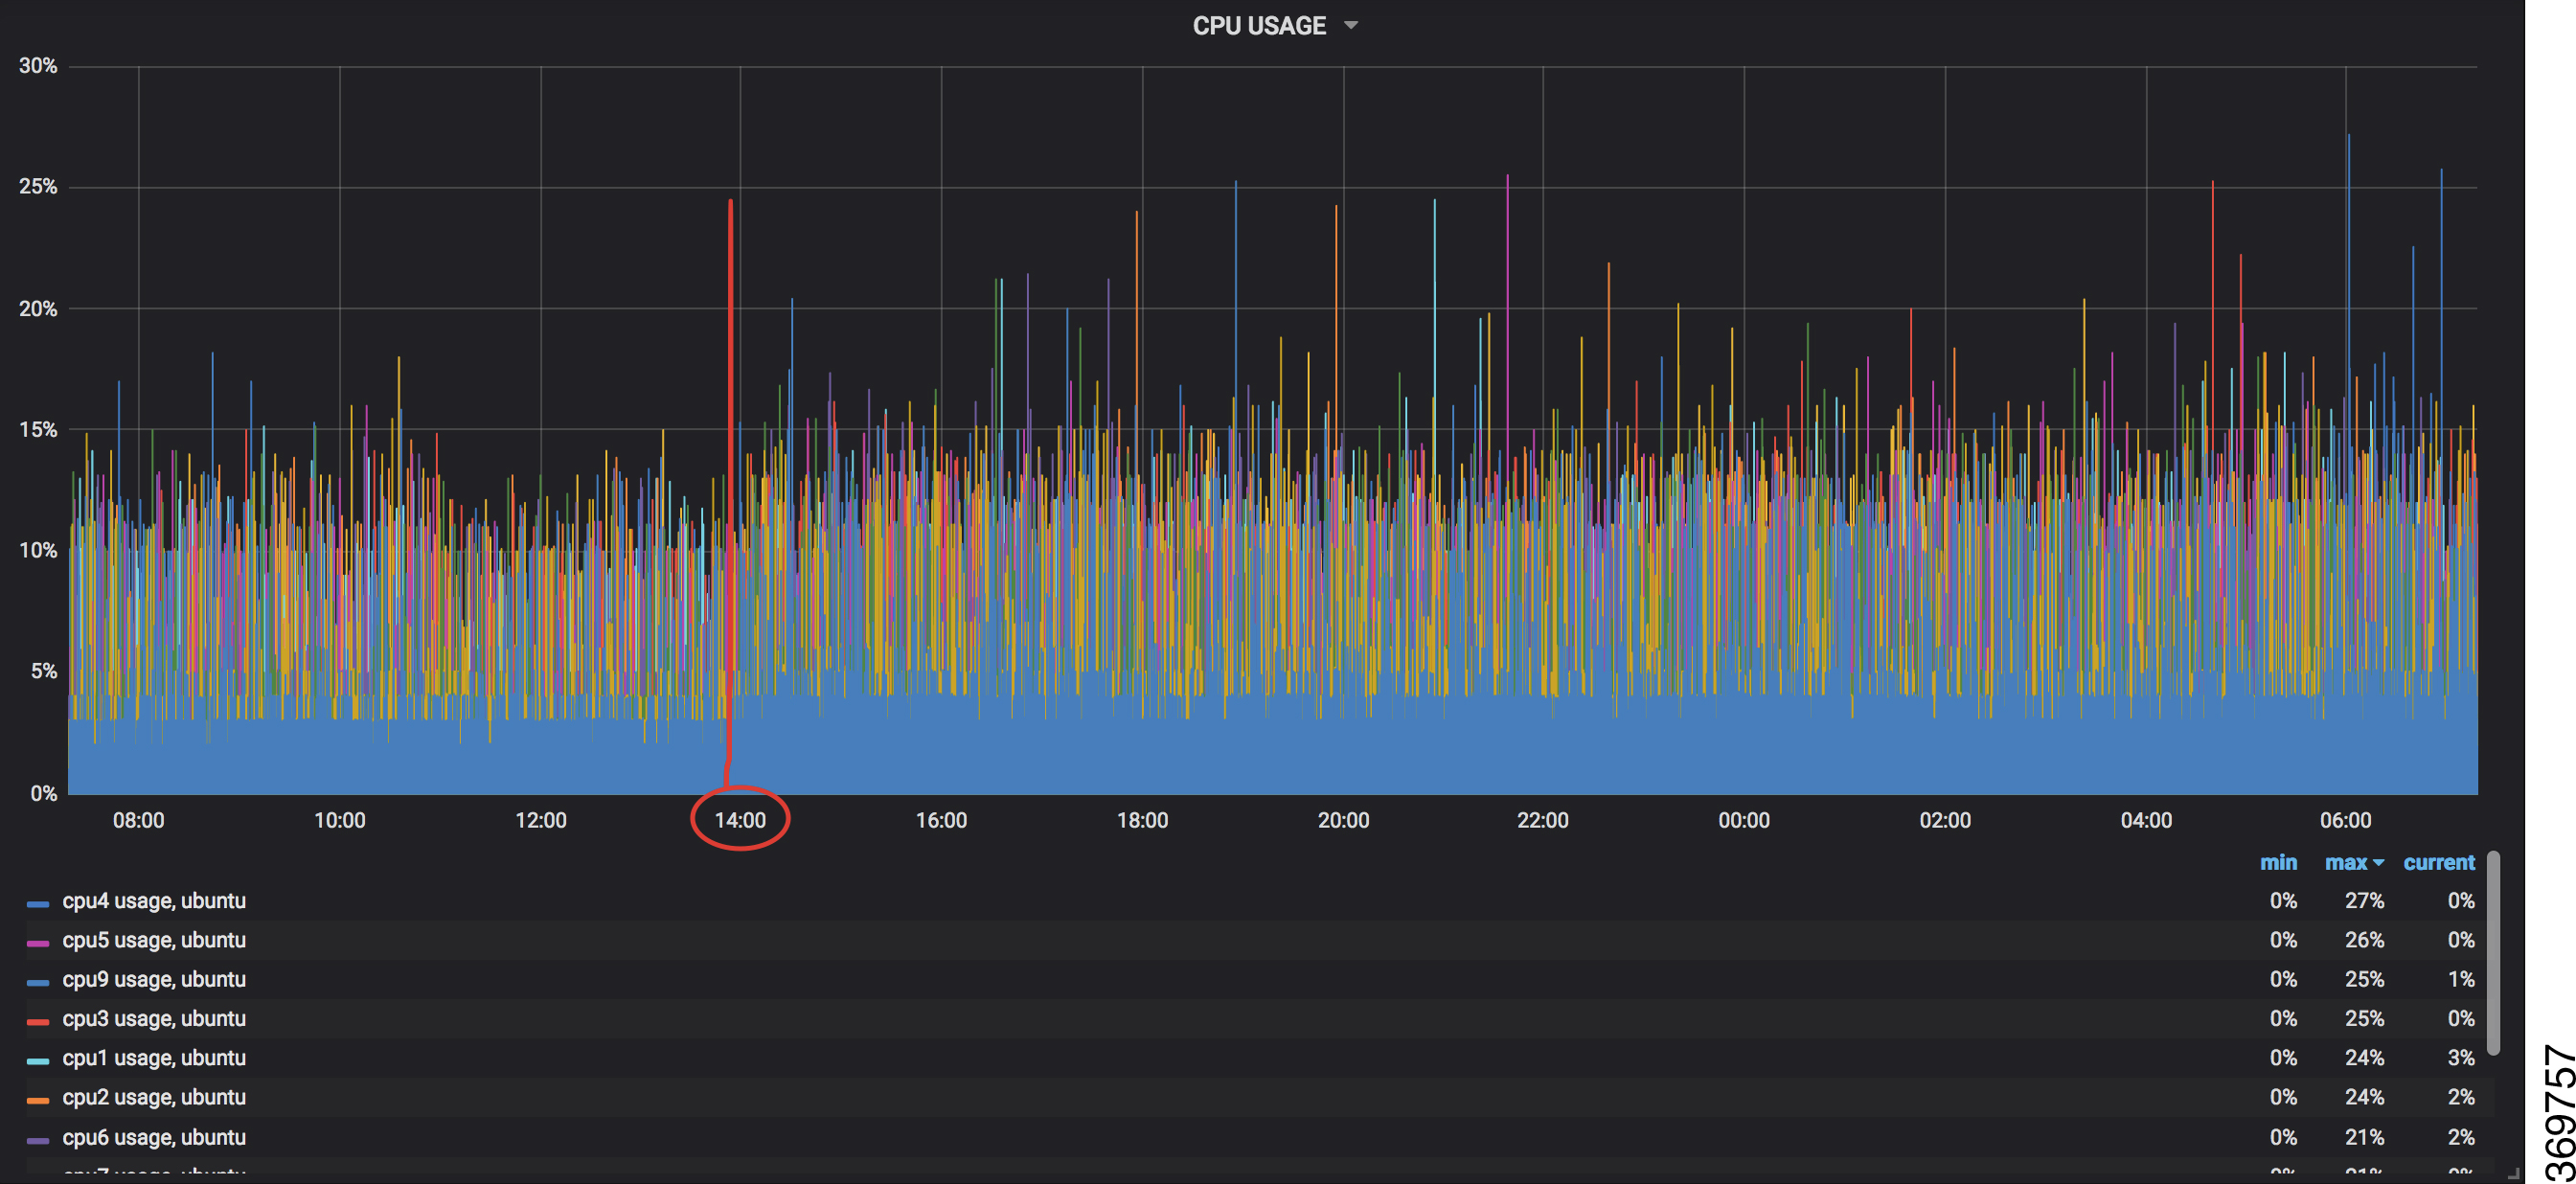
Figure 3. CPU Usage Graph with Two Routers

Five routers

With five routers, the spikes peak upto approximtely 40 percent with midpoint in the range of 22 to 25 percent.

Figure 4. CPU Usage Graph with Five Routers
In conclusion, telemetry data shows that the processes are balanced almost equally across the CPU cores. There is no linear increase on a subset of cores. This analysis helps in planning the CPU utilization based on the number of counters that you stream.