Stadium Antenna, 8-port, Tri-band Wi-Fi 6E with GNSS (IW-ANT-PNL25610-R=)

This chapter contains the following sections:

Overview

The Stadium Antenna (IW-ANT-PNL25610-R=) is an 8-port tri-band directional panel antenna supporting three 4x4 MIMO Wi-Fi 6E radios. It is designed to comply with the FCC's 21 dBm EIRP skyward limit across the UNII-1, UNII-5, and UNII-7 bands.

This antenna is designed for large public venues such as stadiums and other environments such as outdoor campus coverage, warehouses, and industrial sites.

Integrated high-rejection coexistence filters and a passive, L1 GNSS antenna enable concurrent 5–GHz and 6–GHz radio operation and AFC location reporting, respectively. The radome is IP67, UV-stabilized, and UL 94 V-0 rated.
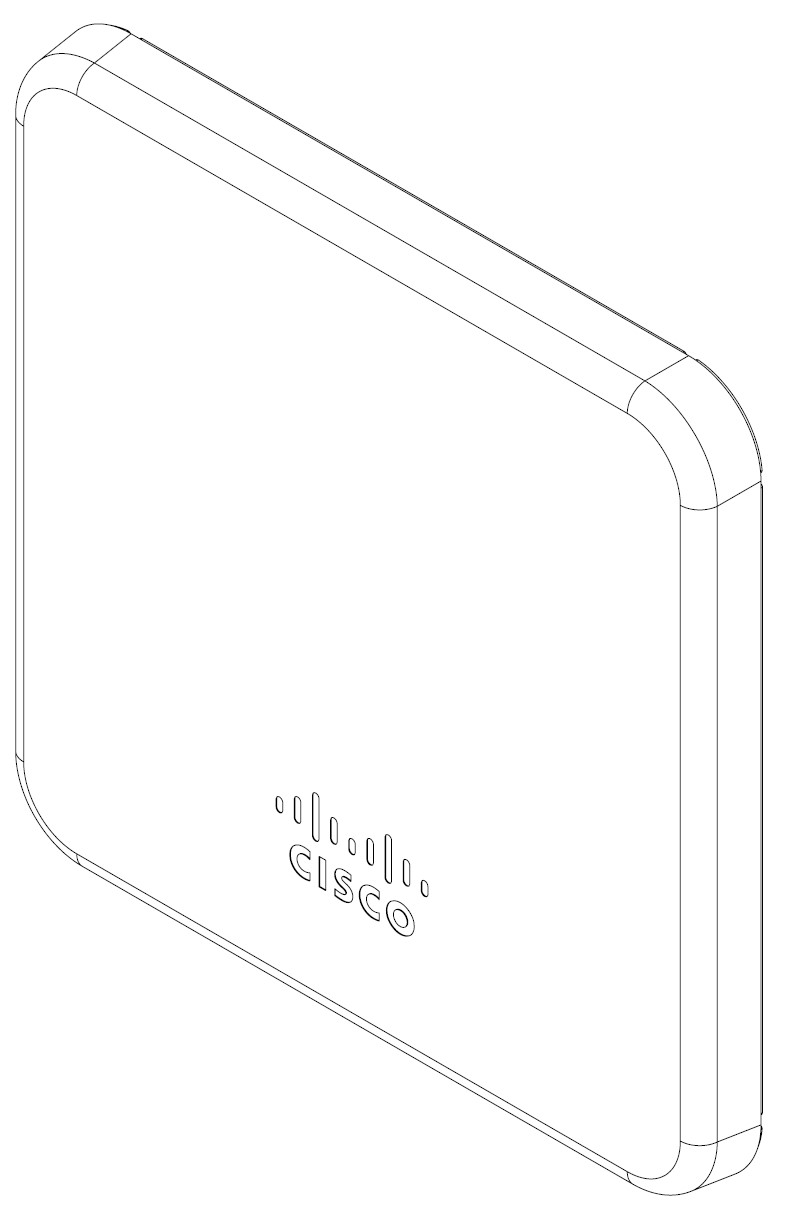
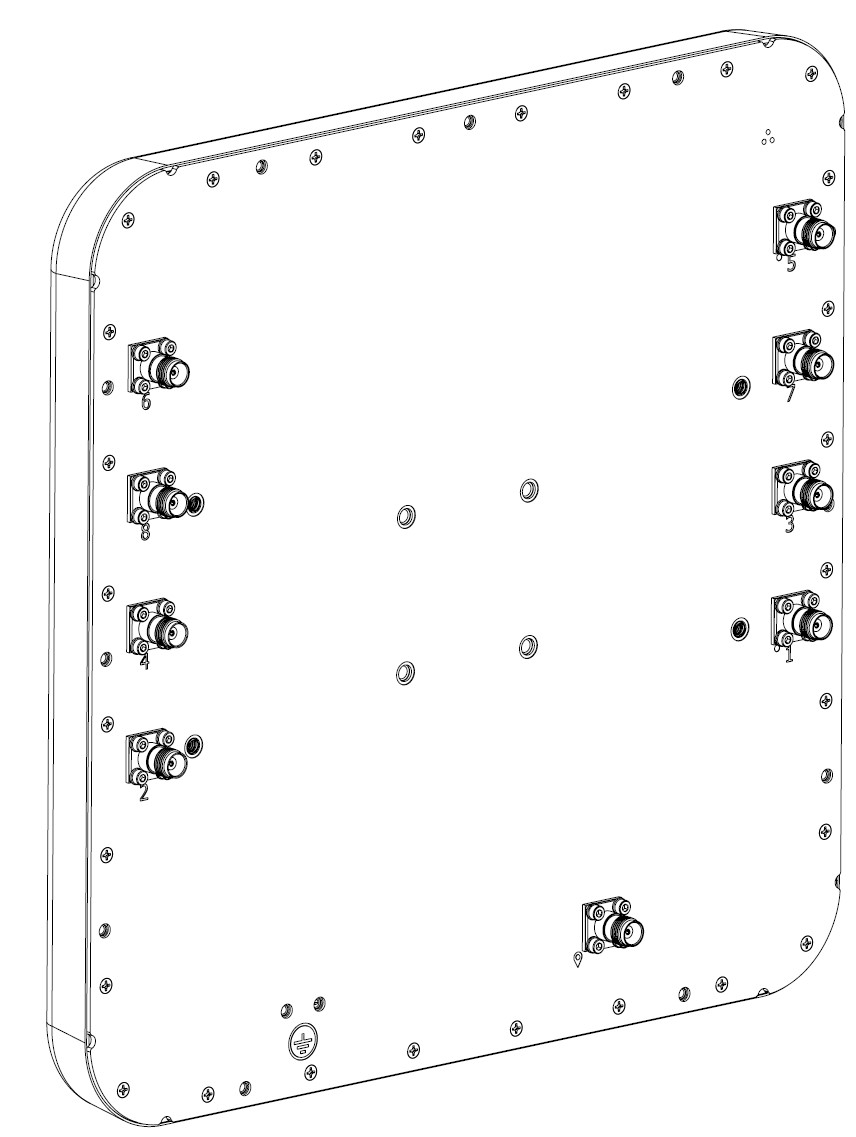
Figure 1. Antenna Front View
Figure 2. Antenna Back View

Features include the following:

  • Supports 4x4 MIMO over 2.4 GHz, 5 GHz, and 6 GHz radio bands

  • High-isolation between 5 GHz and 6 GHz ports enables concurrent radio operation

  • Integrated GNSS antenna covers L1 GPS bands for AFC location reporting

  • Compatible with Cisco Catalyst IW9167E AP


    Note


    The antenna cannot be field replaced in IW9167E-x-STA AP.
  • IP67 rated

  • UV-stabilized, UL 94 V-0 rated radome

  • The antenna supports Self-Identification (SIA) on Ports 1 and 5
Technical Specifications

The following table lists the specifications for the antenna:

Specification

Description

Frequency

2400-2482 MHz (Ports 1–4)

5170-5835 MHz (Ports 1–4)

5925-6875 MHz (Ports 5–8)

Polarization

±45° dual slant

VSWR

2:1 maximum

Port-to-Port Isolation

20 dB minimum between ports of same band

Port-to-Port Isolation, 5 to 6 GHz

55 dB minimum

Peak Gain

2.4 GHz—8 dBi

5 GHz—9 dBi

6 GHz—10 dBi

3-dB Azimuth Beamwidth

2.4 GHz—90 degrees typical

5 GHz—75 degrees typical

6 GHz—75 degrees typical

3-dB Elevation Beamwidth

2.4 GHz—45 degrees typical

5 GHz—28 degrees typical

6 GHz—27 degrees typical

Dimensions

14.5 in x 14.5 in x 1.26 in

368.3 mm x 368.3 mm x 32.0 mm

Weight

Antenna—4.8 lb (2.2 kg)

Connector

RP-TNC, jack

Operating temperature

-40 to +70°C

Flammability rating

UL 94 V-0

IP rating

IP66 and IP67

Table 1. GNSS Specifications

Specification

Description

Frequency

1164-1215 MHz

1559-1610 MHz

Polarization

Mixed

VSWR

2:1 maximum

Maximum Gain

3 dBi

Connector

TNC, jack

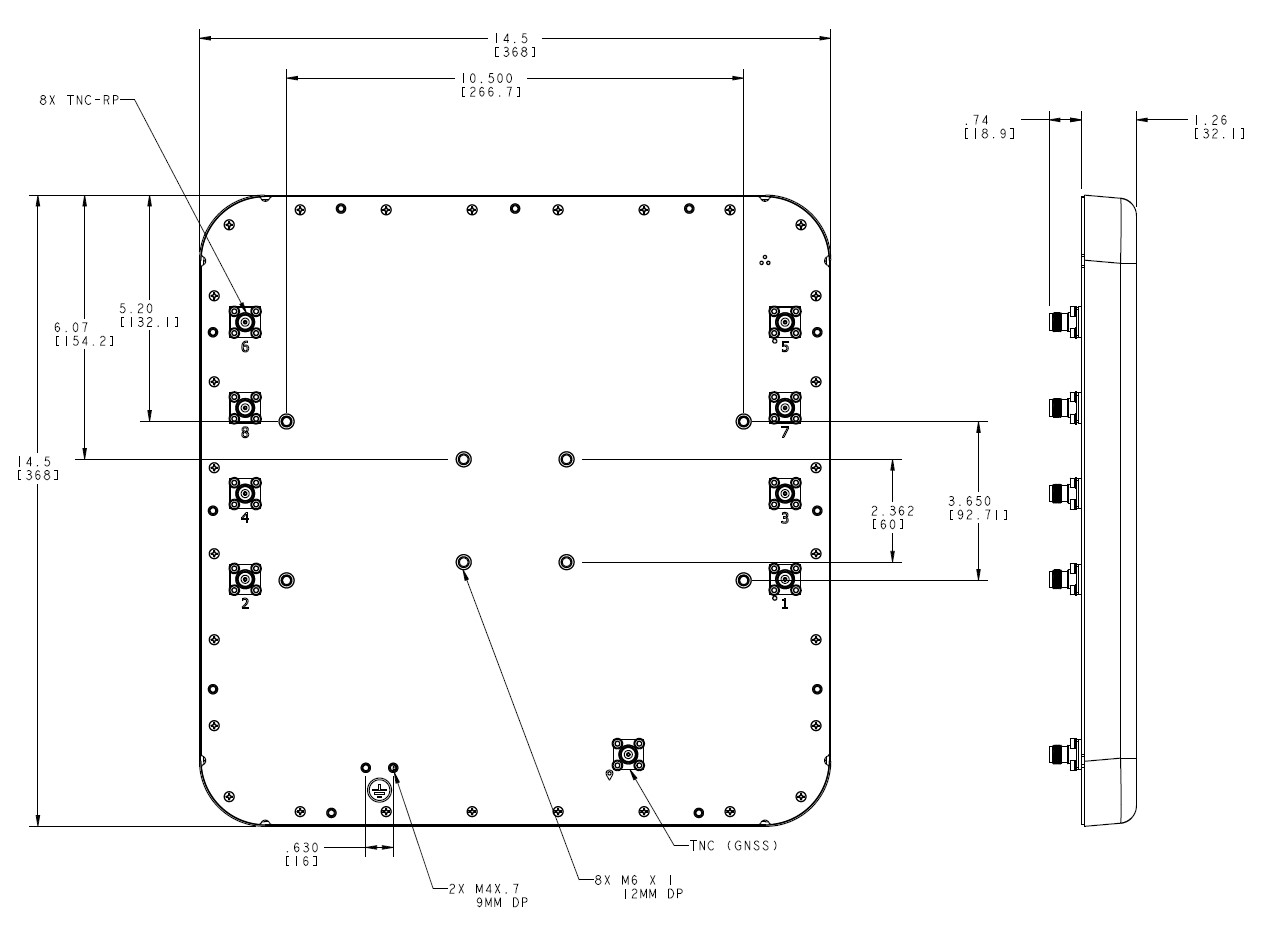
Mechanical Drawings

The following images show details about the antenna:

Figure 3. Antenna Dimensions

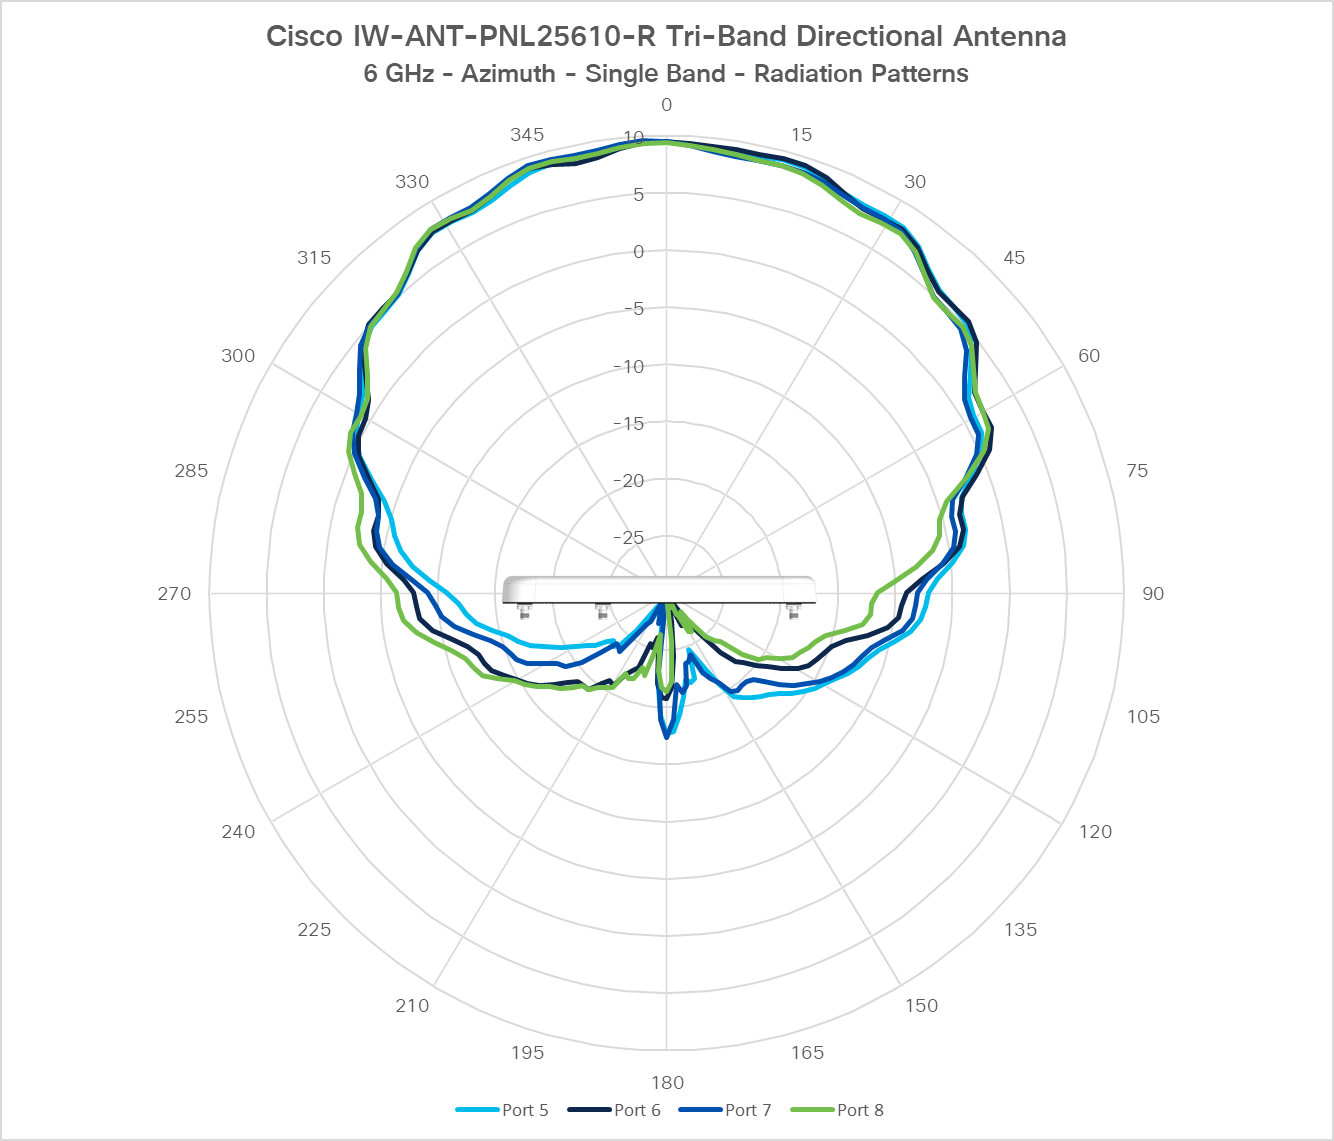
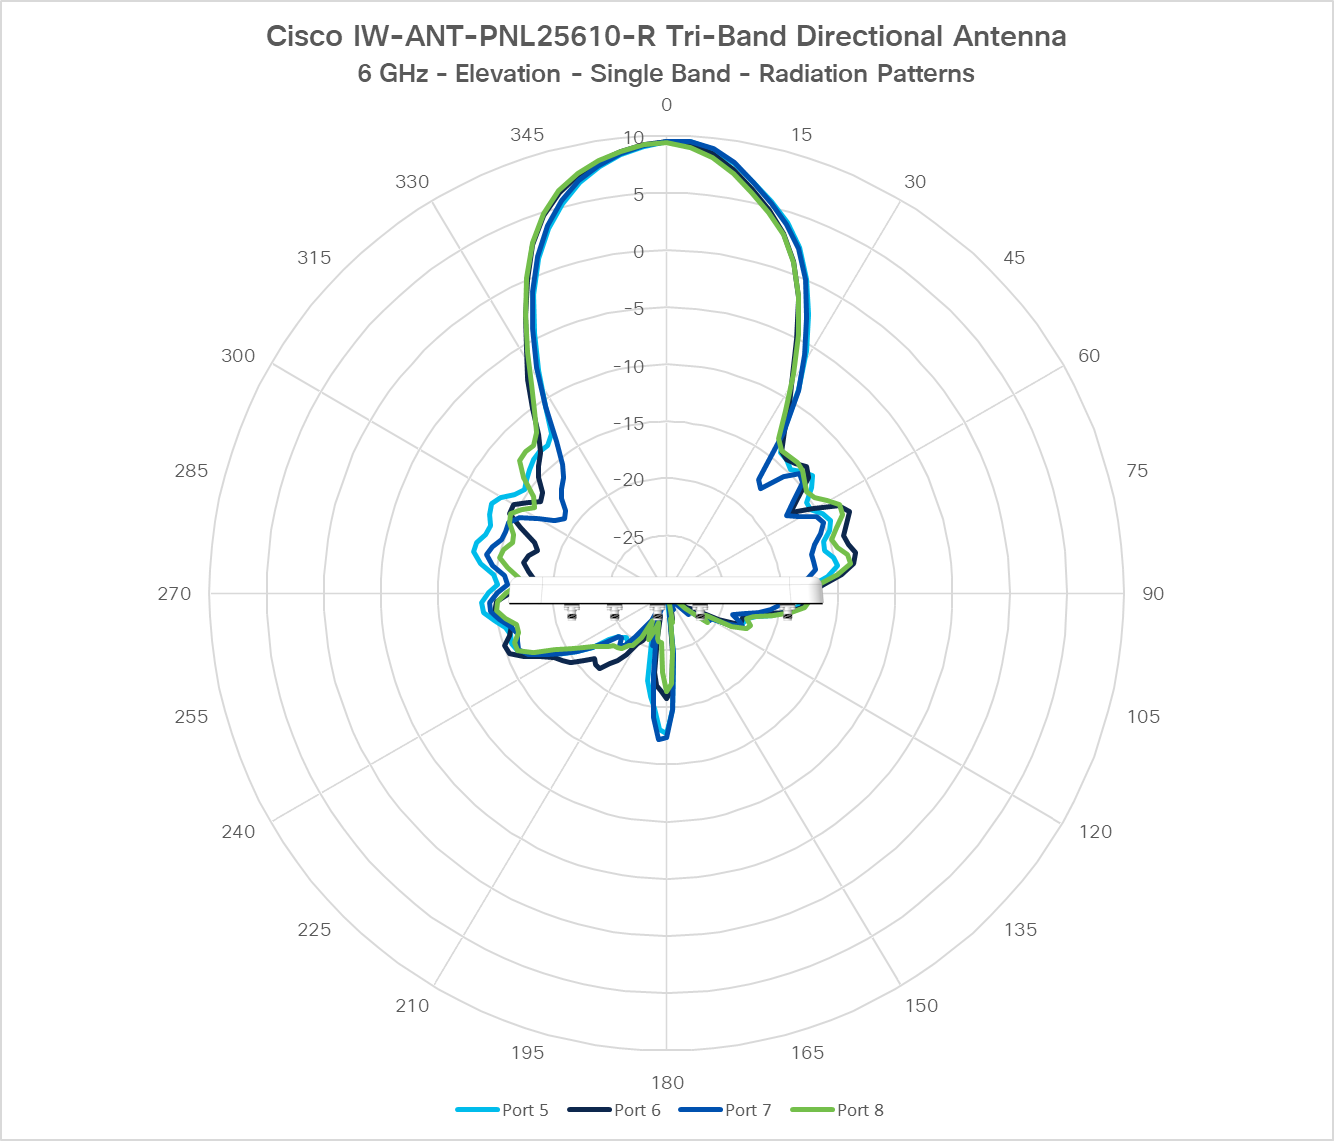
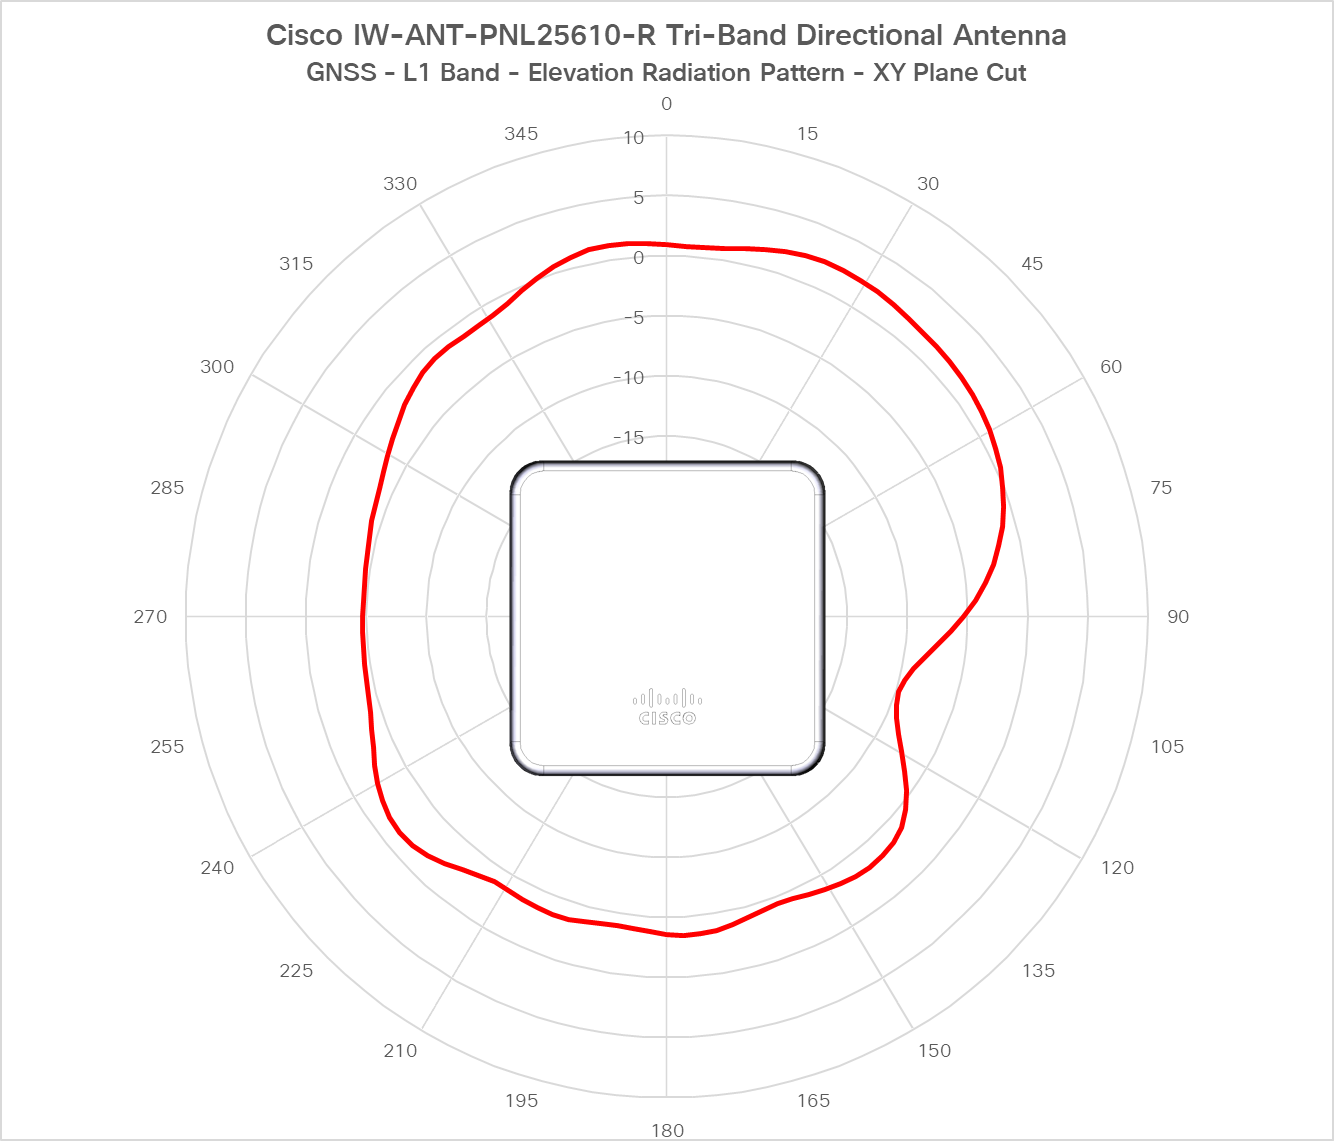
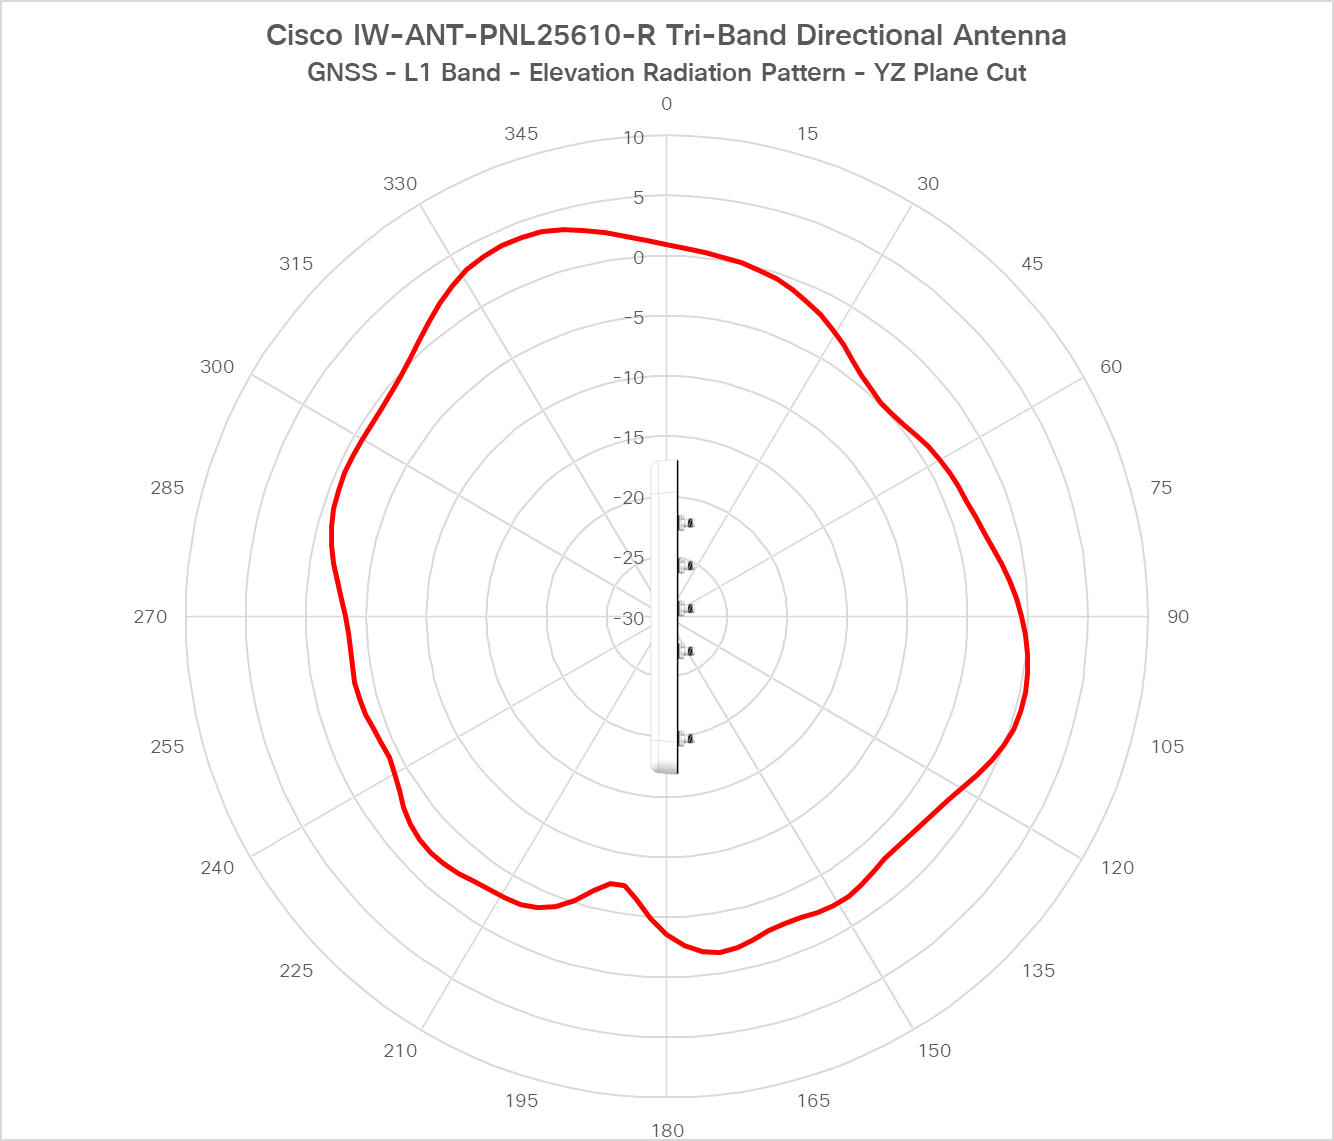
Radiation Patterns

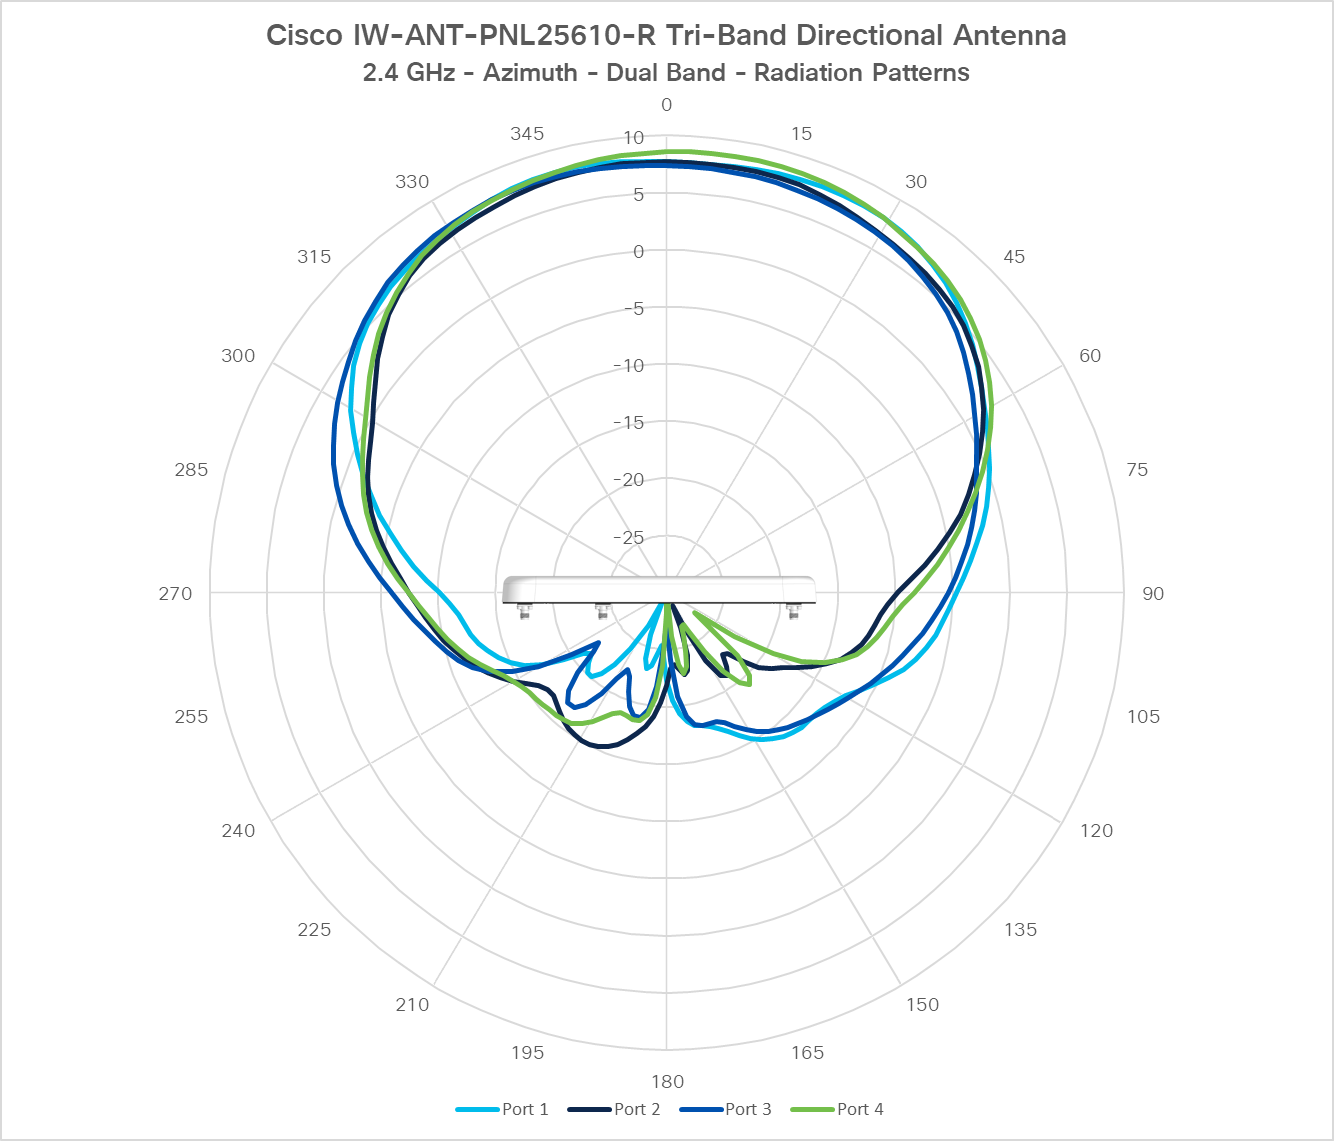
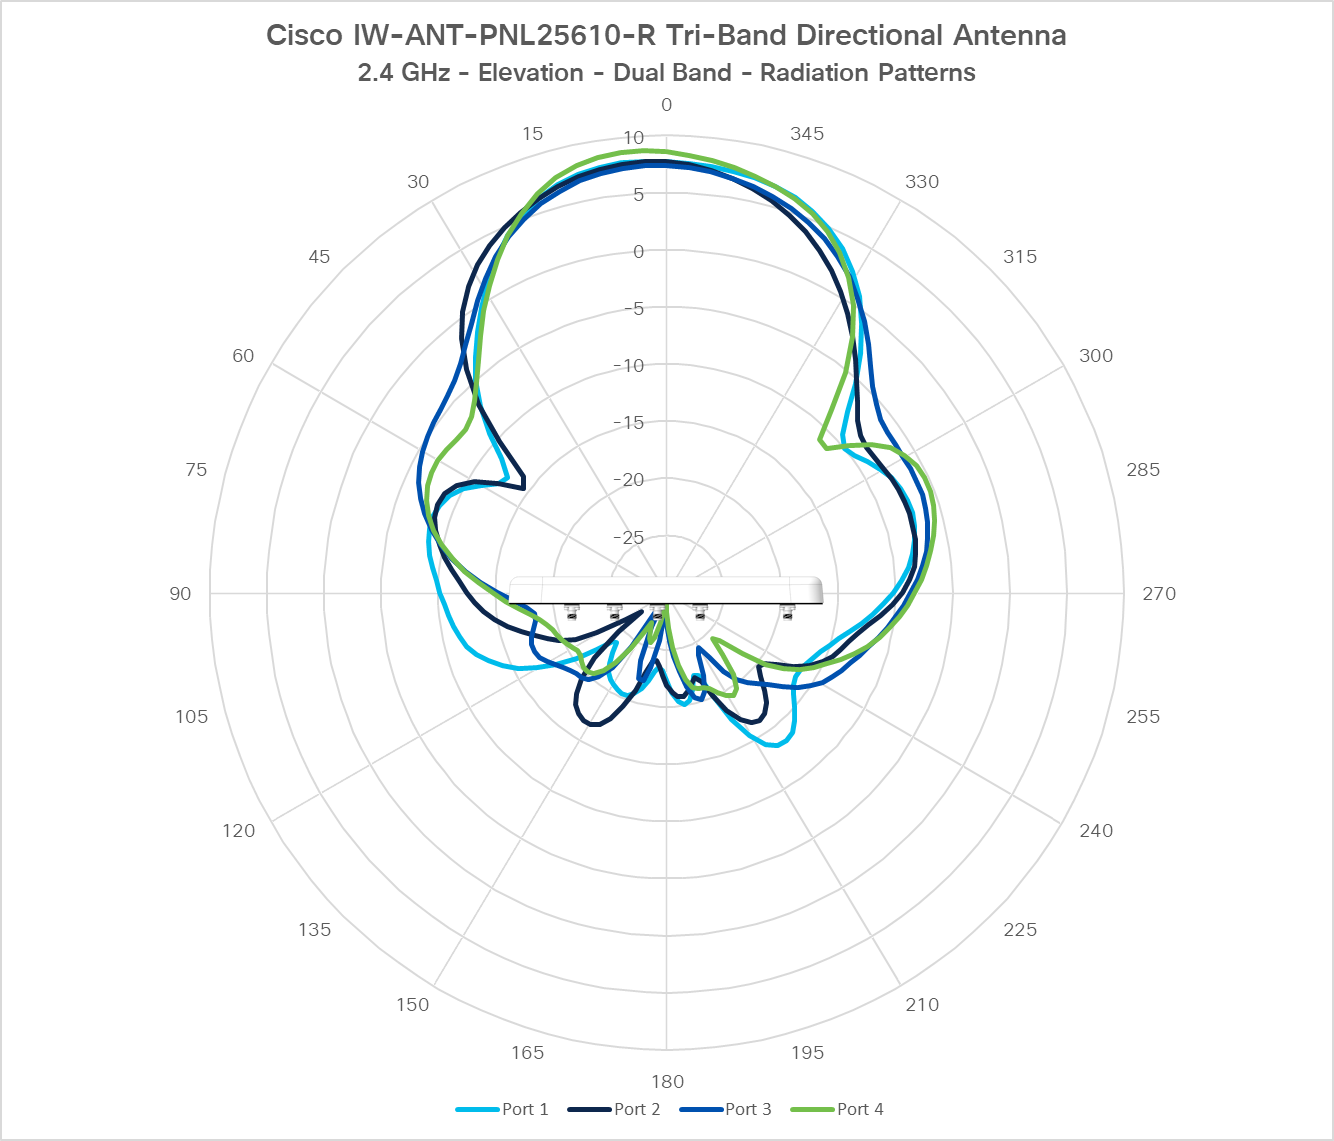
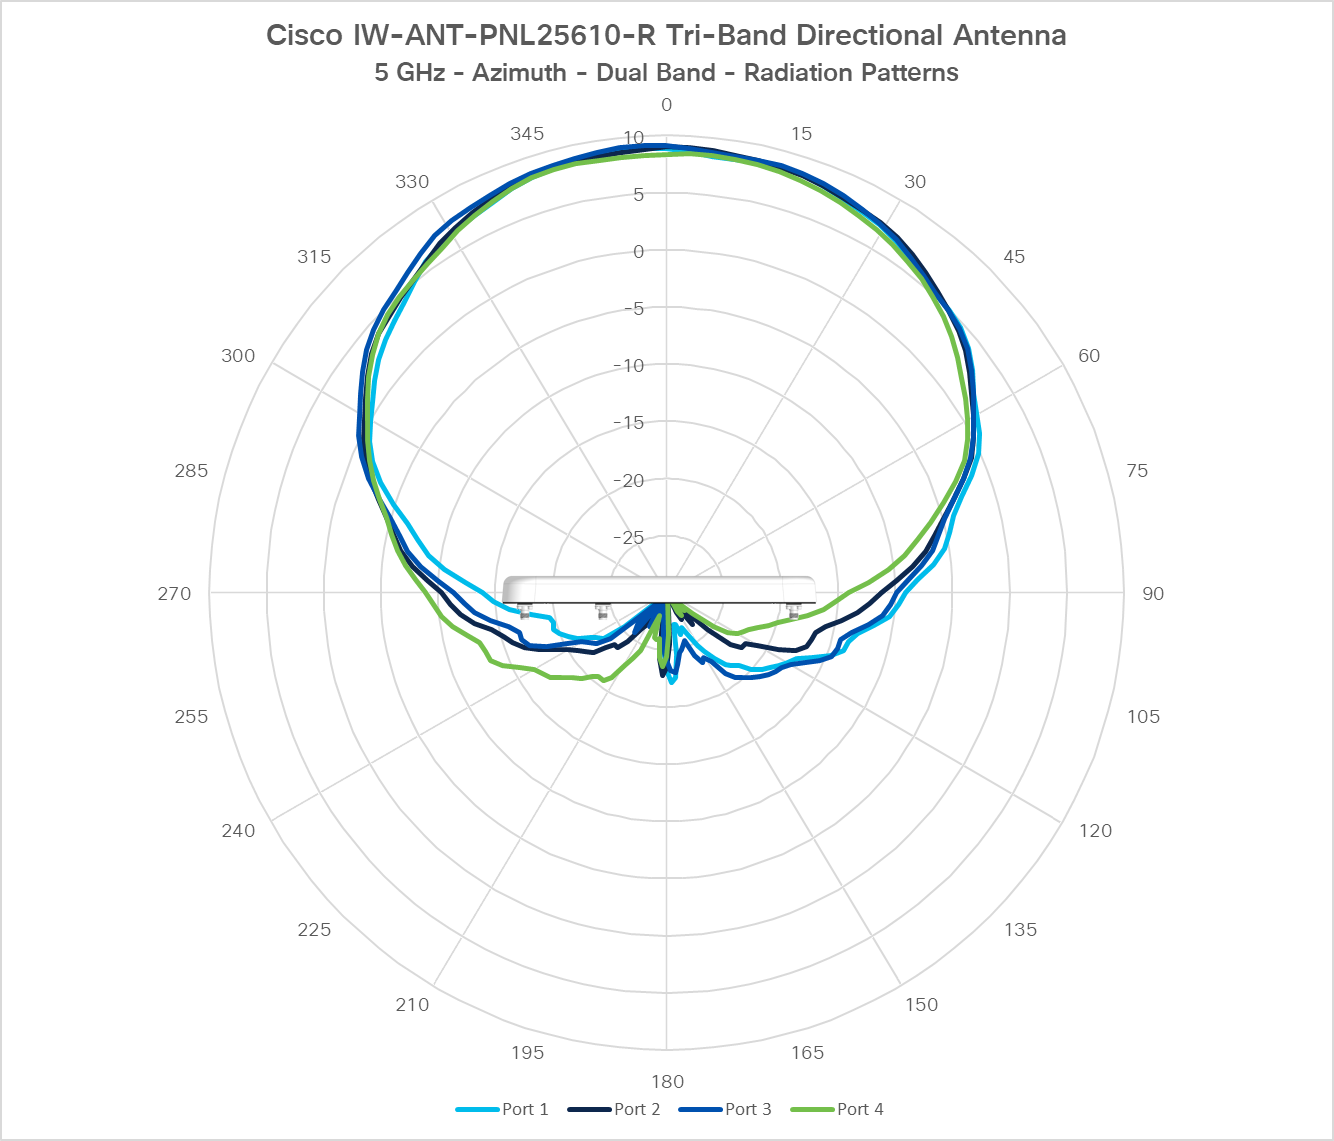
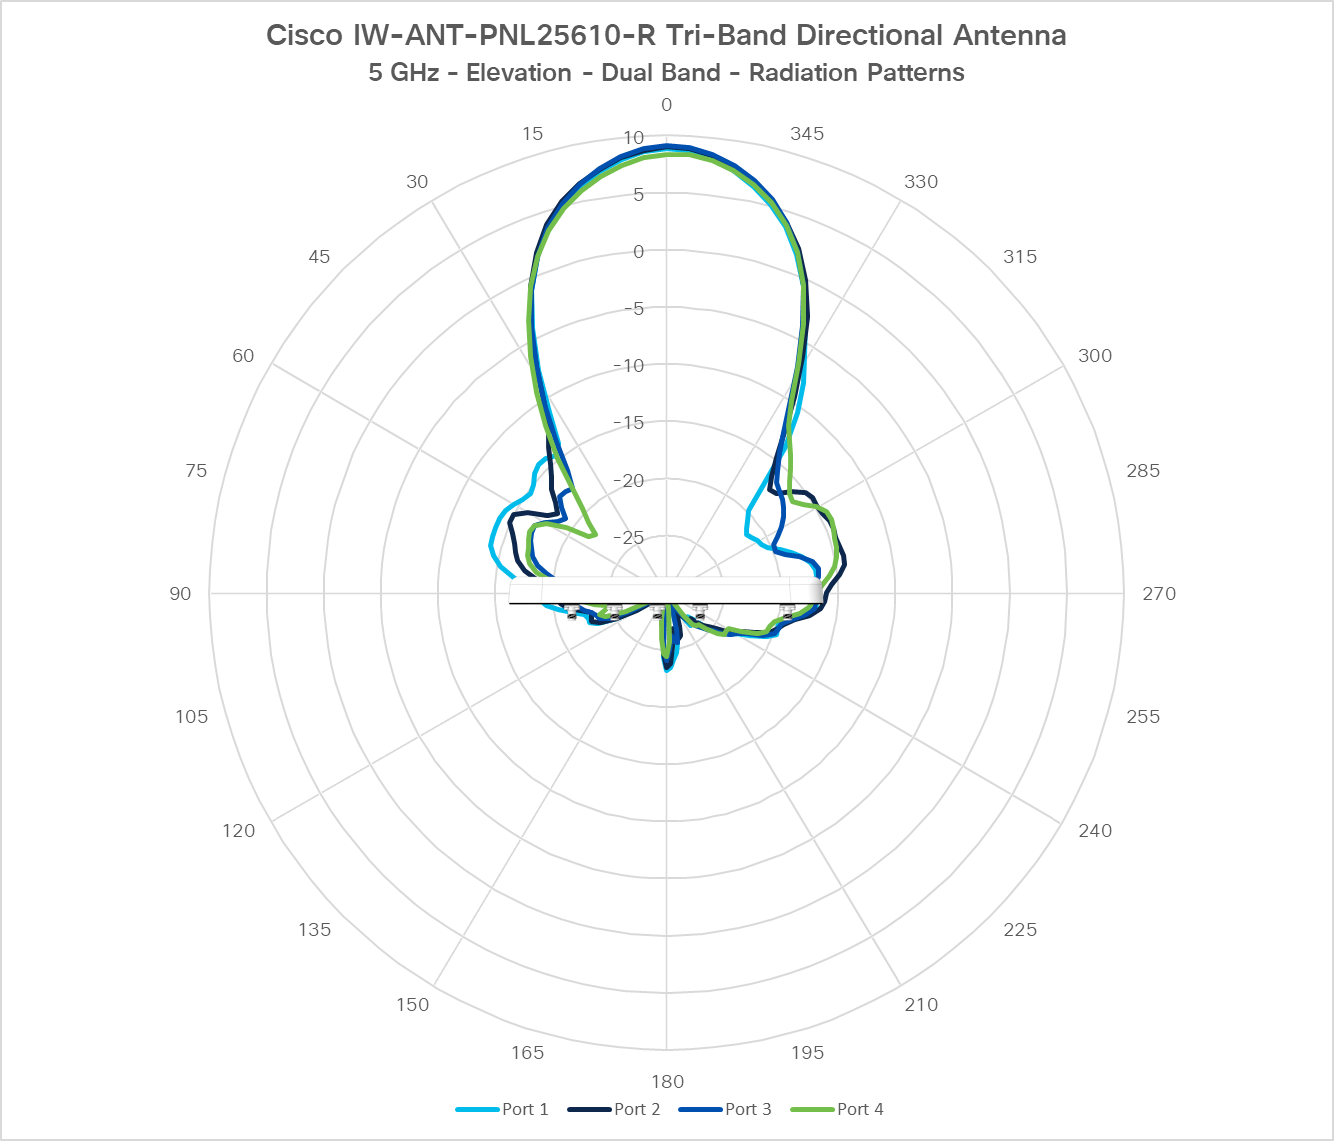
Table 2. Radiation Patterns
Figure 4. 2.4-GHz Azimuth
Figure 5. 2.4-GHz Elevation
Figure 6. 5-GHz Azimuth
Figure 7. 5-GHz Elevation
Figure 8. 6-GHz Azimuth
Figure 9. 6-GHz Elevation
Figure 10. GNSS Elevation, XY plane
Figure 11. GNSS Elevation, YZ plane

Installation Options

The IW-ANT-PNL25610-R tri-band antenna can be wall or pole mounted using the supported mounting kits.

Cisco PID

Description

AIR-MNT-ART1=

Pivoted Pole/Wall mounting bracket for both vertical and horizontal mounting.

IW-ACC-BRK1=

Pole/Wall mount articulating bracket with pan and tilt capability.

Mount using AIR-MNT-ART1= Bracket Kit

The pivoting mounting kit AIR-MNT-ART1= contains a pivoting mounting bracket for both wall and pole mounting the antenna. The antenna with this kit can be mounted to the ceiling in a horizontal plane.


Note


When mounted outdoors, elevation shall only be adjusted such that the antenna is aimed level with or below the horizon to ensure regulatory compliance.

Caution


The mounting surface, attaching screws, and optional wall anchors must support a 50 lb (22.7 kg) static weight.
Table 3. Materials for Mounting AP to a Wall with AIR-MNT-ART1= Kit

Materials Needed

Supplied in the Kit?

Ground lug and screws

(Optional, size is M4 thread with 0.63" pitch)

No

Pivoting mount kit and hardware

Yes

(4) M6 x 12-mm Screws

Yes

Two stainless steel band clamps (adjustable 2 to 5 inch (51 to 127 mm)

Yes

Provided but required for pole/mast mount only.

90.0 mm M8 screw

Yes

M8 Flat washer

Yes

M8 Spring washer

Yes

Four wall mounting screws (M6 max size)

No

#6 AWG ground wire (Optional)

No

Shielded outdoor-rated Ethernet (CAT5e or better) cable

No

Grounding block (Optional)

No

Grounding rod (Optional)

No

13-mm box-end wrench or socket set

No

10-mm box-end wrench

No

Pivoting Bracket Specifications

This kit supports adjusting the antenna position along its vertical plane.

Figure 12. Pivoting Wall Mounting Bracket Dimensions
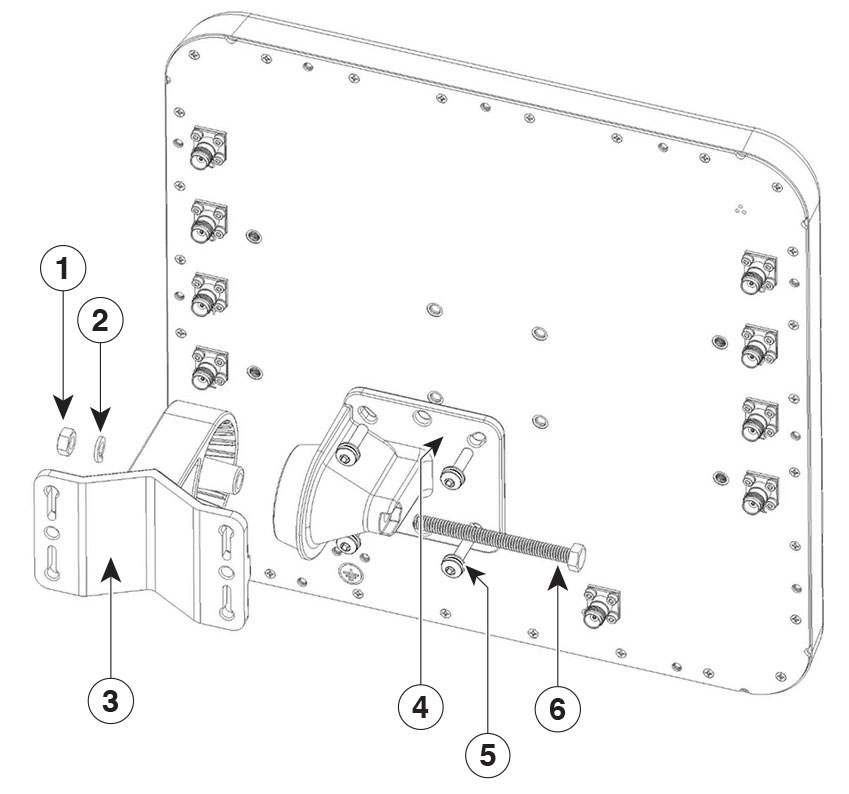
Figure 13. Exploded View of the Pivoting Mounting Kit

1

90.0 mm M8 screw

5

80.0 mm M8 screw with washer and spring washer for fastening the pole-mount screw clamp to the pivoting bracket base plate.

2

M8 washer

6

Pole-mount screw clamp

3

M8 spring washer

7

Pivoting bracket base plate

4

M8 nut

Figure 14. Pivoting Wall Mounting Bracket

1

One of four bolt holes for fastening to the back of the antenna.

This is the antenna-plate end of the bracket and is fastened to the back of the antenna.

2

Wall-plate end of the bracket. This plate is fastened to the wall.

3

Screw holes for wall mounting.

These screw holes can also be used as slots for steel band clamps in pole-mount installations.

Mounting to a Wall or Ceiling using AIR-MNT-ART1= Bracket

Figure 15. Visualization of Antenna Fastened to the Pivoting Wall Mounting Kit

Item #

Mounting Bracket Kit

Quantity

Tightening Values

1

M8 Nut

1

2

M8 Flat, spring Washer

3

3

Wall-plate end of the bracket. This plate is fastened to the wall.

Hardware not supplied (M6 max size)

1

4

This is the antenna-plate end of the bracket and is fastened to the back of the antenna.

1

5

M6 x 12mm Long screws

4

4.5+/- .5 Nm

6

90.0 mm M8 screw

1

25 +/- 1 Nm

Procedure

Step 1

Disassemble the pivot kit, if not already disassembled.

Step 2

Use the mounting bracket's wall-plate end as a template to mark four screw hole locations on the mounting surface. See Pivoting Wall Mounting Bracket for the mounting bracket screw hole locations (screw holes of maximum 6 mm). See Pivoting Wall Mounting Bracket Dimensions for the dimensions of the pivoting mounting bracket.

Step 3

Use four screws and, if required, wall anchors to attach the mounting bracket's wall-plate end to the mounting surface. These screws and anchors are to be sourced independently.

Note

 
  • You can use an exterior-grade plywood backboard to mount the antenna to stucco, cement, or drywall.

  • The mounting surface, attaching screws, and wall anchors must support a 50-lb (22.7 kg) static weight. It is important to use proper anchoring for the mount surface to support the static load.

Step 4

Align the antenna-plate end of the bracket with the screw holes in the antenna's back.

Step 5

Fasten the bracket plate to the antenna by using four M6 x12 mm bolts and a 10–mm box or socket wrench. Tighten the bolts to 40 lbf-in (4.5 Nm) of torque.

Step 6

Using the 90 mm M8 long screw and the hardware supplied with the pivoting bracket, bolt the antenna and bracket plate to the wall plate mounted on the wall. See Pivoting Wall Mounting Bracket for this assembly. Do not fully tighten the assembly.

Note

 
The antenna should be mounted with the ground lug on the base facing downwards.

Step 7

Pivot the antenna as required, and then fully tighten the 90 mm M8 long screw using a 13–mm wrench.

Step 8

Proceed attaching the antennas signal cables, grounding the antenna.


Mounting to a Pole using AIR-MNT-ART1= Bracket

The articulating mounting kit AIR-MNT-ART1= contains a pivoting mounting bracket for both wall and pole mounting. This kit can be used to install the antenna on a pole or mast. It supports metal, wood, or fiberglass poles from 2 to 5 inch (51 to 127mm) in diameter.

The AIR-MNT-ART1= articulating mounting kit allows for adjusting the antenna position by pivoting the antenna along its vertical plane.


Note


The pole or mast must be rigid enough to hold the weight of an antenna along with the associated forces produced by wind loads. In addition, the mast must be structurally strong enough to withstand the clamping force of the hose clamps.

Note


When mounted outdoors, elevation shall only be adjusted such that the antenna is aimed level with or below the horizon to ensure regulatory compliance.
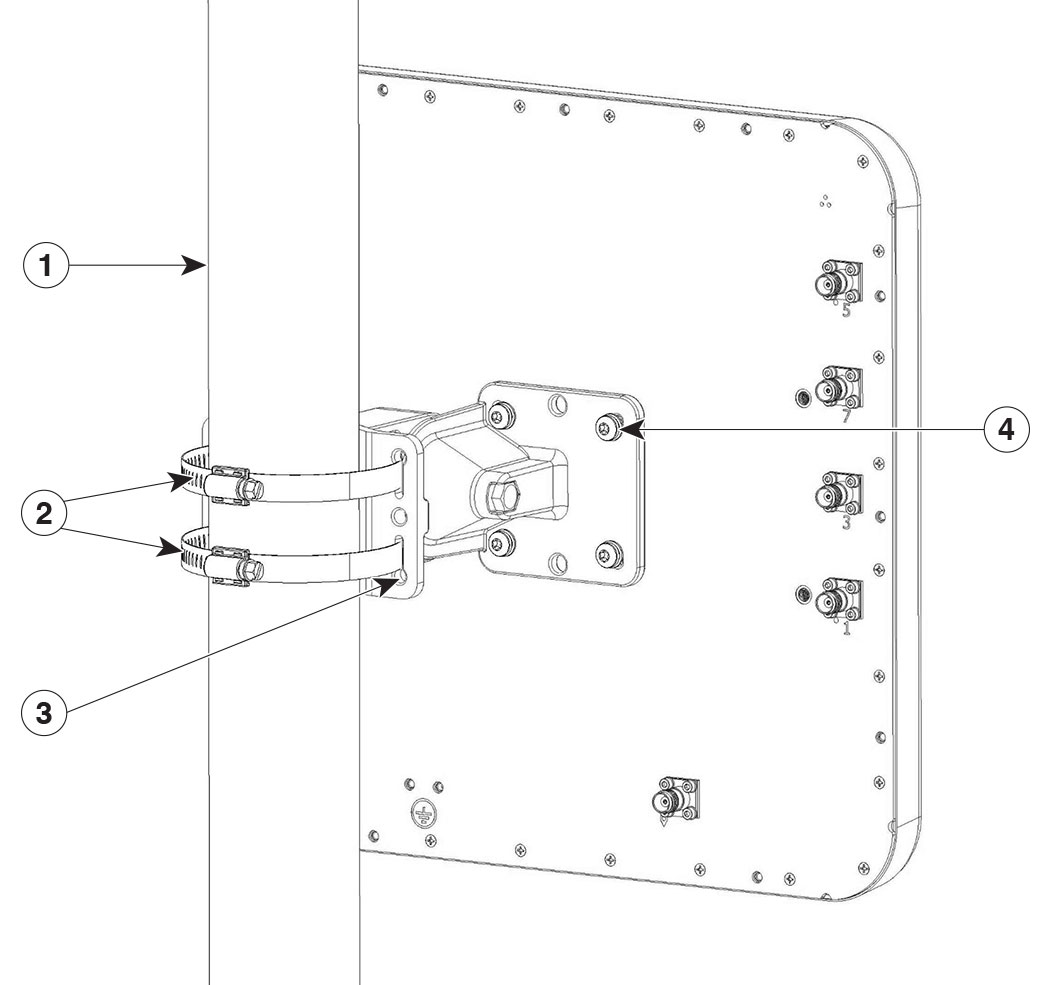
Figure 16. Pole Mounted Antenna Using the Pivoting Mounting Bracket

1

Pole

3

Slots for band clamps

2

Steel band clamps

4

One of four mounting holes for mounting the AP to the bracket

Figure 17. Pivoting Mounting Kit with Pole Mount Clamp

1

One of four mounting holes for the AP. This is the AP-plate end of the bracket and is fastened to the back of the AP

3

Pole mount screw clamp. It can fit poles having a diameter of up to 2 to 3 inches (50 to 76 mm)

2

One of four slots for band clamps.

This is the pivot bracket base plate and is fastened to the pole.

Pole mount installation using band clamps are shown in Pole Mounted Antenna Using the Pivoting Mounting Bracket.

Procedure

Step 1

Select a mounting location on the pole to mount the antenna. You can attach the antenna to any pole with a diameter of 2 to 5 inch (51 to 127mm).

Step 2

Disassemble the pivot kit, if not already disassembled.

Step 3

Fasten the pivot bracket base plate to the pole using either one set of the adjustable band clamps or the screw clamp (the screw clamp can be used only on poles that are 2 to 3 inch (50 to 76 mm) in diameter).

Step 4

Position the pivot bracket base plate and clamp(s) on the pole. Tighten only enough to hold the bracket base plate in place to prevent it from sliding along the pole but still pivot on the pole. Fully tighten only after the antenna is mounted and positioned.

Step 5

Align the antenna-plate end of the bracket with the screw holes in the antenna's back.

Step 6

Fasten the bracket plate to the antenna by using four M6 x12–mm bolts and a 10–mm box or socket wrench. Tighten the bolts to 40–lbf-in (4.5 Nm) of torque.

Step 7

Using the 90 mm M8 long screw and the hardware supplied with the pivoting bracket, bolt the antenna and bracket plate to the base plate mounted on the pole. Do not fully tighten the assembly.

Note

 
The antenna should be mounted with the grounding lug on the base facing downwards.

Step 8

Pivot and position the antenna as required, and then fully tighten the 90 mm M8 long screw using a 13–mm wrench and then tighten the clamps on the pole.

Note

 
Use caution when tightening the 80 mm bolts on the pole-mount screw clamp. Ensure the clamp face remains parallel to the bracket base plate while tightening the bolts. Tighten the M8 x 80 mm bolts to 52 to 61 lbf-in (5.9 to 6.9 Nm) of torque.

Caution

 
Misalignment and over-torquing can result in breaking the screw clamp.

Step 9

Proceed connecting the antennas data cables, grounding the antenna.


Mount using IW-ACC-BRK1= Bracket Kit

The pivoting mounting kit IW-ACC-BRK1= contains a pivoting mounting bracket supporting both wall and pole mounting the antenna. The antenna can be mounted to the ceiling in a horizontal plane.

The bracket supports metal, wood, or fiberglass poles from 2 to 5 inch (51 to 127mm) in diameter.


Note


When mounted outdoors, elevation shall only be adjusted such that the antenna is aimed level with or below the horizon to ensure regulatory compliance.
Table 4. Materials for Wall or Pole Mounting the AP with IW-ACC-BRK1= Kit

Materials Needed

Supplied in the Kit?

Ground lug and screws

(Optional, size is M4 with 0.63" pitch)

No

Pivoting mount kit and hardware

Yes

Adapter Bracket

Yes

M6 x 12-mm Hex-head Bolts

Yes

Pole clamp

Yes

M8 Flat washers

Yes

M8 spring washers

Yes

M6 Flat washers

Yes

M6 spring washers

Yes

Four wall mounting screws (M6 max)

No

#6 AWG ground wire (Optional)

No

Shielded outdoor-rated Ethernet (CAT5e or better) cable

No

Grounding block (Optional)

No

Grounding rod (Optional)

No

13-mm box-end wrench or socket set

No

10-mm box-end wrench

No

Articulation Range

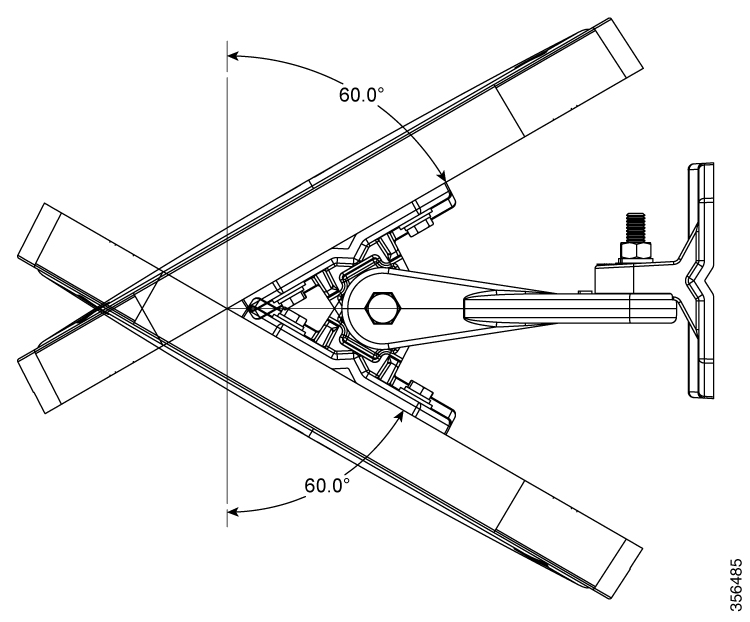
This articulation kit allows for adjusting the position of the antenna by pivoting the antenna along its vertical and horizontal plane.

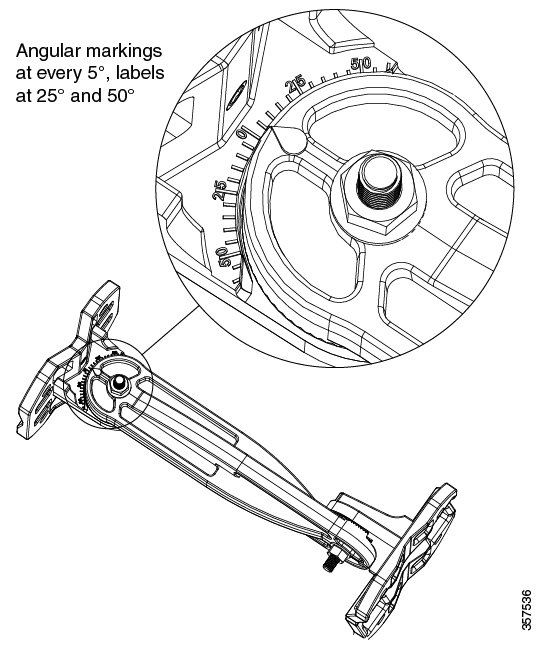
Figure 18. Close-Up View of the Azimuth and Elevation-Adjustment Pivots


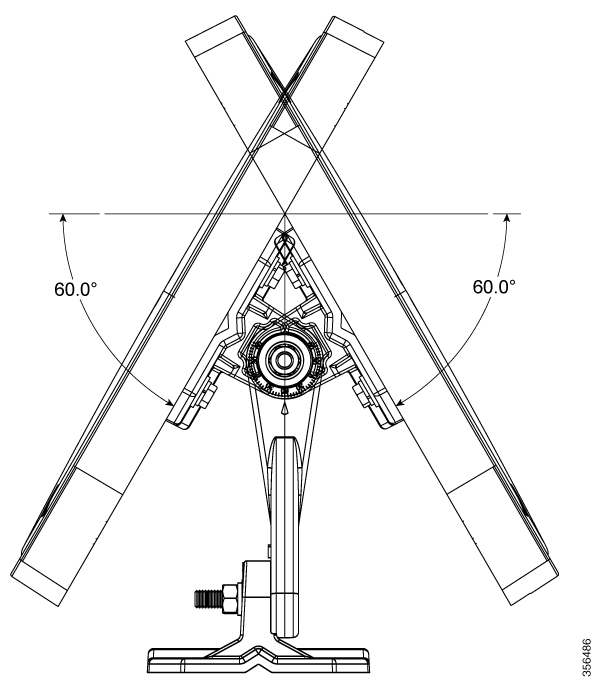
Figure 19. Azimuth Adjustment


Figure 20. Elevation Adjustment


Mounting on a Wall or Ceiling Using IW-ACC-BRK1= Bracket

The articulating mounting kit IW-ACC-BRK1= contains a pivoting mounting bracket for both wall and pole mounting.


Caution


The mounting surface, attaching screws, and optional wall anchors to support a 50 lb (22.7 kg) static weight.
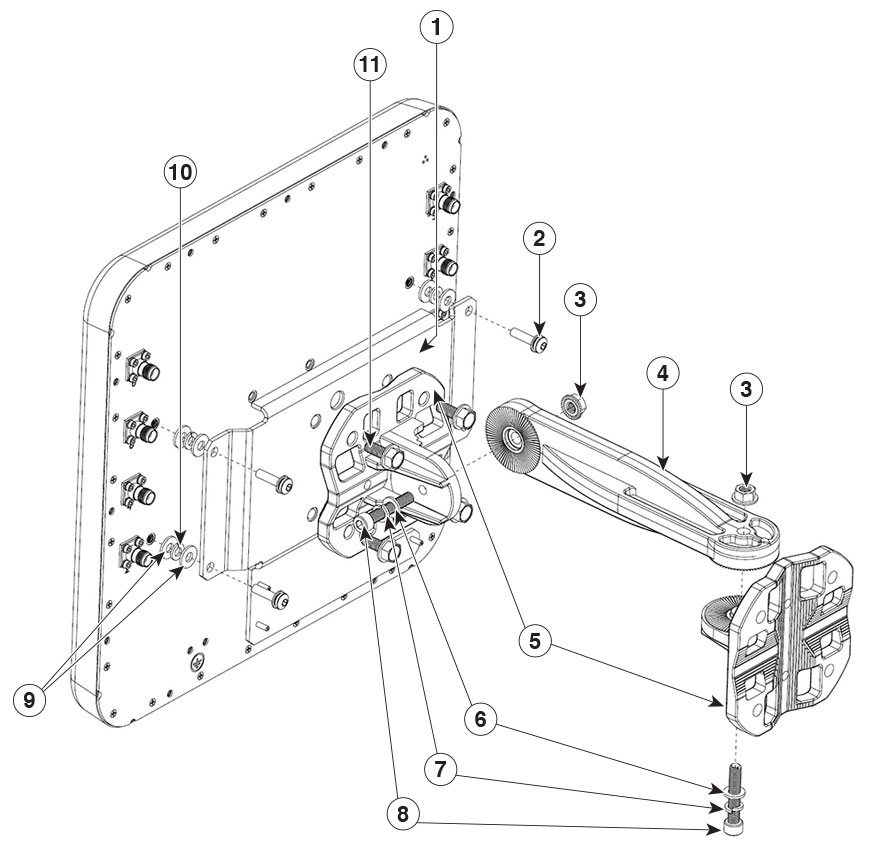
Figure 21. Exploded View of Antenna and Bracket Hardware Assembly

Item #

Mounting Bracket Kit

Quantity

Tightening Values

1

Adapter plate

1

2

M6 screw

4

4.5 +/- .5 Nm

3

M8 nut

2

25.0 +/- 1.0 Nm

4

Mounting arm

1

5

Mounting flange

2

6

M8 Flat washer

2

7

M8 Spring washer

2

8

M8 Bolt

2

9

M6 Flat washer

8

10

M6 Spring washer

4

11

M8 x20 Bolt

4

8 +/-.5 Nm

Procedure

Step 1

Determine the mounting location for the antenna.

Step 2

Attach one of the mount flange to a wall or ceiling using four M8 bolts through the holes in the bracket.

Note

 
The mounting kit does not include the M8 bolts for securing the bracket to the mounting surface.

Step 3

Attach adapter plate to the antenna with M6 screw.

Place the M6 flat washers and the spring washer between the adapter plate and the antenna. Tighten the M6 screws to 4.5 +/-.5 Nm torque.

Step 4

Attach the other mount flange to the back of the adapter plate.

Use the four M8 bolts through the holes in the bracket. Tighten the screws to 8 +/-.5 Nm Nm torque.

Step 5

Assemble the mounting arm to the flanges.

Use a wrench to tighten all screws and nuts. See Exploded View of Antenna and Bracket Hardware Assembly.

Step 6

Orient the antenna as required.

Use a wrench to loosen or tighten the fasteners at the azimuth and elevation- adjustment pivots.

Note

 
Ensure that the antenna cable exits downwards.

Step 7

Adjust the azimuth (side-to-side position) and elevation (up-and-down position) of the antenna.

Loosen the adjustment pivot nuts slightly to allow for adjustment. Use the azimuth and elevation markings on the articulating mounting arm and the flange brackets as a guide. See Close-Up View of the Azimuth and Elevation-Adjustment Pivots. You may adjust the azimuth angle up to ±60 degrees, see Azimuth Adjustment, and elevation up to ±60 degrees see Elevation Adjustment.

Step 8

After adjusting the antenna position, tighten the pivot nuts.

Tighten all nuts at the pivot points to 25.0 +/- 1.0 Nm torque.

Step 9

Connect the signal cables and the grounding cable.


Mounting on a Pole or Mast Using IW-ACC-BRK1= Bracket

The articulating mounting kit IW-ACC-BRK1= contains a pivoting mounting bracket for both wall and pole mounting.


Note


The pole or mast must be rigid enough to hold the weight of an antenna along with the associated forces produced by wind loads. In addition, the mast must be structurally strong enough to withstand the clamping force of the hose clamps.

Note


When mounted outdoors, elevation shall only be adjusted such that the antenna is aimed level with or below the horizon to ensure regulatory compliance.
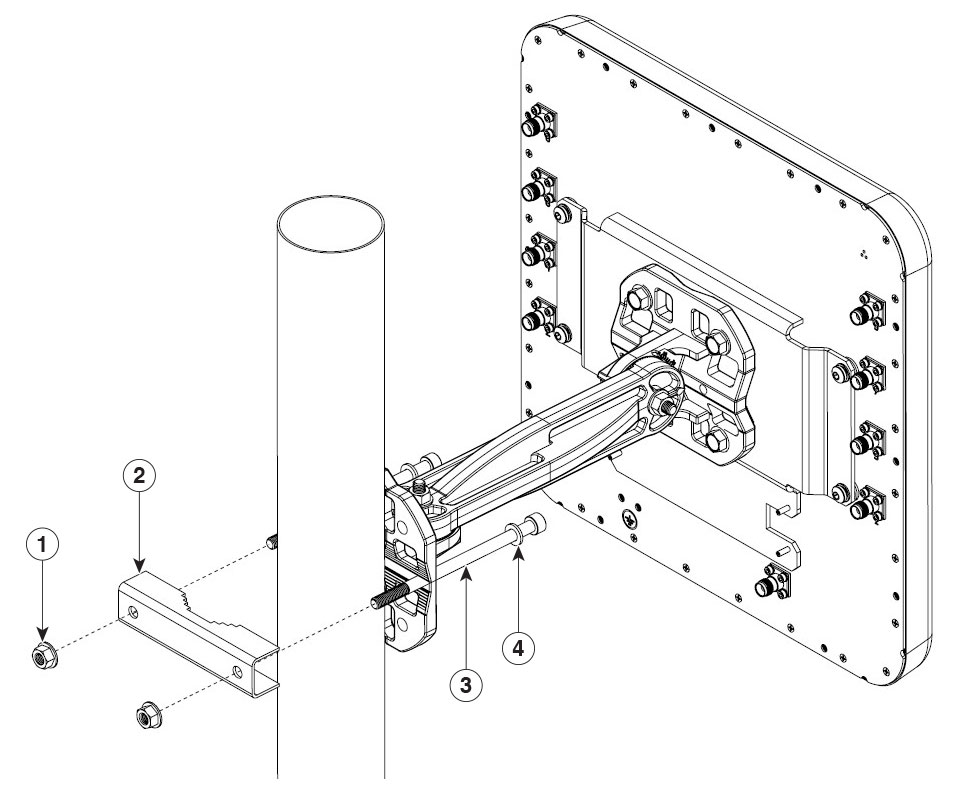
Figure 22. Antenna Bracket Hose Clamp Assembly for Pole Mounting

Item #

Mounting Bracket Kit

Quantity

Tightening Values

1

M8 Nut

2

25.0 +/- 1.0 Nm

2

Pole clamp

1

3

M8 Bolt 140 Lg

2

4

M8 Flat washer

2

Procedure

Step 1

Determine the mounting location for the antenna on the pole or mast.

Step 2

Position and mount the mounting flange bracket onto the pole or mast using the pole clamp provided in the kit.

Tighten the M8 bolts until the flange is fully secure on the pole/mast.

Step 3

Attach the adapter plate to the antenna.

Place the M6 flat washers and the spring washer between the adapter plate and the antenna. Tighten the M6 screws with 4.5 +/-.5 Nm torque.

Step 4

Attach the other mounting flange through the holes in the bracket to the back of the adapter plate using four M8 bolts.

Tighten the bolts to 8 +/-.5 Nm torque.

Step 5

Assemble the mounting arm to the flanges.

Use a wrench to tighten all screws and nuts. Ensure that the antenna cannot rotate about the mast.

Step 6

Adjust the azimuth (side-to-side position) and the antenna’s elevation (up-and-down position).

Loosen the adjustment pivot nuts slightly to allow for adjustment.

You can use the azimuth and elevation markings on the articulating mounting arm and the flange brackets as a guide. See Close-Up View of the Azimuth and Elevation-Adjustment Pivots. You can adjust the azimuth angle up to ±60 degrees, see Azimuth Adjustment, and elevation up to ±60 degrees see Elevation Adjustment.

Step 7

After adjusting the antenna position, tighten all nuts at the pivot points to 25.0 +/- 1.0 Nm torque.

Caution

 
Misalignment and over-torquing can result in breaking the screw clamp.

Step 8

Connect the signal cables and the grounding cable to the antenna.