Installing the M12 Kit

This chapter has the following sections:

M12 Kit Overview

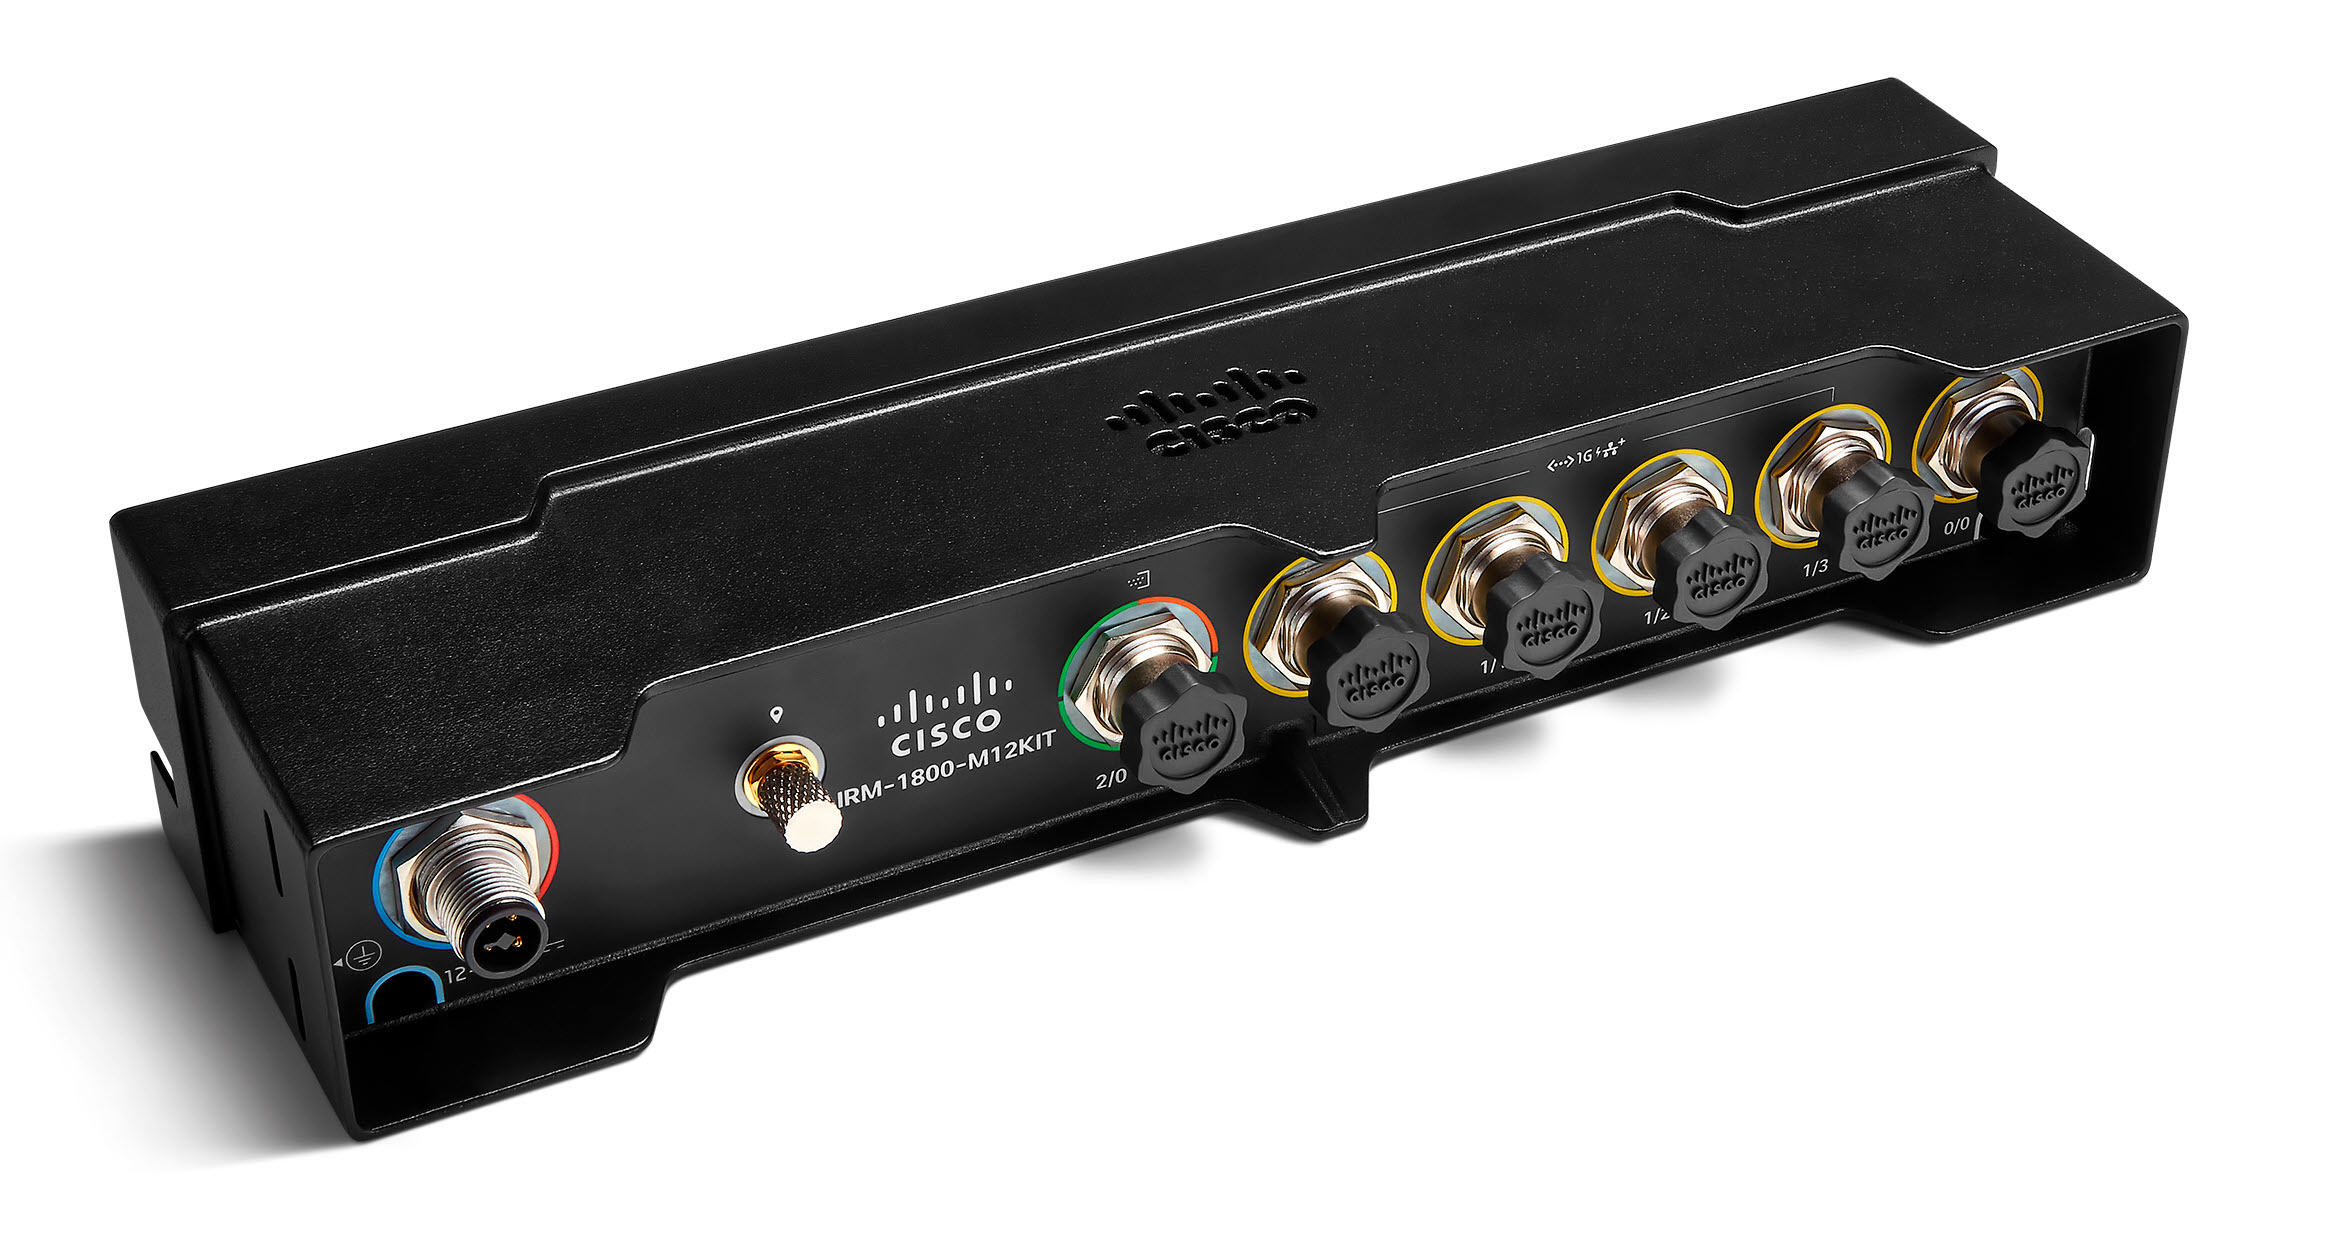
The M12 kit for the Catalyst IR1800 routers is a plug-on module that converts its various interface ports into M12 ports. The part number for the kit is IRM-1800-M12KIT.
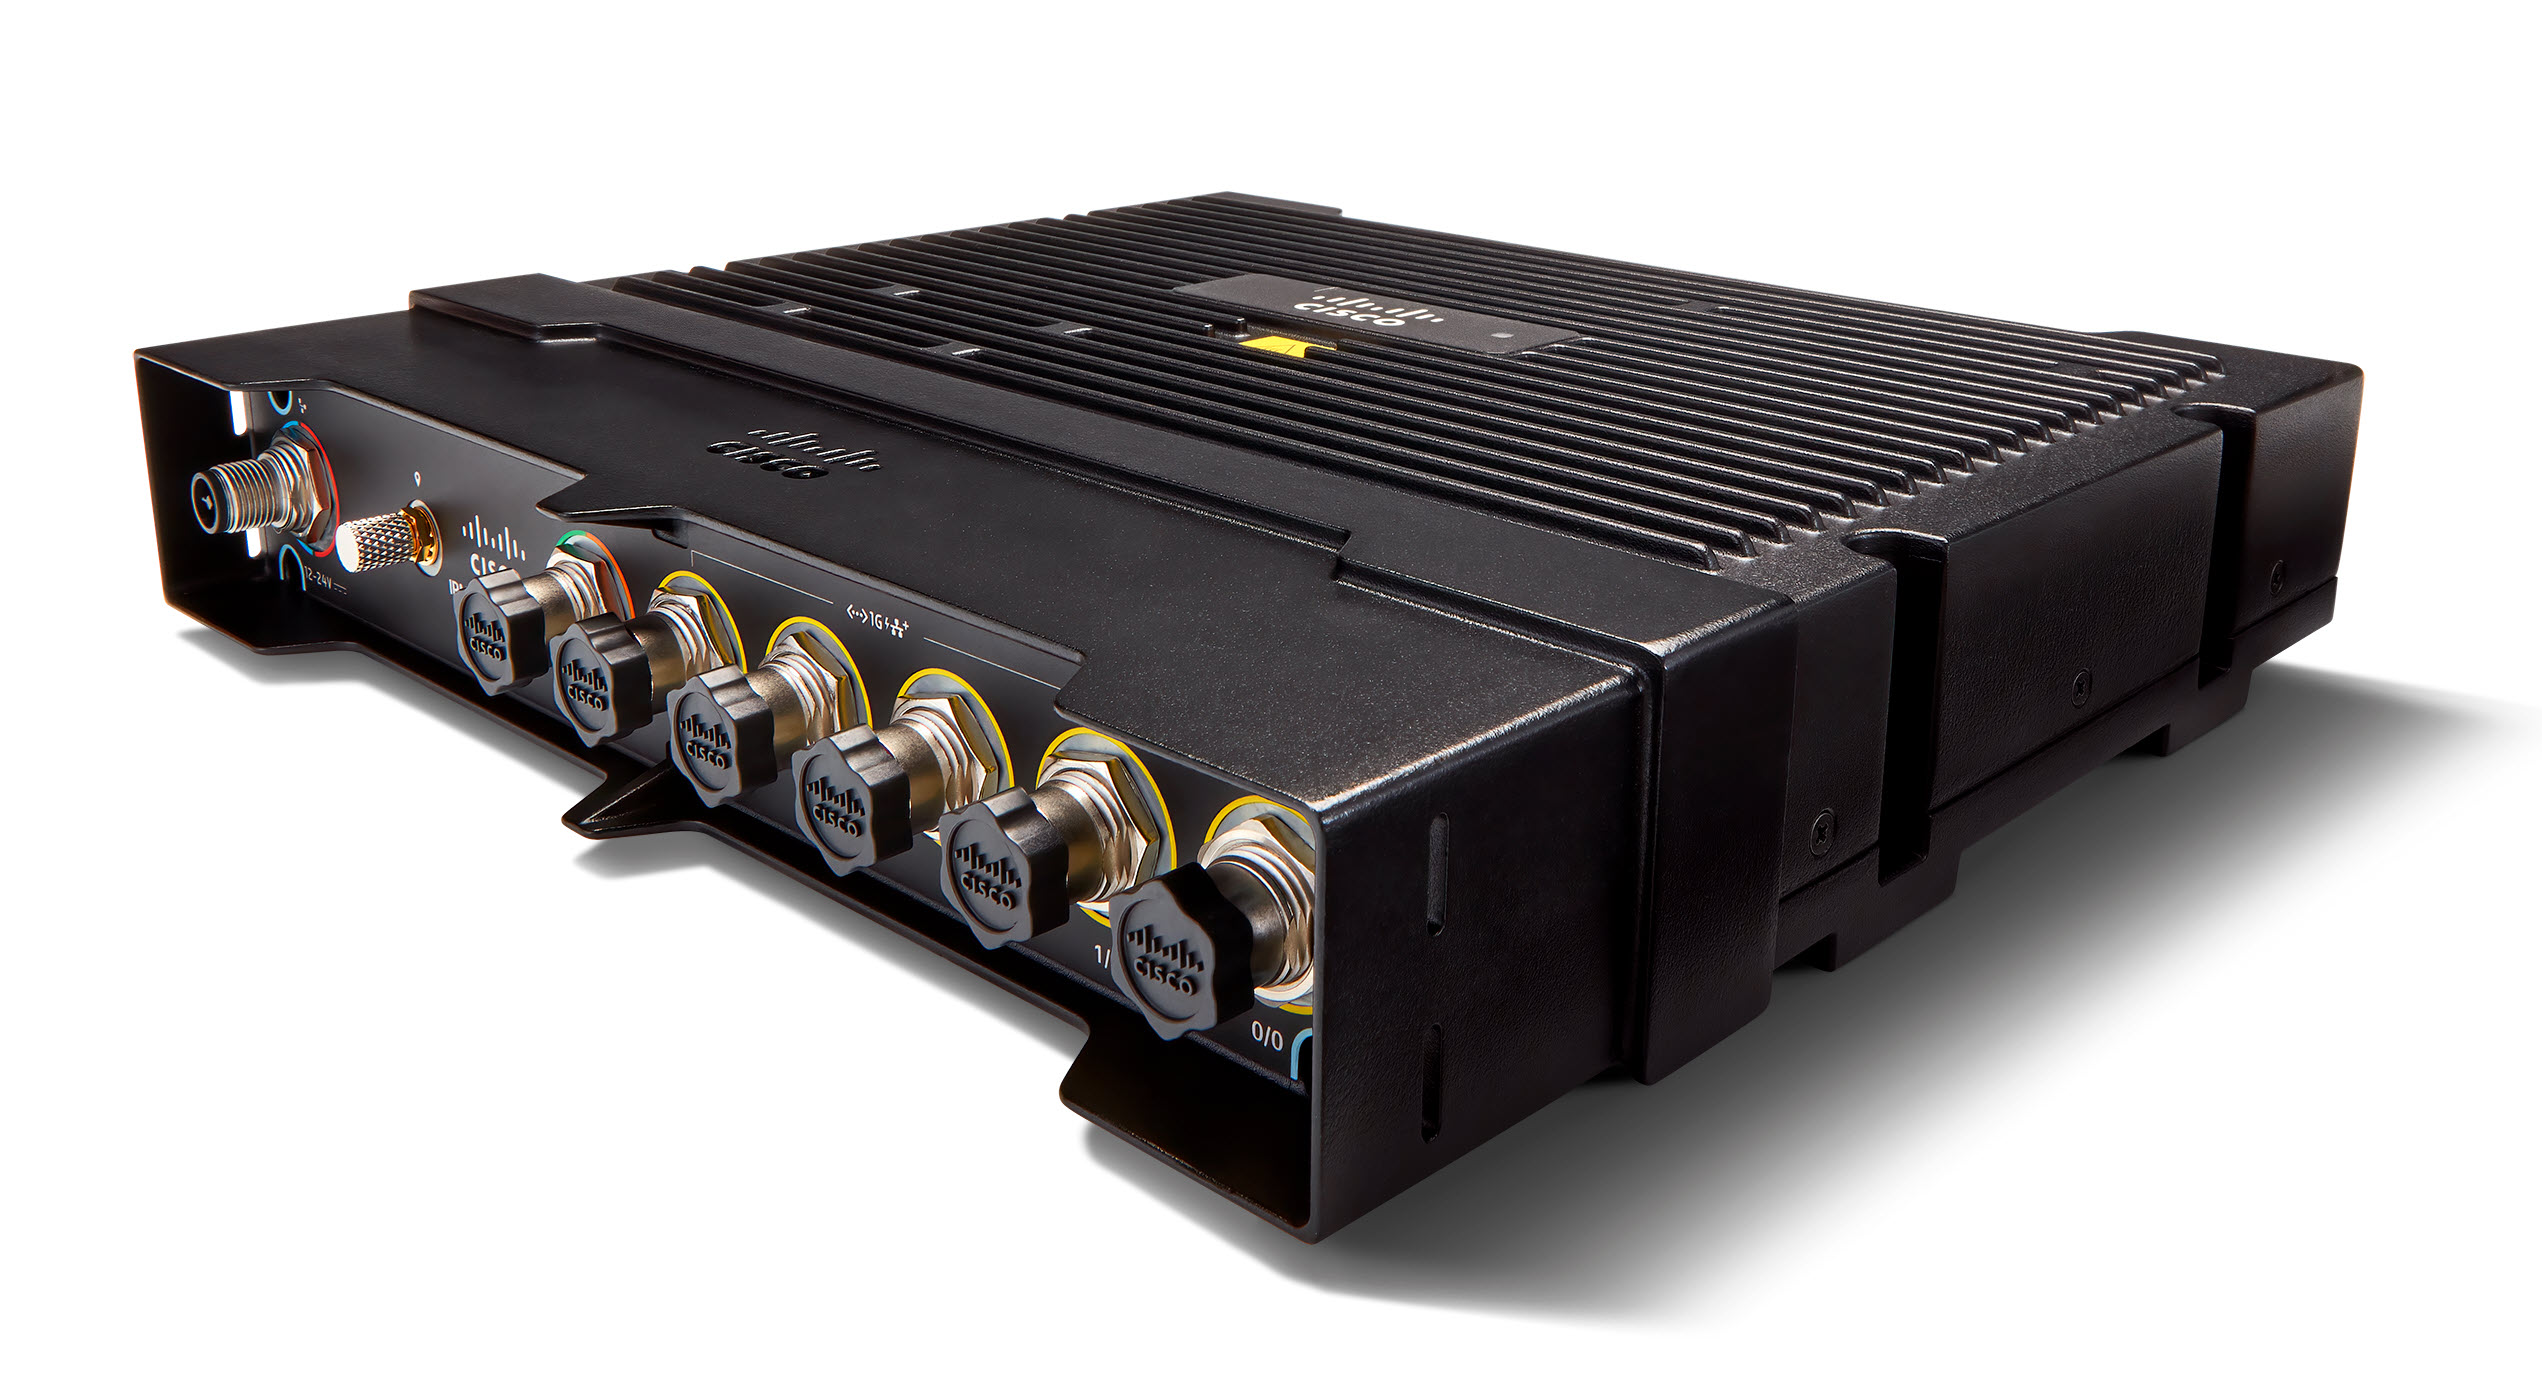
Figure 1. The M12 Kit for the IR1800

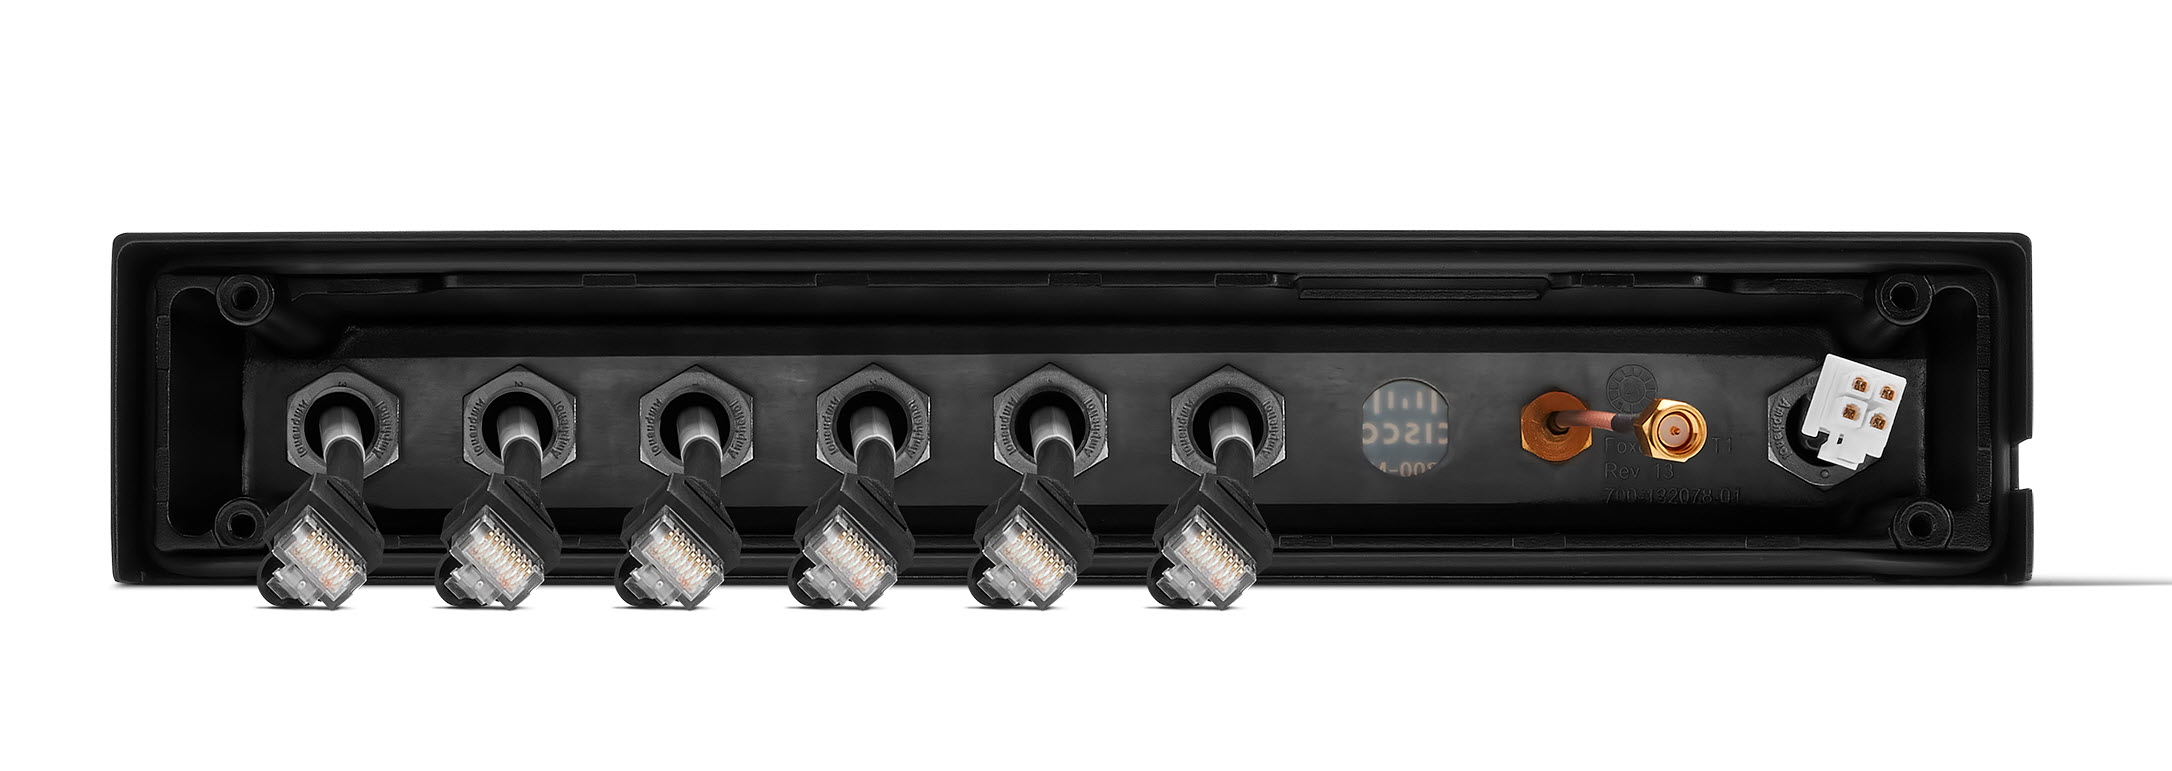
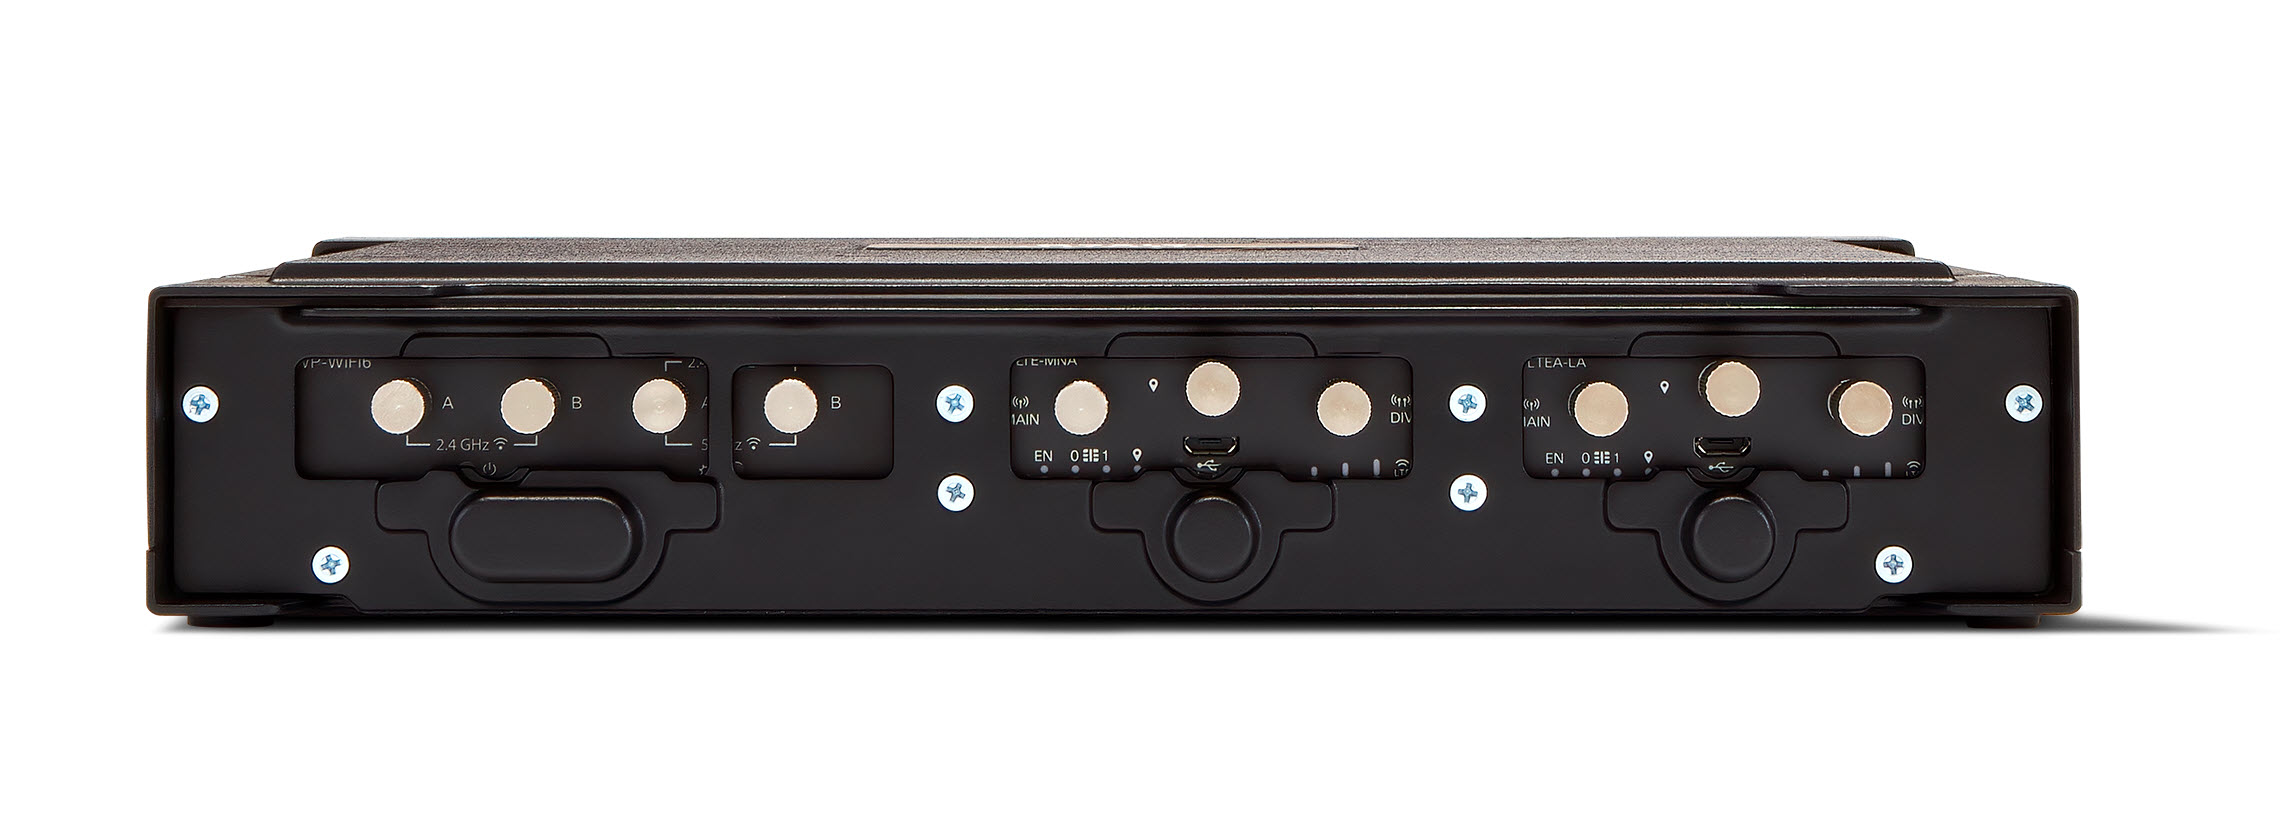
The M12 kit consists of two major pieces. The front panel contains all of the M12 connectors. The back panel covers the access for the pluggable modules.
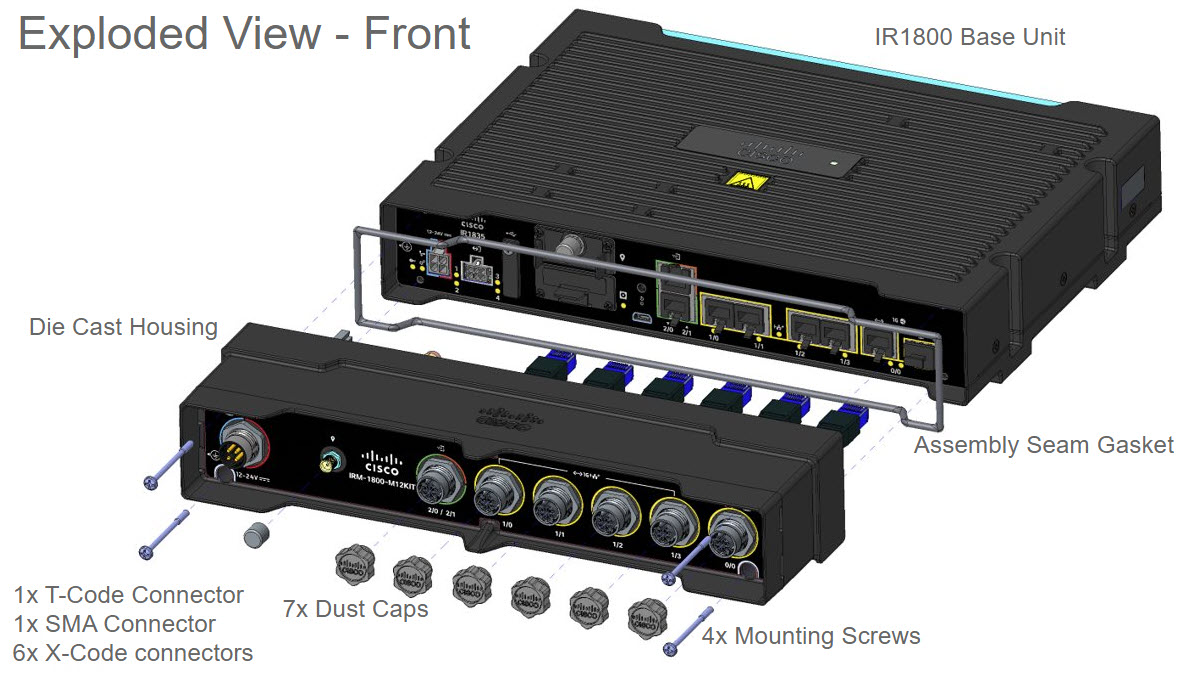
Figure 2. M12 Kit Front Panel Exploded View

Note


The M12 front panel comes with dust covers on all ports except the power connector. If a port is unused, make sure to leave the cover in place.
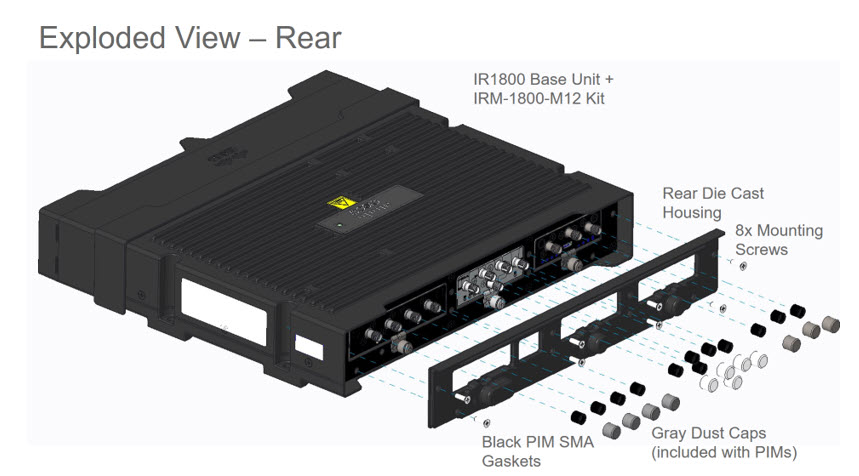
Figure 3. Back Panel Exploded View

Background on M12 Connectors

Introduced in 1985, the M12 connector has a long track record as one of the most reliable connectors for industrial applications. Once used primarily by automobile manufacturers, the M12 has become the industry standard in factory automation, autonomous robotics, communication, measurement and control, and many other applications.

M12 connectors are found at multiple levels in automation, several styles of coding exist to prevent incorrect mating on products. The connectors used for the M12 kit on the IR1800 are:

  • One M12 male with external threads T-coded to Mini-Fit Jr plug for power and CAN interface

  • One SMA female to SMA male for the GNSS/Dead-Reckoning module

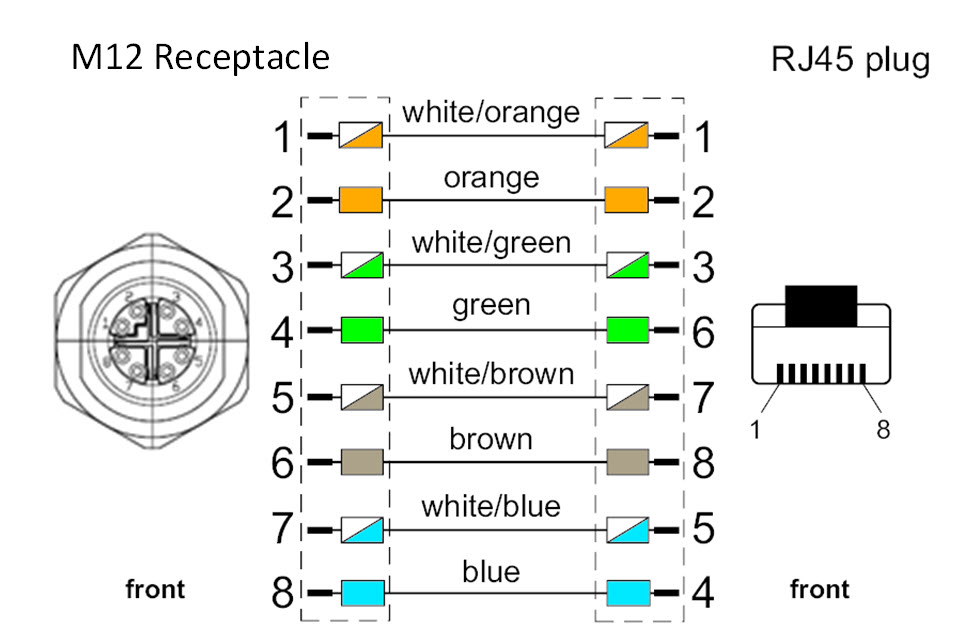
  • One M12 female with internal threads X-coded to RJ45 plug for serial ports

  • Five M12 female with internal threads X-coded to RJ45 plug for the GE WAN and LAN ports

Connector Details

The following figures show the M12 connector details:
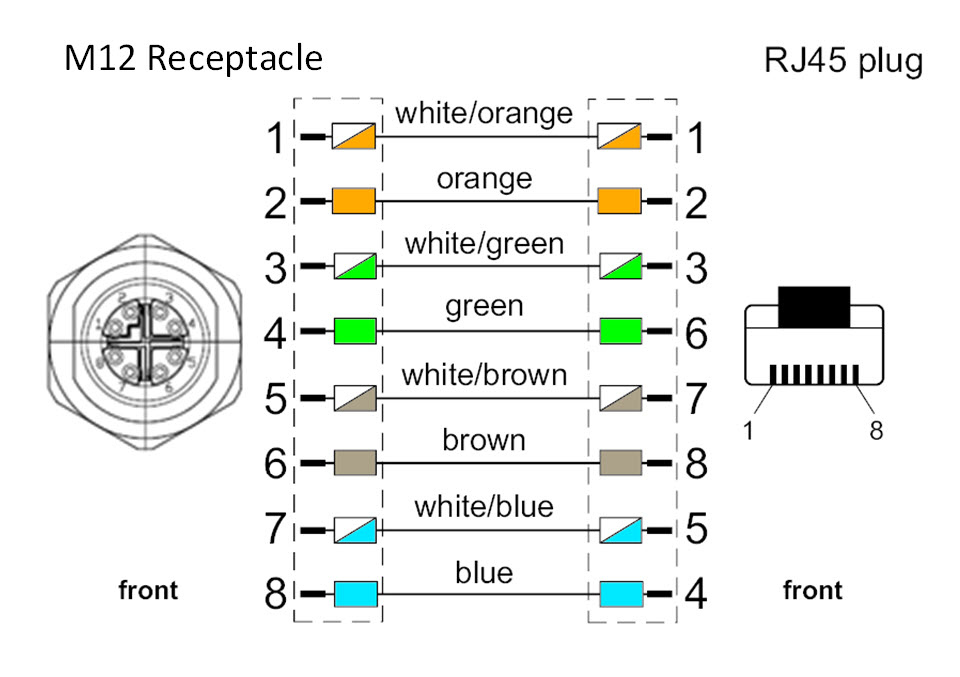
Figure 4. M12 X-code RS232/RS485 Interface
Figure 5. M12 X-code Ethernet
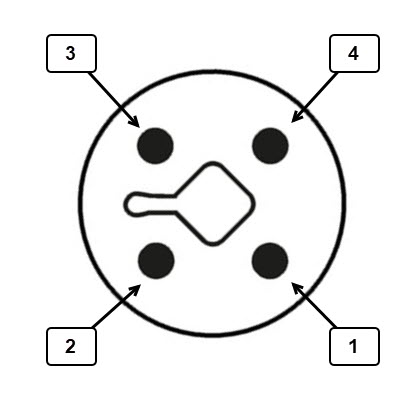
Figure 6. M12-T-code Power and CAN Interface
Table 1. T-code Male Pinouts

1

DC- (GND-)

2

CAN_P (CAN+)

3

CAN_N (CAN-)

4

DC+ (12V, 24V)

SMA Connector

The SMA cable for the GNSS/Dead-Reckoning Interface is an SMA Female to SMA Male connector.
Guidelines and Limitations

Information contained in this guide demonstrates the fully loaded IR1835 device. This device would use all of the available connections for the M12 Kit. When using the M12 Kit on the other PIDs, keep the following information in mind:

  • The IR1833 does not have the Digital IO Interface.

  • The IR1831 does not have the Digital IO Interface, or the GNSS module.

  • The IR1821 does not have the Digital IO Interface, the GNSS module, and only has one RJ45 interface for the serial port.


Note


Unused connections with the M12 Kit should be wound up and tucked inside the cover away from the outer seals.

Note


When deploying the IRM-1800-M12KIT, the GNSS antenna should be installed with a corresponding cable providing a recommended >5ft of separation and adequate mounting hardware, as necessary.

IP54 Compliance

The IR1800 is capable of being IP54 rated when the M12 kit is installed, and particular mounting orientations are used.

Le routeur IR1800 peut atteindre l’indice de protection IP54 lorsqu’il est installé avec l’ensemble M12 conformément à certaines positions de montage particulières.


Note


When installed, suitable IP rated cables must be used to maintain the IP54 rating.

Note


Une fois le tout installé, des câbles avec indice de protection (IP) approprié devront être utilisés pour assurer le maintien de l’indice de protection IP54.

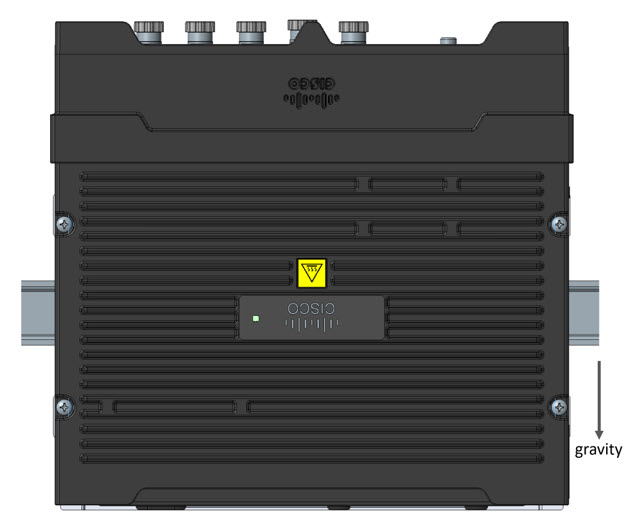
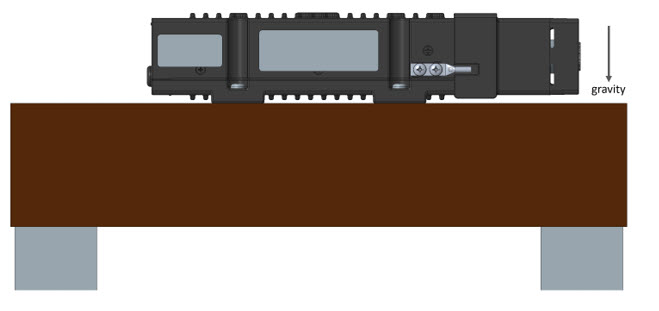
The device can be mounted horizontally on a flat surface such as a table or fixture, or vertically using a DIN-Rail or wall mount. Refer to the following diagrams for Horizontal and Vertical Mounting using gravity as a reference:

L’appareil peut être monté à l’horizontale sur une surface plane comme une table ou un bâti, ou à la verticale, sur un rail DIN ou par montage mural. Consultez les schémas suivants pour voir comment effectuer un montage horizontal ou vertical qui utilise la gravité comme référence :

Figure 7. Horizontal Mounting
Figure 8. Vertical Mounting

Note


The vertical mounting orientation must be as shown above with the ethernet/serial/power connectors facing away from gravity, and the pluggable interface module connectors facing towards gravity. The device can not be mounted rotated 180 degrees.

Note


Additional information on mounting the device is found in the Installing the Router chapter of the IR1800 Hardware Installation Guide.

Known Limitation With Older IR1800 Series Models

The M12 kit will fit on all models of the IR1800 router. However, installing the M12 kit on some older models of the IR1800 will not guarantee an IP54 rating.

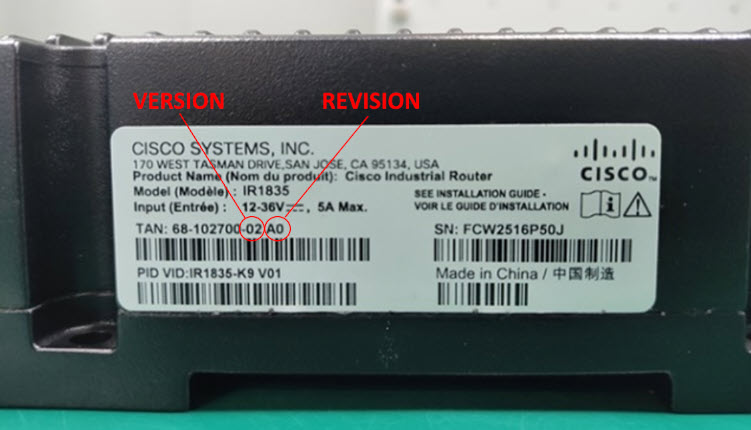
To see if your version of the IR1800 is one of the older models, check the product label. The label shows a "TAN" number which includes a version and a revision number. See the following example:

Figure 9. TAN Number Example

The following table shows the acceptable minimum version/revision of TAN numbers that will work with the M12 kit and offer IP54 compatibility.

Table 2. M12 Compatibility

PID

Minimum TAN Version/Revision

IR1821-K9

68-102698-04 rev D0 or higher

IR1831-K9

68-102610-04 rev D0 or higher

IR1833-K9

68-102699-04 rev D0 or higher

IR1835-K9

68-102700-04 rev D0 or higher

Contents and Dimensions

This section provides an overview of the contents and dimensions of the IRM-1800-M12KIT.

Contents of the Kit

The IRM-1800-M12KIT contains the following:

  • Front Cover including captive screws

  • Back Cover with screws and sealing gaskets

Dimensions of the Kit

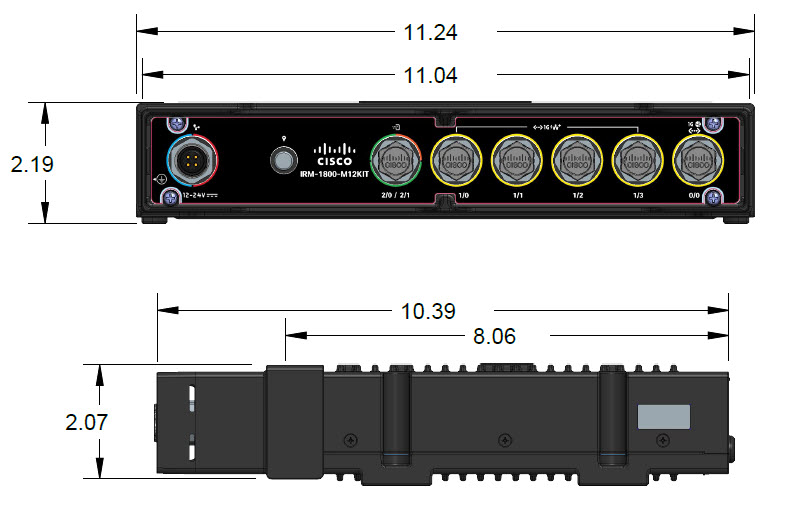
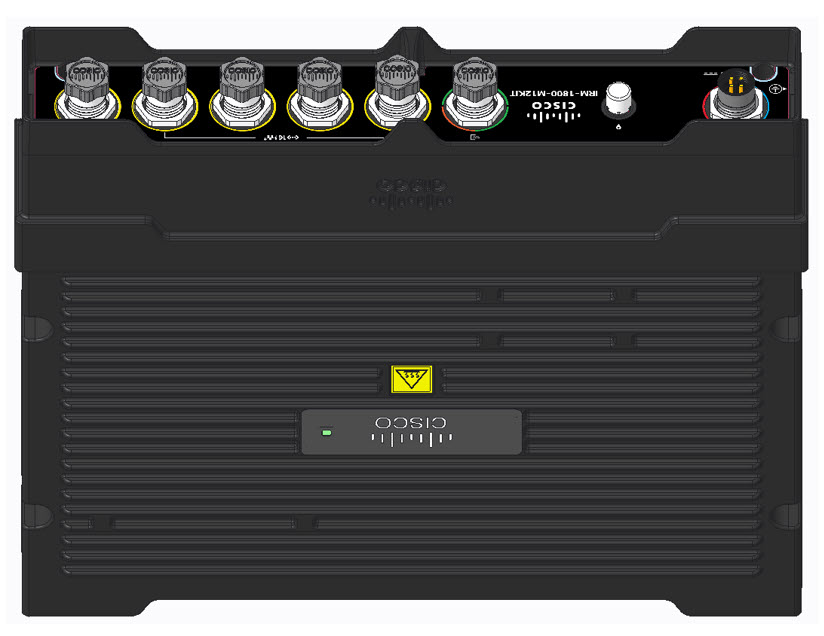
The following figure illustrates the dimensions of the IR1800 with and without the M12 kit installed.

Figure 10. Dimensions

Port Mapping

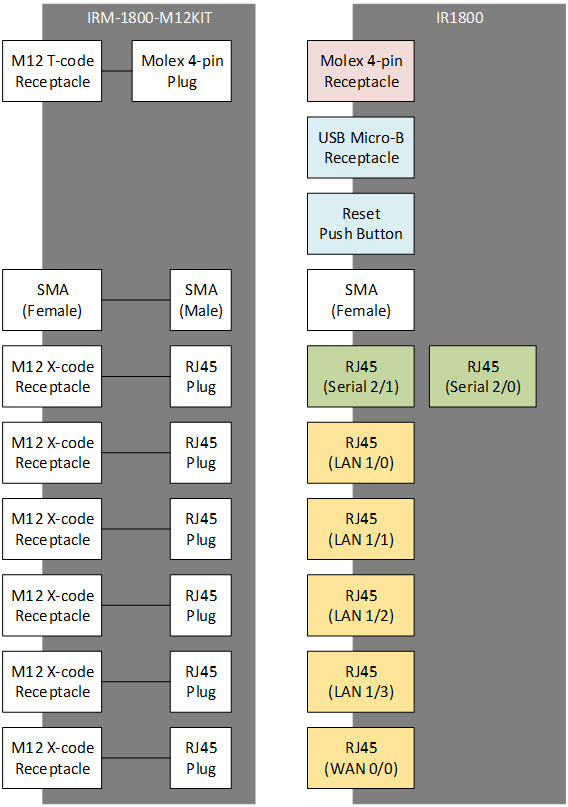
This section describes the cable connections between the IR1800 front panel and the M12 front panel. The cables used in a fully loaded configuration are:

  • One male M12 with external threads T-coded to Mini-Fit Jr plug for power and CAN interface

  • One female SMA to male SMA for the GNSS/Dead-Reckoning module

  • One M12 female with internal threads X-coded to RJ45 plug for serial ports

  • Five M12 female with internal threads X-coded to RJ45 plug for the GE WAN and LAN ports


Note


The cable can be attached to either serial port depending on the use case and the PID.

The following shows a block diagram of the connections:

Figure 11. Block Diagram

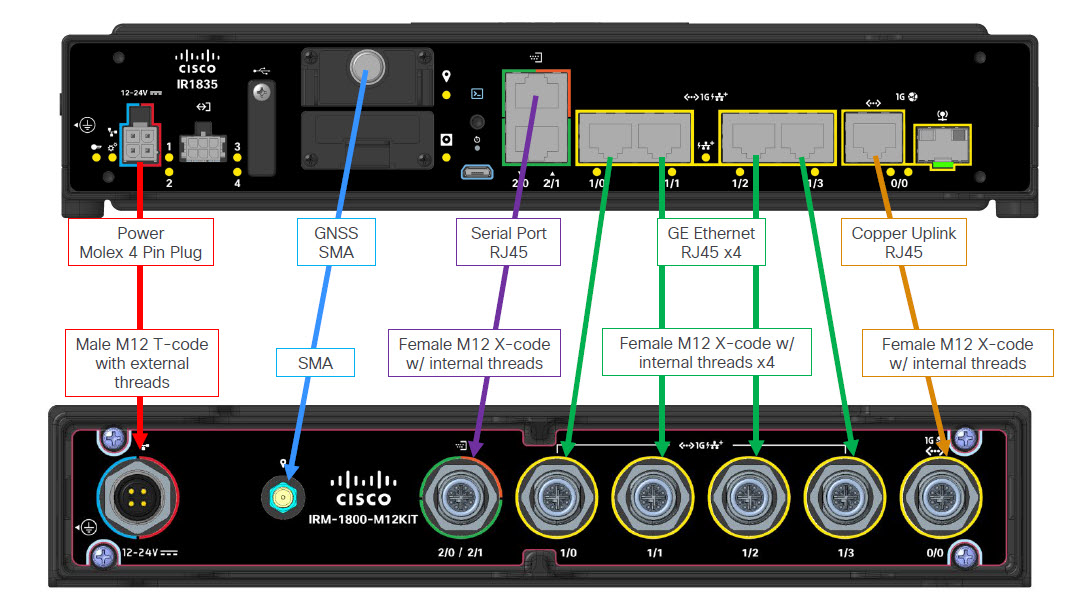
The following shows the port mapping on the IR1835.

Figure 12. IR1835

Installation Instructions

This section describes how to attach the kit to the IR1800. You will need the following tools:

  • A #1 Phillips head screwdriver

  • A #2 Phillips head screwdriver

  • A torque screwdriver

M12 Kit Assembly

The M12 front panel comes fully assembled with cables and captive screws.

Figure 13. Front Panel Front View
Figure 14. Front Panel Rear View

The M12 back panel is a single piece that uses eight screws provided in the accessory kit.

Installing the Front Cover

Follow these steps to install the Front Cover of the M12 Kit on the IR1800.

Step 1

Remove any of the covers from the ports on the IR1800 that you will need to use.

Step 2

For ease of installation, it is recommended to position the IR1800 with the front panel facing up. Take the M12 Kit Front Cover and hold it over the IR1800 front panel. Make sure you have the correct orientation by aligning the power plug with the power connector, and the Cisco logos on top of both the M12 Kit Front Cover and the IR1800.

Attach the cables starting with the RJ-45 connectors, then the GPS FRU/Dead Reckoning cable (if in use on IR1833 or IR1835 only), then the Power cable. If you are not using the GPS FRU/Dead Reckoning cable, tuck it away inside the M12 Kit Front Cover. Make sure it is away from any mounting surfaces to avoid pinching.


Tip


You can reference the front panel labels on both the M12 Kit Front Cover and the IR1800 to connect the cables to the correct ports.

In the figure above, the M12 cables are shown connecting to their correct installation locations. There are additional labels on the M12 Kit Front Cover’s cables (shown in the red rectangle) which have the port designations printed on them.

Step 3

If there are any cables from the M12 Kit Front Cover that you are not using, tuck them away inside of the Front Cover, away from any mounting surfaces. Verify that the sealing gasket is properly seated around the entire M12 Kit Front Cover sealing surface.

Then, lower the M12 Kit Front Cover down onto the IR1800 faceplate. Make sure not to crimp or pinch any cables between the mounting surfaces and screw fastening locations.

Step 4

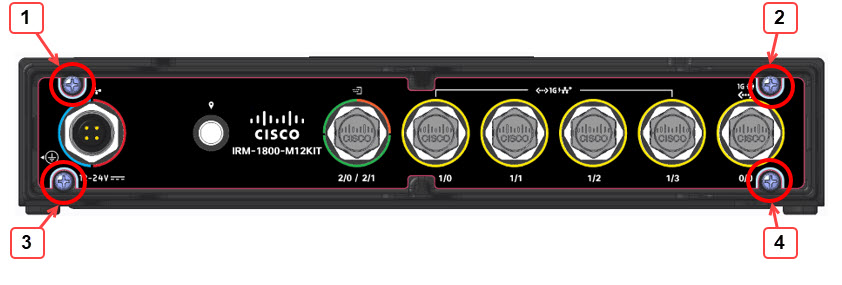
Fasten the M12 Kit Front Cover to the IR1800 with the captive screws in each corner using a # 2 Phillips head screwdriver.

Tighten all four captive screws to 6 in-lbs for proper grounding and sealing.

Step 5

Remove the dust caps only for the connections you require.


Important


To maintain IP54 compliance, the dust caps should remain on for any ports and connectors not used.

Finally, connect your cables to the unit as needed.

Installing the Rear Cover

The M12 Kit Rear Cover is installed as a single piece using eight screws provided in the accessory kit.

Step 1

Make sure that all slots already have pluggable modules or blanks installed. If not using a slot, a blank module is required to maintain IP54 compliance.

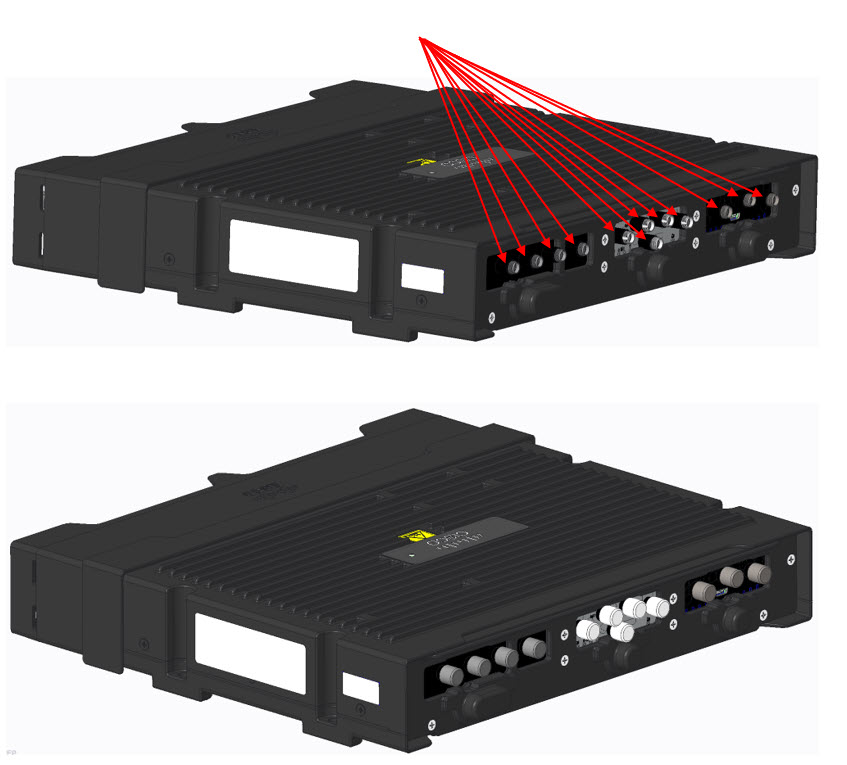
All antennae and dust caps should be removed before attaching the back cover. The following figure shows an exploded view of the M12 Kit Rear Cover:


Note


If your pluggable module has a USB port cover attached, remove the cover. If the USB port cover is installed along with the IP54 back cover, it will interfere with the installation.

Step 2

Align the M12 Kit Rear Cover with the rear of the IR1800. The following figure shows the eight threaded hole locations on the IR1800 that line up with the M12 Kit Rear Cover:

Step 3

To install the M12 Kit Rear Cover, all eight #1 Phillips screws should be installed in a star like pattern, similar to how one would install a car tire. Torque all eight screws to 6 in-lbs. The following figure shows the M12 Kit Rear Cover installed.

Step 4

Once the M12 Kit Rear Cover is installed, place the cylindrical black PIM gaskets over the SMA connectors. Then reinstall dust caps and install SMA cables/antennae as needed. Refer to the following figure:

Grounding the Device

The M12 Kit is automatically grounded to the IR1800 when the 4 captive screws are torqued down to 6 in-lbs. To ensure the IR1800 is properly grounded, see Installing the Router Ground Connection in the Hardware Installation Guide.

Console Port, USB Port, and Reset Button Access

To access the console port, USB Port, and Reset Button on the IR1800, the M12 Kit Front Cover needs to be removed from the IR1800. This can be done while the unit is operational, as no cables need to be unplugged to gain access to any of the additional ports. IP54 sealing is unavailable while accessing the additional ports.

Step 1

Remove the four screws from the M12 Kit Front Cover to expose the front of the IR1800.

Step 2

The IR1800 may have covers on the additional ports. Remove these covers to access the additional ports. The covers are shown in the following figure:


Note


The following figures are of an IR1835 router, which contains additional features that the IR1821, IR1831, and IR1833 do not have. Your IR1800 unit may look slightly different.

1

USB Port Cover

2

Console and Reset Button Cover

Step 3

With covers removed, all additional ports should be accessible. The ports are shown in the following figure:

1

USB Port

2

Console Port

3

Reset Button

Step 4

To reinstall the M12 Kit Front Cover, reinstall the additional covers over the ports, then push the M12 Kit Front Cover into plate. While pushing the M12 Kit Front Cover into place, make sure the sealing gasket is still in place, and that the cables do not get pinched between any screws or walls.

Torque the four M12 Kit Front Cover screws identified below to 6 in-lbs.