Upgrade the Router

Your Cisco router comes preinstalled with IOS XR software. You can upgrade the router by installing a new version of the software. We recommend that you keep the software up-to-date to ensure that the router works with the latest features and bug fixes.

During an upgrade:

  • the newer software replaces the currently active software on the router.

  • packages (RPMs) that have the same name and version in the current and target release versions are not removed or reinstalled.

The following image shows the tasks involved in successfully upgrading the router.

Plan the Software Upgrade

Before you upgrade the software version, prepare the router to ensure that the upgrade process is seamless.
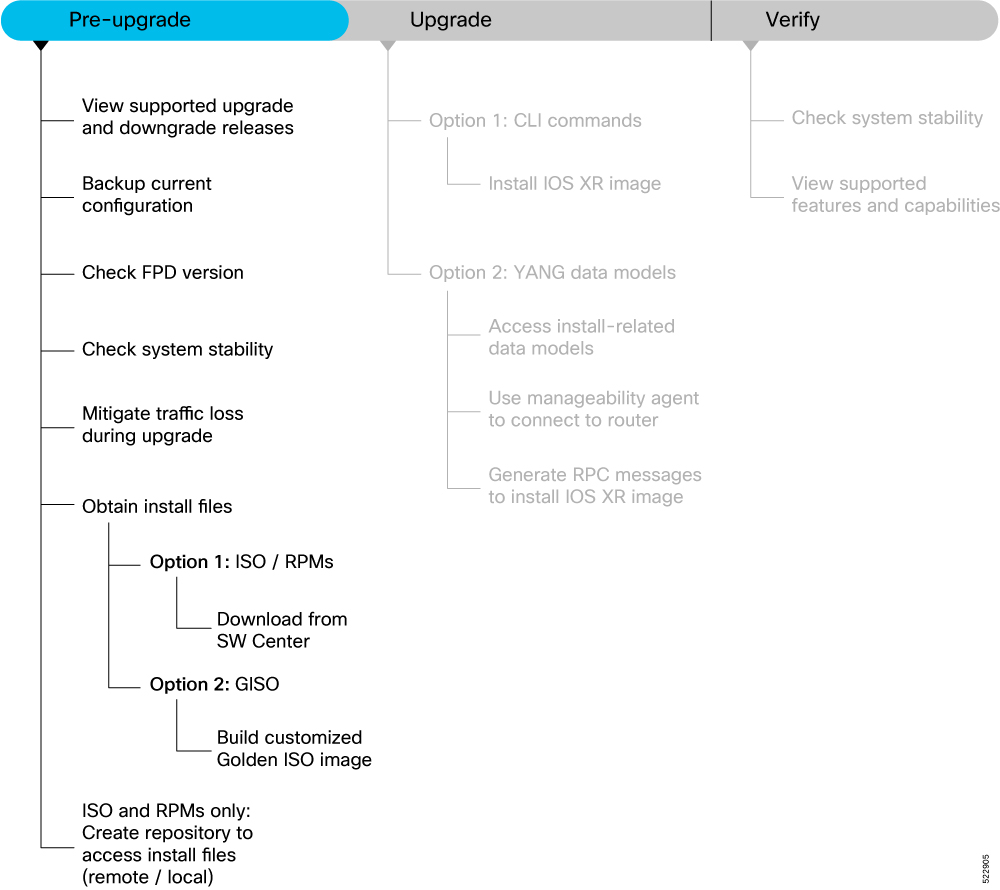
Figure 1. Pre-upgrade Workflow for the Cisco 8000 Series Router
Workflow to prepare the router before a software upgrade

This section describes the following processes to prepare your router for an upgrade:

View Supported Upgrade and Downgrade Releases

Before you begin the upgrade, you must identify a Cisco IOS XR release that aligns with Cisco-recommended upgrade paths.

Use the show install upgrade-matrix running command to identify a supported target upgrade release, and prerequisites or limitations related to the specific software upgrade or downgrade. This command provides the following information:

  • Required bridging SMU RPMs

  • Blocking SMU RPMs

  • Unsupported hardware

  • Caveats or restrictions

In the following example, the output of the show install upgrade-matrix running command displays the upgrade restrictions.

Router#show install upgrade-matrix running
Matrix: XR version: 7.9.1, File version: 1.0
The upgrade matrix indicates that the following system upgrades are supported from the current XR version:

From                 To               Restrictions
7.9.1                7.7.1            CSCab54345
7.9.1                7.7.2            -
7.9.1                7.7.3            -
7.9.1                7.7.4             -
7.9.1                7.7.5             -
7.9.1                7.7.6             -
7.9.1                7.8.1             -

In this example, you provide the current version and the target version that you want to upgrade the router. The output of the command displays the support information and dependencies between these two releases:

Router#show install upgrade-matrix running 7.5.2 7.3.1
Tue May 10 19:33:59.135 UTC

Upgrade matrix information for system upgrade: 7.5.2->7.3.1

XR system upgrade is supported, with the following restrictions:

The following fixes must be installed if any version of the package is installed.
-----------------------------------------
Ddts              Name        Version
-----------------------------------------
CSCab54345        xr-bgp      7.5.2

You can view support information using the following show commands or through the operational data.

Command Description
show install upgrade-matrix running Displays all supported software upgrades from the current version according to the support data installed on the running system
show install upgrade-matrix running v1 v2 Displays details about the software upgrades from version 1 to version 2 according to the support data installed on the running system
show install upgrade-matrix running all Displays all supported software upgrades from any version according to the support data installed on the running system
show install upgrade-matrix iso path-to-ISO Displays details about the software upgrade from the current version to the version of the target ISO according to the support data in both the running system and the ISO image
show install upgrade-matrix iso path-to-ISO v1 v2 Displays details about the software upgrade from version 1 to version 2 according to the support data in the target ISO image
show install upgrade-matrix iso path-to-ISO all Displays all supported software upgrades from any version according to the support data in the target ISO image
show install upgrade-matrix iso path-to-ISO running Displays details about the software upgrade from the current version to the version of ISO according to the support matrices in both the running system and the target ISO image
show install upgrade-matrix rollback Displays details about the software upgrade from the current version to a version of a specific rollback point (indicated by an ID) according to the support matrices in both the running system and the rollback ID
show install upgrade-matrix rollback ID v1 v2 Displays details about the software upgrade from version 1 to version 2 according to the support data in the specific rollback ID
show install upgrade-matrix rollback ID all Displays all supported software upgrades from any version according to the support data in the specific rollback ID
show install upgrade-matrix rollback running Displays details about the software upgrade from the current version to the version of the specific rollback ID according to the support matrices in both the running system and the rollback ID

For release specific caveats see Release-specific Caveats and Workarounds section.

Backup Current Configuration

The ability to recover from a disaster is an essential part of any system maintenance plan. We recommend you backup the configurations in a secure remote location and verify that the transfer is a success, both before and after upgrade.

Procedure


Step 1

Create a backup of the running configuration to one of the following locations based on your requirement:

  • Copy the configuration to the harddisk: location on the router.

    Router#copy running-config harddisk:/running_config-<mmddyyyy>
    Destination filename [running_config-<mmddyyyy>]? 
    Building configuration...
    [OK]
    Verifying checksum...  OK (0xDCF1)
    
  • Copy the configuration to a remote server. Ensure the router has root access to the server.

    Router#scp harddisk:/ running_config-<mmddyyyy> 
    user:password@<ip-address>:<location>

Step 2

Verify that the configuration is backed up.


Check FPD Version

The router uses a number of Field Programmable Devices (FPDs) that are crucial for the function of route processors, line cards, shared port adapters (SPAs), SPA Interface Processors (SIPs), and fan trays. Before upgrading the software, check whether the latest FPDs are available on the router.


Note


FPD auto-upgrade is enabled by default on the Cisco 8000 series routers. However, we recommend that when updating to IOS XR Release 7.5.1, configure the fpd auto-upgrade enable command.


Router#show hw-module fpd

                                                                       FPD Versions
                                                                      =================
Location       Card type   HWver    FPD device        ATR  Status     Running   Programd
-------------------------------------------------------------------------------------------
0/RP0/CPU0     8800-RP     0.51     Bios              S    CURRENT    1.15      1.15
0/RP0/CPU0     8800-RP     0.51     BiosGolden        BS   CURRENT    1.15

0/RP0/CPU0     8800-RP     0.51     EthSwitch              CURRENT    0.07      0.07
0/RP0/CPU0     8800-RP     0.51     EthSwitchGolden   BP   CURRENT    0.07
0/RP0/CPU0     8800-RP     0.51     TimingFpga             CURRENT    0.11      0.11
0/RP0/CPU0     8800-RP     0.51     TimingFpgaGolden  B    CURRENT    0.11
0/RP0/CPU0     8800-RP     0.51     x86Fpga           S    NEED UPGD  0.23      0.23
0/RP0/CPU0     8800-RP     0.51     x86FpgaGolden     BS   CURRENT    0.24
0/RP0/CPU0     8800-RP     0.51     x86TamFw          S    CURRENT    5.05      5.05
0/RP0/CPU0     8800-RP     0.51     x86TamFwGolden    BS   CURRENT    5.05

In this example, x86Fpga FPD device needs an upgrade. You must ensure that FPDs are upgraded before upgrading the router.

Procedure


Step 1

To manually upgrade FPDs, use the upgrade hw-module fpd command.

Router#upgrade hw-module location all fpd all
Alarms are created showing all modules that needs to be upgraded.

Active Alarms
-----------------------------------------------------------------------------------------------------------------
Location      Severity     Group        Set Time                    Description 
----------------------------------------------------------------------------------------------------------------- 
0/6/CPU0       Major       FPD_Infra    09/16/2019 12:34:59 UTC     One Or More FPDs Need Upgrade Or Not In Current State 
0/10/CPU0      Major       FPD_Infra    09/16/2019 12:34:59 UTC     One Or More FPDs Need Upgrade Or Not In Current State 
0/RP0/CPU0     Major       FPD_Infra    09/16/2019 12:34:59 UTC     One Or More FPDs Need Upgrade Or Not In Current State 
0/RP1/CPU0     Major       FPD_Infra    09/16/2019 12:34:59 UTC     One Or More FPDs Need Upgrade Or Not In Current State 
0/FC0          Major       FPD_Infra    09/16/2019 12:34:59 UTC     One Or More FPDs Need Upgrade Or Not In Current State 
0/FC1          Major       FPD_Infra    09/16/2019 12:34:59 UTC     One Or More FPDs Need Upgrade Or Not In Current State 

Note


BIOS and IOFPGA upgrades require a power cycle of the router for the new version to take effect.

For example:
Router#upgrade hw-module location all fpd all
upgrade command issued (use "show hw-module fpd" to check upgrade status)
Router# 
Router#show hw-module fpd
                                                                      FPD Versions
                                                                      =================
Location       Card type   HWver    FPD device        ATR  Status     Running   Programd
-------------------------------------------------------------------------------------------
0/RP0/CPU0     8800-RP     0.51     Bios              S    CURRENT    1.15      1.15
0/RP0/CPU0     8800-RP     0.51     BiosGolden        BS   CURRENT    1.15
0/RP0/CPU0     8800-RP     0.51     EthSwitch              CURRENT    0.07      0.07
0/RP0/CPU0     8800-RP     0.51     EthSwitchGolden   BP   CURRENT    0.07
0/RP0/CPU0     8800-RP     0.51     TimingFpga             CURRENT    0.11      0.11
0/RP0/CPU0     8800-RP     0.51     TimingFpgaGolden  B    CURRENT    0.11
0/RP0/CPU0     8800-RP     0.51     x86Fpga           S    RLOAD REQ  0.23      0.24
0/RP0/CPU0     8800-RP     0.51     x86FpgaGolden     BS   CURRENT    0.24
0/RP0/CPU0     8800-RP     0.51     x86TamFw          S    CURRENT    5.05      5.05
0/RP0/CPU0     8800-RP     0.51     x86TamFwGolden    BS   CURRENT    5.05

Step 2

Reload the individual nodes that require an upgrade by using the reload location node-location command.

For example:
Router#reload location 0/RP0
Proceed with reload?  [confirm]

Note


The system requests recovery reload by default when the system detects fault. However, if you want to prevent the recovery reload for debugging, use the hw-module reset auto disable location command to disable an auto reset mechanism. You can use the hw-module reset auto disable location command in global configuration mode.

If you want to re-enable the recovery reload, use the no hw-module reset auto disable location command.

Step 3

You can enable automatic upgrade of FPD by using the fpd auto-upgrade enable command.

To automatically upgrade all FPDs, use:

Router(config)#fpd auto-upgrade enable

Usage Guidelines—Online Insertion of IMs

When an IM with a lower FPD version is inserted, one of the following scenarios apply:

  • If fpd auto-upgrade is enabled and a new IM is inserted, the system upgrades the IMs FPDs automatically with the latest FPDs.

  • If fpd auto-upgrade is disabled, no action is required.

    Note


    Cisco recommends enabling the fpd auto-upgrade. If you disable it, you must manually check the FPD upgrade on the individual nodes using the show hw-module fpd command and reload the individual nodes that require an upgrade using the reload location node-location command.

Usage Guidelines—Online Insertion of RPs

When fpd auto-upgrade is enabled and a new RP is inserted, the system upgrades the RP FPDs automatically with the latest FPDs.

Verify that all nodes that required an upgrade show an updated status of CURRENT with an updated FPD version using the show hw-module fpd command.

Note


For more information on upgrading FPDs, see the Upgrading Field Programmable Device chapter.


Upgrading FPDs Using Yang Data Models

YANG is a data modeling language that helps to create configurations, retrieve operational data and execute actions. The router acts on the data definition when these operations are requested using NETCONF RPCs. The data model handles the following types of requirements on the routers for FPD:

Operational Data Native Data Model
Auto Upgrade: Enabling or disabling of automatic upgrade of FPD. Cisco-IOS-XR-fpd-infra-cfg.yang

Check System Stability

System stability checks are essential to measure the efficiency and ability of an upgrade to function over an extended period.

At the EXEC prompt, execute the following commands to assess basic system stability checks before and after the software upgrade.

Command

Reason

Workaround

show platform

Verify that all nodes are in IOS XR RUN/OPERATIONAL state

NA

show redundancy

Verify that a standby RP is available, and the system is in NSR-ready state

NA

show ipv4 interface brief

Or

show ipv6 interface brief

Or

show interfaces summary

Verify that all necessary interfaces are UP

NA

show install active summary

Verify that the proper set of packages are active

NA

show install committed summary

Verify that the proper set of committed packages are same as active

Execute ‘install commit’ command

clear configuration inconsistency

Verify/fix configuration file system

NA

show hw-module fpd

Ensure all the FPD versions status are CURRENT

Execute upgrade hw-module fpd command

show media

Display the current state of the disk storage media

To free up space, remove older .iso image files and bug fix .tar files.

show media | i rootfs

Display the current state of the root filesystem (rootfs).

By default, the following files are stored in rootfs :

  • Older config commits

  • Older .iso image and .tar files for SMUs

  • All the extracted .tar files

The installation is blocked if it utilizes more than 92% of the disk space on the rootfs . To avoid this, we recommend maintaining:

  • Twice the free space of the .iso image file size when installing the software

  • At least two and a half times the size of the .tar file when installing SMUs

To free up space in rootfs :

  • use the clear install rollback id id to remove older rollback points

  • consider storing all user data in the harddisk:/ location

show inventory

Show chassis inventory information

NA

show logging

Capture show logging to check for any errors

NA

Mitigate Traffic Loss During Upgrade

During an upgrade, any traffic routed through the device is affected. To minimize traffic loss during the upgrade, do the following:

For OSPF, configure the router to advertise a maximum metric so that other devices do not prefer the router as an intermediate hop in their SPF calculations:

Router(config-ospf)#max-metric router-lsa

For ISIS, set the overload bit for a fixed amount of time. This ensures that the router does not receive transit traffic while the routing protocol is still converging:

Router(config-isis)#set-overload-bit on-startup <timeout>

Obtain Install Files

You can obtain the install files based on one of the following options that is best suited to your network:

  • Base ISO and Optional RPMs: You can upgrade the software through the standard method where you install the ISO followed by the required RPMs.

  • Golden ISO: You can build a customized golden ISO (GISO) image with the base ISO and the required RPMs to automatically upgrade the software.

Standard ISO and RPMs

Download Install Files from Cisco Software Center

Obtain the install files (base ISO and RPMs) for the target release.
Procedure

Step 1

Access the Cisco Software Download page.

For optimum website experience, we recommend any of the following browsers: Google Chrome, Mozilla Firefox or Internet Explorer.

Step 2

Select the following:

  • Product Name: 8000 Series Routers

  • Product Variant: For example, 8201 Router.

  • Software Type: IOS XR Software or IOS XR Software Maintenance Upgrades (SMU).

Step 3

From the left pane, select the release.

For the selected release, the Software Download page displays the downloadable files. For more information, see .

Step 4

Use your Cisco login credentials to download the files.


Golden ISO

Build Customized Golden ISO Image

Table 1. Feature History Table

Feature Name

Release Information

Description

Build Golden ISO (GISO) Using gisobuild.py Tool

Release 7.5.1

This feature allows you to build your GISO image without support from Cisco. You can now select the install files, add your RPMs, repackage them as a custom image, and install the image.

In previous releases, you had to contact Cisco to get your GISO built.

Golden ISO (GISO) is a customized bootable ISO that you can build to suit your network’s installation requirement. You can customize the installable image to include the standard base image with the basic functional components, and add additional RPMs, SMUs and configuration files based on your requirement.

GISO image contains the following files:

  • base image (ISO) with basic functional components

  • optional packages (RPMs) with additional networking functionality

  • bug fixes (SMUs)

For Cisco IOS XR Release 7.5.1 or later, you can build your own GISO image using the gisobuild.py tool. This tool is available on the Github repository.

For releases earlier than Cisco IOS XR Release 7.5.1, contact Cisco Technical Support to build the GISO.


Note


The GISO build tool verifies the RPM dependencies and RPM signatures. The GISO build process fails if the RPM is unsigned or incorrectly signed.


Before you begin

To run and invoke the gisobuild.py tool:

  1. Ensure that your local environment provides all the required executables for the tool. For the list of executables and their versions, see Requirements section in gisobuild toolkit for IOS-XR available in the Github repository.

  2. Alternatively, you can also run gisobuild.py tool on a Linux system using docker build mode. This method provides you the option to avoid the above setup. For more information, see the Invocation section in the gisobuild toolkit for IOS-XR available in the Github repository.

Procedure

Step 1

Download all the relevant files to the system where you build GISO image:

Step 2

Run the gisobuild.py script and provide the parameters to build the GISO image. You can provide multiple repositories to the tool.

Example:
$ ./giso/src/gisobuild.py --iso <input iso> --repo <rpm repo1 rpm_repo2> --pkglist <pkg1 pkg2 pkg3> 
    --xrconfig <config.cfg> --ztp-ini <ztp.ini> --label <label> 
    --out-directory <out_directory> --clean

The tool uses the input parameters to build the GISO image.

The following example shows building a GISO image using 8000-x64.iso base image, xr-cdp, xr-telnet optional packages and with GISO1 label.

$ src/gisobuild.py --iso /ws/8000-x64.iso --repo /ws/optional-rpms/cdp /ws/optional-rpms/telnet 
--pkglist xr-cdp xr-telnet --out-directory /ws/giso-out --label GISO1 --docker --clean
Scanning: /ws/optional-rpms/cdp
Scanning: /ws/optional-rpms/telnet
Setting up container environment...
Reuse matching image, cisco-xr-gisobuild:2.3.3
Removing 'old' images with versions: 2.2.0
Running GISO build...
gisobuild.py --yamlfile /dir/cliConfig.yaml
GISO build successful
ISO: /dir/giso/8000-golden-x86_64-7.8.1-GISO1.iso
Size: 1.76 GB
USB image: /dir/giso/8000-golden-x86_64-usb_boot-7.8.1-GISO1.zip
ISO label: GISO1
Further logs at /logs/gisobuild.log

Done...
Build artefacts copied to /ws/giso
Verifying checksums...
Checksums OK
Container Logs copied to /logs/container 

You can specify multiple values in the --repo option. The values can be .rpm, .tgz, .tar filenames or directories. The RPMs within the .tgz or .tar files are unpacked and used. The RPMs are only used if a version of them is already included in the ISO or if the corresponding package is specified using the --pkglist option.

For the --pkglist option, provide the name of installable package and not the individual RPM files. For example, to install the CDP ackage, use the xr-cdp package and xr-telnet package for Telnet. The package covers all the RPMs. If multiple RPMs are available, the latest version of RPM is used by default.


Create Repository to Access Install Files

A Repository is a directory where the ISO, RPMs, and their metadata are downloaded. The package manager uses this repository to query the packages.

The repository can either be created locally on the router, or on a remote location that can be accessed through FTP, HTTP, or HTTPS. In a repository, you can create directories based on different Cisco IOS XR platforms, releases or both. You can create and use multiple repositories. The files to be installed can saved in the local repository, remote repository or a combination of both.


Note


The Golden ISO (GISO) method does not require you to create a repository. However, you can still install the GISO from a remote repository.


Important


Each package is named based on its name, version, software release, and architecture. Hence, any packages that have these attributes in common and differ only by platform are indistinguishable. We recommend that you create different repositories for different platforms and releases.


Create Remote Repository

We recommend that you create an external remote repository that acts as a central repository to be used across devices. This eliminates the need to copy files for future updates to each router individually. It also serves as a single source when new RPMs (bug fixes, packages, updates) are made available.

The remote repository is available only through the Management Ethernet interface of the router. The server hosting the external repository must be able to reach the router using the address of the loopback interface in the VRF. If a VRF has more than one loopback interface, the loopback with the lowest-numbered loopback name is selected. For example, Loopback1 is selected over Loopback2. When using VRF, configure the repository to be reachable using a non-default VRF table. If the repository is reachable through an address in a VRF, specify the name of the VRF.

The following instructions are applicable to Linux distribution systems.

Procedure

Step 1

Create a directory on the server and copy the ISO and all RPMs. For example, name the directory as remote-repo. The router must be able to access this directory through FTP, HTTP or HTTPS protocol.

Step 2

Extract the files if the RPM files are archived (.tar format) or compressed (.tgz or .gz format). The files hierarchically arrange in sub directories under the main directory.

Step 3

Convert the directory to a repository using createrepo utility on the Linux server. This action creates a directory named repodata with the metadata of all the RPMs.

Example:
[node]$createrepo --database /var/www/html/
Saving Primary metadata 
Saving file lists metadata 
Saving other metadata 
Generating sqlite DBs 
Sqlite DBs complete

[node]$cd /var/www/html/
[node]$ls repodata

Note


If you add new packages to the repository, change or remove packages from the repository, you must run the createrepo command again to update the metadata. This ensures that the package manager chooses the correct packages.

Step 4

Configure the remote repository on the router.

Example:
For HTTP protocol:
Router#config
Router(config)#install repository remote-repo url http://10.194.88.104/<directory-with-rpms>
Router(config)#commit
Thu 02 2022 UTC: config[67542]: Configuration committed by user 'cisco'.
Router(config)#end

where:

  • remote-repo is the repository name.

  • http://10.194.88.104/<directory-with-rpms> is the HTTP repository URL. Similarly, you can configure FTP or HTTPS repository URL.

Step 5

Verify connectivity to the server and check the contents of the repository.

Example:
Router#show install available
Trying to access repositories...
Package        Architecture            Version            Repository
xr-8000-core    x86_64                 7.8.1              remote-repo
xr-core         x86_64                 7.8.1              remote-repo
Only the top-level packages that are available in the repository and not part of the active system are displayed. The contents of the repository are displayed only when the configured repository is valid and the RPMs with the updated metadata are present.

System logs record useful information during the creation of the repository. Check the logs to verify that the repository is valid.


Create Local Repository on the Router

The router can also serve as a repository to host the RPMs. However, you must be a root-lr user with access to the router shell. Using a local repository removes the need to set up an external server for software installation. In this method, the image files are copied directly to the router and used to create a repository locally.


Note


We do not recommend creating a local repository if you are upgrading multiple routers.


Procedure

Step 1

Create a new directory locally on the router's /harddisk:. For example, name the directory as new-repo.

Step 2

Copy the required RPMs and ISO files (using copy or scp command) to the local directory on the router.

Step 3

Access the shell of the router and untar the RPMs.

Example:
Router#run
[node:~]$cd new_repo
[node:~]$tar -xvzf <rpm-name>.tgz

Step 4

Exit from the shell.

Step 5

Configure the local repository.

Example:
Router#config
Router(config)#install repository local-repo url file:///harddisk:/local_repo
Router(config)#commit
Thu 02 2022 UTC: config[67542]: Configuration committed by user 'cisco'.
Router(config)#end

where:

  • new-repo is the repository name.

  • file:///harddisk:/local_repo is the local repository URL.

Step 6

Check the contents of the repository.

Example:
Router#show install available
Trying to access repositories...
Package        Architecture            Version            Repository
xr-8000-core    x86_64                 7.8.1              local-repo
xr-core         x86_64                 7.8.1              local-repo
Only the top-level packages that are available in the repository and not part of the active system are displayed. The contents of the repository are displayed only when the configured repository is valid and the RPMs with the updated metadata are present.

What to do next
The pre-upgrade tasks are complete. Your router is now ready to be upgraded.

Upgrade the Software

This section provides information about the processes involved in upgrading the IOS XR software on your Cisco 8000 series routers.

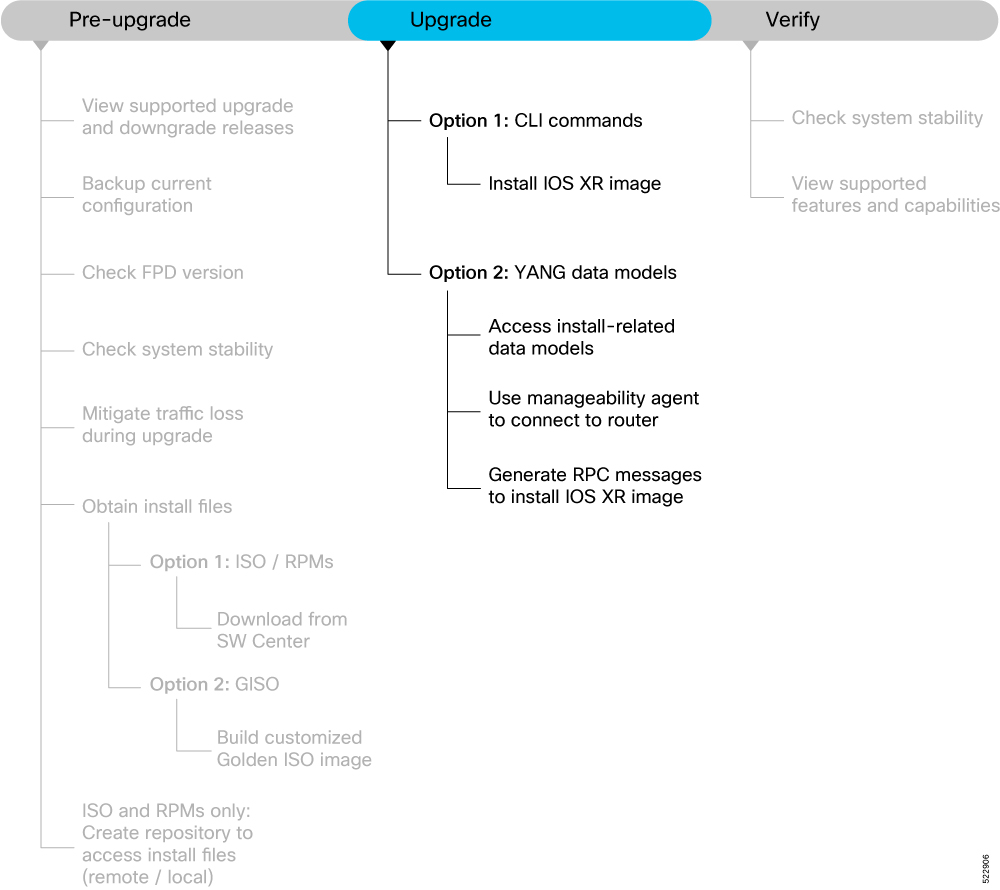
Figure 2. Workflow to Upgrade the Software
Workflow to upgrade the software

The Cisco IOS XR software can be upgraded using one of these methods:

Upgrade Router Using CLI Commands

There are two options to upgrade your Cisco IOS XR software using the Command Line Interface (CLI):

  • Base ISO and optional RPMs

  • Golden ISO (GISO)

Install IOS XR Image

Install ISO and RPMs

Use this procedure to install the base ISO and optional RPMs.
Before you begin
Ensure you have created a repository locally on the router or on a remote server which is reachable over HTTP, HTTPS or FTP. This repository will be used to copy the required RPMs. Ensure the router can reach the repository server over the Management Ethernet interface. For information about creating the repository to host the RPMs, see Create Repository to Access Install Files.
Procedure

Step 1

You can either install from the remote repository or copy the ISO image file to the /harddisk: of the router.

Example:
Router#scp root@<ip-address>:/<dir>/8000-x64-release.iso harddisk:

Step 2

To verify data integrity, verify the md5 checksum of the copied file with the original MD5 values on CCO.

Example:
Router#show md5 file /harddisk:/8000-x64-release.iso

Step 3

Install the base image to upgrade the system.

  • Option 1: Install ISO without control over reload timing.
    Router#install replace /harddisk:/8000-x64-release.iso
    The image is installed, the changes are applied through a reload or a restart of the system, and commits the changes. However, you do not have control over the timing of the reload or restart —these occur as soon as the package operation completes and the system is ready.

    If you want to control when your system reloads (management of a network outage), we recommend that you schedule an upgrade window and perform an install replace , letting the system reload without intervention.

  • Option 2: Install ISO with control over reload timing.
    1. Install the image.

      Router#install package replace /harddisk:/8000-x64-release.iso
    2. Apply the changes.

      Router#install apply [reload | restart]

      You can use either the reload or restart options based on the file that is installed. To determine whether a reload or restart is required, check the output of show install request command. The output indicates the required actions.

Step 4

After the base image is upgraded, install the additional packages. For more information, see Install Additional RPMs and Bug Fixes.

If a system fails to boot successfully, or reboots unexpectedly when the package is undergoing a version change, the system is automatically recovered to its old software state.

Note


If you perform a manual or automatic system reload without completing the transaction with the install commit command, the action will revert the system to the point before the install transaction commenced, including any configuration changes. Only the log is preserved for debugging.


Install Golden ISO

Table 2. Feature History Table

Feature Name

Release Information

Description

Check Integrity of Golden ISO (GISO) Files

Release 7.5.1

This feature enables an automated check during install package replace operations to ensure that the files in GISO have not been corrupted. It does so by calculating the md5sum of the files and comparing it against md5sum value that is contained within the GISO that was calculated when the image was built.

Automatic Bridging of Bug Fix RPMs

Release 7.5.1

In earlier releases, any mandatory bridging bug fixes had to be installed separately before a GISO upgrade. In this release, this feature allows mandatory bridging bug fixes to be included within the GISO for installation during the GISO upgrade process. This eliminates the older two-step workflow.

IOS XR Configuration File in Golden ISO (GISO)

Release 7.5.1

GISO is a customized image with the standard functional components and additional configuration files. This feature extracts the IOS XR configuration file in GISO and automates the updating of configuration files when the router is reloaded with the new GISO.

This feature introduces iso-config [ignore | replace] keywords to the install replace and install package replace commands.

Use this procedure to install the Golden ISO (GISO) that contains the base ISO and a customized list of optional RPMs that you built using the gisobuild.py tool. For details, see Build Customized Golden ISO Image.

Golden ISO (GISO) upgrades the router to a version that has a predefined list of bug fixes (sometimes also called software maintenance updates) with a single operation.

To update the system to the same release version with a different set of bug fixes:

  • Create a GISO with the base version and all the bug fixes you require

  • Use the install replace or install package replace commands to install the GISO.

The GISO can include bridging bug fixes for multiple source releases, and installs only the specific bridging bug fixes required for the target release.

The bridging bug fix RPMs can be used in the following scenarios:

  • To resolve a bug that might stop upgrade.

  • To meet the prerequisite requirements of a new release version that were not met by the earlier version.


Note


The install replace command is supported only with GISO, but not with .rpm packages directly.


Procedure

Step 1

Copy the GISO image file to either the /harddisk: of the router or a repository based on your requirement.

Example:
In this example, the image is copied to the /harddisk: of the router.
Router#scp root@<ip-address>:/auto/tftp-test/8000-x64-release.iso harddisk:

Step 2

Install the GISO.

  • Option 1: Install GISO without control over reload timing.
    1. Install GISO to upgrade to a new release, add or remove bugfixes or optional packages.

      Router#install replace source-location/giso-name.iso
      The source-location can be one of the following locations based on step 1.
      • Local path to the GISO—files located in or under /var/xr/disk1/, /harddisk:/ or /misc/disk1/

      • Remote repository—ftp://<server>[;<vrf>]/<remote_path> or http://<server>[;<vrf>]/<remote_path>

        This command runs the replace operation and applies the new version via router restart or reload, whichever is least impactful, given the change. For example, if you have a GISO that is the same as your base image except one bugfix, and that bugfix can be applied by process restart, the command will install the bugfix and apply by restart, no router reload occurs. However, you do not have control over the timing of the reload or restart—these operations occur as soon as the packaging is complete and the system is ready. If you want to control the timing of system reloads, we recommend that you schedule an upgrade window and run the install replace command, allowing the system to reload without manual intervention or network impact.

    2. [Optional] Specify reload keyword to force reload for all operations. This may be useful if you want a reliable flow.

    3. [Optional] Specify commit keyword for the install, apply and commit operations to be performed without user intervention.

  • Option 2: Install GISO with control over reload timing.

    1. Install GISO to upgrade to a new release, add or remove bugfixes or optional packages. The functionality is similar to install replace command, except that the staging of packaging changes is performed using this command.

      Router#install package replace source-location/giso-name.iso

      The install package replace command does not apply the changes.

    2. Apply the changes.

      Router#install apply [reload | restart]

      You can use either the reload or restart options based on the change that is installed. You can only apply the changes by restarting the software if the difference between the GISO being installed and the running image is minimal such as bugfixes or package updates.

      To determine whether a reload or restart is required, check the output of show install request command. The output indicates the required actions.

Note


A GISO label is a string that identifies a GISO. Any install operation, such as adding or removing a package or modifying the software image (replace or package replace) will change the custom label to a system-generated default label. For example:

Router#show install active summary
Build Information:
Built By     : user1
Built On     : Thu Feb 02 09:47:56 UTC 2023
Build Host   : host
Workspace    : /ws
Version      : 7.8.1
Label        : GISO1
...
In this example, the software image is modified to remove the CDP package.

Router#install package remove xr-cdp

Install remove operation 39.1.1 has started
Install operation will continue in the background
...
Packaging operation 39.1.1: 'install package remove xr-cdp' completed without error
Apply the changes.
Router#install apply
Thu Feb 02 11:13:09.015
Once the packaging dependencies have been determined, the install operation may have to reload the system.
If you want more control of the operation, then explicitly use 'install apply restart' or 'install apply reload' as 
reported by 'show install request'.
Continue? [yes/no]:[yes] yes
RP/0/RP0/CPU0:Feb 02 11:13:12.771 : instorch[404]: %INSTALL-6-ACTION_BEGIN : Apply by restart 39.1 started
Install apply operation 39.1 has started
Install operation will continue in the background
View the software version.
Router#show version
Build Information:
Built By     : user1
Built On     : Thu Feb 02 10:06:56 UTC 2023
Build Host   : host
Workspace    : /ws
Version      : 7.8.1
Label        : 7.8.1
The GISO1 custom label is replaced with the label 7.8.1 generated by the system.

Upgrade Router Using YANG Data Models

Data models are a programmatic way of configuring and collecting operational data of a network device. They replace the process of manual configuration and can be used to automate configuration tasks across heterogeneous devices in a network.

Access Install-related Data Models

You can use YANG data models to install and upgrade the router. The data models are packaged with the release image in the /pkg/yang directory.
Procedure

Step 1

Navigate to the directory in the release image where the YANG data models are available.

Example:
Router#run
[node_RP0_CPU0:~]$cd /pkg/yang

Step 2

View the list of install-related data models on your router.

Example:
node0_RP0_CPU0:/pkg/yang]$ls -ltr *install*
-rw-r--r--.    1    root    root    8646    Jul    2    01:59    Cisco-IOS-XR-install-act.yang
-rw-r--r--.    1    root    root    7267    Jul    2    01:59    Cisco-IOS-XR-install-search-act.yang
-rw-r--r--.    1    root    root    10664   Jul    2    01:59    Cisco-IOS-XR-install-augmented-act.yang
-rw-r--r--.    1    root    root    2511    Jul    2    02:00    Cisco-IOS-XR-um-install-cfg.yang
-rw-r--r--.    1    root    root    2270    Jul    2    02:04    Cisco-IOS-XR-install-cfg.yang
-rw-r--r--.    1    root    root    6222    Jul    2    02:04    Cisco-IOS-XR-install-oper.yang
-rw-r--r--.    1    root    root    14009   Jul    2    02:04    Cisco-IOS-XR-install-augmented-oper.yang

The following table describes the function of the install-related data models:

Date Model

Description

Cisco-IOS-XR-um-install-cfg

Unified data model that contains a collection of YANG definitions for Cisco IOS XR install package configuration, and augments the modules with configuration data.

Cisco-IOS-XR-install-oper

Operational data model to view details that are related to basic package information, active and committed packages, and fixes.

Cisco-IOS-XR-install-cfg

Configuration data model to specify the location of the install source.

Cisco-IOS-XR-install-act

Action model to perform basic install operations and software upgrade.

Cisco-IOS-XR-install-search-act

Action model that contains a collection of YANG definitions for install actions related to searching for package information.

Cisco-IOS-XR-install-augmented-oper

Augmented operational model that displays information aboutpackaging, atomic changes, and history of the install operation on the router.

Cisco-IOS-XR-install-augmented-act

Action model to perform flexible install operations, includingcontrolling the exact timing of system reloads and rolling back to a previous commit.

Cisco-IOS-XR-shellutil-copy-act

Action model to copy files on the router from a source location.

You can also access the supported data models to install Cisco IOS XR software from the Github repository.


Use Manageability Agent to Connect to Router

Use a manageability agent like NETCONF or gRPC to connect and communicate with the router. You can send Remote Procedure Calls (RPC) requests to configure or retrieve operational data from the router. The router processes the request and responds to the request through an RPC response. You use the RPCs to send requests to install the software by populating the relevant parameters of a container and leaf in the data model. For more information about understanding the data model structure and using data models, see the Programmability Configuration Guide for Cisco 8000 Series Routers .

Generate RPC Messages to Install IOS XR Image​

Before you begin

Not all software versions are supported as the target upgrade software version. You must review the supported upgrade and downgrade paths, hardware or software limitations, and bridging SMUs required for the version. For more information about checking the release support between the current and target versions, see View Supported Upgrade and Downgrade Releases.

Procedure

Step 1

Use the install-replace RPC on the Cisco-IOS-XR-install-act.yang data model to upgrade the router(s). Configure the values of the source-type, source, and file parameters.

Example:
<rpc xmlns="urn:ietf:params:xml:ns:netconf:base:1.0" message-id="101">
  <install-replace xmlns=http://cisco.com/ns/yang/Cisco-IOS-XR-install-act>
    <source>/harddisk:</source>
    <file>8000-x64.iso</file>
    <source-type>local</source-type>
    <commit>false</commit>
</install-replace>
</rpc>

To specify any additional parameters, see the Cisco-IOS-XR-install-act.yang data model. If not specified, the default values of these parameters are used.

Step 2

Use the install-commit RPC on the Cisco-IOS-XR-install-act.yang data model to commit the upgrade configuration.

Example:
<rpc xmlns="urn:ietf:params:xml:ns:netconf:base:1.0" message-id="101">
  <install-commit xmlns=http://cisco.com/ns/yang/Cisco-IOS-XR-install-act />
</rpc>
You can also specify two optional parameters using the install-commit RPC to enforce the commit operation and store the specified description:

<rpc xmlns="urn:ietf:params:xml:ns:netconf:base:1.0" message-id="101">
  <install-commit xmlns=http://cisco.com/ns/yang/Cisco-IOS-XR-install-act>
    <force>false</force>
    <description>Description to be stored</description>
  <install-commit>
</rpc>

Step 3

Use the get RPC on the Cisco-IOS-XR-install-oper.yang data model to verify whether the software upgrade is successful. Edit the install parameter and send an RPC request from the client to the router.

Example:
<rpc xmlns="urn:ietf:params:xml:ns:netconf:base:1.0" message-id="101">
  <get>
   <filter>
    <install xmlns="http://cisco.com/ns/yang/Cisco-IOS-XR-install-oper">  
     <request/>
    </install>
   </filter>
  </get>
</rpc>

View the RPC response received from the router to check the state of the install operation.


<?xml version="1.0"?>
  <rpc-reply message-id="101" xmlns="urn:ietf:params:xml:ns:netconf:base:1.0">
   <data>
    <install xmlns="http://cisco.com/ns/yang/Cisco-IOS-XR-install-oper">
     <request>
      <request>install commit</request>
      <state>success</state>
     <timestamp>2022-06-27 T02:52:07Z</timestamp>
    <operation-id>26</operation-id>
   </request>
  </install>

Here, the state of the install operation in the RPC response indicates that the software and the RPMs are upgraded successfully.


What to do next
Perform prelimiary checks to verify that the router is upgraded successfully.

Upgrade QDD Optical Modules

The QDD optics firmware file needs to be copied to the router manually. Contact Cisco Support to check the QDD firmware version, IOS XR release compatibility, and to obtain the QDD optics firmware file.

Starting from Cisco IOS XR Release 7.5.2, you can upgrade the Field-Programmable Device (FPD) for QDD optical modules.

Limitation: When ports share a common management interface, IOS XR serializes the firmware upgrade. Serializing and deserializing may delay the upgrade process.

Procedure


Step 1

Copy the QDD firmware file to the harddisk: location.

Example:

scp user@10.1.1.1:/home/user/filename harddisk:/

When you are using VRF, use the following sample command:

scp user@10.1.1.1:/home/user/cl1.bin vrf MGMT harddisk:/
 
Tue Jan 25 02:57:22.762 UTC
Connecting to 10.1.1.1...
Password: 
  Transferred 1484800 Bytes
  1484800 bytes copied in 0 sec (22161194)bytes/sec
 
RP/0/RP0/CPU0:8808#dir harddisk:/cl1.bin
Tue Jan 25 03:00:47.835 UTC
 
Directory of harddisk:/cl1.bin
35 -rw-r--r--. 1 1484800 Jan 25 02:57 dp04qsdd_dp04sfp8_161_10_01.ackit
 
53461500 kbytes total (42983204 kbytes free)

When you are not using VRF, remove the vrf MGMT command:

scp user@10.1.1.1:/home/user/cl1.bin harddisk:/

Step 2

Upgrade the FPD for QDD optical modules.

Example:

Multiple port upgrade:
Router#upgrade optics port 0,1,2,3,4 filename /harddisk:/cl1.bin location 0/1/CPU0

Single port upgrade:

Router#upgrade optics port 0 filename /harddisk:/cl1.bin location 0/1/CPU0

Step 3

Check the firmware upgrade progress.

Example:

Router#show optics firmware upgrade port 0,1,1,2,3,4 location 0/1/CPU0

Verify the Software Upgrade

This section provides information about the processes involved in verifying the upgraded software on your Cisco 8000 series routers.

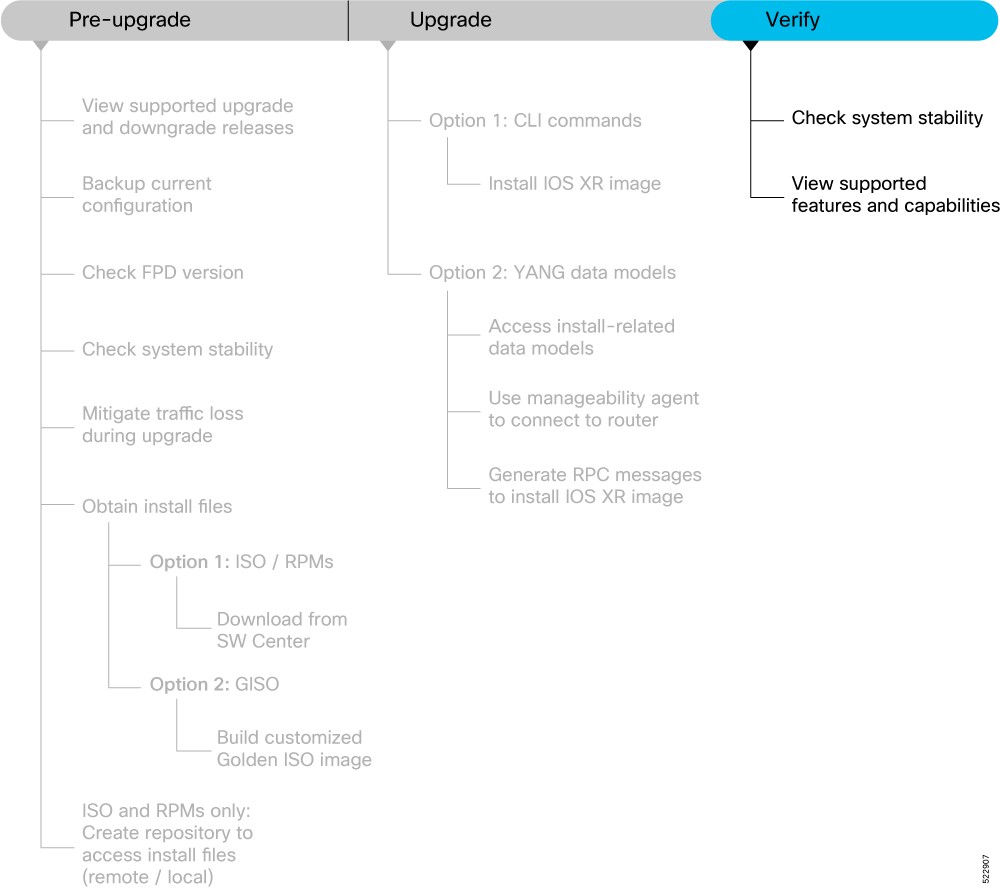
Figure 3. Workflow to Verify the Software Upgrade
Workflow to verify the status of the software upgrade

This section contains the following topics:

Check System Stability

System stability checks are essential to measure the efficiency and ability of an upgrade to function over an extended period.

At the EXEC prompt, execute the following commands to assess basic system stability checks before and after the software upgrade.

Command

Reason

Workaround

show platform

Verify that all nodes are in IOS XR RUN/OPERATIONAL state

NA

show redundancy

Verify that a standby RP is available, and the system is in NSR-ready state

NA

show install active summary

Verify that the proper set of packages are active

NA

show install committed summary

Verify that the proper set of committed packages are same as active

Execute ‘install commit’ command

clear configuration inconsistency

Verify/fix configuration file system

NA

show hw-module fpd

Ensure all the FPD versions status are CURRENT

Execute upgrade hw-module fpd command

show media

Display the current state of the disk storage media

To free up space, remove older .iso image files and bug fix .tar files.

show inventory

Show chassis inventory information

NA

View Supported Features and Capabilities

Table 3. Feature History Table

Feature Name

Release Information

Description

View Supported Features and Capabilities

Release 7.5.2

This functionality displays a list of supported and unsupported features and their capabilities in a release for your router. With this feature, you are better equipped to plan your network configuration with features annotated for their support information.

This feature introduces the show features command.

This feature provides an answer to the question Is feature X supported on my router?

You can determine whether a feature and their capabilities are supported on your router for the release. The support information is based on the release and platform-specific data such as platform variants, RP, or LC present on the router.


Note


In Cisco IOS XR Software Release 7.5.2, only the capabilities for Access Control List (ACL) feature is supported.


The functionality to determine the capabilities information is enabled by default when the supported release is installed on the router.

Use the show features command to view the list of supported features and their capabilities. The feature capabilities are displayed in a tree structure with notations for the support information. For example, in ACL, the capability to use compression to accommodate a large number of Access Control Elements (ACEs) is supported, whereas IPv6 ACL BNG does not have support data in Cisco IOS XR Software Release 7.5.2. This support information about the feature is represented with the following key in the tree structure:

Key

Capability Support Information

Description

X

Unsupported

The feature capability is not supported on the platform for the release

-

Supported

The feature capability is supported on the platform for the release

?

Support unknown

The support for the feature capability is unknown on the platform for the release. This data could be because the optional package for the feature is not installed on the router.

*

Support data not available

The support for the feature capability is not available on the platform for the release. This data could be because the feature may be specific to a line card that is not present on the router.

View the List of Supported Features

In this example, the supported features on the router are displayed.


Note


In Cisco IOS XR Software Release 7.5.2, only the feature capabilities for Access Control List (ACL) is supported.


Router#show features 
Fri Sep 1 19:16:58.298 UTC
Key:
X - Unsupported
- - Supported
? - Support unknown (optional package not installed)
* - Support data not available

[-] Cisco IOS XR
|--[-] XR Protocols 
|  |--[-] XR Base Protocols
|  |  |--[-] Services
|  |  |  |--[-] Access Control List (ACL)
|  |  |  |  |--[-]  IPv6 ACL Support
|  |  |  |  |  |--[*] IPv6 ACL ABF Track
|  |  |  |  |  |--[*] IPv6 ACL BNG
|  |  |  |  |  |--[*] IPv6 ACL Chaining (Meta ACL)
|  |  |  |  |  |--[-] IPv6 ACL Common ACL 
|  |  |  |  |  |--[-] IPv6 ACL Compression
|  |  |  |  |  |--[*] IPv6 ACL Default ABF
|  |  |  |  |  |--[*] IPv6 ACL Fragment
|  |  |  |  |  |--[-] IPv6 ACL ICMP Off
|  |  |  |  |  |--[-] IPv6 ACL ICMP Protocol
|  |  |  |  |  |--[-] IPv6 ACL Interface Statistics
|  |  |  |  |  |--[-] IPv6 ACL Log Rate
|  |  |  |  |  |--[-] IPv6 ACL Log Threshold
|  |  |  |  |  |--[-] IPv6 ACL Logging
|  |  |  |  |  |--[-] IPv6 ACL MIB
|  |  |  |  |  |--[-] IPv6 ACL Object Groups (Scale)
|  |  |  |  |  |--[-] IPv6 ACL Police
|  |  |  |  |  |--[-] IPv6 ACL Priority
|  |  |  |  |  |--[*] IPv6 ACL Protocol Range
|  |  |  |  |  |--[-] IPv6 ACL Set Qos-Group
|  |  |  |  |  |--[-] IPv6 ACL Set TTL
|  |  |  |  |  |--[-] IPv6 ACL TCP Flags
|  |  |  |  |  |--[-] IPv6 ACL TTL Match
|  |  |  |  |  |--[-] IPv6 ACL UDF
|  |  |  |  |--[-] ES-ACL Support (L2 ACL)
|  |  |  |  |--[-] IPv4 ACL Support
|  |  |  |  |  |--[-] IPv4 ACL  Set Qos-group
|  |  |  |  |  |--[*] IPv4 ACL ABF Track
|  |  |  |  |  |--[*] IPv4 ACL BNG
|  |  |  |  |  |--[*] IPv4 ACL Chaining (Meta ACL)
|  |  |  |  |  |--[-] IPv4 ACL Common ACL 
|  |  |  |  |  |--[-] IPv4 ACL Compression
|  |  |  |  |  |--[*] IPv4 ACL Default ABF
|  |  |  |  |  |--[*] IPv4 ACL Fragment
|  |  |  |  |  |--[-] IPv4 ACL Fragment Flags
|  |  |  |  |  |--[-] IPv4 ACL ICMP Off
|  |  |  |  |  |--[-] IPv4 ACL ICMP Protocol
|  |  |  |  |  |--[-] IPv4 ACL Interface Statistics
|  |  |  |  |  |--[-] IPv4 ACL Log Rate
|  |  |  |  |  |--[-] IPv4 ACL Log Threshold
|  |  |  |  |  |--[-] IPv4 ACL Logging
|  |  |  |  |  |--[-] IPv4 ACL MIB
|  |  |  |  |  |--[-] IPv4 ACL Object Groups (Scale)
|  |  |  |  |  |--[-] IPv4 ACL Police
|  |  |  |  |  |--[-] IPv4 ACL Priority
|  |  |  |  |  |--[*] IPv4 ACL Protocol Range
|  |  |  |  |  |--[-] IPv4 ACL Set TTL
|  |  |  |  |  |--[-] IPv4 ACL TCP Flags
|  |  |  |  |  |--[-] IPv4 ACL TTL 
|  |  |  |  |  |--[-] IPv4 ACL UDF
|  |  |  |  |--[-] IPv4 Prefix-List
|  |  |  |  |--[-] IPv6 Prefix-List

View the List of Supported ACL Features

In this example, the capabilities for ACL features on the router are displayed.

Router#show features acl 
Fri Sep 1 19:17:31.635 UTC
Key:
X - Unsupported
- - Supported
? - Support unknown (optional package not installed)
* - Support data not available

[-] Access Control List (ACL)
|--[-]  IPv6 ACL Support
|  |--[*] IPv6 ACL ABF Track
|  |--[*] IPv6 ACL BNG
|  |--[*] IPv6 ACL Chaining (Meta ACL)
|  |--[-] IPv6 ACL Common ACL 
|  |--[-] IPv6 ACL Compression
|  |--[*] IPv6 ACL Default ABF
|  |--[*] IPv6 ACL Fragment
|  |--[-] IPv6 ACL ICMP Off
|  |--[-] IPv6 ACL ICMP Protocol
|  |--[-] IPv6 ACL Interface Statistics
|  |--[-] IPv6 ACL Log Rate
|  |--[-] IPv6 ACL Log Threshold
|  |--[-] IPv6 ACL Logging
|  |--[-] IPv6 ACL MIB
|  |--[-] IPv6 ACL Object Groups (Scale)
|  |--[-] IPv6 ACL Police
|  |--[-] IPv6 ACL Priority
|  |--[*] IPv6 ACL Protocol Range
|  |--[-] IPv6 ACL Set Qos-Group
|  |--[-] IPv6 ACL Set TTL
|  |--[-] IPv6 ACL TCP Flags
|  |--[-] IPv6 ACL TTL Match
|  |--[-] IPv6 ACL UDF
|--[-] ES-ACL Support (L2 ACL)
|--[-] IPv4 ACL Support
|  |--[-] IPv4 ACL  Set Qos-group
|  |--[*] IPv4 ACL ABF Track
|  |--[*] IPv4 ACL BNG
|  |--[*] IPv4 ACL Chaining (Meta ACL)
|  |--[-] IPv4 ACL Common ACL 
|  |--[-] IPv4 ACL Compression
|  |--[*] IPv4 ACL Default ABF
|  |--[*] IPv4 ACL Fragment
|  |--[-] IPv4 ACL Fragment Flags
|  |--[-] IPv4 ACL ICMP Off
|  |--[-] IPv4 ACL ICMP Protocol
|  |--[-] IPv4 ACL Interface Statistics
|  |--[-] IPv4 ACL Log Rate
|  |--[-] IPv4 ACL Log Threshold
|  |--[-] IPv4 ACL Logging
|  |--[-] IPv4 ACL MIB
|  |--[-] IPv4 ACL Object Groups (Scale)
|  |--[-] IPv4 ACL Police
|  |--[-] IPv4 ACL Priority
|  |--[*] IPv4 ACL Protocol Range
|  |--[-] IPv4 ACL Set TTL
|  |--[-] IPv4 ACL TCP Flags
|  |--[-] IPv4 ACL TTL 
|  |--[-] IPv4 ACL UDF
|--[-] IPv4 Prefix-List
|--[-] IPv6 Prefix-List

View the List of Supported ACL Features for Specific RP

In this example, the capabilities for ACL features on the RP location 0/RP0/CPU0 are displayed.

Router#show features acl detail location 0/RP0/CPU0 
Fri Sep 1 19:15:49.889 UTC
Key:
X - Unsupported
- - Supported
? - Support unknown (optional package not installed)
* - Support data not available

[-] Access Control List (ACL)
    Cisco provides basic traffic filtering capabilities with access control 
    lists (also referred to as access lists). User can configure access 
    control lists (ACLs) for all routed network protocols to filter protocol 
    packets when these packets pass through a device. User can configure 
    access lists on your device to control access to a network, access lists 
    can prevent certain traffic from entering or exiting a network.
|--[-]  IPv6 ACL Support
|      IPv6 based ACL is a list of source IPv6 addresses that use Layer 3 or 
|      Layer 4 information to permit or deny access to traffic. IPv6 router 
|      ACLs apply only to IPv6 packets that are routed.. A filter contains the 
|      rules to match the packet matches, the rule also stipulates if the 
|      packet should be permitted or denied.
|  |--[*] IPv6 ACL ABF Track
|  |      IPv6 ACL ABF Track allows the user to configure a rule with track as 
|  |      nexthop inside the ACL rule . ACL Based Forwarding (ABF) denotes the 
|  |      ability to forward packets to another next hop router based on the 
|  |      criteria defined in the rule. Track takes precedence over VRF and 
|  |      IP, if present in the nexthop
|  |--[*] IPv6 ACL BNG
|  |      IPv6 ACL BNG is an ACL subscriber BNG feature. It allows the use of 
|  |      ACL on dynamic template.
|  |--[*] IPv6 ACL Chaining (Meta ACL)
|  |      IPv6 ACL Chaining (Meta ACL) allows the user to apply more than one 
|  |      ACL on the interface.  is known as Meta ACL or ACL chaining.
|  |--[-] IPv6 ACL Common ACL 
|  |      IPv6 ACL Common allows the user to apply the ACL on the interface 
|  |      using the common keyword. Using this feature the ACL won't be 
|  |      applied to the specific interface but it will be common to th entire 
|  |      NPU to which the interface belongs.
|  |--[-] IPv6 ACL Compression
|  |      IPv6 ACL Compression allows the user to apply the ACL on the 
|  |      interface using a compression level. This helps in reducing the 
|  |      hardware resources needed to program the ACL.
|  |--[*] IPv6 ACL Default ABF
|  |      IPv6 ACL Default ABF allows the user to configure a rule with 
|  |      default nexthop inside the ACL rule . ACL Based Forwarding (ABF) 
|  |      denotes the ability to forward packets to another next hop router 
|  |      based on the criteria defined in the rule
|  |--[*] IPv6 ACL Fragment
|  |      IPv6 ACL Fragment allows the user to configure a rule with fragment 
|  |      inside the ACL rule and use it as a match criteria to filter traffic.
|  |--[-] IPv6 ACL ICMP Off
|  |      IPv6 ACL ICMP Off allows the user to not genearte the ICMP error 
|  |      message on a deny action. When configured it will not send the 
|  |      packet to FIB to generate ICMP error message.
-------------------------- Truncated for Brevity --------------------------