Cisco Nexus 9000 Series NX-OS Programmability Guide, Release 10.3(x)
Bias-Free Language
The documentation set for this product strives to use bias-free language. For the purposes of this documentation set, bias-free is defined as language that does not imply discrimination based on age, disability, gender, racial identity, ethnic identity, sexual orientation, socioeconomic status, and intersectionality. Exceptions may be present in the documentation due to language that is hardcoded in the user interfaces of the product software, language used based on RFP documentation, or language that is used by a referenced third-party product. Learn more about how Cisco is using Inclusive Language.
NX-API Developer Sandbox: NX-OS Releases Prior to 9.2(2)
About the NX-API Developer Sandbox
The NX-API Developer Sandbox is a web form hosted on the switch. It translates NX-OS CLI commands into equivalent XML or JSON
payloads.
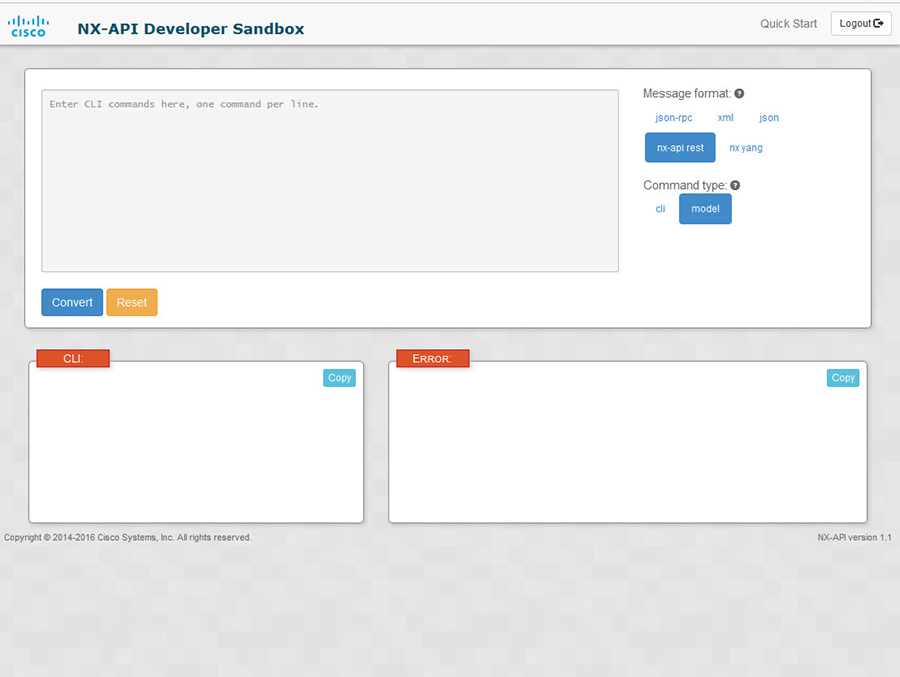
The web form is a single screen with three panes — Command (top pane), Request, and Response — as shown in the figure.
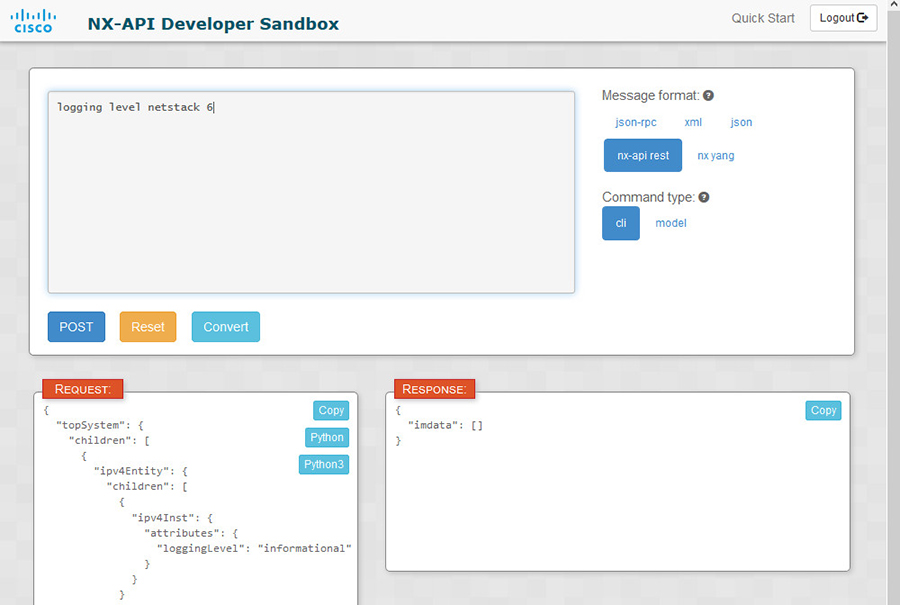
Figure 1. NX-API Developer Sandbox with Example Request and Output Response
Controls in the Command pane allow you to choose a message format for a supported API, such as NX-API REST, and a command
type, such as XML or JSON. The available command type options vary depending on the selected message format.
When you type or paste one or more CLI commands into the Command pane, the web form converts the commands into an API payload,
checking for configuration errors, and displays the resulting payload in the Request pane. If you then choose to post the
payload directly from the Sandbox to the switch, using the POST button in the Command pane, the Response pane displays the
API response.
Guidelines and Limitations
Following are the guidelines and limitations for the Developer Sandbox:
Clicking Send in the Sandbox commits the command to the switch, which can result in a configuration or state change.
Some feature configuration commands are not available until their associated feature has been enabled. For example, configuring a BGP router requires first enabling BGP with the feature bgp command. Similarly, configuring an OSPF router requires first enabling OSPF with the feature ospf command. This also applies to evpn esi multihoming, which enables its dependent commands such as evpn multihoming core-tracking. For more information about enabling features to access feature dependent commands, see the .
Using Sandbox to convert with DN is supported only for finding the DN of a CLI config. Any other workflow, for example, using
DME to convert DN for CLI configuration commands is not supported.
The Command pane (the top pane) supports a maximum of 10,000 individual lines of input.
When you use XML or JSON as the Message Type for CLI input, you can use semicolon to separate multiple commands on the same
line. However, when you use JSON RPC as the Message Type for CLI input, you cannot enter multiple commands on the same line
and separate them with a semicolon ( ; ).
For example, assume that you want to send show hostname and show clock commands through JSON RPC as the following.
In the Sandbox, you enter the CLIs as follows.
show hostname ; show clock
In the JSON RPC request, the input is formatted as follows.
This situation occurs because the Sandbox parses each command in a JSON RPC request as individual items and assigns an ID
to each. When using JSON RPC requests, you cannot use internal punctuation to separate multiple commands on the same line.
Instead, enter each command on a separate line and the request completes sucessfully.
Continuing with the same example, enter the commands as follows in the NX-API CLI.
show hostname
show clock
In the request, the input is formatted as follows.
The Message Format and Command Type are configured in the upper right corner of the Command pane (the top pane). For Message Format, choose the format of the API protocol that you want to use. The Developer Sandbox supports the following API protocols:
Table 1. NX-OS API Protocols
Protocol
Description
json-rpc
A standard lightweight remote procedure call (RPC) protocol that can be used to deliver NX-OS CLI commands in a JSON payload.
The JSON-RPC 2.0 specification is outlined by jsonrpc.org.
xml
Cisco NX-API proprietary protocol for delivering NX-OS CLI or bash commands in an XML payload.
json
Cisco NX-API proprietary protocol for delivering NX-OS CLI or bash commands in a JSON payload.
nx-api rest
Cisco NX-API proprietary protocol for manipulating and reading managed objects (MOs) and their properties in the internal
NX-OS data management engine (DME) model. For more information about the Cisco Nexus 3000 and 9000 Series NX-API REST SDK,
see https://developer.cisco.com/site/cisco-nexus-nx-api-references/.
nx yang
The YANG ("Yet Another Next Generation") data modeling language for configuration and state data.
When the Message Format has been chosen, a set of Command Type options are presented just below the Message Format control. The Command Type setting can constrain the input CLI and can determine the Request and Response format. The options vary depending on the Message Format selection. For each Message Format, the following table describes the Command Type options:
Table 2. Command Types
Message format
Command type
json-rpc
cli — show or configuration commands
cli-ascii — show or configuration commands, output without formatting
xml
cli_show — show commands. If the command does not support XML output, an error message will be returned.
cli_show_ascii — show commands, output without formatting
cli_conf — configuration commands. Interactive configuration commands are not supported.
bash — bash commands. Most non-interactive bash commands are supported.
Note
The bash shell must be enabled in the switch.
json
cli_show — show commands. If the command does not support XML output, an error message will be returned.
cli_show_ascii — show commands, output without formatting
cli_conf — configuration commands. Interactive configuration commands are not supported.
bash — bash commands. Most non-interactive bash commands are supported.
Note
The bash shell must be enabled in the switch.
nx-api rest
cli — configuration commands
nx yang
json — JSON structure is used for payload
xml — XML structure is used for payload
Output Chunking
In order to handle large show command output, some NX-API message formats support output chunking for show commands. In this
case, an Enable chunk mode checkbox appears below the Command Type control along with a session ID (SID) type-in box.
When chunking is enabled, the response is sent in multiple "chunks," with the first chunk sent in the immediate command response.
In order to retrieve the next chunk of the response message, you must send an NX-API request with SID set to the session ID of the previous response message.
Using the Developer Sandbox
Using the Developer Sandbox to Convert CLI Commands to REST Payloads
Tip
Online help is available by clicking Quick Start in the upper right corner of the Sandbox window.
Additional details, such as response codes and security methods, can be found in the chapter "NX-API CLI".
Only configuration commands are supported.
Procedure
Step 1
Configure the Message Format and Command Type for the API protocol you want to use.
Type or paste NX-OS CLI configuration commands, one command per line, into the text entry box in the top pane.
You can erase the contents of the text entry box (and the Request and Response panes) by clicking Reset at the bottom of the top pane.
Step 3
Click the Convert at the bottom of the top pane.
If the CLI commands contain no configuration errors, the payload appears in the Request pane. If errors are present, a descriptive error message appears in the Response pane.
Step 4
When a valid payload is present in the Request pane, you can click POST to send the payload as an API call to the switch.
The response from the switch appears in the Response pane.
Warning
Clicking POST commits the command to the switch, which can result in a configuration or state change.
Step 5
You can copy the contents of the Request or Response pane to the clipboard by clicking Copy in the pane.
Step 6
You can obtain a Python implementation of the request on the clipboard by clicking Python in the Request pane.
Using the Developer Sandbox to Convert from REST Payloads to CLI Commands
Tip
Online help is available by clicking Quick Start in the upper right corner of the Sandbox window.
Additional details, such as response codes and security methods, can be found in the chapter "NX-API CLI".
SUMMARY STEPS
Select nx-api rest as the Message Format and model as the Command Type.
Enter a DN and payload into the text entry box in the top pane. Then click on the Convert button below the top pane.
DETAILED STEPS
Step 1
Select nx-api rest as the Message Format and model as the Command Type.
Example:
Step 2
Enter a DN and payload into the text entry box in the top pane. Then click on the Convert button below the top pane.
Example:
For this example, the DN is api/mo/sys.json and the NX-API REST payload is:
When you click on the Convert button, the CLI equivalent appears in the CLI pane as shown in the following image.
Note
The Developer Sandbox cannot convert all payloads into equivalent CLIs, even if the Sandbox converted the CLIs to NX-API REST
payloads. The following is a list of possible sources of error that can prevent a payload from completely converting to CLI
commands:
Table 3. Sources of REST2CLI Errors
Payload Issue
Result
The payload contains an attribute that does not exist in the MO.
The Error Pane will return an error related to the unsupported MO.
Example:
CLI
ErrorThe entire subtree of "sys/dhcp" is not converted.
NX-API Developer Sandbox: NX-OS Release 9.2(2) and Later
About the NX-API Developer Sandbox
The Cisco NX-API Developer Sandbox is a web form hosted on the switch. It translates NX-OS CLI commands into equivalent XML
or JSON payloads and converts NX-API REST payloads into their CLI equivalents.
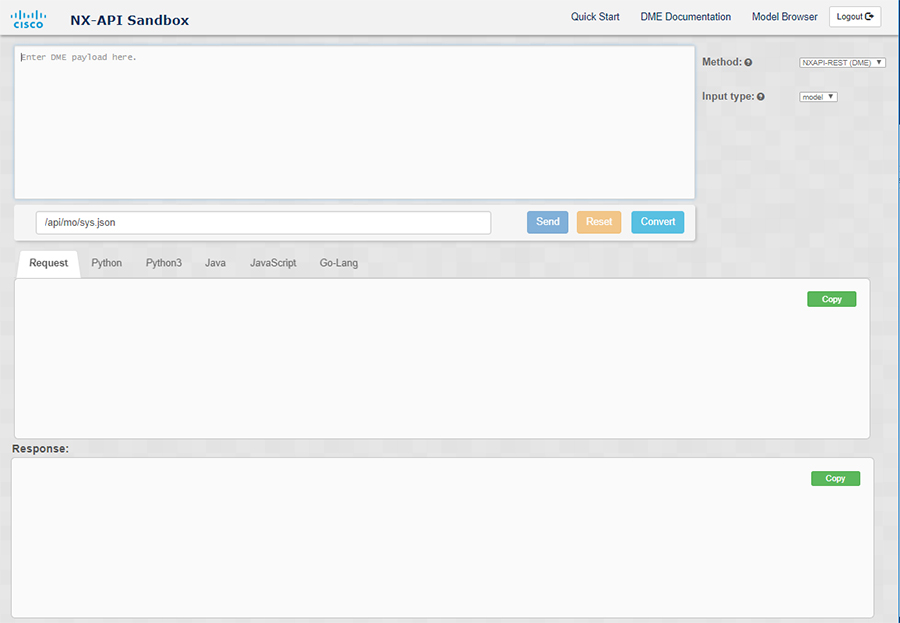
The web form is a single screen with three panes — Command (top pane), Request (middle pane), and Response (bottom pane) —
as shown in the figure below. The designated name (DN) field is located between the Command and Request panes (seen in the
figure below located between the POST and Send options).
The Request pane also has a series of tabs. Each tab represents a different language: Python, Python3, Java, JavaScript, and Go-Lang. Each tab enables you to view the request in the respective language. For example, after converting CLI commands into an
XML or JSON payload, click the Python tab to view the request in Python, which you can use to create scripts.
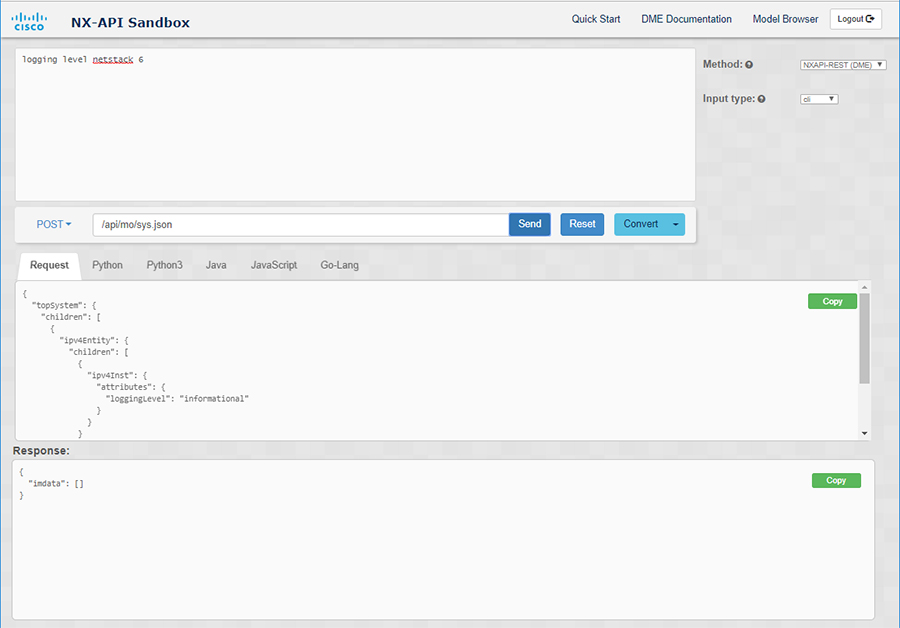
Figure 2. NX-API Developer Sandbox with Example Request and Output Response
Controls in the Command pane enable you to choose a supported API, such as NX-API REST, an input type, such as model (payload)
or CLI, and a message format, such as XML or JSON. The available options vary depending on the chosen method.
When you choose the NXAPI-REST (DME) method, type or paste one or more CLI commands into the Command pane,and click Convert, the web form converts the commands into a REST API payload, checking for configuration errors, and displays the resulting
payload in the Request pane. If you then choose to post the payload directly from the sandbox to the switch (by choosing the
POST option and clicking SEND), the Response pane displays the API response. For more information, see Using the Developer Sandbox to Convert CLI Commands to REST Payloads
Following are the guidelines and limitations for the Developer Sandbox:
Clicking Send in the Sandbox commits the command to the switch, which can result in a configuration or state change.
Some feature configuration commands are not available until their associated feature has been enabled. For example, configuring a BGP router requires first enabling BGP with the feature bgp command. Similarly, configuring an OSPF router requires first enabling OSPF with the feature ospf command. This also applies to evpn esi multihoming, which enables its dependent commands such as evpn multihoming core-tracking. For more information about enabling features to access feature dependent commands, see the .
Using Sandbox to convert with DN is supported only for finding the DN of a CLI config. Any other workflow, for example, using
DME to convert DN for CLI configuration commands is not supported.
The Command pane (the top pane) supports a maximum of 10,000 individual lines of input.
When you use XML or JSON as the Message Type for CLI input, you can use semicolon to separate multiple commands on the same
line. However, when you use JSON RPC as the Message Type for CLI input, you cannot enter multiple commands on the same line
and separate them with a semicolon ( ; ).
For example, assume that you want to send show hostname and show clock commands through JSON RPC as the following.
In the Sandbox, you enter the CLIs as follows.
show hostname ; show clock
In the JSON RPC request, the input is formatted as follows.
This situation occurs because the Sandbox parses each command in a JSON RPC request as individual items and assigns an ID
to each. When using JSON RPC requests, you cannot use internal punctuation to separate multiple commands on the same line.
Instead, enter each command on a separate line and the request completes sucessfully.
Continuing with the same example, enter the commands as follows in the NX-API CLI.
show hostname
show clock
In the request, the input is formatted as follows.
The Method, Message format, and Input type are configured in the upper right corner of the Command pane (the top pane). For Method, choose the format of the API protocol that you want to use. The Cisco NX-API Developer Sandbox supports the following API
protocols:
Table 4. NX-OS API Protocols
Protocol
Description
NXAPI-CLI
Cisco NX-API proprietary protocol for delivering NX-OS CLI or bash commands in an XML or a JSON payload.
NXAPI-REST (DME)
Cisco NX-API proprietary protocol for manipulating and reading managed objects (MOs) and their properties in the internal
NX-OS data management engine (DME) model. The NXAPI-REST (DME) protocol displays a drop-down list that enables you to choose
from the following methods:
The YANG ("Yet Another Next Generation") data modeling language for configuration and state data.
The RESTCONF (Yang) protocol displays a drop-down list that enables you to choose from the following methods:
POST
GET
PUT
PATCH
DELETE
When you choose the Method, a set of Message format or Input type options are displayed in a drop-down list. The Message format can constrain the input CLI and determine the Request and Response format. The options vary depending on the Method you choose.
The following table describes the Input/Command type options for each Message format:
Table 5. Command Types
Method
Message format
Input/Command type
NXAPI-CLI
json-rpc
cli — show or configuration commands
cli-ascii — show or configuration commands, output without formatting
cli-array — show commands. Similar to cli, but with cli_array, data is returned as a list of one element, or an array, within
square brackets, [ ].
NXAPI-CLI
xml
cli_show — show commands. If the command does not support XML output, an error message will be returned.
cli_show_ascii — show commands, output without formatting
cli_conf — configuration commands. Interactive configuration commands are not supported.
bash — bash commands. Most non-interactive bash commands are supported.
Note
The bash shell must be enabled in the switch.
NXAPI-CLI
json
cli_show — show commands. If the command does not support XML output, an error message will be returned.
Note
Beginning with Cisco NX-OS Release 9.3(3), the cli_show_array command is recommended over the cli_show command.
cli_show_array — show commands. Similar to cli_show, but with cli_show_array, data is returned as a list of one element, or
an array, within square brackets [ ].
cli_show_ascii — show commands, output without formatting
cli_conf — configuration commands. Interactive configuration commands are not supported.
bash — bash commands. Most non-interactive bash commands are supported.
Note
The bash shell must be enabled in the switch.
NXAPI-REST (DME)
cli — CLI to model conversion
model — Model to CLI conversion.
RESTCONF (Yang)
json — JSON structure is used for payload
xml — XML structure is used for payload
Output Chunking
JSON and XML NX-API message formats enable you to receive large show command responses in 10-MB chunks. When received, the
chunks are concatenated to create a valid JSON object or XML structure. To view a sample script that demonstrates output chunking,
click the following link and choose the directory that corresponds to Release 9.3x: Cisco NX-OS NXAPI.
Note
For chunk JSON mode, the browser or python script part does not provide the valid JSON output (there will be no closing tags).
To use chunk mode and get valid JSON, use the script provided in the directory.
You receive the first chunk in the immediate command response, which also includes a sid field that contains a session Id. To retrieve the next chunk, you enter the session Id from the previous chunk in the SID text box. You repeat the process until reaching the last response, which is indicated by the eoc (end of content) value in the sid field.
Chunk mode is available when using the NXAPI-CLI method with the JSON or XML format type and the cli_show, cli_show_array, or cli_show_ascii command type. For more information about configuring the chunk mode, see the Chunk Mode Fields table.
Note
NX-API supports a maximum of 2 chunking sessions.
Table 6. Chunk Mode Fields
Field Name
Description
Enable Chunk Mode
Click to place a check mark in the Enable Chunk Mode check box to enable chunking. When you enable chunk mode, responses that exceed 10 MB are sent in multiple chunks of up to
10 MB in size.
SID
Enter the session Id of the previous response in the SID text box to retrieve the next chunk of the response message.
Note
Only alphanumeric characters and ‘_’ are allowed. Invalid characters receive an error.
Using the Developer Sandbox
Using the Developer Sandbox to Convert CLI Commands to REST Payloads
Tip
Online help is available by clicking the help icons (?) next to the field names located in the upper-right corner of the Cisco NX-API Developer Sandbox window.
For additional details, such as response codes and security methods, see the NX-API CLI chapter.
Only configuration commands are supported.
The Cisco NX-API Developer Sandbox enables you to convert CLI commands to REST payloads.
Procedure
Step 1
Click the Method drop-down list and choose NXAPI-REST (DME).
The Input type drop-down list appears.
Step 2
Click the Input type drop-down list and choose cli.
Step 3
Type or paste NX-OS CLI configuration commands, one command per line, into the text entry box in the top pane.
You can erase the contents of the text entry box (and the Request and Response panes) by clicking Reset at the bottom of the top pane.
Step 4
Click Convert.
If the CLI commands contain no configuration errors, the payload appears in the Request pane. If errors are present, a descriptive error message appears in the Response pane.
Step 5
(Optional) To send a valid payload as an API call to the switch, click Send.
The response from the switch appears in the Response pane.
Warning
Clicking Send commits the command to the switch, which can result in a configuration or state change.
Step 6
(Optional) To obtain the DN for an MO in the payload:
From the Request pane, choose POST.
Click the Convert drop-down list and choose Convert (with DN).
The payload appears with with a dn field that contains the DN that corresponds to each MO in the payload.
Step 7
(Optional) To overwrite the current configuration with a new configuration:
Click the Convert drop-down list and choose Convert (for Replace). The Request pane displays a payload with a status field set to replace.
From the Request pane, choose POST.
Click Send.
The current configuration is replaced with the posted configuration. For example, if you start with the following configuration:
interface eth1/2
  description test
  mtu 1501
Then use Convert (for Replace) to POST the following configuration:
interface eth1/2
  description testForcr
The mtu configuration is removed and only the new description (testForcr) is present under the interface. This change is confirmed when entering show running-config .
Step 8
(Optional) To copy the contents of a pane, such as the Request or Response pane, click Copy. The contents o the respective pane is copied to the clipboard.
Step 9
(Optional) To convert the request into an of the formats listed below, click on the appropriate tab in the Request pane:
Python
Python3
Java
JavaScript
Go-Lang
Using the Developer Sandbox to Convert from REST Payloads to CLI Commands
The Cisco NX-API Developer Sandbox enables you to convert REST payloads to corresponding CLI commands. This option is only
available for the NXAPI-REST (DME) method.
Tip
Online help is available by clicking help icons (?) next to the Cisco NX-API Developer Sandbox field names. Click a help icon get information about the respective field.
For additional details, such as response codes and security methods, see the chapter NX-API CLI.
The top-right corner of the Cisco NX-API Developer Sandbox contains links for additional information. The links that appear
depend on the Method you choose. The links that appear for the NXAPI-REST (DME) method:
NX-API References—Enables you to access additional NX-API documentation.
DME Documentation—Enables you to access the NX-API DME Model Reference page.
Model Browser—Enables you to access Visore, the Model Browser. Note that you might have to manually enter the IP address for your switch
to access the Visore page:
https://management-ip-address/visore.html.
Procedure
Step 1
Click the Method drop-down list and choose NXAPI-REST (DME).
Example:
Step 2
Click the Input Type drop-down list and choose model.
Step 3
Enter the designated name (DN) that corresponds to the payload in the field above the Request pane.
Step 4
Enter the payload in the Command pane.
Step 5
Click Convert.
Example:
For this example, the DN is /api/mo/sys.json and the NX-API REST payload is:
When you click on the Convert button, the CLI equivalent appears in the CLI pane as shown in the following image.
Note
The Cisco NX-API Developer Sandbox cannot convert all payloads into equivalent CLIs, even if the sandbox converted the CLIs
to NX-API REST payloads. The following is a list of possible sources of error that can prevent a payload from completely converting
to CLI commands:
Table 7. Sources of REST2CLI Errors
Payload Issue
Result
The payload contains an attribute that does not exist in the MO.
The Error Pane will return an error related to the unsupported MO.
Example:
CLI
ErrorThe entire subtree of "sys/dhcp" is not converted.
Using the Developer Sandbox to Convert from RESTCONF to json or XML
Tip
Online help is available by clicking the help icon (?) in the upper-right corner of the Cisco NX-API Developer Sandbox window.
Click on the Yang Documentation link in the upper right corner of the Sandbox window to go to the Model Driven Programmability with Yang page.
Click on the Yang Models link in the upper right corner of the Sandbox window to access the YangModels GitHub site.
Procedure
Step 1
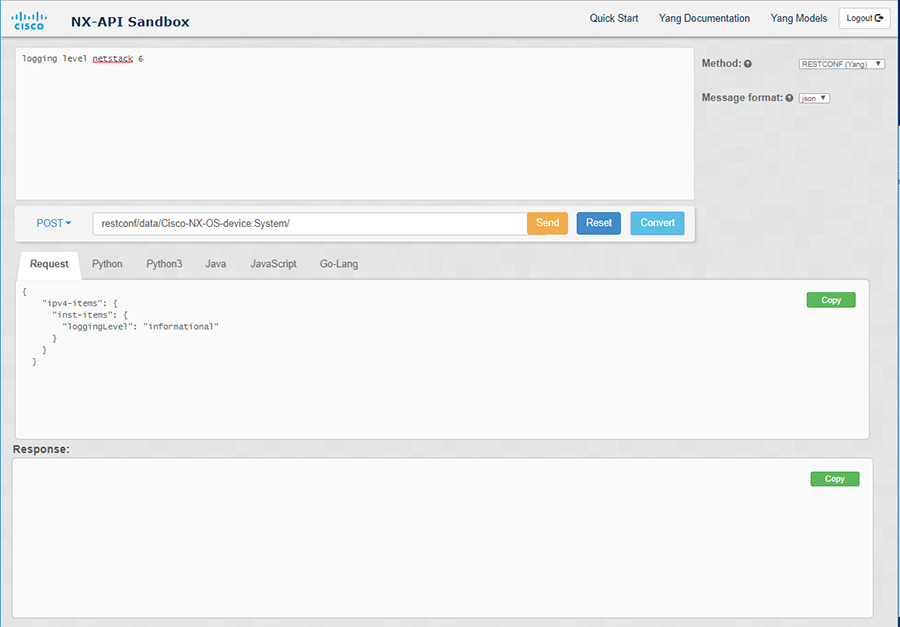
Click the Method drop-down list and choose RESTCONF (Yang).
Example:
Step 2
Click Message format and choose either json or xml.
Step 3
Enter a command in the text entry box in the top pane.
Step 4
Choose a message format.
Step 5
Click Convert.
Example:
For this example, the command is logging level netstack 6 and the message format is json:
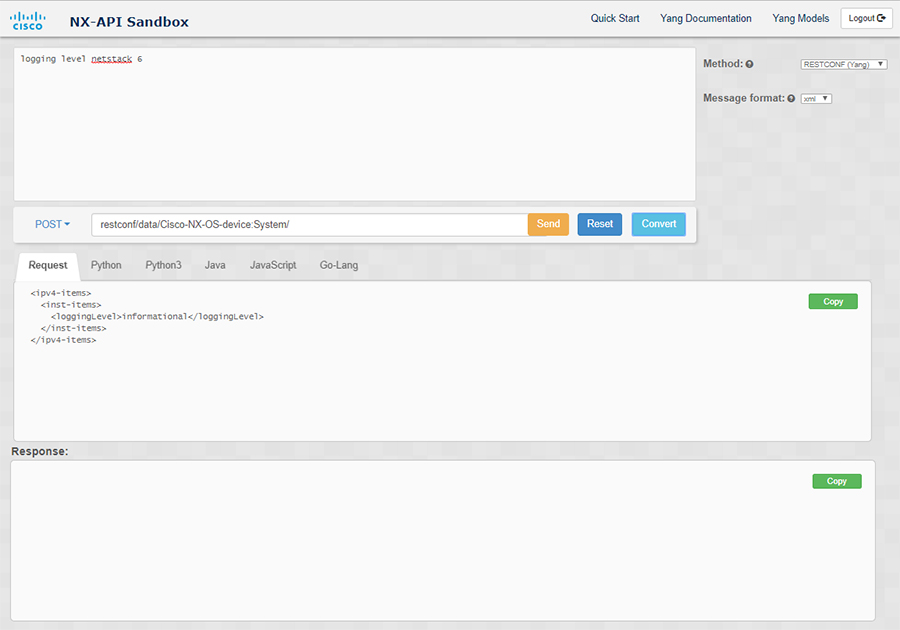
Example:
For this example, the command is logging level netstack 6 and the message format is xml:
Note
When converting a negated CLI to a Yang payload using the XML or JSON message format, the sandbox throws a warning and disables
the Send option. The warning message that appears depends on the message format:
For the XML message format — "This is a Netconf payload as it is being generated for DELETE operation(s), hence SEND option
is disabled for Restconf!"
For the JSON message format—"This is a gRPC payload as it is being generated for DELETE operation(s), hence SEND option is
disabled for Restconf!"
Step 6
You can also convert the request into the following formats by clicking on the appropriate tab in the Request pane:
Python
Python3
Java
JavaScript
Go-Lang
Note
The Java-generated script does not work if you choose the PATCH option from the drop-down menu in the area above the Request
tab. This is a known limitation with Java and is expected behavior.


 Feedback