Adding and Deleting Sites

Adding Cisco NDFC Sites

This section describes how to add a NDFC site using the Nexus Dashboard GUI and then enable that site to be managed by Nexus Dashboard Orchestrator.

Before you begin

  • You must ensure that the site(s) you are adding are running Cisco NDFC, Release 11.5(1) or later.

Procedure


Step 1

Log in to your Nexus Dashboard and open the Admin Console.

Step 2

From the left navigation menu, choose Sites and click Add Site..

Step 3

Provide site information.

  1. For Site Type, select NDFC or NDFC.

  2. Provide the NDFC controller information.

    You need to provide the Host Name/IP Address of the in-band (eth2) interface, User Name, and Password. for the NDFC controller currently managing your NDFC fabrics.

  3. Click Select Sites to select the specific fabrics managed by the controller.

    In the fabric selection window that opens, select the fabrics you want to add to the Nexus Dashboard and click Select:

  4. Click Add Security Domains to select one or more security domains that will have access to this site.

Step 4

Repeat the previous steps for any additional NDFC sites.

Step 5

From the Nexus Dashboard's Service Catalog page, open the Nexus Dashboard Orchestrator service.

You will be automatically logged in using the Nexus Dashboard user's credentials.
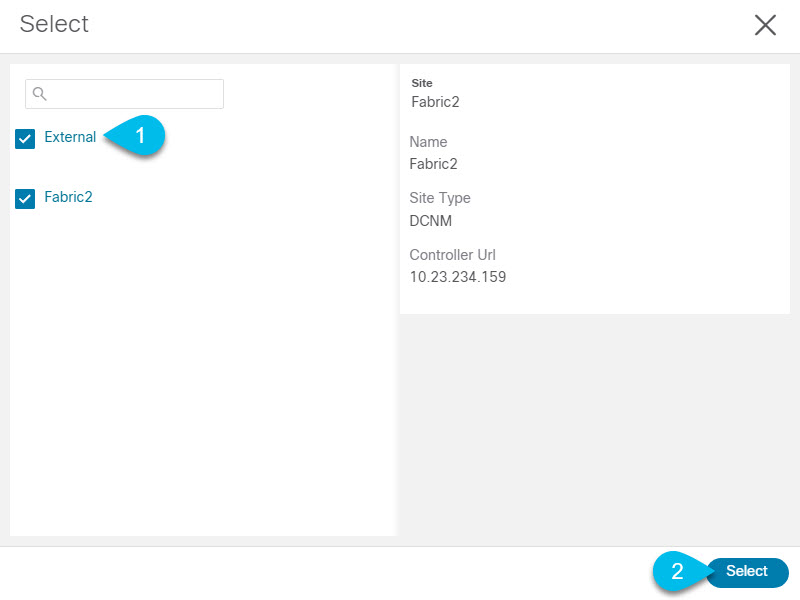
Step 6

In the Nexus Dashboard Orchestrator GUI, manage the sites.

  1. From the left navigation menu, select Infrastructure > Sites.

  2. In the main pane, change the State from Unmanaged to Managed for each fabric that you want the NDO to manage.

    If the fabric you are managing is part of a Multi-Site Domain (MSD), it will have a Site ID already associated with it. In this case, simply changing the State to Managed will manage the fabric.

    However, if the fabric is not part of an MSD, you will also be prompted to provide a Fabric ID for the site when you change its state to Managed.

    Note


    If you want to manage both kinds of fabrics, those that are part of an existing MSD and those that are not, you must on-board the MSD fabrics first, followed by any standalone fabrics.


Removing Sites

This section describes how to disable site management for one or more sites using the Nexus Dashboard Orchestrator GUI. The sites will remain present in the Nexus Dashboard.

Before you begin

You must ensure that all templates associated with the site you want to remove are not deployed.

Procedure


Step 1

Open the Nexus Dashboard Orchestrator GUI.

You can open the NDO service from the Nexus Dashboard's Service Catalog. You will be automatically logged in using the Nexus Dashboard user's credentials.

Step 2

Remove the site from all templates.

You must remove the site from all templates with which it is associated before you can unmanaged the site and remove it from your Nexus Dashboard.

  1. Navigate to Application Management > Schemas.

  2. Click a schema that contains one or more templates associated with the site.

  3. From the View dropdown, choose a template that's associated with the site that you want to remove.

  4. From the Actions dropdown, choose Sites Association and uncheck the site you want to remove.

    This will remove configurations that were deployed using this template to this site.

    Note


    For non-stretched templates, you can choose to preserve the configurations deployed by the template to the sites by selecting Actions > Dissociate Sites instead. This option will allow you to retain configurations deployed by NDO but no longer manage those objects from NDO.

  5. Repeat this step for all templates associated with the site that you want to unmanage in this and all other schemas.

Step 3

In the Nexus Dashboard Orchestrator GUI, disable the sites.

  1. From the left navigation menu, select Sites.

  2. In the main pane, change the State from Managed to Unmanaged for the site that you want to unmanage.

    Note


    If the site is associated with one or more deployed templates, you will not be able to change its state to Unmanaged until you undeploy those templates, as described in the previous step.

Step 4

Delete the site from Nexus Dashboard.

If you no longer want to manage this site or use it with any other applications, you can delete the site from the Nexus Dashboard as well.

Note


Note that the site must not be currently in use by any of the services installed in your Nexus Dashboard cluster.

  1. In the top navigation bar, click the Home icon to return to the Nexus Dashboard GUI.

  2. From the left navigation menu of the Nexus Dashboard GUI, select Sites.

  3. Select one or more sites you want to delete.

  4. In the top right of the main pane, select Actions > Delete Site.

  5. Provide the site's login information and click OK.

    The site will be removed from the Nexus Dashboard.


Cross Launch to Fabric Controllers

Nexus Dashboard Orchestrator currently supports a number of configuration options for each type of fabrics. For many additional configuration options, you may need to log in directly into the fabric's controller.

You can cross launch into the specific site controller's GUI from the NDO's Infrastucture > Sites screen by selecting the actions (...) menu next to the site and clicking Open in user interface. Note that cross-launch works with out-of-band (OOB) management IP of the fabric.

If the same user is configured in Nexus Dashboard and the fabric, you will be logged in automatically into the fabric's controller using the same log in information as the Nexus Dashboard user. For consistency, we recommend configuring remote authentication with common users across Nexus Dashboard and the fabrics.