Configure and Troubleshoot DNA Spaces and Catalyst 9800 or Embedded Wireless Controller (EWC) with Direct Connect
Available Languages
Download Options
Bias-Free Language
The documentation set for this product strives to use bias-free language. For the purposes of this documentation set, bias-free is defined as language that does not imply discrimination based on age, disability, gender, racial identity, ethnic identity, sexual orientation, socioeconomic status, and intersectionality. Exceptions may be present in the documentation due to language that is hardcoded in the user interfaces of the product software, language used based on RFP documentation, or language that is used by a referenced third-party product. Learn more about how Cisco is using Inclusive Language.
Contents
Introduction
Instead of Mobility Express, Cisco's latest 9000 series of Access Points (9115, 9117, 9120, 9130) are capable of running Embedded Wireless Controller (EWC) image. EWC is based on Cisco 9800 WLC code and allows one of the Access points to act as a controller for up to 100 other APs.
EWC or the Catalyst 9800 can be connected to DNA Spaces cloud in 3 different ways:
- Direct Connection
- Via DNA Spaces Connector
- Via Cisco Connected Mobile Xperience (CMX) on-prem appliance or VM
Integration with DNA Spaces is supported on every version of EWC. This article will be covering setup and troubleshooting of Direct Connection only for both the EWC on a Catalyst AP and the 9800 as the procedure are identical.
Important: Direct connection is only recommended for deployments of up to 50 clients. For any larger ones, use DNA Spaces Connector.
Prerequisites
Components Used
- Embedded Wireless Controller image version 17.1.1s or Catalyst 9800-L using 16.12.1
- 9115 AP
- DNA Spaces cloud
Steps outlined in this article assume that the EWC or 9800 has already been deployed and has a working web interface and SSH.
Configure
Network Diagram
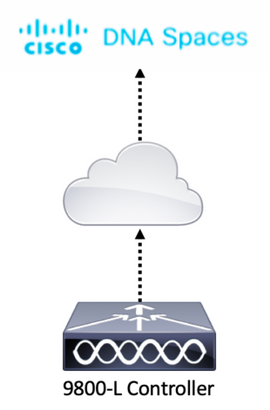
Configure the controller
DNA Spaces cloud nodes and the controller are communicating over HTTPS protocol. In this test setup, the controller has been placed behind a NAT with full internet access.
Install root certificate
Before configuring the controller, a DigiCert root certificate needs to be downloaded. SSH into the controller and run:
WLC# conf t
Enter configuration commands, one per line. End with CNTL/Z.
WLC(config)# ip name-server <DNS ip>
WLC(config)# ip domain-lookup
WLC(config)# crypto pki trustpool import url https://www.cisco.com/security/pki/trs/ios.p7b
Reading file from http://www.cisco.com/security/pki/trs/ios.p7b
Loading http://www.cisco.com/security/pki/trs/ios.p7b !!!
% PEM files import succeeded.
EWC have DNS configured by default using Cisco DNS servers, but it will be a required step for a 9800 controller.
To verify certificate has been installed, run:
EWC(config)#do show crypto pki trustpool | s DigiCert Global Root CA
cn=DigiCert Global Root CA
cn=DigiCert Global Root CA
Configure via Web Interface
Before the controller can be connected to DNA Spaces, it is required to set up NTP and DNS servers and have at least one AP joined.
Open the web interface of the EWC and navigate to the Administration > Time. Make sure that the WLC is synced up with an NTP server. By default, EWC is preconfigured to use ciscome.pool.ntp.org NTP servers. In case of 9800, you can use the same NTP or your preferred NTP server:
Navigate to Administration > DNS and verify that the DNS server has been added. By default, EWC is preconfigured to use Cisco Open DNS servers:

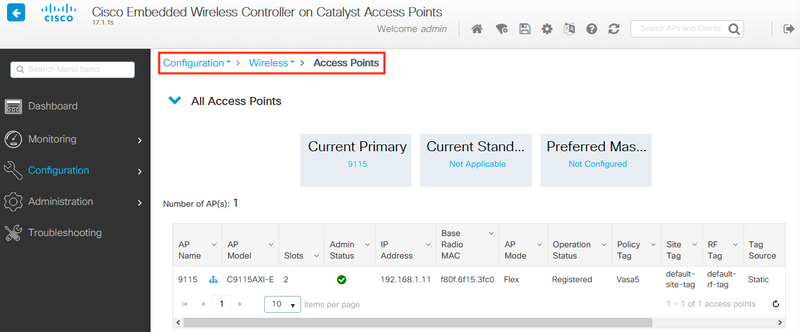
Under Configuration > Wireless > Access Points, verify that at least one AP has been joined. This AP can be the same one on which the EWC is running:
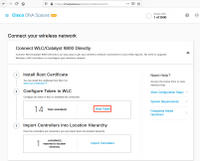
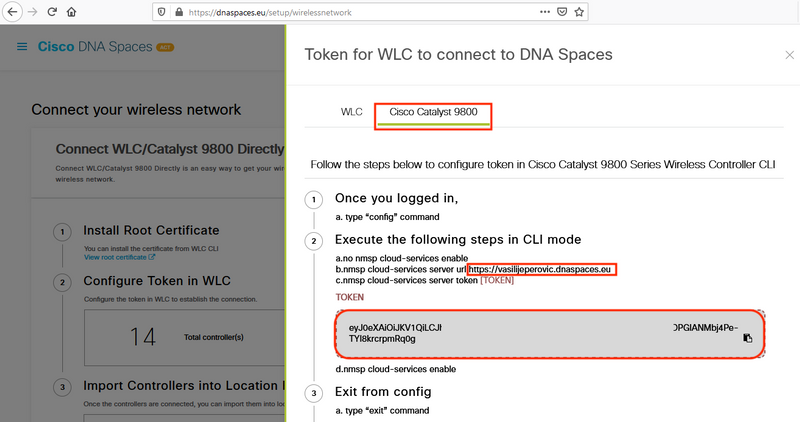
On DNA Spaces cloud, navigate from home page to Setup > Wireless Networks > Connect WLC/Catalyst 9800 Directly. Click on View Token:
Switch tab to Cisco Catalyst 9800. Copy the token and URL:
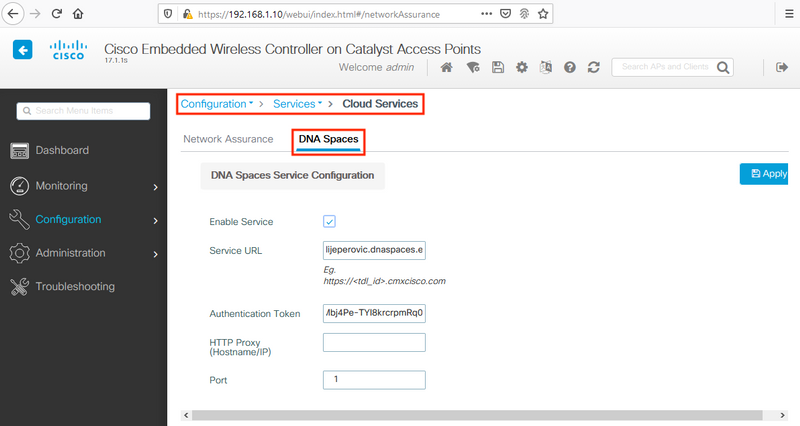
In the WLC web interface, navigate to Configuration > Services > Cloud Services > DNA Spaces. Paste URL and Authentication Token. If HTTP proxy is being used, specify its IP address and port.
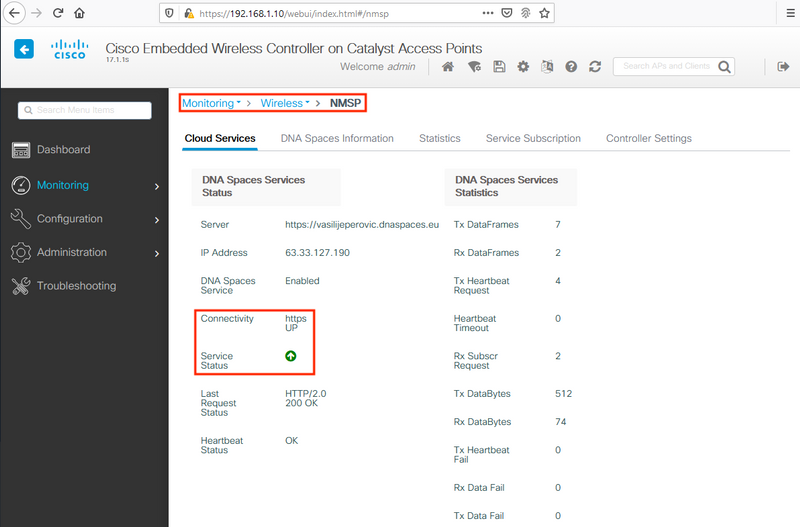
Verify that the connection has been successfully established under Monitoring > Wireless > NMSP. Service Status should show green arrow:
Skip the next chapter and go to the “Import Controllers into Location Hierarchy”.
Configuration via CLI
Verify NTP is configured and synced:
EWC#show ntp associations

  address     	ref clock   	st   when   poll reach  delay  offset   disp
*~45.87.76.3  	193.79.237.14	2	638   1024   377 10.919  -4.315  1.072
+~194.78.244.172  172.16.200.253   2	646   1024   377 15.947  -2.967  1.084
+~91.121.216.238  193.190.230.66   2	856   1024   377  8.863  -3.910  1.036
 * sys.peer, # selected, + candidate, - outlyer, x falseticker, ~ configured
New NTP servers can be added using ntp server <ntp_ip_addr> command.
Verify DNS servers have been configured:
EWC#show ip name-servers
208.67.222.222
208.67.220.220
New DNS servers can be added using ip name-server <dns_ip> command.
To confirm AP has been joined:
EWC#show ap status
AP Name    Status     Mode    Country
--------------------------------------
9115       Enabled    Local   BE
Like previously mentioned, access DNA Spaces cloud, navigate to Setup > Wireless Networks > Connect WLC/Catalyst 9800 Directly and click View Token:

Switch tab to Cisco Catalyst 9800. Copy the token and URL:
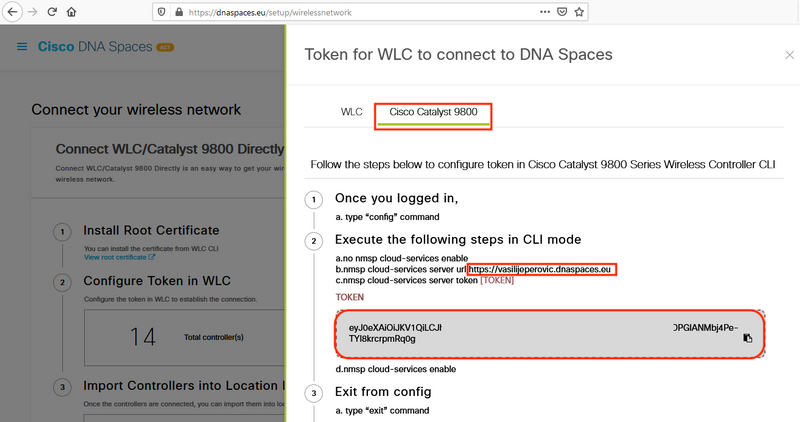
Run the following commands:
CL-9800-01(config)#no nmsp cloud-services enable
CL-9800-01(config)#nmsp cloud-services server url [URL]
CL-9800-01(config)#nmsp cloud-services server token [TOKEN]
CL-9800-01(config)#nmsp cloud-services enable
CL-9800-01(config)#exit
To verify that connection with DNA Spaces cloud has been successfully established, run:
CL-9800-01#show nmsp cloud-services summary
CMX Cloud-Services Status
------------------------------------------------
Server : https://vasilijeperovic.dnaspaces.eu
CMX Service : Enabled
Connectivity : https: UP
Service Status : Active
Last IP Address : 63.33.127.190
Last Request Status : HTTP/2.0 200 OK
Heartbeat Status : OK
Import EWC into Location Hierarchy
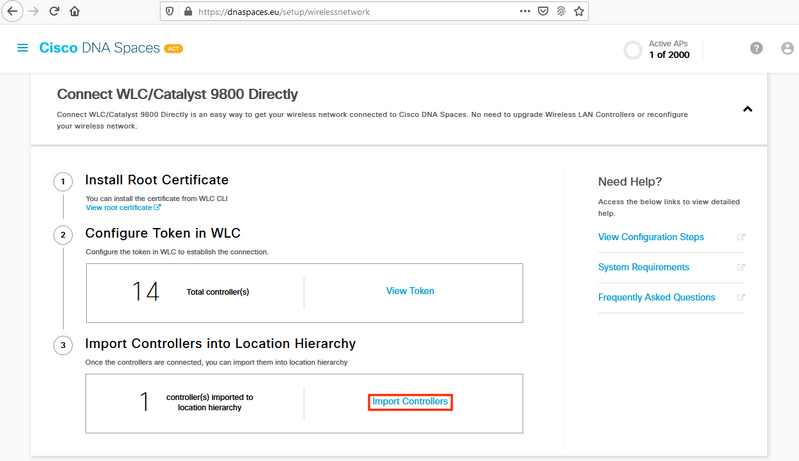
Step 1. The rest of the configuration will be done in DNA Spaces. Under Setup > Wireless Networks > Connect WLC/Catalyst 9800 Directly, click on Import Controllers.
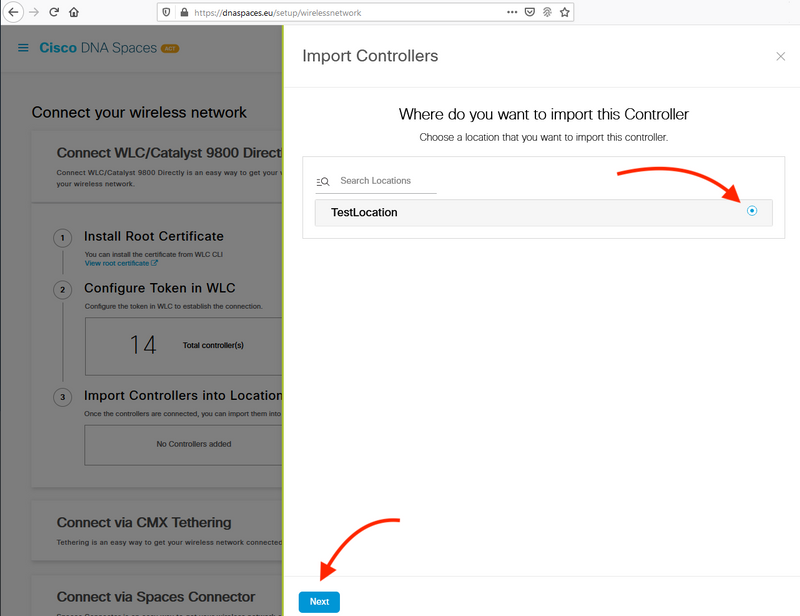
Step 2. Check the radio button next to your account name and click Next. If you already have some Locations added, they will show up in the list below:
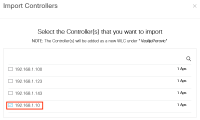
Step 3. Find your controller IP address, check the box next to it and press Next:
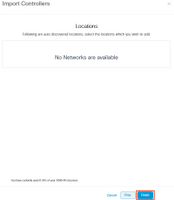
Step 4. Since no other Locations have been added, just click Finish:
Step 5. Prompt saying the WLC has been successfully imported into Location Hierarchy will pop up:
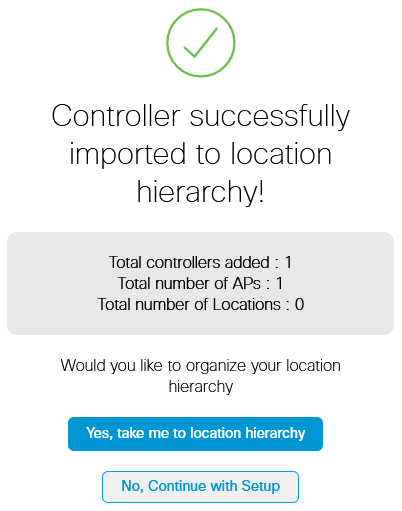
Now that the WLC has been successfully connected to the cloud, you can start using all other DNA Spaces features.
Note: NMSP traffic always uses the Wireless Management interface for communicating with DNA Spaces or CMX. This can not be changed in the 9800 controller configuration. The interface number would be irrelevant, whichever interface is assigned as a Wireless Management Interface on the 9800 controller will be used.
Organize the Location Hierarchy on Cisco DNA Spaces
If a new location hierarchy is desired or if no locations were added in step 4 of the Import the 9800 controller to Cisco DNA Spaces section, you can configure them manually.
Location hierarchy is one of the most important features of DNA spaces as it is used for analytics information and based on it, the rules of the captive portals are configured. The more granular the location hierarchy is the more granular control one has over the rules of the captive portal and over the information that can be retrieved from DNA Spaces.
The location hierarchy feature on DNA Spaces works the same way as the traditional hierarchy from Cisco Prime Infrastructure or Cisco CMX, but the naming is quite different. When the controller is imported into the location hierarchy, it represents the equivalent as the campus from the traditional hierarchy; under the controller, groups can be created that are the equivalent to buildings; then, under the groups, networks can be configured that are the equivalent to floors, finally, under the networks, zones can be created that remains in the same level than they used to in the traditional location hierarchy. To sum up, this is the equivalence:
Table 1. Equivalence between the traditional hierarchy levels with the levels of DNA spaces.
| DNA Spaces Hierarchy | Traditional Hierarchy |
| Controller (Wireless Network) | Campus |
| Group | Building |
|
Network |
Floor |
|
Zone |
Zone |
Step 1. Configure a group. Groups organize multiple locations or zones based on geolocation, brand or any other type of grouping depending on the business. Navigate to Location Hierarchy, hover the mouse on the existing wireless controller and click on Create Group.
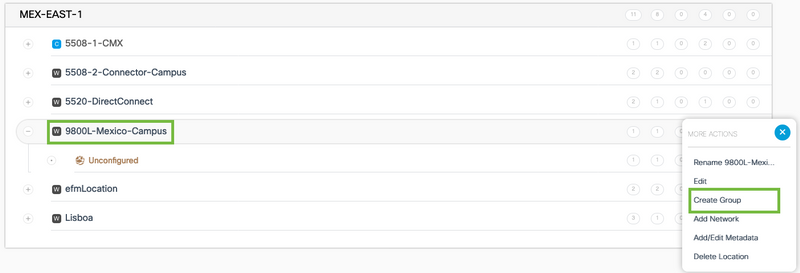
To change the name of the location level, hover the mouse on the network and click "Rename".
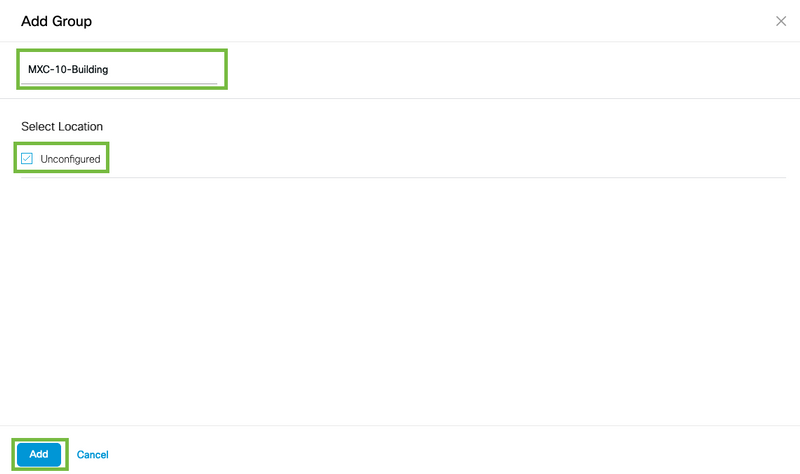
Step 2. Enter the Group name and select the Unconfigured location as that includes all the APs imported with the controller, those APs will be mapped then to networks and zones as needed. Click Add.
Step 3. Create a network. A network or location is defined in Cisco DNA Spaces as all access points within a physical building consolidated as a Location. Hover the mouse on the Group and click Add Network.
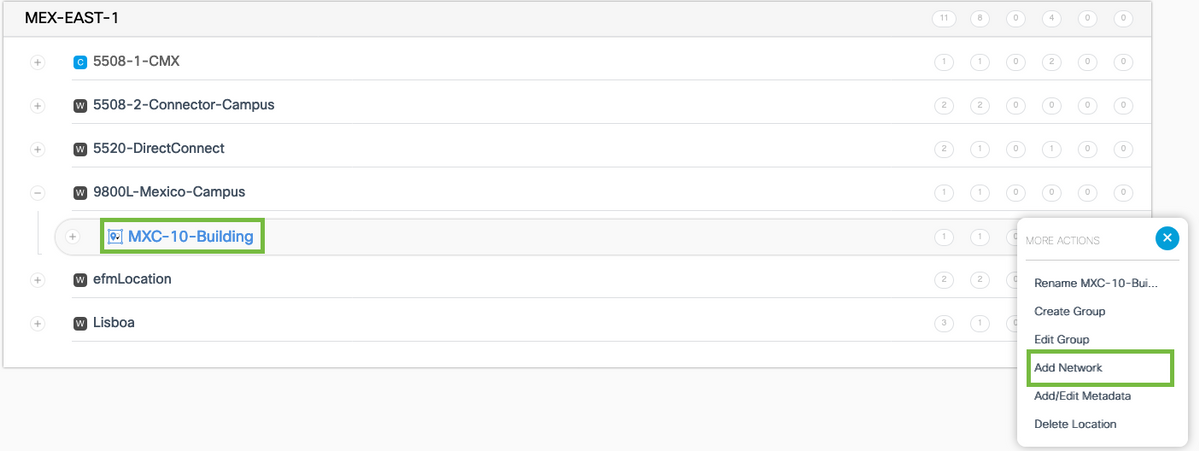
Note: This is the most important node in the Location Hierarchy as business insights and location analytics calculations are generated from here.
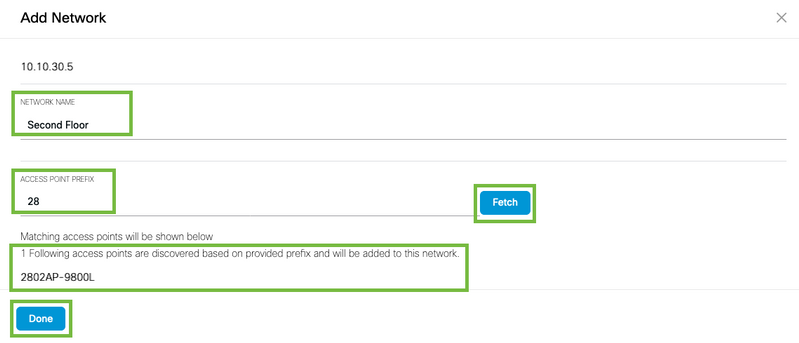
Step 4. Enter the network name and the access point prefix, click Fetch. DNA Spaces fetches all the APs associated to that controller with that prefix and allows one to add the APs to the floor. Only one prefix can be entered.
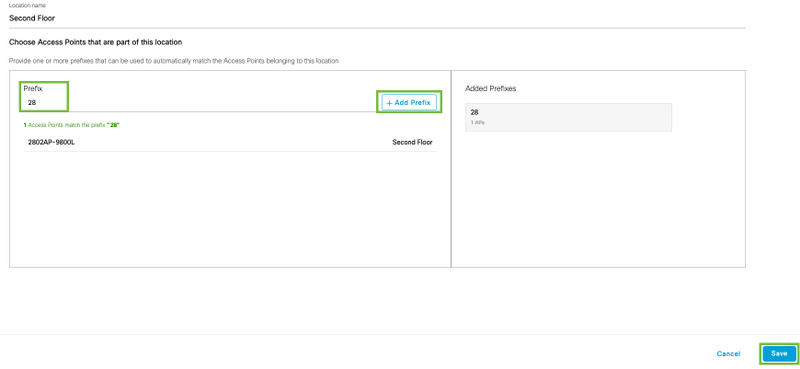
Step 5. In case more prefixes are needed in the network. Click the network name, in the Location Info tab click the Edit button next to Access Points Prefix Used.

Enter the prefix name, click +Add Prefix, and Save. Repeat for all the prefixes as needed, this will map the APs to the network and allow to map associate the APs to zones later.
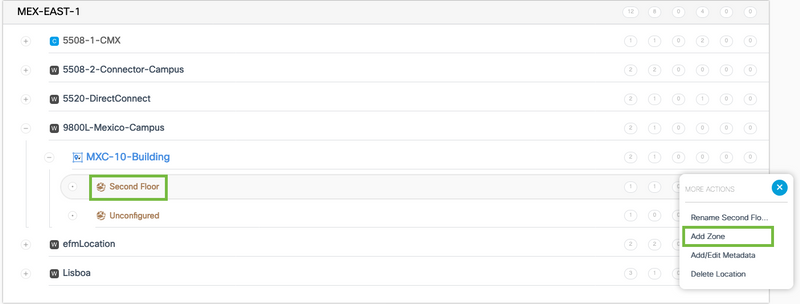
Step 6. Create a Zone. A zone is a collection of access points within a section of a building/location. It can be defined based on the departments in a physical building or an organization. Hover the mouse on the Network and select Add Zone.
Step 7. Configure the Zone Name and select the APs for the zone, and click Add:

Troubleshoot & Common Issues
Common Issues
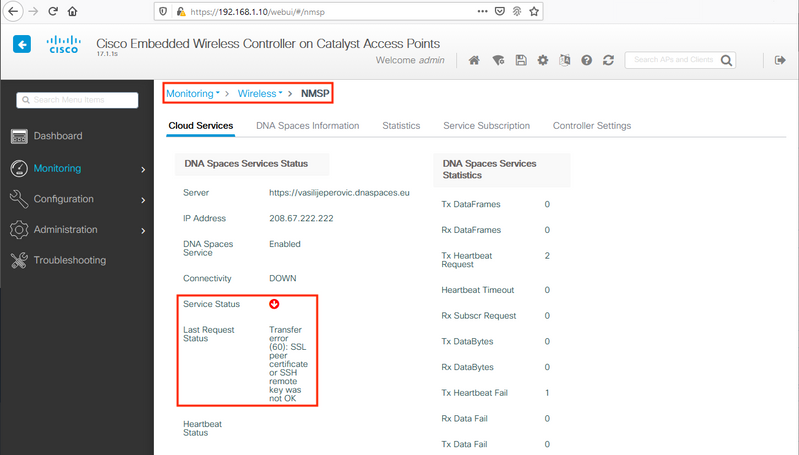
The web interface page under Monitoring > Wireless > NMSP (or running show nmsp cloud-services summary command) will usually show enough information about the connection failure. Several common mistakes can be found in the screenshots below:
1. When DNS is not configured, the error message “Transfer error (6): Couldn't resolve host name” shows up:
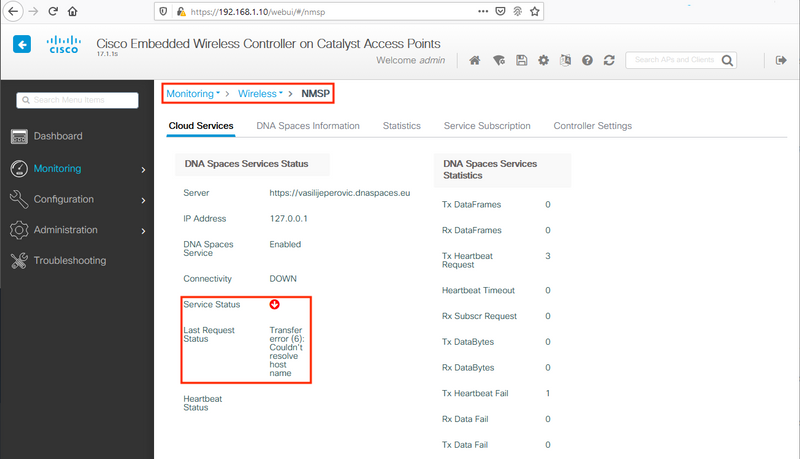
Certificate not being installed or NTP not being configured both result with the error message saying: “Transfer error (60): SSL peer certificate or SSH remote key was not OK”:
Radioactive Tracing
EWC, like all other 9800 controllers, supports always-on Radioactive Traces. In order to collect them and see why the connection is not being established, it is required to know which DNA Spaces IP address the EWC is reaching out to. This can be found under Monitor > Wireless > NMSP or through the CLI:
EWC#show nmsp status
NMSP Status
-----------

CMX IP Address      Active	Tx Echo Resp  Rx Echo Req   Tx Data 	Rx Data 	Transport
--------------------------------------------------------------------------------------------------
63.33.127.190       Active	0             0             38      	2       	HTTPS
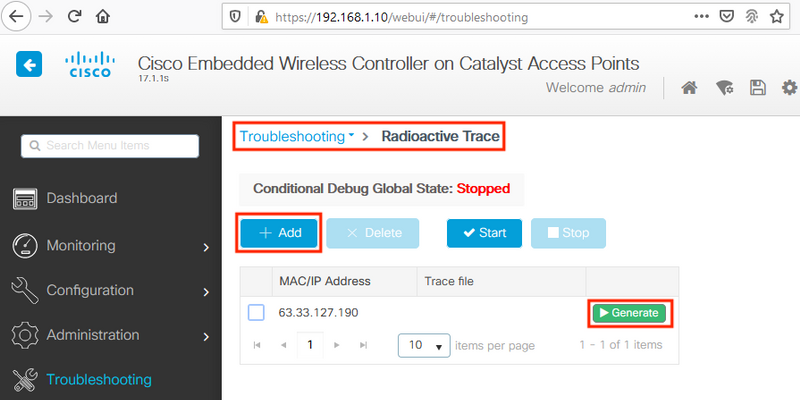
The EWC in this test setup is connecting to 63.33.127.190. Copy this IP address and navigate to Troubleshooting > Radioactive Trace. Click Add, paste the IP address and click Generate:
Select Generate logs for the last 10 minutes and click Apply. Enabling Internal Logs can generate large amounts of data that might be hard to analyze:

Note: Misconfigured DNS, NTP and lack of certificate will not generate any Radioactive Traces
Example of a Radioactive Trace in a case where Firewall is blocking the HTTPS:
2020/02/24 18:40:30.774 {nmspd_R0-0}{1}: [nmsp-main] [11100]: (note): CMX [63.33.127.190]:[32]: closing
2020/02/24 18:40:30.774 {nmspd_R0-0}{1}: [nmsp-https] [11100]: (debug): Called 'is_ready'
2020/02/24 18:40:30.774 {nmspd_R0-0}{1}: [nmsp-main] [11100]: (info): CMX [63.33.127.190]:[32]: Processing connection event NMSP_APP_LBS_DOWN(201)
2020/02/24 18:40:30.774 {nmspd_R0-0}{1}: [nmsp-db] [11100]: (info): Started or incremented transaction (TID: -1, ref count: 1, started: 0, abort: 0)
2020/02/24 18:40:30.774 {nmspd_R0-0}{1}: [nmsp-enc] [11100]: (debug): Decoding control message structure
2020/02/24 18:40:30.774 {nmspd_R0-0}{1}: [nmsp-enc] [11100]: (debug): Control structure was successfully decoded from message
2020/02/24 18:40:30.774 {nmspd_R0-0}{1}: [nmsp-db] [11100]: (debug): Retrieving CMX entry: 32
2020/02/24 18:40:30.774 {nmspd_R0-0}{1}: [nmsp-db] [11100]: (ERR): CMX entry 32 not found
2020/02/24 18:40:30.774 {nmspd_R0-0}{1}: [nmsp-main] [11100]: (debug): CMX Pool processing NMSP message (id: event NMSP_APP_LBS_DOWN(201), length: 48, client: 0, CMX id: 32)
2020/02/24 18:40:30.774 {nmspd_R0-0}{1}: [nmsp-db] [11100]: (info): Ending transaction (TID: -1, ref count: 1, started: 0, abort: 0)
2020/02/24 18:40:30.774 {nmspd_R0-0}{1}: [nmsp-db] [11100]: (info): Ended transaction (TID: -1, ref count: 0, started: 0, abort: 0)
2020/02/24 18:40:30.774 {nmspd_R0-0}{1}: [nmsp-client] [11100]: (debug): NMSP IPC sent message to NMSPd NMSP message (id: event NMSP_APP_LBS_DOWN(201), length: 48, client: 0, CMX id: 32) successfully
2020/02/24 18:40:30.774 {nmspd_R0-0}{1}: [nmsp-main] [11100]: (info): CMX [63.33.127.190]:[32]: successfully broadcasted IPC event NMSP_APP_LBS_DOWN(201)
2020/02/24 18:40:30.774 {nmspd_R0-0}{1}: [nmsp-main] [11100]: (note): CMX [63.33.127.190]:[32]: down
2020/02/24 18:40:30.774 {nmspd_R0-0}{1}: [nmsp-main] [11100]: (debug): NMSP timer 0xab774af4: close
2020/02/24 18:40:30.774 {nmspd_R0-0}{1}: [nmsp-https] [11100]: (debug): Decrease reference count for https_con object: Now it's 1
Example of Radioactive Trace for a successful connection with the cloud:
2020/02/24 18:53:20.634 {nmspd_R0-0}{1}: [nmsp-https] [11100]: (note): Server did not reply to V2 method. Falling back to V1.
2020/02/24 18:53:20.634 {nmspd_R0-0}{1}: [nmsp-https] [11100]: (debug): Cloud authentication 2 step failed, trying legacy mode
2020/02/24 18:53:20.634 {nmspd_R0-0}{1}: [nmsp-https] [11100]: (note): Set connection status from HTTP_CON_AUTH_PROGRESS_2STEP to HTTP_CON_AUTH_IDLE
2020/02/24 18:53:20.634 {nmspd_R0-0}{1}: [nmsp-https] [11100]: (debug): tenant ID: vasilijeperovic
2020/02/24 18:53:20.634 {nmspd_R0-0}{1}: [nmsp-https] [11100]: (debug): hostname is: data.dnaspaces.eu
2020/02/24 18:53:20.635 {nmspd_R0-0}{1}: [nmsp-https] [11100]: (note): Starting authentication V1 using Heartbeat URL https://data.dnaspaces.eu/api/config/v1/nmspconfig and Data URL https://data.dnaspaces.eu/networkdata
2020/02/24 18:53:20.635 {nmspd_R0-0}{1}: [nmsp-https] [11100]: (note): Set connection status from HTTP_CON_AUTH_IDLE to HTTP_CON_AUTH_PROGRESS_1STEP
2020/02/24 18:53:21.635 {nmspd_R0-0}{1}: [nmsp-https] [11100]: (debug): tenant ID: vasilijeperovic
2020/02/24 18:53:21.635 {nmspd_R0-0}{1}: [nmsp-https] [11100]: (debug): hostname is: data.dnaspaces.eu
2020/02/24 18:53:21.635 {nmspd_R0-0}{1}: [nmsp-https] [11100]: (debug): Authenticator V1 get heartbeat host: https://data.dnaspaces.eu/api/config/v1/nmspconfig
2020/02/24 18:53:21.635 {nmspd_R0-0}{1}: [nmsp-https] [11100]: (debug): Authenticator V1 get access token: eyJ0eX[information omitted]rpmRq0g
2020/02/24 18:53:21.635 {nmspd_R0-0}{1}: [nmsp-db] [11100]: (debug): DNSs used for cloud services: 208.67.222.222,208.67.220.220
2020/02/24 18:53:21.635 {nmspd_R0-0}{1}: [nmsp-https] [11100]: (debug): Using nameservers: 208.67.222.222,208.67.220.220
2020/02/24 18:53:21.635 {nmspd_R0-0}{1}: [nmsp-https] [11100]: (debug): IP resolution preference is set to IPv4
2020/02/24 18:53:21.635 {nmspd_R0-0}{1}: [nmsp-https] [11100]: (debug): Not using proxy for cloud services
2020/02/24 18:53:21.635 {nmspd_R0-0}{1}: [nmsp-dump-https] [11100]: (debug): Found bundle for host data.dnaspaces.eu: 0xab764f98 [can multiplex]
2020/02/24 18:53:21.635 {nmspd_R0-0}{1}: [nmsp-dump-https] [11100]: (debug): Re-using existing connection! (#0) with host data.dnaspaces.eu
2020/02/24 18:53:21.635 {nmspd_R0-0}{1}: [nmsp-dump-https] [11100]: (debug): Connected to data.dnaspaces.eu (63.33.127.190) port 443 (#0)
2020/02/24 18:53:21.635 {nmspd_R0-0}{1}: [nmsp-dump-https] [11100]: (debug): Using Stream ID: 3 (easy handle 0xab761440)
2020/02/24 18:53:21.636 {nmspd_R0-0}{1}: [nmsp-dump-https] [11100]: (debug): POST /api/config/v1/nmspconfig/192.168.1.10?recordType=nmsp_hrbt_init&jwttoken=eeyJ0eX[information omitted]70%3A69%3A5a%3A74%3A8e%3A58 HTTP/2
Host: data.dnaspaces.eu
Accept: */*
Accept-Encoding: gzip

2020/02/24 18:53:21.665 {nmspd_R0-0}{1}: [nmsp-dump-https] [11100]: (debug): We are completely uploaded and fine
HTTP/2 200
Contributed by Cisco Engineers
- Vasilije PerovicCisco TAC
- Petar MusturCisco TAC
- Andres SilvaCisco TAC
Contact Cisco
- Open a Support Case

- (Requires a Cisco Service Contract)
 Feedback