Configure the Aironet 600 Series OfficeExtend Access Point
Available Languages
Contents
Introduction
This document provides information on the requirements to configure a Cisco Wireless LAN (WLAN) Controller for use with the Cisco Aironet® 600 Series OfficeExtend Access Point (OEAP). The Cisco Aironet 600 Series OEAP supports split mode operation and it has facilities that require configuration through the WLAN Controller and features that can be configured locally by the end user. This document also provides information about the configurations necessary for proper connection and supported feature sets.
Prerequisites
Requirements
There are no specific requirements for this document.
Components Used
The information in this document is based on the Cisco Aironet 600 Series OfficeExtend Access Point (OEAP).
The information in this document was created from the devices in a specific lab environment. All of the devices used in this document started with a cleared (default) configuration. If your network is live, make sure that you understand the potential impact of any command.
Conventions
Refer to Cisco Technical Tips Conventions for more information on document conventions.
Background Information
Setup Guidelines
-
The Cisco Aironet 600 Series OEAP is supported on these controllers: Cisco 5508, WiSM-2 and the Cisco 2504.
-
The first controller release that supports Cisco Aironet 600 Series OEAP is 7.0.116.0
-
The controller’s Management Interfaces need to be on a routable IP network.
-
Corporate Firewall configuration needs to be changed to allow traffic with UDP port numbers 5246 and 5247.
Office Extend Solution Overview
-
A user is given an access point (AP) primed with the IP address of the corporate controller, or the user can enter the IP address of the controller from the configuration screen (setup HTML pages).
-
The user plugs the AP to their home router.
-
The AP gets an IP address from their home router, joins the primed controller and creates a secured tunnel.
-
Cisco Aironet 600 Series OEAP then advertises the corporate SSID, which extends the same security methods and services across the WAN to the user’s home.
-
If the remote LAN is configured, one wired port on the AP is tunneled back to the controller.
-
The user can then enable additionally a local SSID for personal use.
Firewall Configuration Guidelines
The general configuration on the firewall is to allow CAPWAP control and CAPWAP management port numbers through the firewall. The Cisco Aironet 600 Series OEAP controller can be placed in the DMZ zone.
Note: The UDP 5246 and 5247 ports need to be opened on the firewall between the WLAN controller and the Cisco Aironet 600 Series OEAP.
This diagram shows an Cisco Aironet 600 Series OEAP controller on the DMZ:
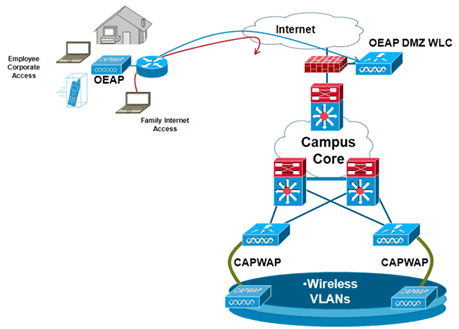
Here is a sample firewall configuration:
interface Ethernet0/0
 nameif outside
 security-level 0
 ip address X.X.X.X 255.255.255.224

!--- X.X.X.X represents a public IP address

!
interface Ethernet0/2
 nameif dmz
 security-level 50
 ip address 172.16.1.2 255.255.255.0
!
access-list Outside extended permit udp any host X.X.X.Y eq 5246

!--- Public reachable IP of corporate controller

access-list Outside extended permit udp any host X.X.X.Y eq 5247

!--- Public reachable IP of corporate controller

access-list Outside extended permit icmp any any
!
global (outside) 1 interface
nat (dmz) 1 172.16.1.0 255.255.255.0
static (dmz,outside) X.X.X.Y 172.16.1.25 netmask 255.255.255.255
access-group Outside in interface outside
In order to transmit the internal AP-Manager IP address to the OfficeExtend AP as part of the CAPWAPP Discovery Response packet, the controller administrator needs to make sure that NAT is enabled in the AP-Manager interface and the correct NATed IP address is sent to the AP.
Note: By default, the WLC will only respond with the NAT IP address during AP Discovery when NAT is enabled. If APs exist on the inside and outside of the NAT gateway, issue this command in order to set the WLC to respond with both the NAT IP address and Non-NAT (inside) Management IP address:
config network ap-discovery nat-ip-only disable
Note: This is only required if the WLC has a NAT IP address.
This diagram shows NAT is enabled, assuming the WLC has a NAT IP address:
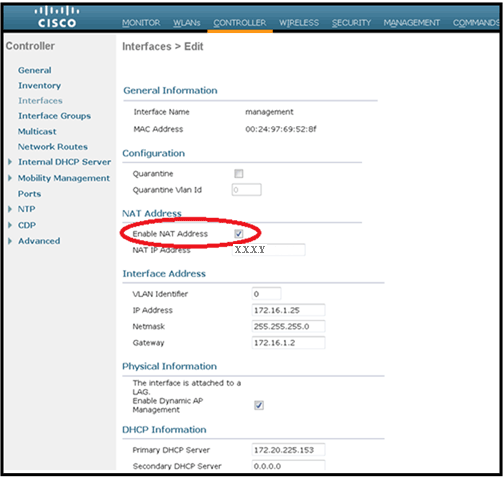
Note: This configuration is not required in the controller provided it is configured with Internet routable IP address and not behind a firewall.
Office Extend AP-600 Configuration Steps
The Cisco Aironet 600 Series OEAP will connect to the WLC as a Local Mode Access Point.
Note: Monitor, H-REAP, Sniffer, Rogue Detection, Bridge and SE-Connect modes are not supported on the 600 Series and are not configurable.
Note: Cisco Aironet 600 Series OEAP functionality in the 1040, 1130, 1140 and 3502i Series Access Points requires configuring the APs for Hybrid REAP (H-REAP) and setting the sub-mode for the AP to Cisco Aironet 600 Series OEAP. This is not done with the 600 Series beacuse it uses local mode and cannot be altered.
MAC filtering can be used in the AP authentication during the initial join process to prevent unauthorized Cisco Aironet 600 Series OEAP units from joining the controller. This image shows where you enable MAC filtering and configure AP security policies:
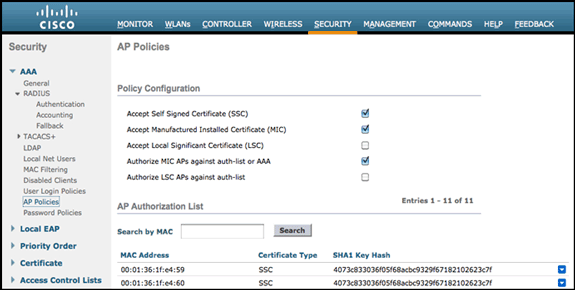
The Ethernet MAC (not the Radio MAC address) is entered here. Also, if entering the MAC address into a Radius server, lower case must be used. You can examine the AP Event log for information on how to discover the Ethernet MAC address (more on this later).
WLAN and Remote LAN Configuration Settings
There is one physical remote LAN port (yellow port #4) on the Cisco Aironet 600 Series OEAP. It is very similar to a WLAN in how it is configured. However, because it is not wireless and a wired LAN port on the back of the AP, it is called out and managed as a remote LAN port.
While there is only one physical port on the device, up to four wired clients can be connected if a hub or switch is used.
Note: The remote LAN client limit supports connecting a switch or hub to the remote LAN port for multiple devices or connecting directly to a Cisco IP phone that is connected to that port.
Note: Only the first four devices can connect until one of the devices is idle for more than one minute. If using 802.1x authentication, there might be issues attempting to use more than one client on the wired port.
Note: This number does not affect the fifteen limit imposed for the Controller WLANs.
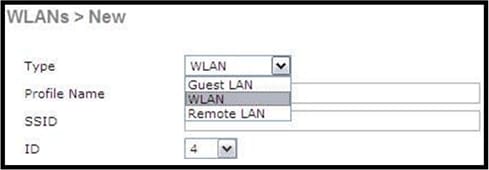
A remote LAN is configured similarly to a WLAN and guest LAN configured on the controller.
WLANs are wireless security profiles. These are the profiles that are used by your corporate network. The Cisco Aironet 600 Series OEAP supports at most two WLANs and one remote LAN.
A remote LAN is similar to a WLAN except it is mapped to the wired port on the back of the access point (port #4 in yellow) as shown in this image:
Note: If you have more than two WLANs or more than one remote LAN, all need to be placed into an AP Group.
This image shows where WLANs and the remote LAN are configured:

This image shows a sample OEAP group name:

This image shows a WLAN SSID and RLAN configuration:

If the Cisco Aironet 600 Series OEAP is entered into an AP group, the same limits of two WLANs and one remote LAN apply for the configuration of the AP group. Also, if the Cisco Aironet 600 Series OEAP is in the default group, which means it is not in a defined AP Group, the WLAN/remote LAN IDs need to be set at less than ID 8 because this product does not support the higher ID sets.
Keep ID sets to less than 8 as shown in this image:
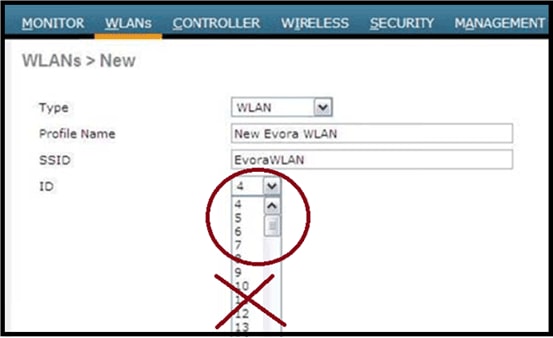
Note: If additional WLANs or remote LANs are created with the intent of changing the WLANs or remote LAN being used by the Cisco Aironet 600 Series OEAP, then disable the current WLANs or remote LAN that you are removing before enabling the new WLANs or remote LAN on the 600 Series. If there is more than one remote LAN enabled for an AP group, disable all remote LANs and then enable only one.
If there are more than two WLANs enabled for an AP group, disable all WLANs and then enable only two.
WLAN Security Settings
When setting the security setting in the WLAN, there are specific elements that are not supported on the 600 series.
For Layer 2 Security, only these options are supported for the Cisco Aironet 600 Series OEAP:
-
None
-
WPA+WPA2
-
Static WEP can also be used but not for .11n data rates.
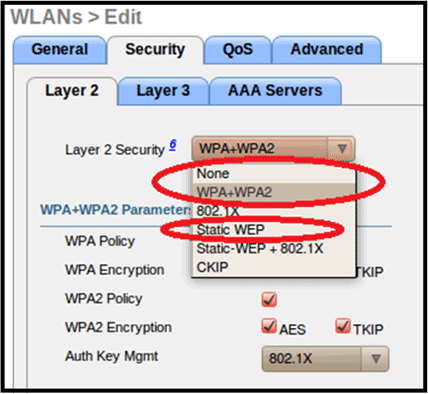
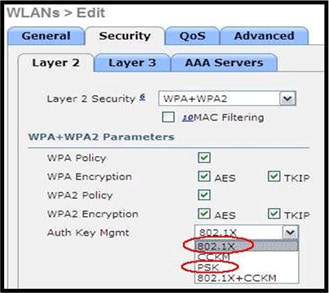
Note: Only 802.1x or PSK should be selected.
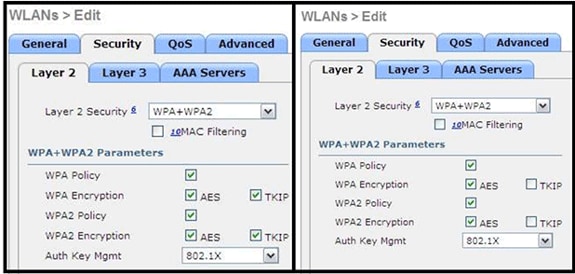
Security encryption settings need to be identical for WPA and WPA2 for TKIP and AES as shown in this image:
These images provide examples of incompatible settings for TKIP and AES:
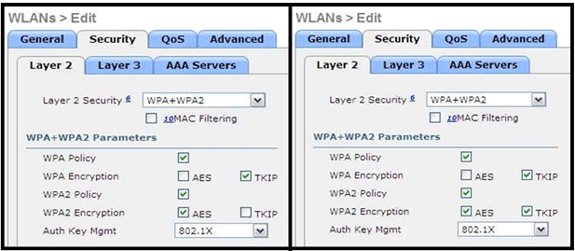
Note: Be aware that security settings permit unsupported features.
These images provide examples of compatible settings:
MAC Filtering
Security settings can be left open, set for MAC filtering, or set for Web Authentication. The default is to utilize MAC filtering.
This image shows Layer 2 and Layer 3 MAC filtering:

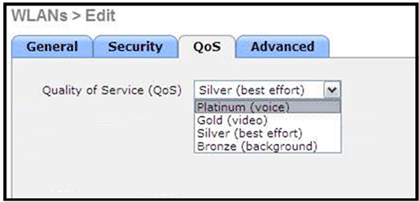
QoS settings are managed:
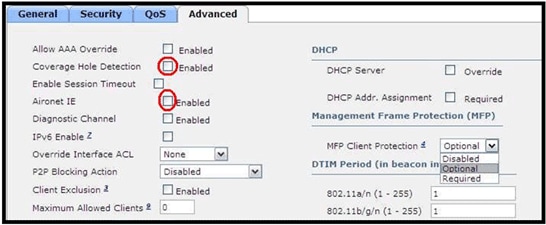
Advanced settings should also be managed:
Notes:
-
Coverage Hole Detection should not be enabled.
-
Aironet IE (Information Elements) should not be enabled as they are not used.
-
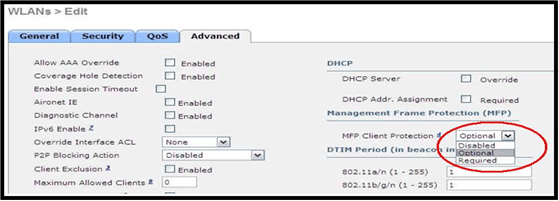
Management Frame Protection (MFP) is also not supported, and should be disabled or configured as optional as shown in this image:
-
Client Load Balancing and Client Band Select are not supported and should not be enabled:

Supported User Count
Only fifteen users are allowed to connect on the WLAN Controller WLANs provided on the 600 series at any one time. A sixteenth user cannot authenticate until one of the first clients de-authenticates or a timeout occurred on the controller.
Note: This number is cumulative across the controller WLANs on the 600 series.
For example, if two controller WLANs are configured and there are fifteen users on one of the WLANs, no users will be able to join the other WLAN on the 600 series at that time. This limit does not apply to the local private WLANs that the end user configures on the 600 series designed for personal use and clients connected on these private WLANs or on the wired ports do not affect these limits.
Channel Management and Settings
The radios for the 600 series are controlled through the Local GUI on the 600 series and not through the Wireless LAN Controller.
Attempting to control the spectrum channel, power, or disable the radios through the controller will fail to have any effect on the 600 series.
The 600 series will scan and choose channels for 2.4 GHz and 5.0 GHz during startup as long as the default settings on the Local GUI are left as default in both spectrums.
Note: If the user disables one or both radios locally (that radio is also disabled for corporate access), also as previously stated, RRM and advanced features such as monitor, H-REAP, sniffer are beyond the capabilities of the Cisco Aironet 600 Series OEAP which is positioned for home and teleworker usage.
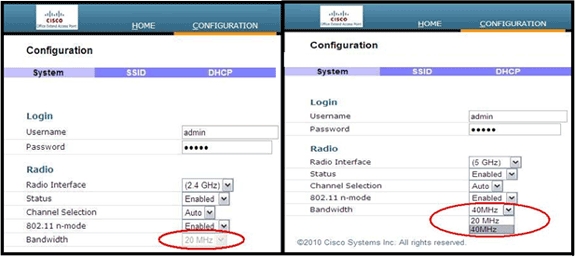
The channel selection and bandwidth for 5.0 GHz are configured here on the local GUI of the Cisco Aironet 600 Series OEAP.
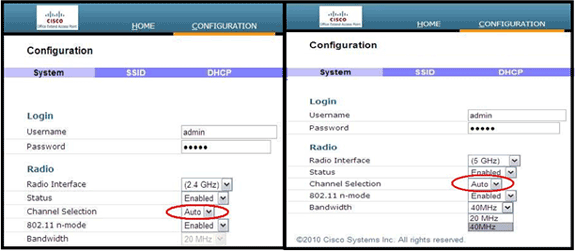
Notes:
-
20 and 40 MHz wide settings are available for 5 GHz.
-
2.4 GHz 40 MHz wide is not supported and fixed at 20 MHz.
-
40 MHz wide (channel bonding) is not supported in 2.4 GHz.
Additional Caveats
The Cisco Aironet 600 Series OEAP is designed for single AP deployments. Therefore, client roaming between the 600 series is not supported.
Note: Disabling the 802.11a/n or 802.11b/g/n on the controller might not disable these spectrums on the Cisco Aironet 600 Series OEAP because local SSID might still be working.
The end user has enable/disable control over the radios inside the Cisco Aironet 600 Series OEAP.

802.1x Support on the Wired Port
In this initial release, 802.1x is only supported on Command Line Interface (CLI).
Note: GUI support has not been added yet.
This is the wired port (port #4 in yellow) on the back of the Cisco Aironet 600 Series OEAP and is tied to the remote LAN (see previous section on configuring remote LAN).
At any time, you can use the show command to display the current remote LAN configuration:
show remote-lan <remote-lan-id>
In order to change the remote LAN configuration, you must first disable it:
remote-lan disable <remote-lan-id>
Enable 802.1X authentication for the remote LAN:
config remote-lan security 802.1X enable <remote-lan-id>
You can undo it by using this command:
config remote-lan security 802.1X disable <remote-lan-id>
For the remote LAN, “Encryption” is always “None” (as displayed in show remote-lan) and not configurable.
If you want to use local EAP (in the controller) as authentication server:
config remote-lan local-auth enable <profile-name> <remote-lan-id>
Where the profile is defined either through the controller GUI (Security > Local EAP) or CLI (config local-auth ). Refer to the controller guide for details on this command.
You can undo it bywith this command:
config remote-lan local-auth disable <remote-lan-id>
Or, if you use an external AAA authentication server:
-
config remote-lan radius_server auth add/delete <remote-lan-id> <server-id>
-
config remote-lan radius_server auth enable/disable <remote-lan-id>
Where server is configured through the controller GUI (Security > RADIUS > Authentication) or CLI (config radius auth). Refer to the controller guide for more information about this command..
After you are done with the configuration, enable the remote LAN:
config remote-lan enable <remote-lan-id>
Use the show remote-lan <remote-lan-id> command in order to verify your setting.
For the remote LAN client, you need to enable 802.1X authentication and configure correspondingly. Refer to your device user guide.
OEAP-600 Access Point Configuration
This image shows the wiring diagram for the Cisco Aironet 600 Series OEAP:
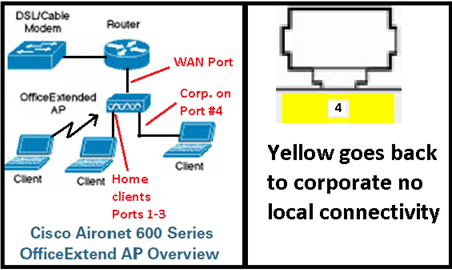
The default DHCP scope of the Cisco Aironet 600 Series OEAP is 10.0.0.x so you can browse to the AP on ports 1-3 using the address of 10.0.0.1. The default username and password are admin.
Note: This is different from the AP1040, 1130, 1140 and 3502i which used Cisco as the username and password.
If the radios are up and a personal SSID has already been configured, you can access the configuration screen wirelessly. Otherwise, you need to use local Ethernet ports 1-3.
In order to login, the default username and password are admin.
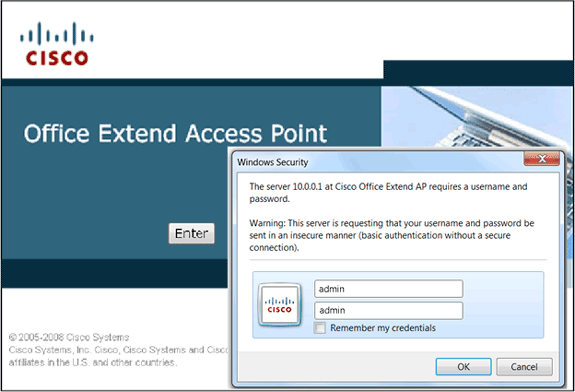
Note: The yellow port #4 is not active for local use. If a remote LAN is configured on the controller, this port tunnels back after the AP successfully joins the controller. In order to browse to the device, locally use ports 1-3:

Once you successfully browse to the device, you see the home status screen. This screen provides radio and MAC statistics. If radios have not been configured, the configuration screen permits the user to enable the radios, set channels and modes, configure local SSIDs, and enable the WLAN settings.
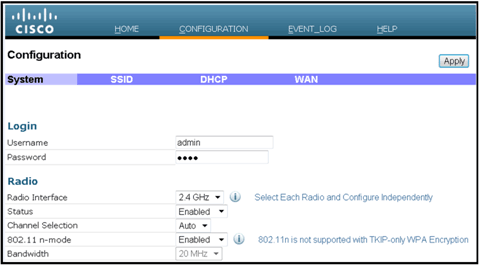
From the SSID screen is where the user can configure the personal WLAN network. The corporate radio SSID and security parameters are set up and pushed down from the controller (after you configure the WAN with the IP of the controller), and a successful join has occurred.
This image shows an SSID local MAC filtering configuration:
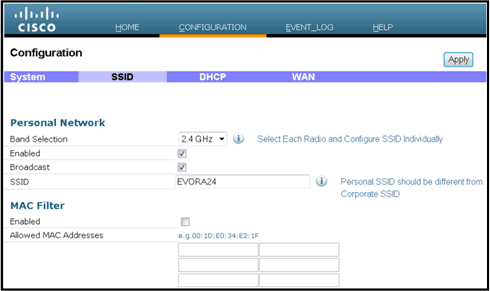
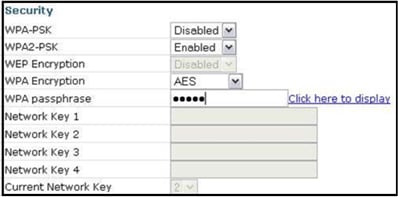
After the user configures the personal SSID, the screen below permits the user to set up security on the private home SSID, enable radios, and configure MAC filtering if desired. If the personal network is using 802.11n rates, it is recommended that the user choose an authentication type, encryption type and a passphrase enabling WPA2-PSK and AES.
Note: These SSID settings are different from the corporate settings if the user chooses to disable one or both of the radios (both are alsodisabled for corporate use as well).
Users who have access locally to the admin control settings have control over core functions such as radio enable/disable unless the device is password protected and configured by the administrator. Therefore, care must be taken not to disable both radios as this can result in a loss of connectivity even if the device successfully joins the controller.
This image shows the system security settings:
It is expected that the home teleworker installs the Cisco Aironet 600 Series OEAP behind a home router as this product is not designed to replace the functionality of a home router. This is because the current version of this product does not have firewall support, PPPoE support or port forwarding. These are features customers expect to find in a home router.
While this product can work without a home router, it is recommended not to position it that way for the reasons stated. Also, there can be compatibility issues connecting directly to some modems.
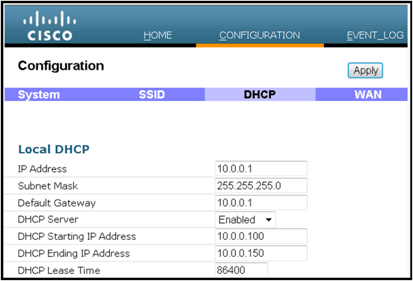
Given that most home routers have a DHCP scope in the 192.168.x.x range, this device has a default DHCP scope of 10.0.0.x and is configurable.
If the home router happens to be using 10.0.0.x, then you must configure the Cisco Aironet 600 Series OEAP to use a 192.168.1.x or compatible IP address to avoid network conflicts.
This image shows a DHCP scope configuration:
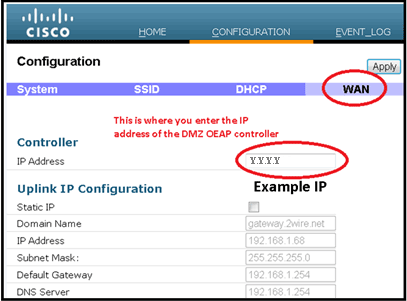
 Caution: If the Cisco Aironet 600 Series OEAP is not staged or configured by the IT administrator, the user needs to enter the IP address of the corporate controller (see below) so the AP can successfully join the controller. After a successful join, the AP should download the latest image from the controller and the configuration parameters such as the corporate WLAN settings. Also, if configured, the remote LAN settings wired port #4 on the back of the Cisco Aironet 600 Series OEAP.
If it does not join, verify that the IP address of the controller is reachable via the Internet. If MAC filtering is enabled, verify that the MAC address is successfully entered into the controller.
This image shows the IP address of the Cisco Aironet 600 Series OEAP controller:
OEAP-600 Access Point Hardware Installation
This image shows the physical aspects of the Cisco Aironet 600 Series OEAP:
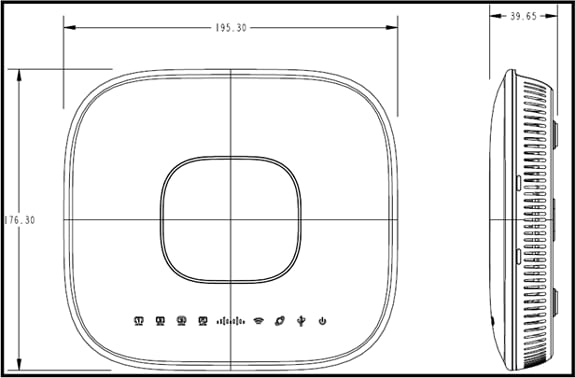
This AP is designed to be mounted on a table and has rubber feet. It can also be wall mounted, or can sit upright using the supplied cradle. Try to locate the AP as close to the intended users as possible. Avoid areas with large metal surfaces, such as sitting the device on a metal desk or near a large mirror. The more walls and objects between the AP and the user result in lower signal strength, and can reduce performance.
Note: This AP utilizes a +12 Volt power supply and does not utilize Power over Ethernet (PoE). Also, the device does not supply PoE. Make sure the right power adapter is used with the AP. Also, make sure not to use other adapters from other devices such as laptops and IP phones as these can damage the AP.
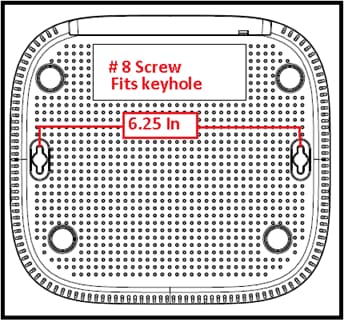
The unit can be mounted on the wall with plastic anchors or wood screws.
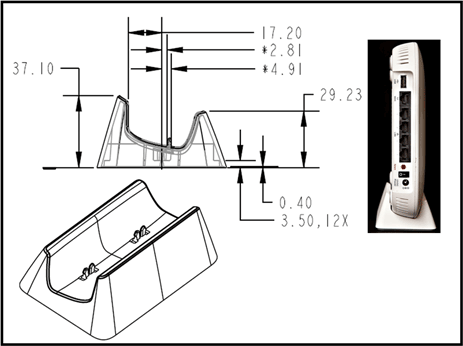
The unit can be mounted upright using the supplied cradle.
The Cisco Aironet 600 Series OEAP has antennas located on the edges of the AP. The user should take care not to place the AP in areas near metal objects or obstructions which can cause the signal to become directional or diminished. The antenna gain is approximately 2 dBi in both bands and designed to radiate in a 360 degree pattern. Similar to a light bulb (without a lamp shade), the goal is to radiate in all directions. Think of the AP as you would a lamp and try to place it in close proximity to the users.
Metal objects, such as mirrors, obstruct the signal much like the lampshade analogy. You can experience degraded throughput or range if the signal must penetrate or go through solid objects. If you expect connectivity, for example in a three story home, avoid placing the AP in the basement and try to mount the AP in a central location within the home.
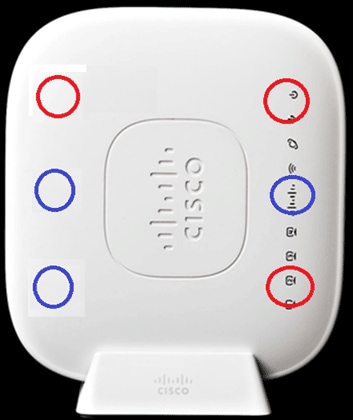
The access point has six antennas (three per band).
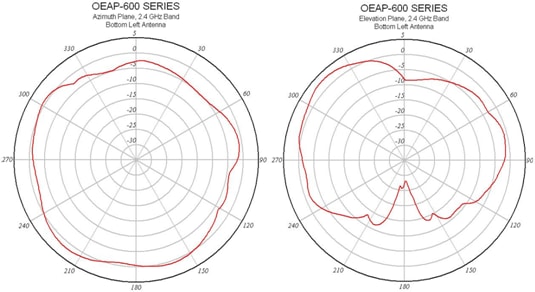
This image shows a 2.4 GHz Antenna Radiation Pattern (taken from the bottom left antenna).
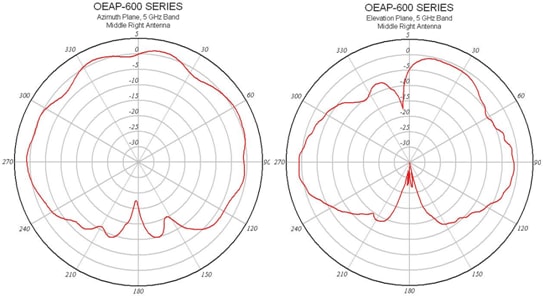
This image shows a 5 GHz Antenna Radiation Pattern (taken from the middle right antenna):
Troubleshooting the OEAP-600
Verify that the initial wiring is correct. This confirms that the WAN port on the Cisco Aironet 600 Series OEAP is connected to the router and can receive an IP address successfully. If the AP does not appear to join the controller, connect a PC to port 1-3 (home client ports) and see if you can browse to the AP using the default IP address of 10.0.0.1. The default username and password is admin.
Verify that the IP address for the corporate controller is set. If not, enter the IP address and reboot the Cisco Aironet 600 Series OEAP so it can try to establish a link to the controller.
Note: The corporate port #4 (in yellow) cannot be used to browse to the device for configuration purposes. This is essentially a “dead port” unless a remote LAN is configured. Then, it will tunnel back to corporate (used for wired enterprise connectivity)
Check the event log to see how the association progressed (more on this later).
This image shows the Cisco Aironet 600 Series OEAP wiring diagram:
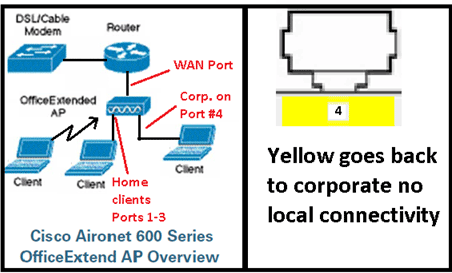
This image shows the Cisco Aironet 600 Series OEAP connectivity ports:
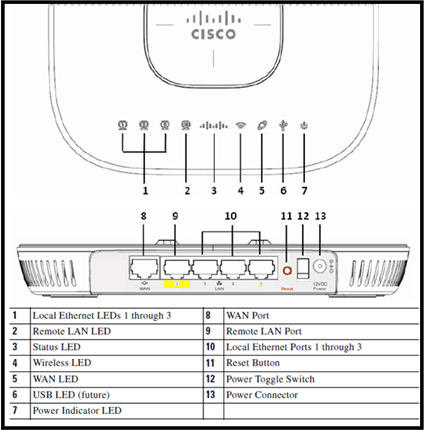
If the Cisco Aironet 600 Series OEAP fails to join the controller, it is recommended that you check these items:
-
Verify that the router is functional and connected to the WAN Port of the Cisco Aironet 600 Series OEAP.
-
Connect a PC to one of the ports 1-3 on the Cisco Aironet 600 Series OEAP. It should see the Internet.
-
Verify that the IP address of corporate controller is in the AP.
-
Confirm that the controller is on DMZ and reachable via the Internet.
-
Verify join and confirm the Cisco logo LED is solid blue or purple.
-
Allow for enough time in case the AP needs to load a new image and restart.
-
If a firewall is in use, verify that UDP 5246 and 5247 ports are not blocked.
This image shows the Cisco Aironet 600 Series OEAP logo LED status:
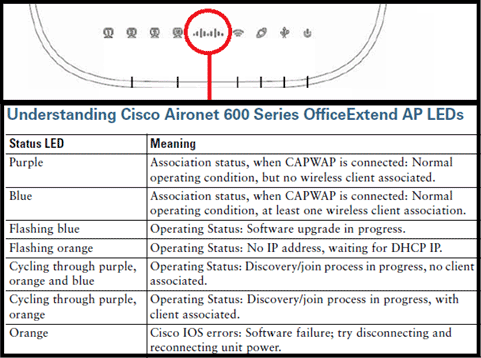
If the join process fails, the LED cycles though colors or perhaps flashes orange. If this occurs, check the event log for further details. In order to get to the event log, browse to the AP (using personal SSID or wired ports 1-3) and capture this data for the IT administrator to review.
This image shows the Cisco Aironet 600 Series OEAP event log:
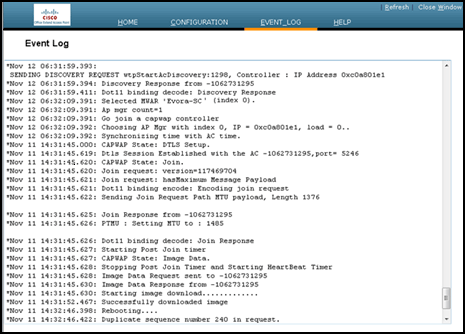
If the join process fails and this is the first time the Cisco Aironet 600 Series OEAP has tried to connect to the controller, check the AP join statistics for the Cisco Aironet 600 Series OEAP. In order to do this, you need the Base Radio MAC of the AP. This can be found in the event log. Here is an example of an event log with comments to help you interpret this:
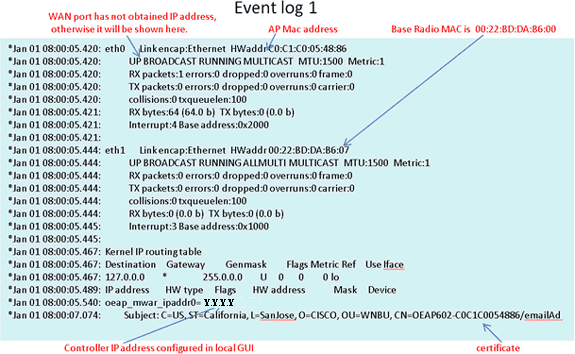
Once this is known, you can look in the controller monitor statistics to determine whether the Cisco Aironet 600 Series OEAP has joined the controller or has ever joined the controller. Also, this should provide an indication on why, or if, a failure has occurred.
If AP authentication is required, verify the Cisco Aironet 600 Series OEAP Ethernet MAC address (not the radio MAC address) has been entered into the Radius server in lower case. You can determine the Ethernet MAC address from the event log as well.
Searching on the Controller for the Cisco Aironet 600 Series OEAP 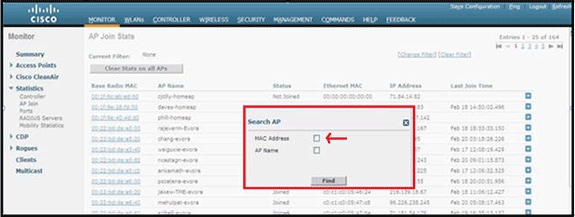
If you have determined that Internet is accessible from a PC connected to the local Ethernet port, but the AP still cannot join the controller, and you have confirmed the controller IP address is configured in the local AP GUI and is reachable, then confirm if the AP has ever joined successfully. Perhaps the AP is not in the AAA server. Or, if DTLS handshaking fails, the AP might have a bad certificate or date/time error on the controller.
If no Cisco Aironet 600 Series OEAP units can join the controller, verify that the controller is on the DMZ is reachable and has UDP ports 5246 and 5247 open.
How to debug client association issues
The AP joins the controller properly, but the wireless client cannot associate with the Corporate SSID. Check the event log to see if an association message reaches the AP.
The next figure shows the normal events for client association with corporate SSID with WPA or WPA2. For SSID with open authentication or static WEP, there is only one ADD MOBILE event.
Event Log – Client Association 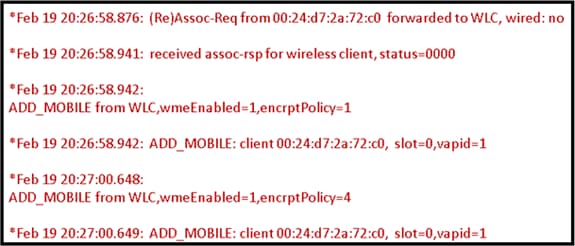
If (Re)Assoc-Req event is not in the log, verify the client has the right security settings.
If (Re)Assoc-Req event shows up in the log but the client cannot associate properly, enable the debug client <MAC address> command on the controller for the client and investigate the problem in the same way as a client working with other Cisco non-OEAP access points.
How to interpret the event log
The following event logs with comments can assist you in troubleshooting other Cisco Aironet 600 Series OEAP connection issues.
Here are a few samples collected from the Cisco Aironet 600 Series OEAP event log files with comments to help with interpreting the event log:
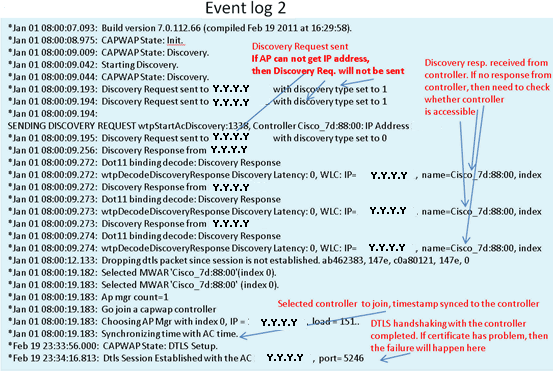
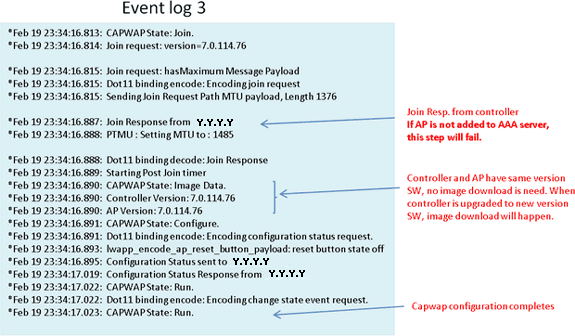
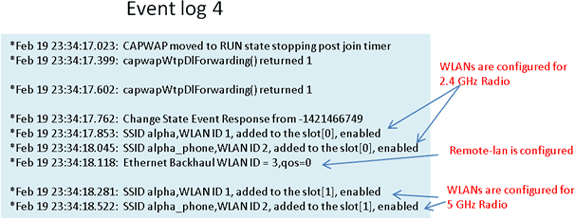
When the Internet connection appears unreliable
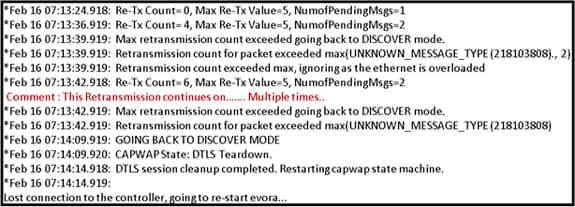
The event log example in this section can occur when the Internet connection fails or ends up being very slow or intermittent. This can be caused by your ISP network, the ISP modem, or your home router. Sometimes connectivity from the ISP drops or becomes unreliable. When this occurs, the CAPWAP link (tunnel back to corporate) can fail or have difficulty.
Here is an example of such a failure in the event log:
Additional debug Commands
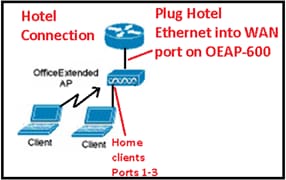
When using the Cisco Aironet 600 Series OEAP in a hotel or other pay for use venue, before the Cisco Aironet 600 Series OEAP can tunnel back to the controller, you need to get through the walled garden. In order to do this, plug a laptop into one of the wired local ports (port 1-3) or use a personal SSID to login to the hotel and satisfy the splash screen.
Once you have Internet connectivity from the home side of the AP, the unit establishes a DTLS tunnel and your corporate SSIDs. Then, wired port #4 (assuming a remote LAN is configured) becomes active.
Note: This might take a few minutes, watch the Cisco logo LED for solid blue or purple to indicate successful join. At this point both personal and corporate connectivity are active.
Note: The tunnel breaks when hotel or another ISP disconnects (usually 24 hours). Then, you have to start same process over. This is by design and is normal.
This image shows Office Extend in pay-for-use configuration:
This image shows additional debug commands (radio interface information):

Known Issues/Caveat
When you upload the configuration file from a controller to a TFTP/FTP server, Remote-LAN configurations are uploaded as WLAN configurations. Refer to Release Notes for Cisco Wireless LAN Controllers and Lightweight Access Points for Release 7.0.116.0 for more information.
On the OEAP-600, if the CAPWAP connection fails due to an authentication failure on the controller, the Cisco logo LED on the OEAP-600 can turn off for some time before the OEAP-600 tries to restart the CAPWAP attempt. This is normal so you should be aware that the AP did not die should the logo LED momentarily turns off.
This OEAP-600 product has a different login name then previous OEAP Access Points, to be consistent with home products such as Linksys, the default username is admin with a password of admin the other Cisco OEAP Access Points such as the AP-1130 and AP-1140 have a default user name of Cisco with a password of Cisco.
This first release of the OEAP-600 has 802.1x support, but it is only supported on the CLI. Users who try to make changes to the GUI can lose their configurations.
When you use the OEAP-600 in a hotel or other pay for use venue, before the OEAP-600 can tunnel back to the controller, you need to get through the walled garden. Simply plug a laptop into one of the wired local ports (port 1-3) or use a personal SSID log into the hotel and satisfy the splash screen. Once you have internet connectivity from the home side of the AP, the unit then establishes a DTLS tunnel and your corporate SSIDs and wired port #4, which is assumed that Remote-LAN is configured, then becomes active. Note that this may take a few minutes, watch the Cisco logo LED for solid blue or purple to indicate successful join. At this point both personal and corporate connectivity are active.
Note: Tthe tunnel can break when hotel or other ISP disconnects (usually 24 hours) and you would have to restart same process. This is by design and is normal.
Office Extend in pay for use venue 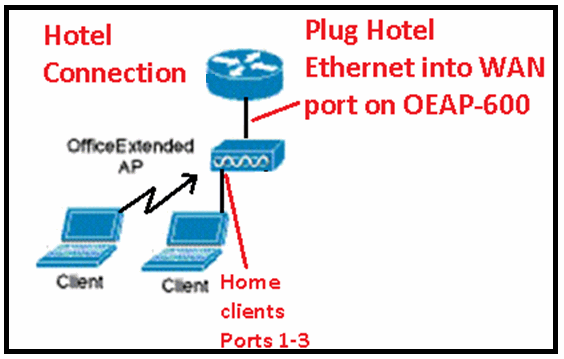
These are some additional enhancements introduced in the Cisco 7.2 release:
-
Addition of 802.1x security added in GUI
-
Ability to disable local WLAN access on the AP from controller – disabling personal SSID allowing only corporate configuration
-
Channel assignment selectable options
-
Support changed from 2 corporate SSID to 3 SSIDs
-
Support for Dual RLAN port feature
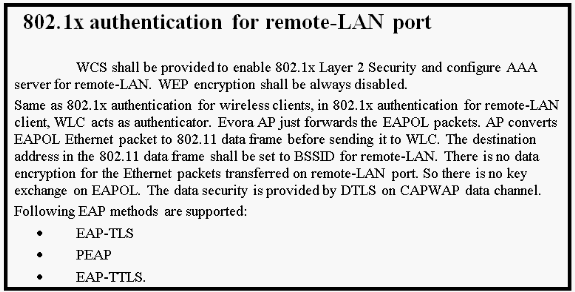
Addition of 802.1x security added in GUI
802.1x now added to the GUI 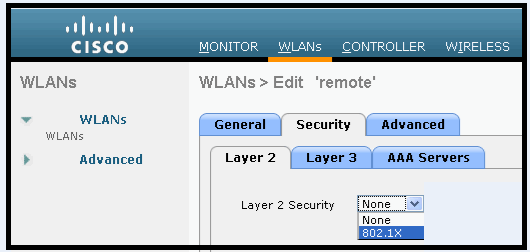
Ability to disable local WLAN access on the AP from controller – disabling personal SSID allowing only corporate configuration
Disable local WLAN access 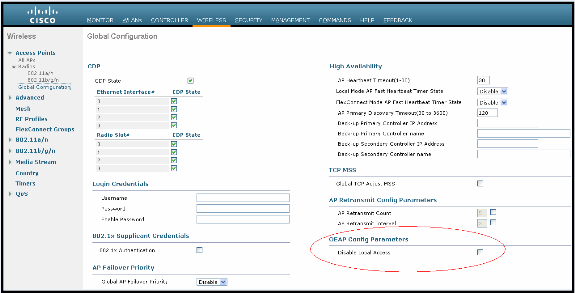
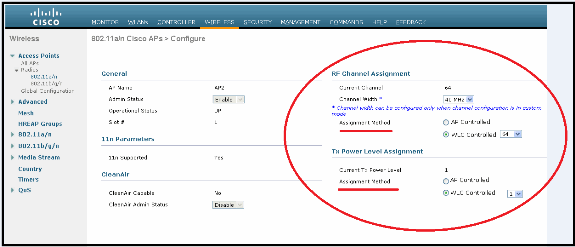
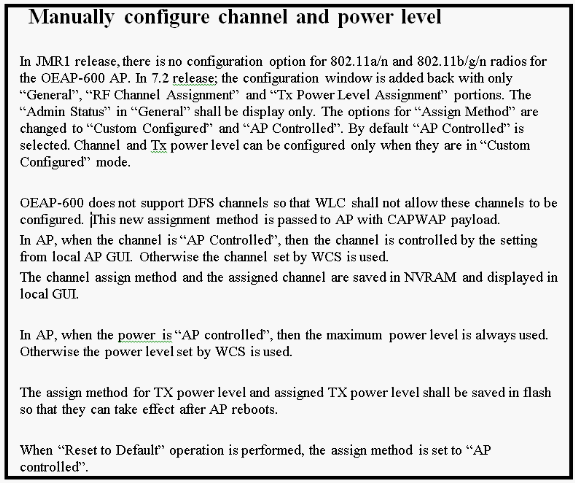
The channel assignment selectable options are:
-
AP controlled locally
-
WLC controlled
Support for Dual RLAN port feature (CLI only)
This note applies to OEAP-600 series APs using the Dual RLAN Ports feature, which allows OEAP-600 Ethernet port 3 to operate as a remote LAN. The configuration is only allowed through the CLI, and here is an example:
Config network oeap-600 dual-rlan-ports enable|disable
In the event that this feature is not configured, the single port 4 remote-lan continues to function. Each port uses a unique remote-lan for each port. The remote-lan mapping is different, which depends on whether the default-group or AP Groups is used.
Default-group
If the default-group is used, a single remote LAN with an even remote-lan ID is mapped to port 4. For instance, the remote-lan with remote-lan-id 2 is mapped to port 4 (on the OEAP-600). The remote-lan with an odd numbered remote-lan ID is mapped to port 3 (on the OEAP-600).
As an example, take these two remote-lans:
(Cisco Controller) >show remote-lan summary

Number of Remote LANS............................ 2

RLAN ID  RLAN Profile Name    Status    Interface Name
-------  -------------------------------------  --------  --------------------
2        rlan2                                  Enabled   management
3        rlan3                                  Enabled   management
rlan2 has an even numbered remote-lan ID, 2, and as such maps to port 4. rlan3 has odd remote-lan ID 3, and so maps to port 3.
AP Groups
If you use an AP group, the mapping to the OEAP-600 ports is determined by the AP-Group ordering. In order to use an AP group, you must first delete all remote-lans and WLANs from the AP-group and leave it empty. Then add the two remote-lans to the AP group. First add the port 3 AP remote-LAN first, then add port 4 remote group, and finally add any WLANs.
A remote-lan in the first position in the list maps to port 3, and second in the list maps to port 4, as in this example:
RLAN ID  RLAN Profile Name      Status    Interface Name
-------  -------------------------------------  --------  --------------------
2        rlan2                                  Enabled   management
3        rlan3                                  Enabled   management
Related Information
Revision History
| Revision | Publish Date | Comments |
|---|---|---|
1.0 |
25-May-2012 |
Initial Release |
Contact Cisco
- Open a Support Case

- (Requires a Cisco Service Contract)


 Feedback