FlexVPN Spoke in Redundant Hub Design with a Dual Cloud Approach Configuration Example
Available Languages
Contents
Introduction
This document describes how to configure a spoke in a FlexVPN network with use of the FlexVPN client configuration block in a scenario where multiple hubs are available.
Prerequisites
Requirements
Cisco recommends that you have knowledge of these topics:
- FlexVPN
- Cisco Routing Protocols
Components Used
The information in this document is based on these software and hardware versions:
- Cisco G2 Series Integrated Service Router (ISR)
- Cisco IOS® Version 15.2M
The information in this document was created from the devices in a specific lab environment. All of the devices used in this document started with a cleared (default) configuration. If your network is live, make sure that you understand the potential impact of any command.
Configure
For redundancy purposes, a spoke might need to connect to multiple hubs. Redundancy on the spoke-side allows continuous operation without a single point of failure on the hub-side.
The two most common FlexVPN redundant hub designs that use the spoke configuration are:
- Dual cloud approach, where a spoke has two separate tunnels active to both hubs at all times.
- Failover approach, where a spoke has an active tunnel with one hub at any given point in time.
Both approaches have a unique set of pros and cons.
| Approach | Pros | Cons |
| Dual cloud |
|
|
| Failover |
|
|
This document describes the first approach. The approach to this configuration is similar to the Dynamic Multipoint VPN (DMVPN) dual cloud configuration. The basic configuration of hub and spoke is based on migration documents from DMVPN to FlexVPN. Refer to the FlexVPN Migration: Hard Move from DMVPN to FlexVPN on Same Devices article for a description of this configuration.
Network Diagram
Transport Network
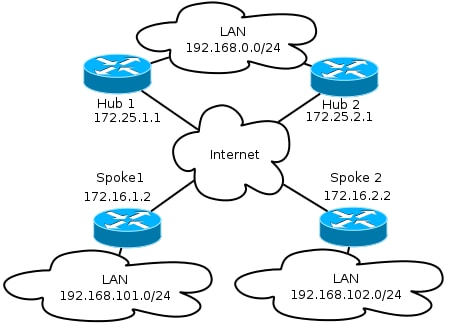
This diagram illustrates the basic transport network typically used in FlexVPN networks.

Overlay Network
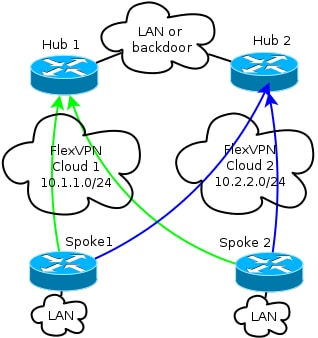
The diagram illustrates the overlay network with logical connectivity that shows how the failover should work. During normal operation, Spoke 1 and Spoke 2 maintain a relationship with both hubs. Upon a failure, the routing protocol switches from one hub to another.

Both hubs retain separate IP addressing in overlay clouds. The /24 addressing represents the pool of addresses allocated for this cloud, not the actual interface addressing. This is because the FlexVPN hub typically allocates a dynamic IP address for the spoke interface, and relies on routes inserted dynamically via route commands in the FlexVPN authorization block.
Spoke Configurations
Spoke Tunnel Interface Configuration
The typical configuration used in this example is simply two tunnel interfaces with two separate destination addresses.
interface Tunnel1
 ip address negotiated
 ip mtu 1400
 ip nhrp network-id 2
 ip nhrp shortcut virtual-template 1
 ip nhrp redirect
 ip tcp adjust-mss 1360
 tunnel source Ethernet0/0
 tunnel destination 172.25.1.1
 tunnel path-mtu-discovery
 tunnel protection ipsec profile default

interface Tunnel2
 ip address negotiated
 ip mtu 1400
 ip nhrp network-id 2
 ip nhrp shortcut virtual-template 1
 ip nhrp redirect
 ip tcp adjust-mss 1360
 tunnel source Ethernet0/0
 tunnel destination 172.25.2.1
 tunnel path-mtu-discovery
 tunnel protection ipsec profile default
In order to allow spoke-to-spoke tunnels to form properly, a Virtual Template (VT) is needed.
interface Virtual-Template1 type tunnel
 ip unnumbered ethernet1/0
 ip mtu 1400
 ip nhrp network-id 2
 ip nhrp shortcut virtual-template 1
 ip nhrp redirect
 ip tcp adjust-mss 1360
 tunnel path-mtu-discovery
 tunnel protection ipsec profile default
The spoke uses an unnumbered interface that indicates the LAN interface in the Virtual Routing and Forwarding (VRF), which is global in this case. However, it might be better to reference a loopback interface. This is because loopback interfaces remain online under almost all conditions.
Spoke Border Gateway Protocol (BGP) Configuration
Since Cisco recommends iBGP as the routing protocol to be used in the overlay network, this document mentions only this configuration.
router bgp 65001
 bgp log-neighbor-changes
 network 192.168.101.0
 neighbor 10.1.1.1 remote-as 65001
 neighbor 10.1.1.1 fall-over
 neighbor 10.2.2.1 remote-as 65001
 neighbor 10.2.2.1 fall-over
FlexVPN in this configuration does not have a primary or secondary hub concept. The administrator decides whether the routing protocol prefers one hub over another or, in some scenarios, performs load-balancing.
Spoke Failover and Convergence Considerations
In order to minimize the time it takes for a spoke to detect failure, use these two typical methods.
- Shorten the BGP timers. The default hold-time causes failover.
- Configure BGP fall-over, which is discused in this article, BGP Support for Fast Peering Session Deactivation.
- Do not use Bidirectional Forwarding Detection (BFD), because it is not recommended in most FlexVPN deployments.
Spoke-to-Spoke Tunnels and Failover
Spoke-to-spoke tunnels use Next Hop Resolution Protocol (NHRP) shortcut switching. Cisco IOS indicates that those shortcuts are NHRP routes, for example:
Spoke1#show ip route nhrp
(...)
192.168.102.0/24 is variably subnetted, 2 subnets, 2 masks
H 192.168.102.0/24 [250/1] via 10.2.2.105, 00:00:21, Virtual-Access1
Those routes do not expire when the BGP connection expires; instead, they are held for NHRP holdtime, which is two hours by default. This means that active spoke-to-spoke tunnels remain in operation even in a failure.
Hub Configurations
Local Pools
As discussed in the Network Diagram section, both hubs retain separate IP addressing.
Hub1
ip local pool FlexSpokes 10.1.1.100 10.1.1.254
Hub2
ip local pool FlexSpokes 10.2.2.100 10.2.2.254
Hub BGP Configuration
Hub BGP configuration remains similar to previous examples.
This output comes from Hub 1 with a LAN IP address of 192.168.0.1.
router bgp 65001
 bgp log-neighbor-changes
 bgp listen range 10.1.1.0/24 peer-group Spokes
 network 192.168.0.0
 aggregate-address 192.168.0.0 255.255.0.0 summary-only
 neighbor Spokes peer-group
 neighbor Spokes remote-as 65001
 neighbor Spokes fall-over
 neighbor 192.168.0.2 remote-as 65001
 neighbor 192.168.0.2 route-reflector-client
 neighbor 192.168.0.2 next-hop-self all
 neighbor 192.168.0.2 unsuppress-map ALL
route-map ALL permit 10
 match ip address 1

ip access-list standard 1
 permit any
In essence, this is what is done:
- Local FlexVPN address pool is in the BGP listen range.
- Local network is 192.168.0.0/24.
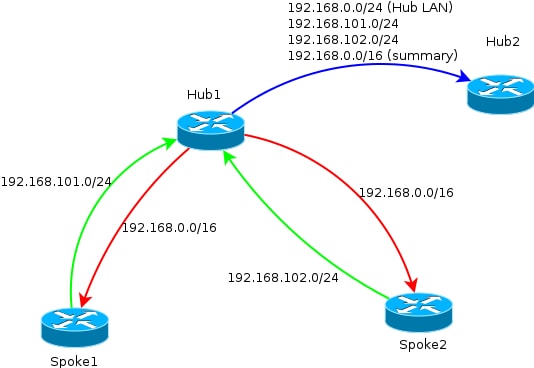
- A summary is advertised only to spokes. Aggregate-address configuration creates a static route for that prefix via null0 interface, which is a discard route that is used in order to prevent routing loops.
- All the specific prefixes are advertised to the other hub. Since it is also an iBGP connection, it requires a route-reflector configuration.
This diagram represents the exchange of BGP prefixes between spokes and hubs in one FlexVPN cloud.

Verify
Since each spoke retains association with both hubs, two IKEv2 sessions are seen with the show crypto ikev2 sa command.
IPv4 Crypto IKEv2 SA
Tunnel-id Local Remote fvrf/ivrf Status
3 172.16.1.2/500 172.16.2.2/500 none/none READY
 Encr: AES-CBC, keysize: 256, Hash: SHA512, DH Grp:5, Auth sign: PSK, Auth verify: PSK
 Life/Active Time: 86400/3147 sec
Tunnel-id Local Remote fvrf/ivrf Status
1 172.16.1.2/500 172.25.2.1/500 none/none READY
 Encr: AES-CBC, keysize: 256, Hash: SHA512, DH Grp:5, Auth sign: PSK, Auth verify: PSK
 Life/Active Time: 86400/3256 sec
In order to view the routing protocol information, enter these commands:
show bgp ipv4 unicast

show bgp summary
On the spokes, you should see that the summary prefix is received from the hubs, and that connections to both hubs are active.
Spoke1#show bgp ipv4 unicast
BGP table version is 4, local router ID is 192.168.101.1
Status codes: s suppressed, d damped, h history, * valid, > best, i - internal,
 r RIB-failure, S Stale, m multipath, b backup-path, f RT-Filter,
 x best-external, a additional-path, c RIB-compressed,
Origin codes: i - IGP, e - EGP, ? - incomplete
RPKI validation codes: V valid, I invalid, N Not found
Network Next Hop Metric LocPrf Weight Path
 *>i 192.168.0.0/16 10.1.1.1 0 100 0 i
 * i         10.2.2.1 0 100 0 i
 *> 192.168.101.0 0.0.0.0 0 32768 i
Spoke1#show bgp summa
Spoke1#show bgp summary
BGP router identifier 192.168.101.1, local AS number 65001
BGP table version is 4, main routing table version 4
2 network entries using 296 bytes of memory
3 path entries using 192 bytes of memory
3/2 BGP path/bestpath attribute entries using 408 bytes of memory
0 BGP route-map cache entries using 0 bytes of memory
0 BGP filter-list cache entries using 0 bytes of memory
BGP using 896 total bytes of memory
BGP activity 2/0 prefixes, 3/0 paths, scan interval 60 secs
Neighbor V AS MsgRcvd MsgSent TblVer InQ OutQ Up/Down State/PfxRcd
10.1.1.1 4 65001 7 7 4 0 0 00:00:17 1
10.2.2.1 4 65001 75 72 4 0 0 01:02:24 1
Troubleshoot
There are two major blocks to troubleshoot:
- Internet Key Exchange (IKE)
- Internet Protocol Security (IPsec)
Here are the relevant show commands:
show crypto ipsec sa

show crypto ikev2 sa
Here are the relevant debug commands:
debug crypto ikev2 [internal|packet]

debug crypto ipsec

debug vtemplate event
Here is the relevant routing protocol:
show bgp ipv4 unicast (or show ip bgp)

show bgp summary
Revision History
| Revision | Publish Date | Comments |
|---|---|---|
1.0 |
13-Sep-2013 |
Initial Release |
Contact Cisco
- Open a Support Case

- (Requires a Cisco Service Contract)
 Feedback