FlexVPN and Anyconnect IKEv2 Client Configuration Example
Available Languages
Contents
Introduction
This document describes how to configure Cisco AnyConnect Secure Mobility Client to use Remote Authentication Dial-In User Service (RADIUS) and local authorization attributes in order to authenticate against Microsoft Active Directory.
Prerequisites
Requirements
There are no specific requirements for this document.
Components Used
The information in this document is based on these software and hardware versions:
- Cisco IOS version 15.2(T) or later
- Cisco AnyConnect Secure Mobility Client version 3.0 or later
- Microsoft Active Directory
The information in this document was created from the devices in a specific lab environment. All of the devices used in this document started with a cleared (default) configuration. If your network is live, make sure that you understand the potential impact of any command.
Conventions
Refer to the Cisco Technical Tips Conventions for more information on document conventions.
Configure
In this section, you are presented with the information in order to configure the features described in this document.
Use the Command Lookup Tool (registered customers only) in order to obtain more information on the commands used in this section.
Network Diagram
This document uses this network setup:
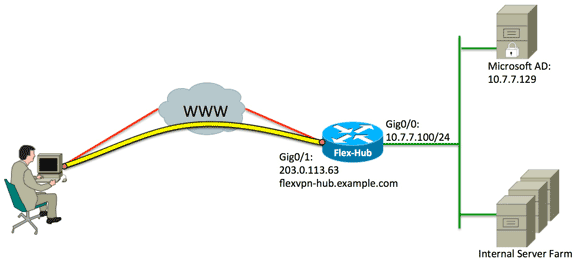
Configurations
This document uses these configurations:
Hub Configuration
- Configure RADIUS for authentication only and define local authorization.
aaa new-model
aaa group server radius FlexVPN-AuthC-Server-Group-1
 server-private 10.7.7.129 key Cisco123
aaa authentication login FlexVPN-AuthC-List-1 group
      FlexVPN-AuthC-Server-Group-1
aaa authorization network FlexVPN-AuthZ-List-1 local
The aaa authentication login list command refers to the authentication, authorization, and accounting (AAA) group (which defines the RADIUS server). The aaa authorization network list command states that locally defined users/groups are to be used. The configuration on the RADIUS server must be changed to allow authentication requests from this device. - Configure the local authorization policy.
ip local pool FlexVPN-Pool-1 10.8.8.100 10.8.8.200
crypto ikev2 authorization policy FlexVPN-Local-Policy-1
 pool FlexVPN-Pool-1
 dns 10.7.7.129
 netmask 255.255.255.0
 def-domain example.com
The ip local pool command is used to define the IP addresses that are assigned to the client. An authorization policy is defined with a username of FlexVPN-Local-Policy-1, and attributes for the client (DNS servers, netmask, split list, domain name, and so forth) are configured here. - Ensure the server uses a certificate (rsa-sig) in order to authenticate itself.
Cisco AnyConnect Secure Mobility Client requires that the server authenticate itself using a certificate (rsa-sig). The router must have a web server certificate (that is, a certificate with 'server authentication' within the extended key usage extension) from a trusted certificate authority (CA).
Refer to steps 1 through 4 in ASA 8.x Manually Install 3rd Party Vendor Certificates for use with WebVPN Configuration Example, and change all instances of crypto ca to crypto pki.crypto pki trustpoint FlexVPN-TP-1
enrollment url
serial-number none
fqdn flex-hub.example.com
ip-address none
subject-name cn=flex-hub.example.com
revocation-check crl
rsakeypair FlexVPN-TP-1-Key 2048 - Configure settings for this connection.
crypto ikev2 profile FlexVPN-IKEv2-Profile-1
 match identity remote key-id example.com
 identity local dn
  authentication remote eap query-identity
 authentication local rsa-sig
 pki trustpoint FlexVPN-TP-1
 dpd 60 2 on-demand
 aaa authentication eap FlexVPN-AuthC-List-1
 aaa authorization group eap list FlexVPN-AuthZ-List-1
      FlexVPN-Local-Policy-1
 virtual-template 10
The crypto ikev2 profilec ontains most of the relevant settings for this connection:- match identity remote key-id - Refers to the IKE identity used by the client. This string value is configured within the AnyConnect XML profile.
- identity local dn - Defines the IKE identity used by the FlexVPN hub. This value uses the value from within the certificate used.
- authentication remote - States that EAP should be used for client authentication.
- authentication local - States that certificates should be used for local authenticate.
- aaa authentication eap - States to use aaa authentication login list FlexVPN-AuthC-List-1 when EAP is used for authentiation.
- aaa authorization group eap list - States to use aaa authorization network list FlexVPN-AuthZ-List-1 with username of FlexVPN-Local-Policy-1 for authorization attributes.
- virtual-template 10 - Defines which template to use when a virtual-access interface is cloned.
- Configure an IPsec profile that links back to the IKEv2 profile defined in step 4.
crypto ipsec profile FlexVPN-IPsec-Profile-1
set ikev2-profile FlexVPN-IKEv2-Profile-1 - Configure the virtual template from which the virtual-access interfaces are cloned:
- ip unnumbered - Unnumber the interface from an Inside interface so IPv4 routing can be enabled on the interface.
- tunnel mode ipsec ipv4 - Defines the interface to be a VTI type tunnel.
interface Virtual-Template10 type tunnel
 ip unnumbered GigabitEthernet0/0
 tunnel mode ipsec ipv4
tunnel protection ipsec profile FlexVPN-IPsec-Profile-1 - Limit the negotiation to SHA-1. (Optional)
Due to defect CSCud96246 (registered customers only) , the AnyConnect client might fail to correctly validate the FlexVPN Hub certificate. This issue is due to IKEv2 negotiating a SHA-2 function for Pseudo-Random Function (PRF) whereas the FlexVPN-Hub certificate has been signed using SHA-1. The configuration below limits the negotiation to SHA-1:crypto ikev2 proposal SHA1-only
encryption aes-cbc-256
integrity sha1
group 5
crypto ikev2 policy SHA1-only
match fvrf any
proposal SHA1-only
Microsoft Active Directory Server Configuration
- In Windows Server Manager, expand Roles > Network Policy and Access Server > NMPS (Local) > RADIUS Clients and Servers, and click RADIUS Clients.
The New RADIUS Client dialog box appears.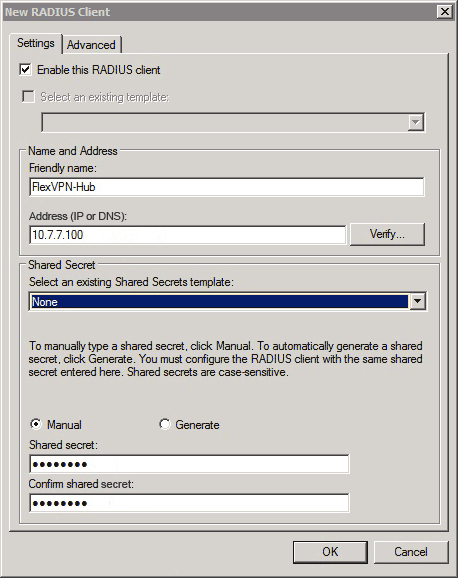
- In the New RADIUS Client dialog box, add the Cisco IOS router as a RADIUS client:
- Click the Enable this RADIUS client check box.
- Enter a name in the Friendly name field. This example uses FlexVPN-Hub.
- Enter the IP address of the router in the Address field.
- In the Shared Secret area, click the Manual radio button, and enter the shared secret in the Shared secret and Confirm shared secret fields.
Note: The shared secret must match the shared secret configured on the router.
- Click OK.
- In the Server Manager interface, expand Policies, and choose Network Policies.
The New Network Policy dialog box appears.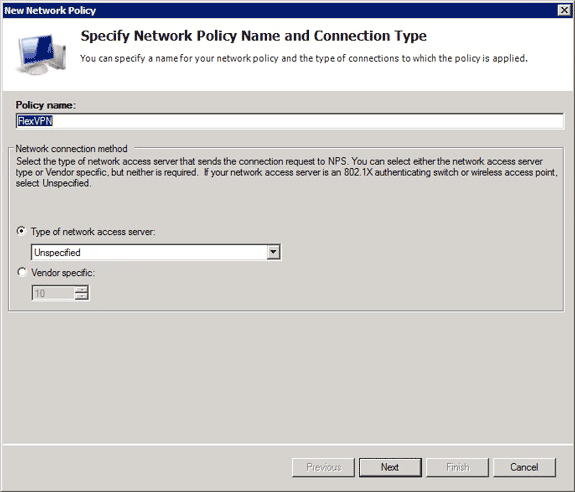
- In the New Network Policy dialog box, add a new network policy:
- Enter a name in the Policy name field. This example uses FlexVPN.
- Click the Type of network access server radio button, and choose Unspecified from the drop-down list.
- Click Next.
- In the New Network Policy dialog box, click Add to add a new condition.
- In the Select condition dialog box, select the NAS IPv4 Address condition, and click Add.
The NAS IPv4 Address dialog box appears.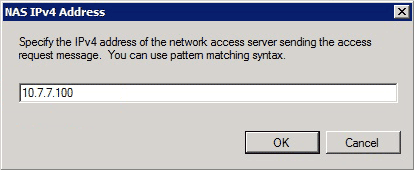
- In the NAS IPv4 Address dialog box, enter the IPv4 address of the network access server in order to limit the network policy to only requests that originate from this Cisco IOS router.
- Click OK.
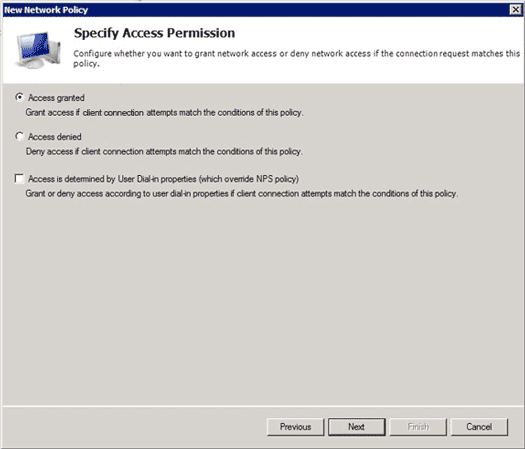
- In the new Network Policy dialog box, click the Access granted radio button in order to allow the client access to the network (if the credentials provided by the user are valid), and click Next.
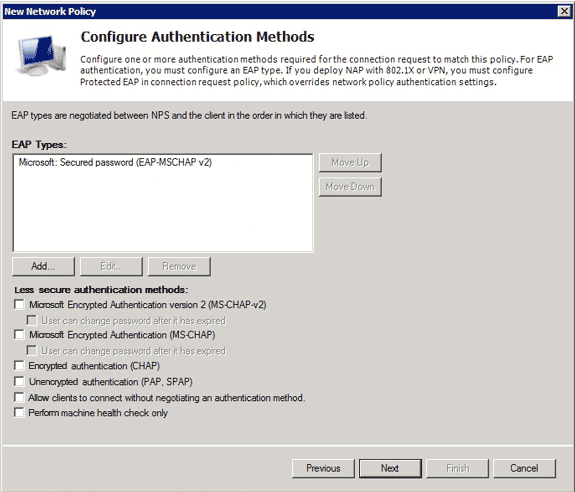
- Ensure only Microsoft: Secure password (EAP-MSCHAP v2) appears in the EAP Types area in order to allow EAP-MSCHAPv2 to be used as the communication method between the Cisco IOS device and Active Directory, and click Next.
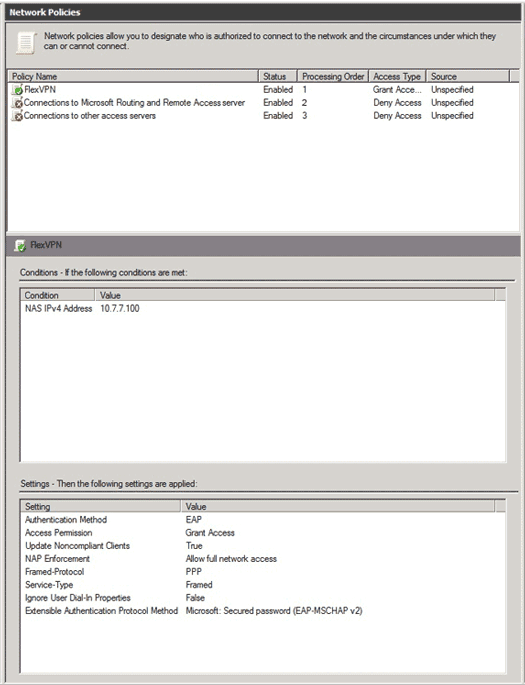
- Continue through the wizard and apply any additional constraints or settings as defined by your organizations security policy. In addition, ensure that the policy is listed first in the processing order as shown in this image:
Client Configuration
- Create an XML profile within a text editor, and name it flexvpn.xml.
This example uses this XML profile:<?xml version="1.0" encoding="UTF-8"?>
<AnyConnectProfile xmlns="http://schemas.xmlsoap.org/encoding/"
xmlns:xsi="http://www.w3.org/2001/XMLSchema-instance"
xsi:schemaLocation="http://schemas.xmlsoap.org/encoding/
AnyConnectProfile.xsd">
<ClientInitialization>
<UseStartBeforeLogon UserControllable="true">false
</UseStartBeforeLogon>
<AutomaticCertSelection UserControllable="true">true
</AutomaticCertSelection>
<ShowPreConnectMessage>false</ShowPreConnectMessage>
<CertificateStore>All</CertificateStore>
<CertificateStoreOverride>false</CertificateStoreOverride>
<ProxySettings>Native</ProxySettings>
<AllowLocalProxyConnections>true
</AllowLocalProxyConnections>
<AuthenticationTimeout>12</AuthenticationTimeout>
<AutoConnectOnStart UserControllable="true">false
</AutoConnectOnStart>
<MinimizeOnConnect UserControllable="true">true
</MinimizeOnConnect>
<LocalLanAccess UserControllable="true">false
</LocalLanAccess>
<ClearSmartcardPin UserControllable="true">false
</ClearSmartcardPin>
<AutoReconnect UserControllable="false">true
<AutoReconnectBehavior UserControllable="false">
DisconnectOnSuspend
</AutoReconnectBehavior>
</AutoReconnect>
<AutoUpdate UserControllable="true">false</AutoUpdate>
<RSASecurIDIntegration UserControllable="false">
Automatic
</RSASecurIDIntegration>
<WindowsLogonEnforcement>SingleLocalLogon
</WindowsLogonEnforcement>
<WindowsVPNEstablishment>LocalUsersOnly
</WindowsVPNEstablishment>
<AutomaticVPNPolicy>false</AutomaticVPNPolicy>
<PPPExclusion UserControllable="false">Disable
<PPPExclusionServerIP UserControllable="false">
</PPPExclusionServerIP>
</PPPExclusion>
<EnableScripting UserControllable="true">true
<TerminateScriptOnNextEvent>true
</TerminateScriptOnNextEvent>
<EnablePostSBLOnConnectScript>true
</EnablePostSBLOnConnectScript>
</EnableScripting>
<EnableAutomaticServerSelection UserControllable="false">false
<AutoServerSelectionImprovement>20
</AutoServerSelectionImprovement>
<AutoServerSelectionSuspendTime>4
</AutoServerSelectionSuspendTime>
</EnableAutomaticServerSelection>
<RetainVpnOnLogoff>false
</RetainVpnOnLogoff>
</ClientInitialization>
<ServerList>
<HostEntry>
<HostName>FlexVPN Hub</HostName>
<HostAddress>flexvpn-hub.example.com</HostAddress>
<PrimaryProtocol>IPsec
<StandardAuthenticationOnly>true
<AuthMethodDuringIKENegotiation>EAP-MSCHAPv2</AuthMethodDuringIKENegotiation>
<IKEIdentity>example.com</IKEIdentity>
</StandardAuthenticationOnly>
</PrimaryProtocol>
</HostEntry>
</ServerList>
</AnyConnectProfile>
- <HostName> is a text string that appears in the client.
- <HostAddress> is the fully qualified domain name (FQDN) of the FlexVPN hub.
- <PrimaryProtocol> configures the connection to use IKEv2/IPsec rather than SSL (the default in AnyConnect).
- <AuthMethodDuringIKENegotiation> configures the connection to use MSCHAPv2 within EAP. This value is required for authentication against Microsoft Active Directory.
- <IKEIdentity> defines the string value that matches the client to a specific IKEv2 profile on the hub (see step 4 above).
- Save the flexvpn.xml file to the appropriate directory as listed in this table:
OS Location Windows XP %ALLUSERSPROFILE%Application DataCiscoCisco AnyConnect Secure Mobility ClientProfile Windows Vista/7 %PROGRAMDATA%CiscoCisco AnyConnect Secure Mobility ClientProfile Mac OS X /opt/cisco/anyconnect/profile/ Linux /opt/cisco/anyconnect/profile/ - Close and restart the AnyConnect client.
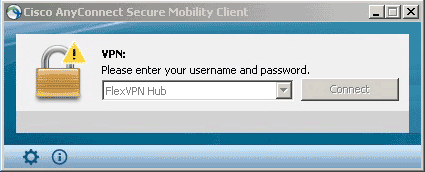
- In the Cisco AnyConnect Secure Mobility Client dialog box, choose FlexVPN Hub, and click Connect.
The Cisco AnyConnect | FlexVPN Hub dialog box appears.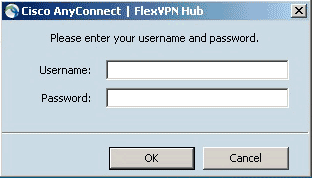
- Enter a username and password, and click OK.
Verify
In order to verify the connection, use the show crypto session detail remote client-ipaddress command. Refer to show crypto session for more information about this command.
Troubleshoot
In order to troubleshoot the connection, collect and analyze DART logs from the client and use these debug commands on the router: debug crypto ikev2 packet and debug crypto ikev2 internal.
Related Information
Revision History
| Revision | Publish Date | Comments |
|---|---|---|
1.0 |
24-Sep-2013 |
Initial Release |
Contact Cisco
- Open a Support Case

- (Requires a Cisco Service Contract)


 Feedback