簡介
本檔案介紹如何為Catalyst 9800無線控制器(9800 WLC)建立自訂Web驗證入口網站。
必要條件
原始碼易於編輯,具有響應式的WEB設計,與電腦和流動裝置上的現代Web瀏覽器相容。
需求
思科建議您瞭解以下主題:
採用元件
本檔案中的資訊是根據以下軟體和硬體版本:
- Cisco Catalyst 9800無線控制器系列,Cisco IOS® XE直布羅陀版v16.12.1s
本文中的資訊是根據特定實驗室環境內的裝置所建立。文中使用到的所有裝置皆從已清除(預設)的組態來啟動。如果您的網路運作中,請確保您瞭解任何指令可能造成的影響。
自定義Web門戶檔案
構成自訂Web驗證入口的檔案有:
- log in.html
- bootstrap.min.css
- Jquery.min.js
- style.css
- animate.css
- web_auth_logo.png
只有這些檔案需要編輯:
- log in.html
- style.css
- web_auth_logo.png
這是Web身份驗證門戶(log in.html)的原始碼
注意:仔細閱讀代碼,其中包含HTML註釋,用於解釋Web身份驗證門戶的結構。
<!DOCTYPE html>
<html lang="en">
<head>
	<meta charset="utf-8">
	<meta name="viewport" content="width=device-width, initial-scale=1">
	<title>YOUR COMPANY TITLE HERE</title>
	<script src="jquery.min.js"></script>
        <link rel="stylesheet" href="bootstrap.min.css">
        <link rel="stylesheet" href="animate.css">
<link rel="stylesheet" href="style.css" >
	<script>
		function submitAction(){
		      var link = document.location.href;
		      var searchString = "redirect=";
		      var equalIndex = link.indexOf(searchString);
		      var redirectUrl = "";

		      if (document.forms[0].action == "") {
		      var url = window.location.href;
		      var args = new Object();
		      var query = location.search.substring(1);
		      var pairs = query.split("&");
		          for(var i=0;i<pairs.length;i++){
		              var pos = pairs[i].indexOf('=');
		              if(pos == -1) continue;
		              var argname = pairs[i].substring(0,pos);
		              var value = pairs[i].substring(pos+1);
		              args[argname] = unescape(value);
		          }
		          document.forms[0].action = args.switch_url;
		      }
		      if(equalIndex >= 0) {
		            equalIndex += searchString.length;
		            redirectUrl = "";
		            redirectUrl += link.substring(equalIndex);
		      }
		      if(redirectUrl.length > 255)
		      redirectUrl = redirectUrl.substring(0,255);
		      document.forms[0].redirect_url.value = redirectUrl;
		      document.forms[0].buttonClicked.value = 4;
		      document.forms[0].submit();
		}

		function loadAction(){
		     var url = window.location.href;
		     var args = new Object();
		     var query = location.search.substring(1);
		     var pairs = query.split("&");
		     for(var i=0;i<pairs.length;i++){
		          var pos = pairs[i].indexOf('=');
		          if(pos == -1) continue;
		          var argname = pairs[i].substring(0,pos);
		          var value = pairs[i].substring(pos+1);
		          args[argname] = unescape(value);
		     }


		     document.forms[0].action = args.switch_url;

		     // This is the status code returned from webauth log in action
		     // Any value of status code from 1 to 5 is error condition and user
		     // should be shown error as below or modify the message as it suits
		     // the customer

		     if(args.statusCode == 1){
		        alert("You are already logged in. No further action is required on your part.");
		     }
		     else if(args.statusCode == 2){
		        alert("You are not configured to authenticate against web portal. No further action is required on your part.");
		     }
		     else if(args.statusCode == 3){
		        alert("The username specified cannot be used at this time. Perhaps the user is already logged into the system?");
		     }
		     else if(args.statusCode == 4){
		        alert("Wrong username and password. Please try again.");
		     }
		     else if(args.statusCode == 5){
		        alert("The User Name and Password combination you have entered is invalid.  Please try again.");
		     }
		}

		</script>
</head>
<body class="animated fadeInUp">

<!-- TOP BAR -->
<nav class="navbar navbar-expand-md sticky-top navbar-light bg-dark ">
	<img src="web_auth_logo.png" style="width: 70px; height: 70px;">
<div class="container">
	<h4 class="align-middle text-white">Your Company Name Here</h4>
</div>
</nav>
<!-- END TOP BAR -->

<div class="bg"> <!---Background color -->

<div class="container-fluid padding "><!--- page content -->
	<div class="row padding">
		<div class="col-md-12 col-lg-6">
                <br>
                <h5>Accessing Company Public Network From Your Wireless Device</h5>
		<p class="text-justify">The Company provides Internet access points at no charge in selected areas for guests with portable
                computers or devices capable of receiving wireless signals.
                You can access the Internet from your wireless device when sitting within range of an access point.
                Guests are expected to use the wireless access in a legal and responsible manner. By using this wireless access network, the
                user  acknowledges that he/she is subject to, and agrees to abide by all laws, and all state and federal rules and regulations
                applicable to Internet use.
                </p>
                <br>
		<h5>Terms and Conditions of Use</h5>
		<p class="text-justify">Guests need a notebook/laptop computer or other device equipped with a wireless card that supports the WiFi standard.
		The Company assumes no responsibility for the safety of equipment.</p>
                <br>
                <br>
                <div class="card mx-auto" style="width: 350px;"> <!--Form container-->
		    <h5 class="card-header info-color white-text text-center py-4">
			<strong>Sign in</strong>
		    </h5>
		    <div class="card-body px-lg-5 pt-0"><!--Form content-->
		    <!-- Form -->
		    <form class="text-center" style="color: #757575;" method="post">
		        <input TYPE="hidden" NAME="buttonClicked" SIZE="16" MAXLENGTH="15" value="0">
                        <input TYPE="hidden" NAME="redirect_url" SIZE="255" MAXLENGTH="255" VALUE="">
                        <input TYPE="hidden" NAME="err_flag" SIZE="16" MAXLENGTH="15" value="0">
			<!-- Username input -->
			<div class="md-form"><br>
			    <label for="materiallog inFormEmail">Username</label>
			    <input type="TEXT" name="username" SIZE="25" MAXLENGTH="63" VALUE="" class="form-control" required>
		       </div><br><!-- End Username input -->
                       <!-- Password input-->
		       <div class="md-form">
		           <label for="materiallog inFormPassword">Password</label>
			   <input type="password" name="password" SIZE="25" MAXLENGTH="63" VALUE="" class="form-control" required>
                       </div><br><!-- End password input -->
		       <!-- Sign in button -->
		          <button class="btn btn-outline-info btn-rounded btn-block my-4 waves-effect z-depth-0" type="button" onclick="submitAction();">Sign in</button>
		    </form> <!-- End FORM -->
                    </div><!-- End Form content-->
                    </div><!--Form container-->
        </div>
	</div>
</div><!--- End page content -->
</div><!---End background color -->

</body>
</html>
若要變更頁面,請編輯此區段的標題:
...
  <title>YOUR COMPANY TITLE HERE</title>
...
若要變更公司標誌,請編輯img標籤,使用.png或.svg影像。若要調整標誌的大小,請變更寬度與高度引數。
注意:建議使用具有透明背景的.svg影像,以獲得更好的外觀和感覺。
<!-- TOP BAR -->
<nav class="navbar navbar-expand-md sticky-top navbar-light bg-dark ">
	<img src="web_auth_logo.png" style="width: 70px; height: 70px;">
<div class="container">
	<h4 class="align-middle text-white">Your Company Name Here</h4>
</div>
</nav>
<!-- END TOP BAR -->
若要變更頁面標題背景顏色,請在style.css檔案上建立您自己的類別,並以自訂類別取代bg-dark:
<!-- TOP BAR -->
<nav class="navbar navbar-expand-md sticky-top navbar-light my-custom-bg-class">
<img src="web_auth_logo.png" style="width: 70px; height: 70px;">
<div class="container">
<h4 class="align-middle text-white animated fadeInLeft slow">Your Company Name Here</h4>
</div>
</nav>
<!-- END TOP BAR -->
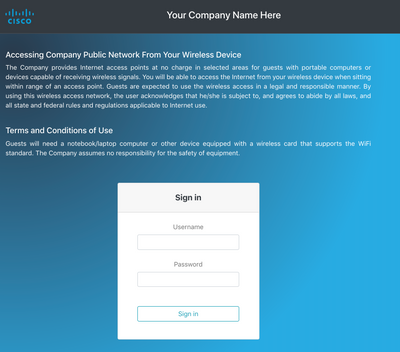
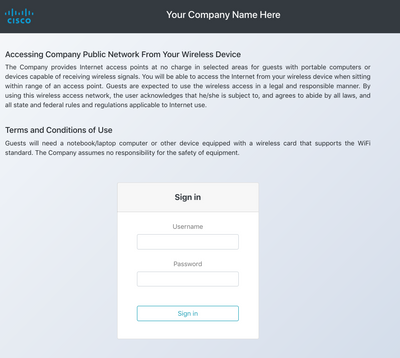
若要變更頁面的背景和文字顏色,請變更bg類別:
<div class="bg"> <!---Background color -->
以下是可用的類別,請注意,背景和文字顏色會相應地變更:
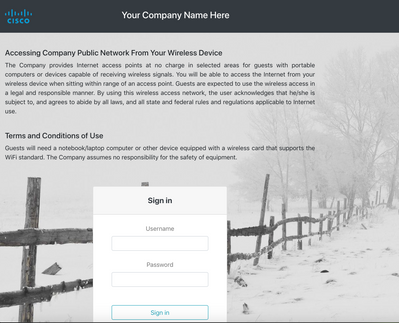
如果要在style.css檔案上使用影像作為背景或不同的顏色,請編輯CSS類別bg-img並使用。
注意:由於背景影象的大小原因,它在流動裝置上無法正常顯示,並且由於影象顏色的原因,文本可能難以讀取。
.bg-img{
   background-image: url("winter.jpg");
   height: 100%;
   background-position: center;
   background-repeat: no-repeat;
   background-size: cover;
}
使用影像做為背景看起來就像是下一個影像:
Bg5類看起來像下一個映像:
Bg6類看起來像下一個映像:
若要以您自己的條款與條件變更頁面內容,請編輯此區段:
    <h5>Accessing Company Public Network From Your Wireless Device</h5>
    <p class="text-justify">The Company provides Internet access points at no charge in selected areas for guests with portable
    computers or devices capable of receiving wireless signals.
    You are able to access the Internet from your wireless device when sitting within range of an access point.
    Guests are expected to use the wireless access in a legal and responsible manner. By using this wireless access network, the
    user  acknowledges that he/she is subject to, and agrees to abide by all laws, and all state and federal rules and regulations
    applicable to Internet use.
    </p>
    <br>
    <h5>Terms and Conditions of Use</h5>
    <p class="text-justify">Guests need a notebook/laptop computer or other device equipped with a wireless card that supports the WiFi standard.
    The Company assumes no responsibility for the safety of equipment.</p>
    <br>
為了提升身份驗證門戶的級別,您可以增加動畫而不會增加複雜性。在動畫類別之後編輯動畫名稱。在本範例中,它使用了兩個動畫。要檢視可用的動畫,請訪問animate.css:
...
<body class="animated fadeInUp">
...
<h4 class="align-middle text-white animated fadeInLeft slow">Your Company Name Here</h4>
...
這是包含動畫的自訂Web驗證入口網站的最終外觀。選擇Result頁籤檢視即時示例。
提示:您可以根據需要輕鬆編輯背景顏色和字型。在style.css檔案上建立新類別並使用它。
將自訂Web驗證入口網站上傳到9800 WLC並進行設定
本節包含有關如何在Cat 9800中安裝和設定自訂WebAuth套件組合的分步程式。
1. 從Cisco.com下載無線LAN控制器Web驗證套件組合(WLC_WEBAUTH_BUNDLE_1.0.zip):
https://software.cisco.com/download/home/286316412/type/282791507/release/16.10.1
注意:所有9800控制器的捆綁包都相同。例如,可以從9800-40下載檔案,並將其用於9800-L或虛擬9800-CL
2. 若要自訂套件組合,請將套件組合解壓縮至檔案夾。 請依照先前說明開啟每個需要編輯的HTML檔案,您可以同時上傳圖志。檔案名稱並不重要,您可以隨意稱呼它們。
執行此步驟後,請刪除log in.tar檔案,因為您需要生成一個新檔案。
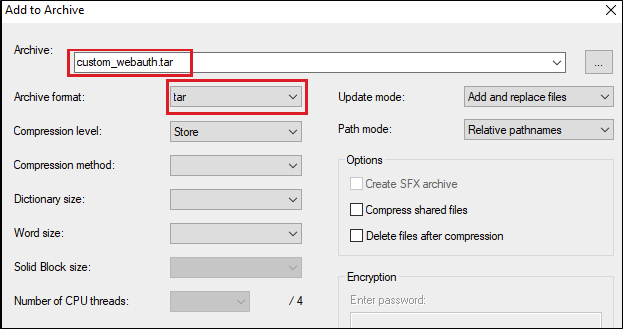
選擇所有檔案並按一下右鍵,然後選擇7-Zip(或您已安裝的任何類似程式)並選擇Add to archive...。
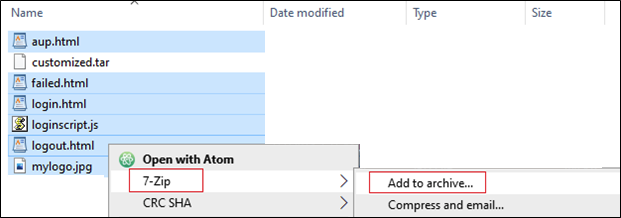
為它指定任意名稱並選擇tar作為存檔格式:
3. 然後瀏覽至9800 WLC
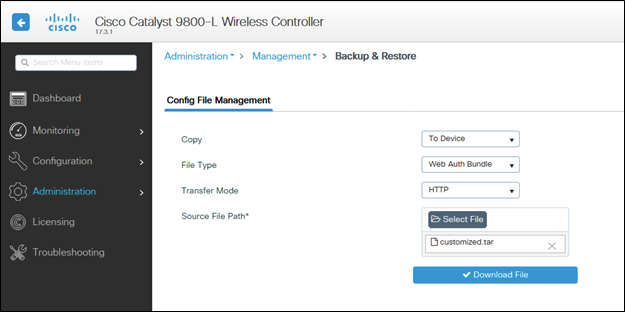
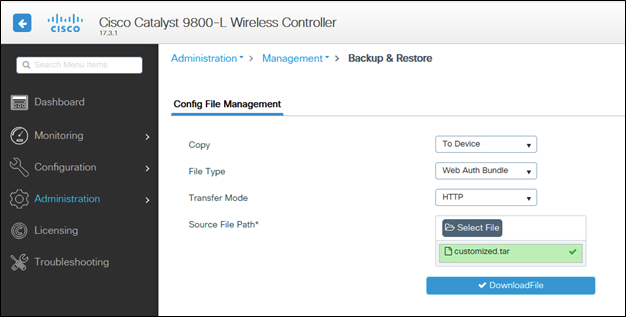
Administration > Management > Backup & Restore將檔案型別更改為Web Auth Bundle,並只上傳自定義的.tar檔案。
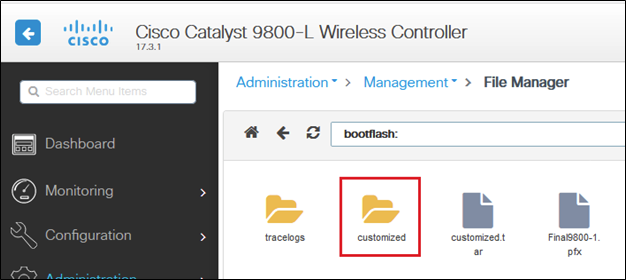
根據預設,9800可以在bootflash中建立一個資料夾:無論您叫它什麼.tar檔案,所有檔案都可以位於該資料夾中:
如果您有HA設定,則需要執行17.3程式碼(或未來的版本),因為此增強功能錯誤:
思科漏洞ID CSCvr05309:將webauth tar套件組合複製到備用bootflash。此外,在HA設定的情況下。
若要檢查兩個HA (主動和待命),表示是否已上傳名為customized.tar的檔案。
9800-1#show bootflash: | 自訂
9800-1#show stby-bootflash: | 自訂
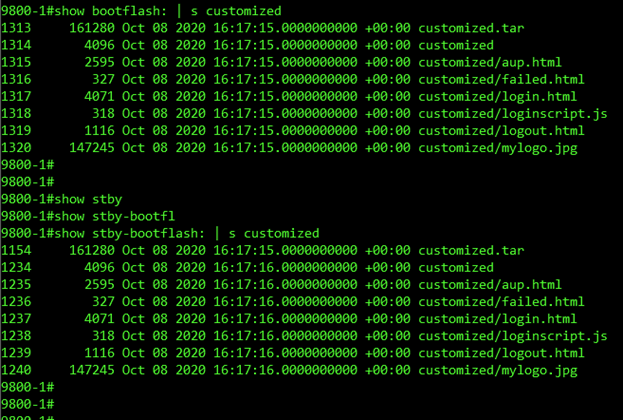
注意:手動上傳的檔案未同步到HA備用。
附註:您不需要success.html檔案即可讓自訂webauth運作。如果需要,只需建立一個檔案並將其增加到.tar檔案中,然後將該tar檔案上傳到9800 WLC。
4. 編輯WebAuth全域引數對應並設定虛擬IP位址。遺漏虛擬IP位址可能會導致影像無法在入口頁面正確顯示。
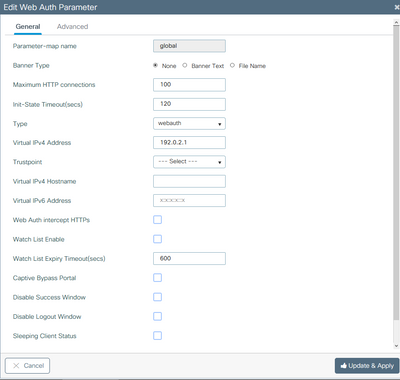
注意:設定虛擬IP位址後,無線使用者端會在瀏覽器上顯示網站警告,因為控制器虛擬介面會透過HTTPS傳送URL。由於未附加簽名證書,因此不受信任。在這種情況下,請使用程式產生CSR並安裝有效憑證。
僅當不需要HTTPS時,才能運行這兩個命令,以便僅透過HTTP傳送URL(這些命令僅在17.3.1及更高版本中存在):
#configure terminal
(config)#parameter-map type webauth global
(config-params-parameter-map)#secure-webauth-disable
(config-params-parameter-map)#webauth-http-enable
(config-params-parameter-map)#end
#write
5. 下一步是建立新的「引數對映」。從9800 GUI > Security > Web-Auth > Add進行導航。
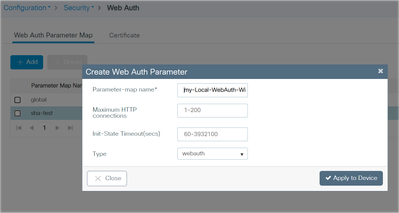
建立之後,按一下要編輯的引數對映名稱:
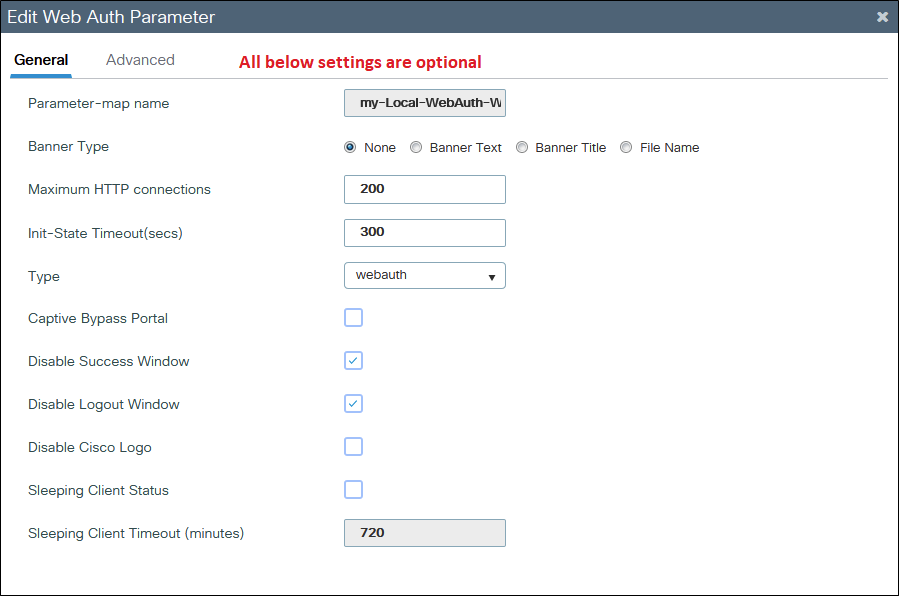
核取「停用成功視窗」以停用9800預設成功頁面,而不是success.html。如果同時使用兩者,訪客將看到兩個成功頁面,一個來自9800預設成功頁面,另一個來自custom success.html。
即使您停用所有成功頁面(停用「成功窗口」並且未使用success.html),流動裝置仍會看到圖示的成功頁面,而PC會看到此成功頁面,然後它消失。
iPhone示例:
 Web Auth登入
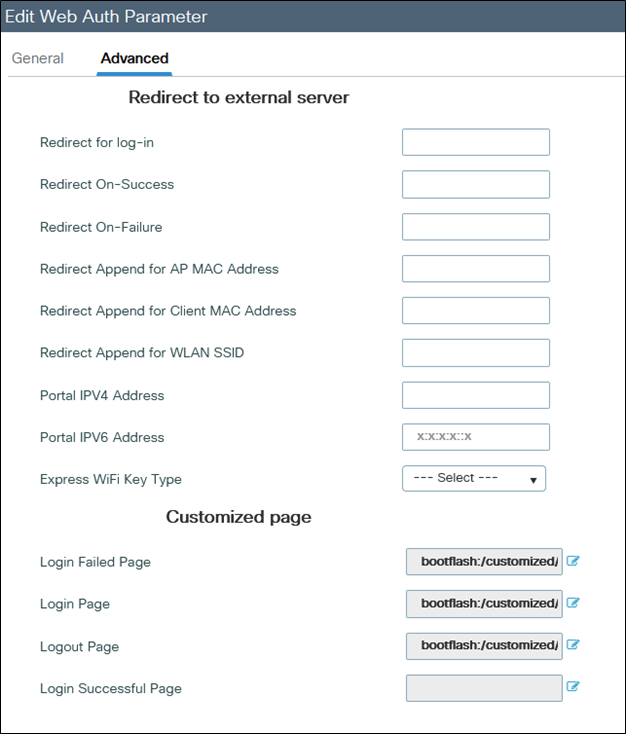
如果您按一下任何頁面旁邊的藍色圖示,9800會嘗試載入該圖示,您可以依圖例選擇頁面。
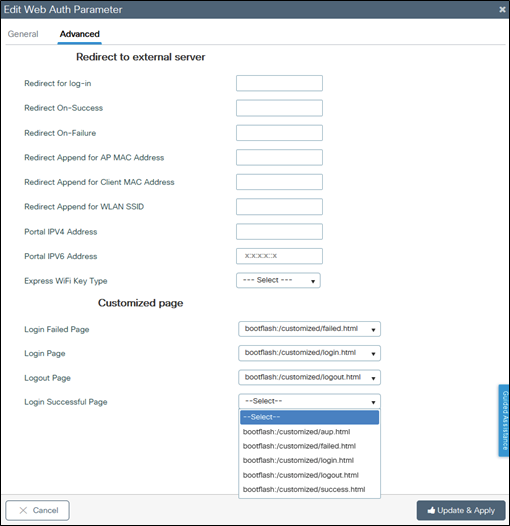
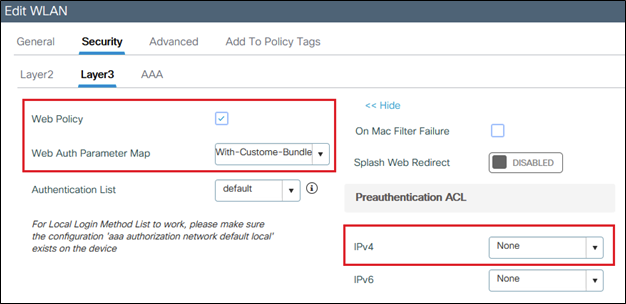
6. 下一步是標籤指向WLAN的引數對映(Cat9800 GUI > Tags and Profiles > WLAN)。在本例中,WLAN首先從本地9800訪客帳戶對訪客進行身份驗證,然後從ISE (RADIUS伺服器)對訪客進行身份驗證。
注意:可以在此步驟中增加AAA和預身份驗證ACL配置(可選)。
ISE或任何RADIUS伺服器的示例配置:
radius server ISE
address ipv4 x.x.x.x auth-port 1812 acct-port 1813
timeout 5
retransmit 3
automate-tester username dummy probe-on
key XXXXXXXXXXX
exit
aaa group server radius RADIUS-GROUP
server name ISE
exit
aaa authentication dot1x ISE-Method group RADIUS-GROUP
aaa authorization network ISE-Method group RADIUS-GROUP
aaa accounting identity default start-stop group RADIUS-GROUP
aaa authentication webauth default local group RADIUS-GROUP
end
注意:從最後一個CLI命令可以看出,首先進行本地使用者身份驗證檢查,然後是ISE/RADIUS。您可以將身份驗證限制為僅本地,或僅限制ISE/RADIUS,或將其保留為兩者。例如,使用者首先在本機進行檢查,如果使用者不在那裡,則會針對RADIUS進行檢查。
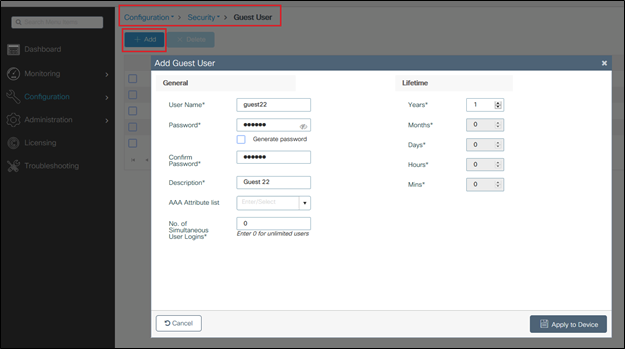
要增加本地訪客使用者,請導航到Configuration > Security > Guest User。
驗證
在您的電腦上,使用Web瀏覽器開啟log in.html檔案,並確認動畫和內容是正確的。
疑難排解
在9800 WLC上上傳所有檔案時,請確保這些檔案不在子資料夾中,而且沒有其他名稱。


 意見
意見