簡介
本文檔介紹如何配置FlexVPN頭端以透過本地使用者資料庫的安全客戶端(AnyConnect) IKEv2/EAP身份驗證進行訪問。
必要條件
需求
思科建議您瞭解以下主題:
採用元件
本文中的資訊係根據以下軟體和硬體版本:
- 雲服務路由器版本16.9.2
- 在Windows 10上運行的AnyConnect客戶端4.6.03049版
本文中的資訊是根據特定實驗室環境內的裝置所建立。文中使用到的所有裝置皆從已清除(預設)的組態來啟動。如果您的網路運作中,請確保您瞭解任何指令可能造成的影響。
背景資訊
AnyConnect-EAP或聚合身份驗證允許FlexVPN伺服器透過Cisco專有的AnyConnect-EAP方法對AnyConnect客戶端進行身份驗證。
與標準型可延伸驗證通訊協定(EAP)方法(例如EAP-Generic Token Card (EAP-GTC)、EAP-Message Digest 5 (EAP-MD5)等不同,FlexVPN伺服器不會在EAP傳遞模式下運作。
與客戶端的所有EAP通訊在FlexVPN伺服器上終止,用於構建AUTH負載的所需會話金鑰由FlexVPN伺服器本地計算。
FlexVPN伺服器必須使用IKEv2 RFC要求的證書向客戶端驗證自身。
Flex Server現在支援本地使用者身份驗證,並且遠端身份驗證是可選的。
這非常適合於遠端訪問使用者數量較少的小型部署,以及無法訪問外部身份驗證、授權和記帳(AAA)伺服器的環境。
但是,對於大規模部署以及需要每個使用者屬性的情況下,仍建議使用外部AAA伺服器進行身份驗證和授權。
AnyConnect-EAP實施允許使用Radius進行遠端身份驗證、授權和記帳。
網路圖表
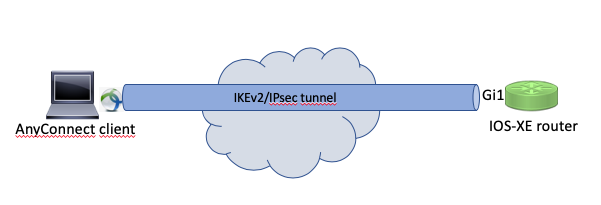
設定
使用本地資料庫對使用者進行身份驗證和授權
註:要根據路由器上的本地資料庫對使用者進行身份驗證,需要使用EAP。但是,要使用EAP,本地身份驗證方法必須是rsa-sig,因此路由器需要正確的身份證書,並且不能使用自簽名證書。
使用本地使用者身份驗證、遠端使用者和組授權以及遠端記賬的示例配置。
步驟 1.啟用AAA,配置身份驗證、授權和記帳清單,並向本地資料庫增加使用者名稱:
aaa new-model
!
aaa authentication login a-eap-authen-local local
aaa authorization network a-eap-author-grp local
!
username test password cisco123
步驟 2.配置用於儲存路由器證書的信任點。此範例中使用的是PKCS12檔案匯入。有關其他選項,請參閱安全和VPN配置指南,IOS XE 17.x,章節:為PKI文檔配置證書註冊。
Router(config)# crypto pki import IKEv2-TP pkcs12 bootflash:IKEv2-TP.p12 password cisco123
步驟 3.定義IP本地池以向AnyConnect VPN客戶端分配地址:
ip local pool ACPOOL 192.168.10.5 192.168.10.10
步驟 4.建立IKEv2本地授權策略:
crypto ikev2 authorization policy ikev2-auth-policy
 pool ACPOOL
 dns 10.0.1.1
步驟5 (可選)。建立所需的IKEv2建議和策略。如果未配置,則使用智慧預設值:
crypto ikev2 proposal IKEv2-prop1
 encryption aes-cbc-256
 integrity sha256
 group 14
!
crypto ikev2 policy IKEv2-pol
 proposal IKEv2-prop1
步驟 6.建立AnyConnect配置檔案
註:AnyConnect配置檔案需要傳送到客戶端電腦。有關詳細資訊,請參閱下一節。
使用AnyConnect配置檔案編輯器配置客戶端配置檔案,如下圖所示:
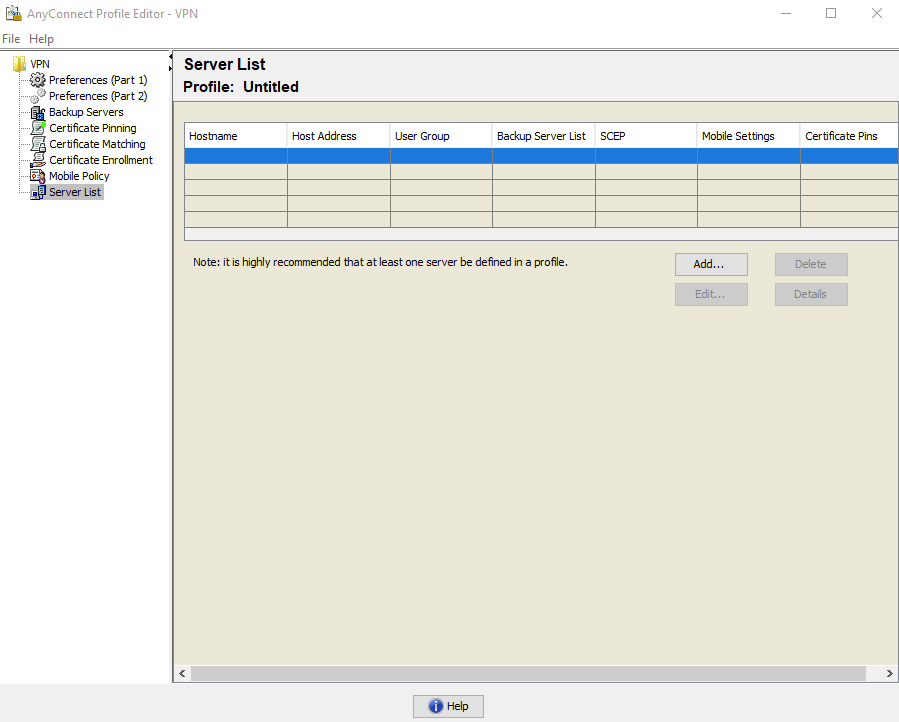
按一下Add為VPN網關建立一個條目。確保選擇IPsec作為Primary Protocol。取消選中ASA gateway選項。
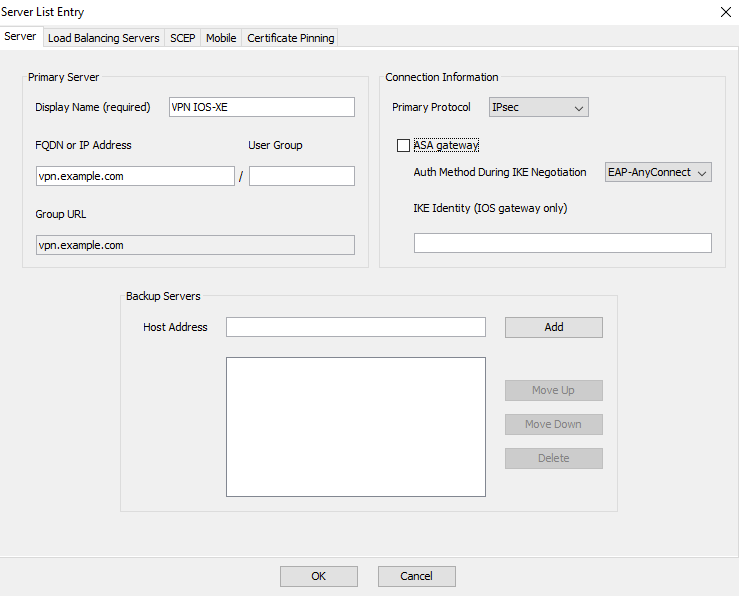
儲存配置檔案:檔案->另存為。設定檔的XML對等用法:
<?xml version="1.0" encoding="UTF-8"?>
<AnyConnectProfile xmlns="http://schemas.xmlsoap/encoding/" xmlns:xsi="http://www.w3.org/2001/XMLSchema-instance" xsi:schemaLocation="http://schemas.xmlsoap/encoding/ AnyConnectProfile.xsd">
    <ClientInitialization>
        <UseStartBeforeLogon UserControllable="true">false</UseStartBeforeLogon>
        <AutomaticCertSelection UserControllable="true">false</AutomaticCertSelection>
        <ShowPreConnectMessage>false</ShowPreConnectMessage>
        <CertificateStore>All</CertificateStore>
        <CertificateStoreMac>All</CertificateStoreMac>
        <CertificateStoreOverride>false</CertificateStoreOverride>
        <ProxySettings>Native</ProxySettings>
        <AllowLocalProxyConnections>true</AllowLocalProxyConnections>
        <AuthenticationTimeout>12</AuthenticationTimeout>
        <AutoConnectOnStart UserControllable="true">false</AutoConnectOnStart>
        <MinimizeOnConnect UserControllable="true">true</MinimizeOnConnect>
        <LocalLanAccess UserControllable="true">false</LocalLanAccess>
        <DisableCaptivePortalDetection UserControllable="true">false</DisableCaptivePortalDetection>
        <ClearSmartcardPin UserControllable="true">true</ClearSmartcardPin>
        <IPProtocolSupport>IPv4,IPv6</IPProtocolSupport>
        <AutoReconnect UserControllable="false">true
            <AutoReconnectBehavior UserControllable="false">ReconnectAfterResume</AutoReconnectBehavior>
        </AutoReconnect>
        <AutoUpdate UserControllable="false">true</AutoUpdate>
        <RSASecurIDIntegration UserControllable="false">Automatic</RSASecurIDIntegration>
        <WindowsLogonEnforcement>SingleLocalLogon</WindowsLogonEnforcement>
        <WindowsVPNEstablishment>LocalUsersOnly</WindowsVPNEstablishment>
        <AutomaticVPNPolicy>false</AutomaticVPNPolicy>
        <PPPExclusion UserControllable="false">Disable
            <PPPExclusionServerIP UserControllable="false"></PPPExclusionServerIP>
        </PPPExclusion>
        <EnableScripting UserControllable="false">false</EnableScripting>
        <EnableAutomaticServerSelection UserControllable="false">false
            <AutoServerSelectionImprovement>20</AutoServerSelectionImprovement>
            <AutoServerSelectionSuspendTime>4</AutoServerSelectionSuspendTime>
        </EnableAutomaticServerSelection>
        <RetainVpnOnLogoff>false
        </RetainVpnOnLogoff>
        <AllowManualHostInput>true</AllowManualHostInput>
    </ClientInitialization>
    <ServerList>
        <HostEntry>
            <HostName>VPN IOS-XE</HostName>
            <HostAddress>vpn.example.com</HostAddress>
            <PrimaryProtocol>IPsec
                <StandardAuthenticationOnly>true
                    <AuthMethodDuringIKENegotiation>EAP-AnyConnect</AuthMethodDuringIKENegotiation>
                </StandardAuthenticationOnly>
            </PrimaryProtocol>
        </HostEntry>
    </ServerList>
</AnyConnectProfile>
注意:AnyConnect使用*$AnyConnectClient$*作為其型別key-id的預設IKE標識。但是,可以在AnyConnect配置檔案中手動更改此標識以滿足部署需求。
注意:要將XML配置檔案上傳到路由器,需要使用16.9.1或更高版本。如果使用的是較舊的軟體版本,則需要在客戶端上停用配置檔案下載功能。有關詳細資訊,請參閱停用AnyConnect下載程式功能部分。
將建立的XML配置檔案上傳到路由器的快閃記憶體並定義配置檔案:
crypto vpn anyconnect profile acvpn bootflash:/acvpn.xml
注意:用於AnyConnect XML配置檔案的檔名始終為acvpn.xml。即使使用其他檔名,傳送到PC的配置檔案也命名為acvpn.xml。 因此,建議不要更改路由器配置中的名稱。
步驟 7.為AnyConnect-EAP客戶端身份驗證方法建立IKEv2配置檔案。
crypto ikev2 profile AnyConnect-EAP
 match identity remote key-id *$AnyConnectClient$*
 authentication local rsa-sig
 authentication remote anyconnect-eap aggregate
 pki trustpoint IKEv2-TP
 aaa authentication anyconnect-eap a-eap-authen-local
 aaa authorization group anyconnect-eap list a-eap-author-grp ikev2-auth-policy
 aaa authorization user anyconnect-eap cached
 virtual-template 100
 anyconnect profile acvpn
注意:對於aaa authentication eap / anyconnect-eap命令,請確保在配置遠端身份驗證方法之前將本地身份驗證方法配置為rsa-sig。
步驟 8.在路由器上停用基於HTTP-URL的證書查詢和HTTP伺服器:
no crypto ikev2 http-url cert
no ip http server
no ip http secure-server
注意:請參閱下一代加密支援文檔以確認您的路由器硬體是否支援NGE演算法(例如sha-256、aes-gcm、ecdh、ecdsa),否則,在隧道建立的最後階段硬體上的IPSec SA安裝將失敗。
步驟 9.定義用於保護資料的加密和雜湊演算法
crypto ipsec transform-set TS esp-aes 256 esp-sha256-hmac
 mode tunnel
步驟 10.建立IPSec配置檔案:
crypto ipsec profile AnyConnect-EAP
 set transform-set TS
 set ikev2-profile AnyConnect-EAP
步驟 11.使用某些虛擬IP地址配置環回介面。虛擬訪問介面從它借用IP地址。
interface loopback100
 ip address 10.0.0.1 255.255.255.255
步驟 12.配置虛擬模板(關聯IKEv2配置檔案中的模板)
interface Virtual-Template100 type tunnel
 ip unnumbered Loopback100
 ip mtu 1400
 tunnel mode ipsec ipv4
 tunnel protection ipsec profile AnyConnect-EAP
步驟13 (可選)。預設情況下,來自客戶端的所有流量都透過隧道(全隧道)傳送。您可以配置分割隧道,僅允許選定的流量透過該隧道。
ip access-list standard split_tunnel
 permit 10.0.0.0 0.255.255.255
!
crypto ikev2 authorization policy ikev2-auth-policy
 route set access-list split_tunnel
步驟14 (可選)。如果所有流量都需要透過隧道,請配置NAT以允許遠端客戶端連線到Internet。
ip access-list extended NAT
 permit ip 192.168.10.0 0.0.0.255 any
!
ip nat inside source list NAT interface GigabitEthernet1 overload
!
interface GigabitEthernet1
 ip nat outside
!
interface Virtual-Template 100
 ip nat inside
示例:AnyConnect配置檔案下載配置
此示例顯示如何配置FlexVPN AnyConnect配置檔案下載功能:
注意:您不需要修改Anyconnect客戶端電腦上的本地策略檔案。配置帶IKEv2的Anyconnect配置檔案下載功能後,VPN下載程式模組正常工作-在進行XML配置檔案更新時,客戶端裝置上會自動更新所需的XML配置檔案。
注意:不能同時使用HTTPS伺服器和SSL策略。在啟用SSL策略之前,請刪除ip http secure-server命令。 如果同時啟用這兩個功能,並且裝置收到傳入的SSL VPN連線,則裝置可能會崩潰。
no ip http secure-server
crypto ssl policy ssl-policy
  pki trustpoint IKEv2-TP sign
  ip address local 10.0.0.1 port 443
  no shutdown
crypto ssl profile ssl_prof
    match policy ssl-policy
停用AnyConnect下載程式功能(僅適用於16.9.1之前的版本)。
僅當使用早於16.9.1的版本時,才需要執行此步驟。在此版本之前,無法將XML配置檔案上傳到路由器。預設情況下,安全客戶端(AnyConnect)在成功登入後嘗試下載XML配置檔案。如果設定檔無法使用,連線就會失敗。解決方法是,在客戶端上停用AnyConnect配置檔案下載功能。若要執行此操作,可以修改此檔案:
For Windows:
C:\ProgramData\Cisco\Cisco AnyConnect Secure Mobility Client\AnyConnectLocalPolicy.xml

For MAC OS:
/opt/cisco/anyconnect/AnyConnectLocalPolicy.xml
BypassDownloader選項設定為true,例如:
<?xml version="1.0" encoding="UTF-8"?>
<AnyConnectLocalPolicy xmlns="http://schemas.xmlsoap/encoding/" xmlns:xsi="http://www.w3.org/2001/XMLSchema-instance" xsi:schemaLocation="http://schemas.xmlsoap/encoding/ AnyConnectLocalPolicy.xsd" acversion="4.6.03049">
<BypassDownloader>true</BypassDownloader>
<EnableCRLCheck>false</EnableCRLCheck>
<ExcludeFirefoxNSSCertStore>false</ExcludeFirefoxNSSCertStore>
<ExcludeMacNativeCertStore>false</ExcludeMacNativeCertStore>
<ExcludePemFileCertStore>false</ExcludePemFileCertStore>
<ExcludeWinNativeCertStore>false</ExcludeWinNativeCertStore>
<FipsMode>false</FipsMode>
<RestrictPreferenceCaching>false</RestrictPreferenceCaching>
<RestrictTunnelProtocols>false</RestrictTunnelProtocols>
<RestrictWebLaunch>false</RestrictWebLaunch>
<StrictCertificateTrust>false</StrictCertificateTrust>
<UpdatePolicy>
<AllowComplianceModuleUpdatesFromAnyServer>true</AllowComplianceModuleUpdatesFromAnyServer>
<AllowISEProfileUpdatesFromAnyServer>true</AllowISEProfileUpdatesFromAnyServer>
<AllowServiceProfileUpdatesFromAnyServer>true</AllowServiceProfileUpdatesFromAnyServer>
<AllowSoftwareUpdatesFromAnyServer>true</AllowSoftwareUpdatesFromAnyServer>
<AllowVPNProfileUpdatesFromAnyServer>true</AllowVPNProfileUpdatesFromAnyServer></UpdatePolicy>
</AnyConnectLocalPolicy>
修改完成後,需要重新啟動AnyConnect客戶端。
AnyConnect XML配置檔案交付
透過AnyConnect的全新安裝(未增加XML配置檔案),使用者可以在AnyConnect客戶端的位址列中手動輸入VPN網關的FQDN。這會導致與網關的SSL連線。預設情況下,AnyConnect客戶端不會嘗試使用IKEv2/IPsec協定建立VPN隧道。這就是客戶端PC上必須安裝XML配置檔案才能與FlexVPN網關建立IKEv2/IPsec隧道的原因。
從AnyConnect位址列的下拉選單中選擇配置檔案時,將使用該配置檔案。
在AnyConnect配置檔案編輯器->伺服器清單->伺服器清單條目的顯示名稱欄位中指定清單上顯示的名稱。
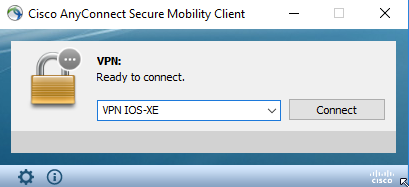
視使用者端作業系統而定,可以手動將XML設定檔放入目錄中:
For Windows:
C:\ProgramData\Cisco\Cisco AnyConnect Secure Mobility Client\Profile

For MAC OS:
/opt/cisco/anyconnect/profile
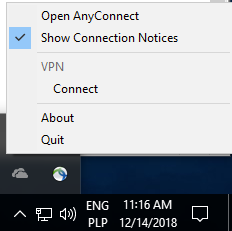
需要重新啟動AnyConnect客戶端,才能在GUI中顯示配置檔案。關閉AnyConnect窗口是不夠的。按一下右鍵Windows系統工作列中的AnyConnect圖示並選擇Quit選項,即可重新啟動該進程:
通訊流
按一下這裡
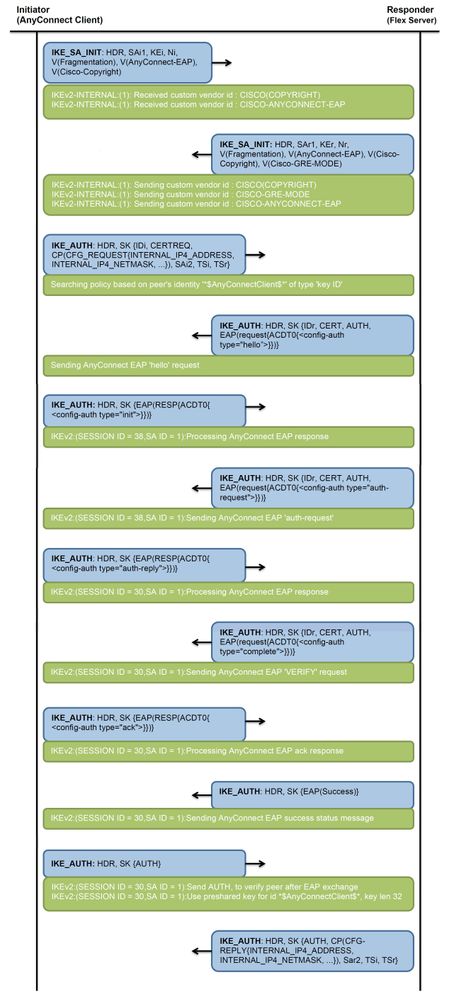
IKEv2和EAP交換
驗證
使用本節內容,確認您的組態是否正常運作。
! Check IKEv2 SA parameters
Router# show crypto ikev2 sa detailed

 IPv4 Crypto IKEv2  SA

Tunnel-id Local                 Remote                fvrf/ivrf            Status
1         192.0.2.1/4500     192.0.2.100/50899    none/none            READY
      Encr: AES-CBC, keysize: 256, PRF: SHA256, Hash: SHA256, DH Grp:14, Auth sign: RSA, Auth verify: AnyConnect-EAP
      Life/Active Time: 86400/758 sec
      CE id: 1004, Session-id: 4
      Status Description: Negotiation done
      Local spi: 413112E83D493428       Remote spi: 696FA78292A21EA5
      Local id: 192.0.2.1
      Remote id: *$AnyConnectClient$*
      Remote EAP id: test        <------ username
      Local req msg id:  0              Remote req msg id:  31
      Local next msg id: 0              Remote next msg id: 31
      Local req queued:  0              Remote req queued:  31
      Local window:      5              Remote window:      1
      DPD configured for 0 seconds, retry 0
      Fragmentation not  configured.
      Dynamic Route Update: disabled
      Extended Authentication not configured.
      NAT-T is detected  outside
      Cisco Trust Security SGT is disabled
      Assigned host addr: 192.168.10.8.  <---- Assigned IP
      Initiator of SA : No

! Check the crypto session information
Router# show crypto session detail
Crypto session current status

Code: C - IKE Configuration mode, D - Dead Peer Detection
K - Keepalives, N - NAT-traversal, T - cTCP encapsulation
X - IKE Extended Authentication, F - IKE Fragmentation
R - IKE Auto Reconnect, U - IKE Dynamic Route Update
S - SIP VPN

Interface: Virtual-Access1. <----- Virtual interface associated with the client
Profile: AnyConnect-EAP
Uptime: 00:14:54
Session status: UP-ACTIVE
Peer: 192.0.2.100 port 50899 fvrf: (none) ivrf: (none). <----- Public IP of the remote client
      Phase1_id: *$AnyConnectClient$*
      Desc: (none)
  Session ID: 8
  IKEv2 SA: local 192.0.2.1/4500 remote 192.0.2.100/50899 Active
          Capabilities:N connid:1 lifetime:23:45:06
  IPSEC FLOW: permit ip 0.0.0.0/0.0.0.0 host 192.168.10.8
        Active SAs: 2, origin: crypto map
        Inbound:  #pkts dec'ed 89 drop 0 life (KB/Sec) 4607990/2705. <------ Packets received from the client
        Outbound: #pkts enc'ed 2 drop 0 life (KB/Sec) 4607999/2705. <------ Packets sent to the client

! Check the actual configuration applied for the Virtual-Acces interface associated with client
Router# show derived-config interface virtual-access 1.
Building configuration...

Derived configuration : 258 bytes
!
interface Virtual-Access1
 ip unnumbered Loopback100
 ip mtu 1400
 ip nat inside
 tunnel source 192.0.2.1
 tunnel mode ipsec ipv4
 tunnel destination 192.0.2.100
 tunnel protection ipsec profile AnyConnect-EAP
 no tunnel protection ipsec initiate
end
疑難排解
本節提供的資訊可用於對組態進行疑難排解。
- 要從頭端收集的IKEv2調試:
debug crypto ikev2
debug crypto ikev2 packet
debug crypto ikev2 error
- 用於檢視本地和/或遠端屬性分配的AAA調試:
debug aaa authorization
debug aaa authentication
- AnyConnect客戶端的診斷和報告工具(DART)。
要收集DART捆綁包,請執行《Cisco Secure Client (包括AnyConnect)管理員指南》第5版第1章:Troubleshoot Cisco Secure Clientdocument中介紹的步驟。


 意見
意見