簡介
本文檔介紹如何在連線到Cisco ASA時允許Cisco AnyConnect安全移動客戶端訪問本地LAN。
必要條件
需求
本文檔假定功能正常的遠端訪問VPN配置已存在於思科自適應安全裝置(ASA)上。
如果需要,請參閱CLI書3:Cisco ASA系列VPN CLI配置指南9.17 以獲取配置幫助。
採用元件
本文中的資訊係根據以下軟體和硬體版本:
- Cisco ASA 5500系列版本9(2)1
- 思科調適型安全裝置管理員(ASDM)版本7.1(6)
- Cisco AnyConnect安全行動化使用者端3.1.05152版
本文中的資訊是根據特定實驗室環境內的裝置所建立。文中使用到的所有裝置皆從已清除(預設)的組態來啟動。如果您的網路運作中,請確保您瞭解任何指令可能造成的影響。
網路圖表
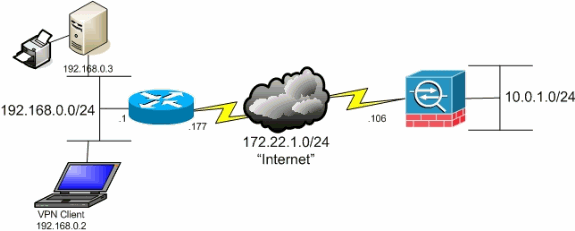
客戶端位於典型的小型辦公室/家庭辦公室(SOHO)網路上,透過Internet連線到總部。
背景資訊
此配置允許Cisco AnyConnect安全移動客戶端透過IPsec、安全套接字層(SSL)或網際網路金鑰交換版本2 (IKEv2)安全訪問企業資源,並且仍然使客戶端能夠執行如客戶端所在位置的列印等活動。如果允許,發往Internet的流量仍然透過隧道傳輸到ASA。
與以未加密方式傳送所有Internet流量的傳統分割隧道方案不同,啟用VPN客戶端的本地LAN訪問時,它僅允許這些客戶端與其所在網路上的裝置以未加密方式通訊。例如,在從家連線到ASA時允許本地LAN訪問的客戶端可以列印到自己的印表機,但無法訪問Internet,除非它首先透過隧道傳送流量。
訪問清單用於允許本地LAN訪問,其方法與在ASA上配置分割隧道的方法大致相同。但是,與分割通道情況不同,此存取清單並未定義必須加密的網路。相反,它定義哪些網路不能加密。此外,與分割隧道方案不同,不需要知道清單中的實際網路。相反,ASA提供預設網路0.0.0.0/255.255.255.255,這表示客戶端的本地LAN。

注意:這不是分割隧道的配置,其中客戶端在連線到ASA時可以訪問未加密的網際網路。有關如何在ASA上配置分割隧道的資訊,請參閱CLI手冊3:Cisco ASA系列VPN CLI配置指南9.17 中的設定分割隧道策略。
注意:當客戶端已連線且已針對本地LAN訪問配置時,您無法在本地LAN上按名稱列印或瀏覽。但是,可以按IP地址瀏覽或列印。有關此情況的詳細資訊和解決方法,請參閱本文檔的故障排除部分。
配置AnyConnect安全移動客戶端的本地LAN訪問
完成以下任務,以允許Cisco AnyConnect安全移動客戶端在連線到ASA時訪問其本地LAN:
透過ASDM配置ASA
在ASDM中完成以下步驟,以允許VPN客戶端在連線到ASA時訪問本地LAN:
- 選擇
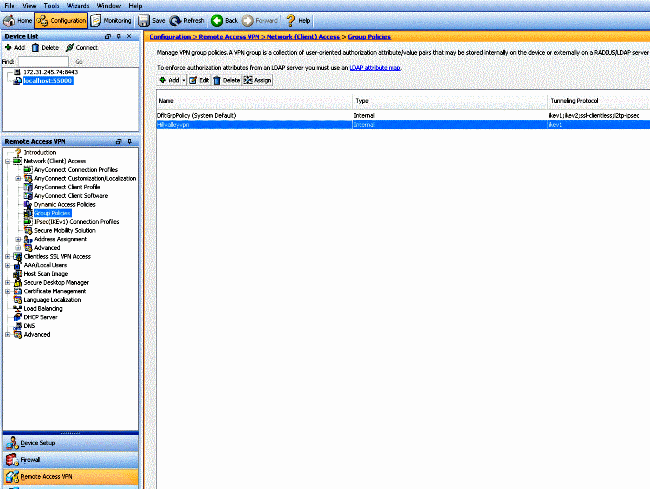
Configuration > Remote Access VPN > Network (Client) Access > Group Policy並選擇您希望在其中啟用本地LAN訪問的組策略。然後按一下Edit。
- 轉到
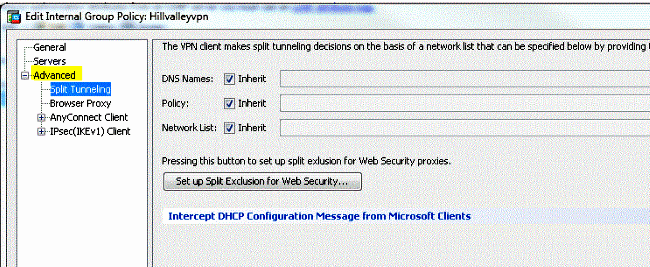
Advanced > Split Tunneling。
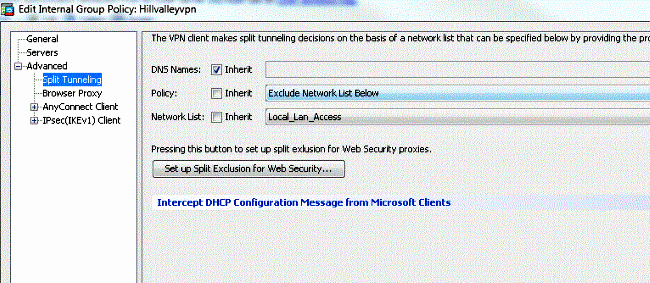
- 取消選中Policy所對應的
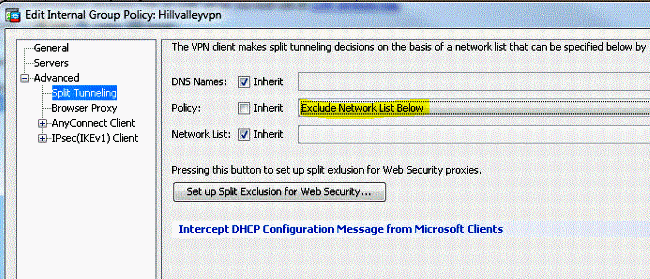
Inherit框,然後選擇Exclude Network List Below。
- 取消選中Network List的
Inherit覈取方塊,然後按一下Manage以啟動訪問控制清單(ACL)管理器。

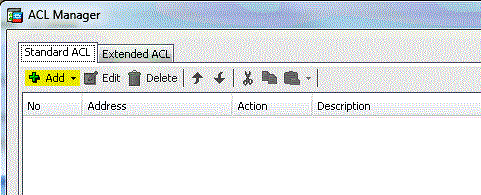
- 在ACL Manager中,選擇
Add > Add ACL...以建立新的訪問清單。
- 為此ACL提供一個名稱,然後按一下
OK。

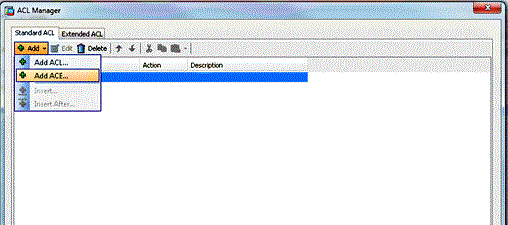
- 建立ACL後,選擇
Add > Add ACE...以增加訪問控制條目(ACE)。
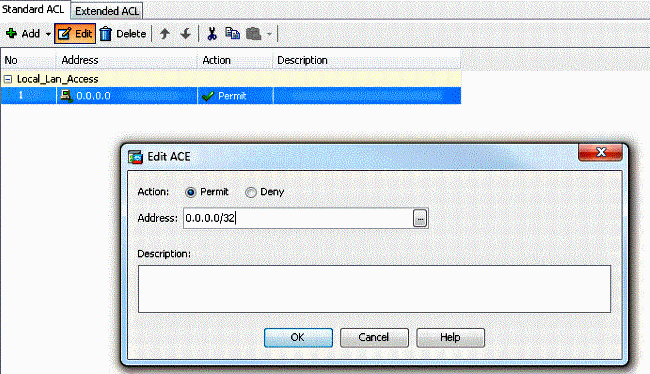
- 定義與客戶端的本地LAN對應的ACE。
- 選擇.
Permit
- 選擇IP地址0.0.0.0
- 選擇網路掩碼/32。
- (可選)提供說明。
- 點選
OK。
- 按一下
OK退出ACL Manager。
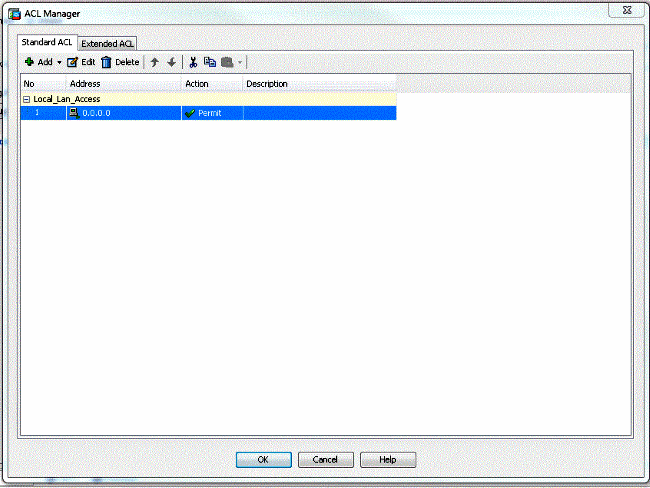
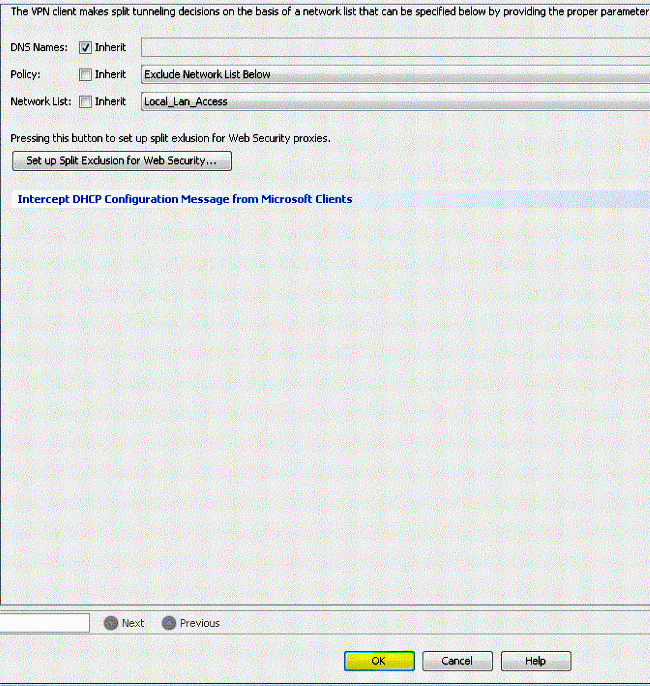
- 確保您剛剛建立的ACL已針對Split Tunnel Network List進行選擇。
- 按一下
OK以返回組策略配置。
- 點選
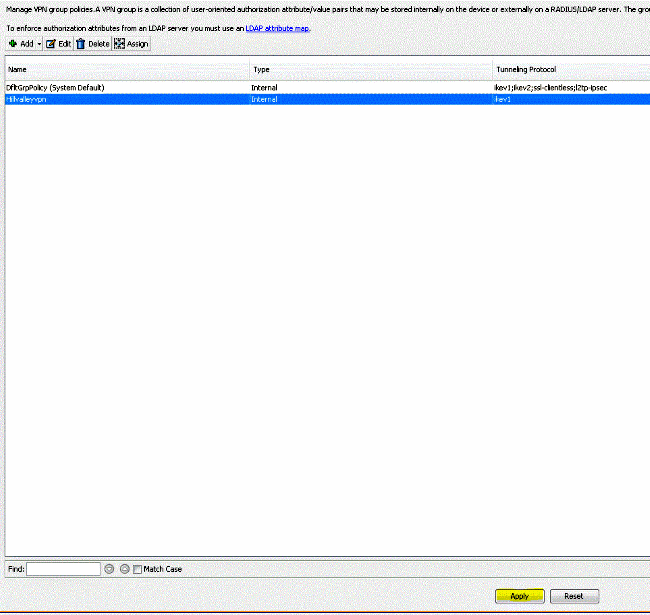
Apply,然後點選Send(如果需要),以將命令傳送到ASA。
透過CLI配置ASA
您可以在ASA CLI中完成以下步驟,而不是使用ASDM,以允許VPN客戶端在連線到ASA時訪問本地LAN:
- 進入配置模式。
ciscoasa>enable
Password:
ciscoasa#configure terminal
ciscoasa(config)#
- 建立訪問清單以允許本地LAN訪問。
ciscoasa(config)#access-list Local_LAN_Access remark Client Local LAN Access
ciscoasa(config)#access-list Local_LAN_Access standard permit host 0.0.0.0
- 進入要修改的策略的組策略配置模式。
ciscoasa(config)#group-policy hillvalleyvpn attributes
ciscoasa(config-group-policy)#
- 指定拆分隧道策略。在本示例中,此策略為
excludespecified。
ciscoasa(config-group-policy)#split-tunnel-policy excludespecified
- 指定拆分隧道訪問清單。在本例中,清單為
Local_LAN_Access。
ciscoasa(config-group-policy)#split-tunnel-network-list value Local_LAN_Access
- 發出以下命令:
ciscoasa(config)#tunnel-group hillvalleyvpn general-attributes
- 將組策略與隧道組關聯。
ciscoasa(config-tunnel-ipsec)# default-group-policy hillvalleyvpn
- 退出兩種配置模式。
ciscoasa(config-group-policy)#exit
ciscoasa(config)#exit
ciscoasa#
- 將配置儲存到非易失性RAM (NVRAM),並在系統提示指定源檔名時按
Enter。
ciscoasa#copy running-config startup-config

Source filename [running-config]?
Cryptochecksum: 93bb3217 0f60bfa4 c36bbb29 75cf714a

3847 bytes copied in 3.470 secs (1282 bytes/sec)
ciscoasa#
配置Cisco AnyConnect安全移動客戶端
要配置Cisco AnyConnect安全移動客戶端,請參閱CLI書3:Cisco ASA系列VPN CLI配置指南9.17的配置AnyConnect連線部分。
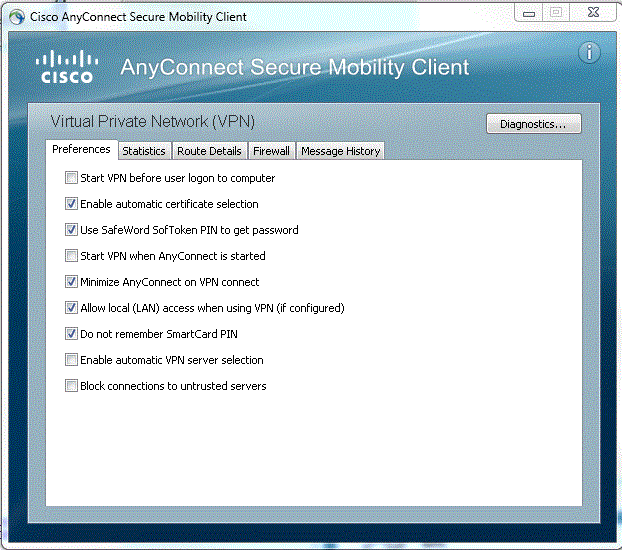
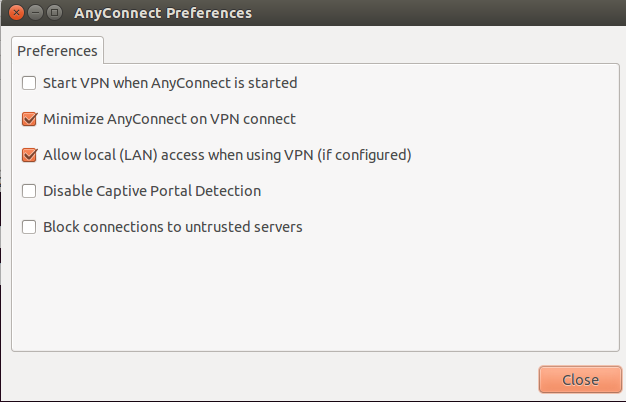
分割排除隧道需要您在AnyConnect客戶端中啟用AllowLocalLanAccess。所有分離排除隧道都被視為本地LAN訪問。要使用分割隧道的排除功能,您必須在AnyConnect VPN客戶端首選項中啟用AllowLocalLanAccess首選項。預設情況下,停用本地LAN訪問。
為了允許本地LAN訪問以及分割排除隧道,網路管理員可以在配置檔案中啟用它,或者使用者可以在其首選項設定中啟用它(請參閱下一節的映像)。為了允許本地LAN訪問,如果在安全網關上啟用了分割隧道並配置了split-tunnel-policy exclude specified策略,使用者將選擇Allow Local LAN access覈取方塊。此外,如果透過
true
允許本地LAN訪問,您還可以配置VPN客戶端配置檔案。
使用者偏好設定
以下是您必須在Cisco AnyConnect安全移動客戶端的「首選項」頁籤中進行選擇,才能允許本地LAN訪問。
在Linux上
XML設定檔範例
以下是如何使用XML配置VPN客戶端配置檔案的示例。
<?xml version="1.0" encoding="UTF-8"?>
<AnyConnectProfile xmlns="http://schemas.xmlsoap.org/encoding/"
 xmlns:xsi="http://www.w3.org/2001/XMLSchema-instance"
 xsi:schemaLocation="http://schemas.xmlsoap.org/encoding/ AnyConnectProfile.xsd">
    <ClientInitialization>
        <UseStartBeforeLogon UserControllable="true">false</UseStartBeforeLogon>
        <AutomaticCertSelection UserControllable="true">false</AutomaticCertSelection>
        <ShowPreConnectMessage>false</ShowPreConnectMessage>
        <CertificateStore>All</CertificateStore>
        <CertificateStoreOverride>false</CertificateStoreOverride>
        <ProxySettings>Native</ProxySettings>
        <AllowLocalProxyConnections>true</AllowLocalProxyConnections>
        <AuthenticationTimeout>12</AuthenticationTimeout>
        <AutoConnectOnStart UserControllable="true">false</AutoConnectOnStart>
        <MinimizeOnConnect UserControllable="true">true</MinimizeOnConnect>
        <LocalLanAccess UserControllable="true">true</LocalLanAccess>
        <ClearSmartcardPin UserControllable="true">true</ClearSmartcardPin>
        <IPProtocolSupport>IPv4,IPv6</IPProtocolSupport>
        <AutoReconnect UserControllable="false">true
            <AutoReconnectBehavior UserControllable="false">DisconnectOnSuspend
            </AutoReconnectBehavior>
        </AutoReconnect>
        <AutoUpdate UserControllable="false">true</AutoUpdate>
        <RSASecurIDIntegration UserControllable="false">Automatic
        </RSASecurIDIntegration>
        <WindowsLogonEnforcement>SingleLocalLogon</WindowsLogonEnforcement>
        <WindowsVPNEstablishment>LocalUsersOnly</WindowsVPNEstablishment>
        <AutomaticVPNPolicy>false</AutomaticVPNPolicy>
        <PPPExclusion UserControllable="false">Disable
            <PPPExclusionServerIP UserControllable="false"></PPPExclusionServerIP>
        </PPPExclusion>
        <EnableScripting UserControllable="false">false</EnableScripting>
        <EnableAutomaticServerSelection UserControllable="false">false
            <AutoServerSelectionImprovement>20</AutoServerSelectionImprovement>
            <AutoServerSelectionSuspendTime>4</AutoServerSelectionSuspendTime>
        </EnableAutomaticServerSelection>
        <RetainVpnOnLogoff>false
        </RetainVpnOnLogoff>
    </ClientInitialization>
</AnyConnectProfile>
驗證
完成以下幾節中的步驟以驗證您的設定:
將您的Cisco AnyConnect安全移動客戶端連線到ASA以驗證您的配置。
- 從伺服器清單中選擇連線條目,並按一下
Connect。

- 選擇
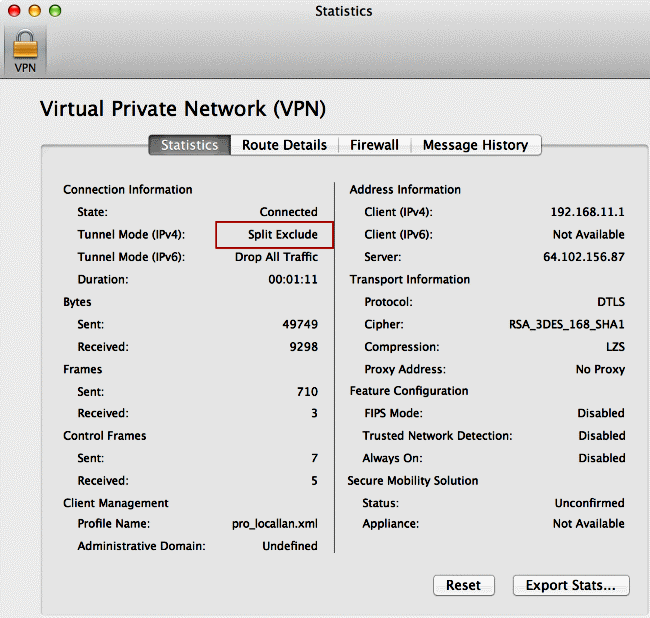
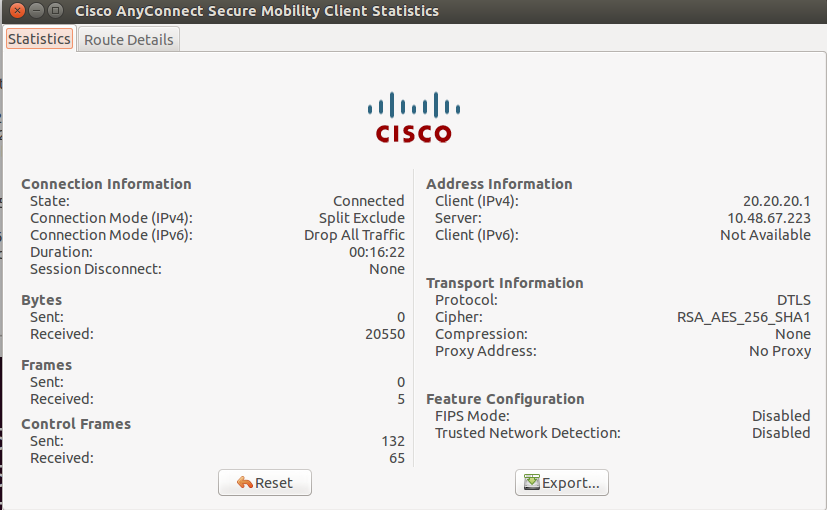
Advanced Window for All Components > Statistics...以顯示隧道模式。
在Linux上
- 按一下
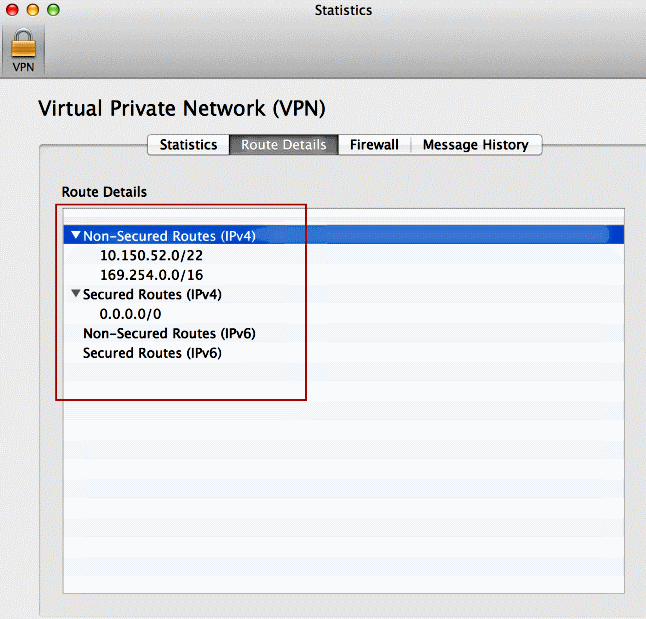
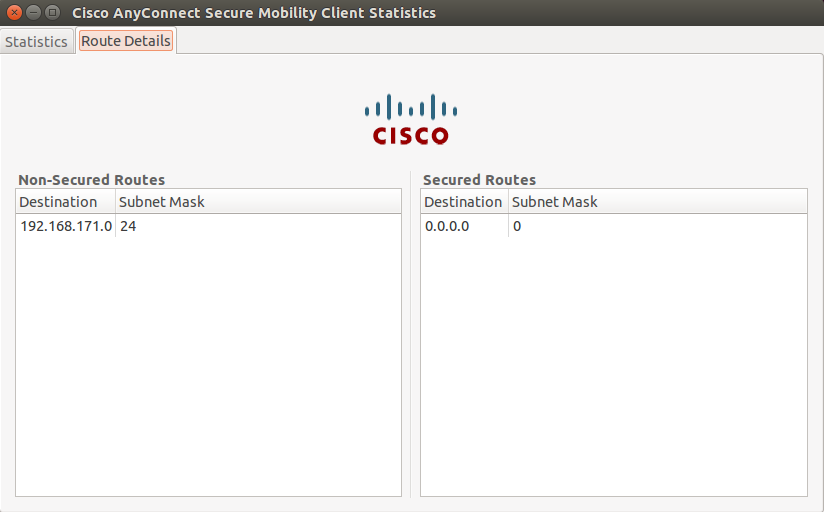
Route Details頁籤以檢視Cisco AnyConnect安全移動客戶端仍然具有本地訪問許可權的路由。
在本例中,允許客戶端訪問本地LAN到10.150.52.0/22和169.254.0.0/16,同時所有其它流量都經過加密並透過隧道傳送。
在Linux上
Cisco AnyConnect安全行動化使用者端
當您檢查診斷和報告工具(DART)捆綁包中的AnyConnect日誌時,您可以確定是否設定了允許本地LAN訪問的引數。
******************************************

Date        : 11/25/2011
Time        : 13:01:48
Type        : Information
Source      : acvpndownloader

Description : Current Preference Settings:
ServiceDisable: false
CertificateStoreOverride: false
CertificateStore: All
ShowPreConnectMessage: false
AutoConnectOnStart: false
MinimizeOnConnect: true
LocalLanAccess: true
AutoReconnect: true
AutoReconnectBehavior: DisconnectOnSuspend
UseStartBeforeLogon: false
AutoUpdate: true
RSASecurIDIntegration: Automatic
WindowsLogonEnforcement: SingleLocalLogon
WindowsVPNEstablishment: LocalUsersOnly
ProxySettings: Native
AllowLocalProxyConnections: true
PPPExclusion: Disable
PPPExclusionServerIP:
AutomaticVPNPolicy: false
TrustedNetworkPolicy: Disconnect
UntrustedNetworkPolicy: Connect
TrustedDNSDomains:
TrustedDNSServers:
AlwaysOn: false
ConnectFailurePolicy: Closed
AllowCaptivePortalRemediation: false
CaptivePortalRemediationTimeout: 5
ApplyLastVPNLocalResourceRules: false
AllowVPNDisconnect: true
EnableScripting: false
TerminateScriptOnNextEvent: false
EnablePostSBLOnConnectScript: true
AutomaticCertSelection: true
RetainVpnOnLogoff: false
UserEnforcement: SameUserOnly
EnableAutomaticServerSelection: false
AutoServerSelectionImprovement: 20
AutoServerSelectionSuspendTime: 4
AuthenticationTimeout: 12
SafeWordSofTokenIntegration: false
AllowIPsecOverSSL: false
ClearSmartcardPin: true


******************************************
使用Ping測試本地LAN訪問
測試VPN客戶端在透過隧道連線到VPN頭端時是否仍可訪問本地LAN的另一種方法是:在Microsoft Windows命令列中使用ping命令。以下範例顯示使用者端的本機LAN為192.168.0.0/24,而網路上有另一部主機,其IP位址為192.168.0.3。
C:\>ping 192.168.0.3
Pinging 192.168.0.3 with 32 bytes of data:

Reply from 192.168.0.3: bytes=32 time<1ms TTL=255
Reply from 192.168.0.3: bytes=32 time<1ms TTL=255
Reply from 192.168.0.3: bytes=32 time<1ms TTL=255
Reply from 192.168.0.3: bytes=32 time<1ms TTL=255

Ping statistics for 192.168.0.3:
    Packets: Sent = 4, Received = 4, Lost = 0 (0% loss),
Approximate round trip times in milli-seconds:
    Minimum = 0ms, Maximum = 0ms, Average = 0ms
在Linux上

疑難排解
本節提供的資訊可用於對組態進行疑難排解。
無法按名稱列印或瀏覽
當VPN客戶端已連線且已針對本地LAN訪問配置時,您無法在本地LAN上按名稱列印或瀏覽。可採用兩個選項來解決此問題:
相關資訊


 意見
意見