簡介
本文檔介紹如何從UCS Manager(UCSM)和ESXi角度在HX群集上實施不相交的第2層(DL2)配置。
必要條件
需求
思科建議您瞭解以下主題:
- 對DL2配置有基礎認識
- Hyperflex集群的基本知識
- 建議瞭解有關vNIC、服務配置檔案和模板的UCSM知識
其他要求包括:
- 必須在上游交換機上建立要使用的VLAN。
- 要使用的VLAN不能存在於服務配置檔案上的任何其他虛擬NIC(vNIC)上。
採用元件
本文件所述內容不限於特定軟體和硬體版本。
- 2個UCS-FI-6248UP
- 2x N5K-C5548UP
- UCSM版本4.2(1f)
本文中的資訊是根據特定實驗室環境內的裝置所建立。文中使用到的所有裝置皆從已清除(預設)的組態來啟動。如果您的網路運作中,請確保您瞭解任何指令可能造成的影響。
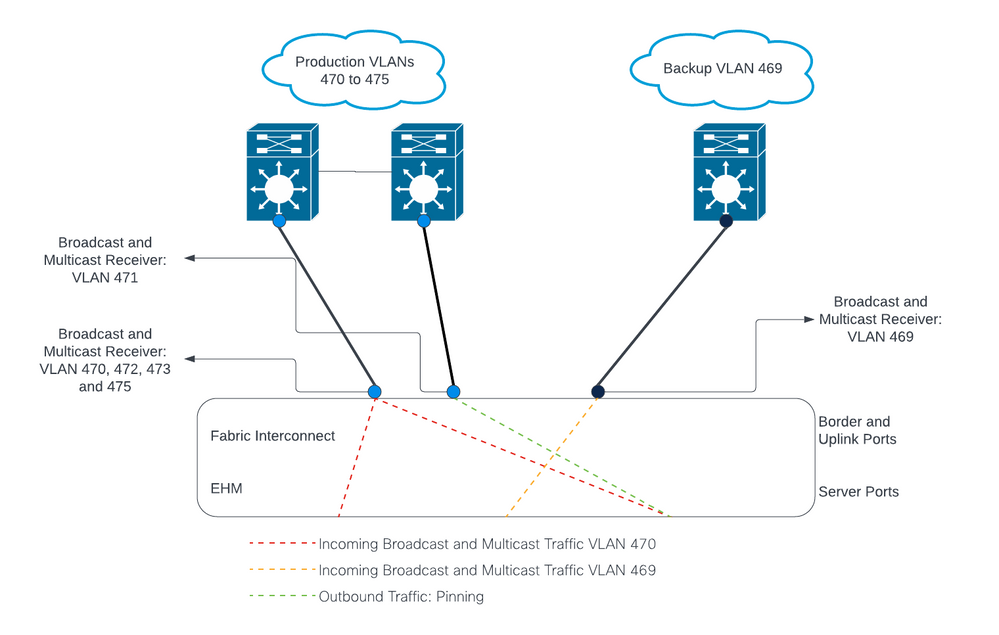
網路圖表
組態
DL2配置用於將特定上行鏈路上的流量隔離到上游裝置,因此VLAN流量不會混合。
配置新的vNIC
步驟 1.登入到UCSM,然後按一下左側面板上的LAN頁籤。
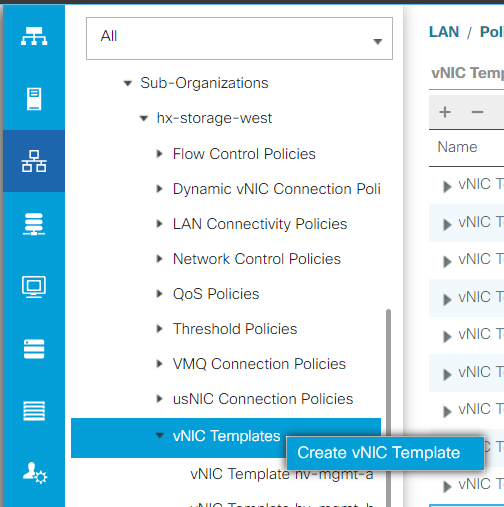
導航到Policies > root > Sub-organizations > Sub-organization name > vNIC templates。按一下右鍵該模板,然後按一下建立vNIC模板。
步驟 2.為模板命名,選擇Fabric A,向下滾動,並為新鏈路選擇適當的VLAN。可以根據需要配置其餘設定。
接下來,重複相同的過程,但這次選擇「交換矩陣B」。
步驟 3.從LAN頁籤導航到 Policies > root > Sub-organizations > Sub-organization name > LAN Connectivity Policies > Hyperflex。
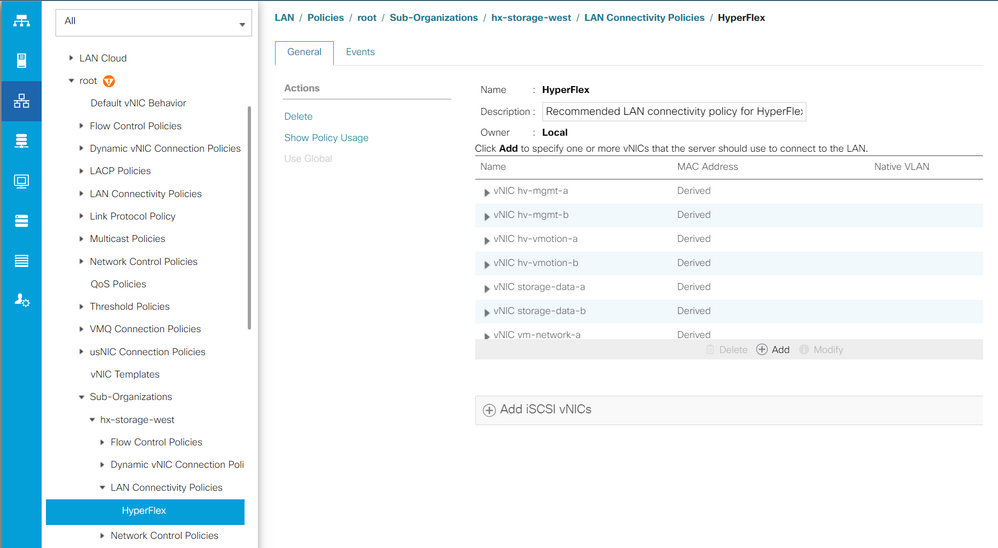
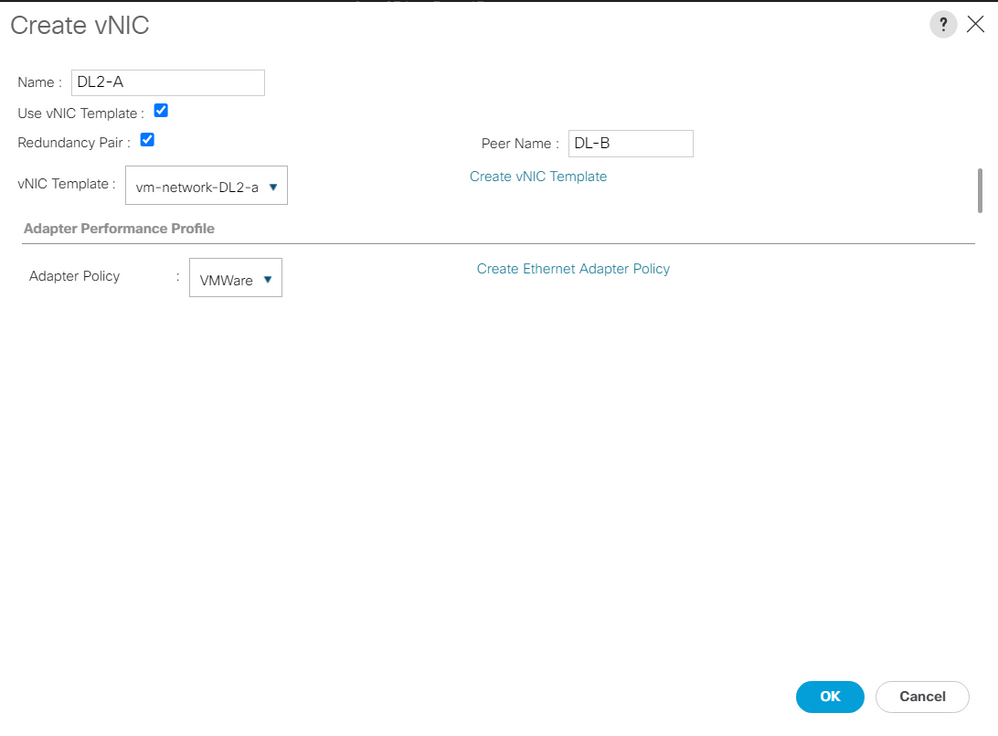
步驟 4.按一下Add,為vNIC命名,然後從下拉選單中選擇MAC池。
選中Use vNIC Template和Redundancy Pair框。從vNIC模板下拉選單中,選擇新模板,並在新模板旁邊輸入 對等體名稱。
選擇所需的介面卡策略,然後按一下OK。
步驟 5.在vNIC清單中,查詢剛剛建立的對等體,選擇該對等體,然後按一下 修改。
按一下Use vNIC Template框,並從下拉選單中選擇建立的其他模板。
按一下底部的Save Changes,這將觸發相關伺服器的Pending Activities。
確認待定活動
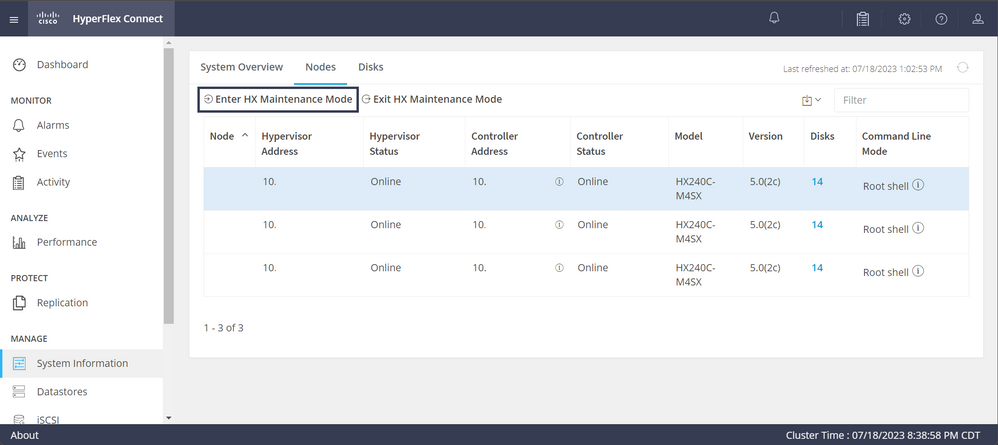
步驟 1.登入到HX Connect,導航到System Information > Nodes,按一下其中一個節點,然後按一下Enter HX Maintenance Mode,然後等待任務完成。
步驟 2.在vCenter中,確保節點處於維護狀態。
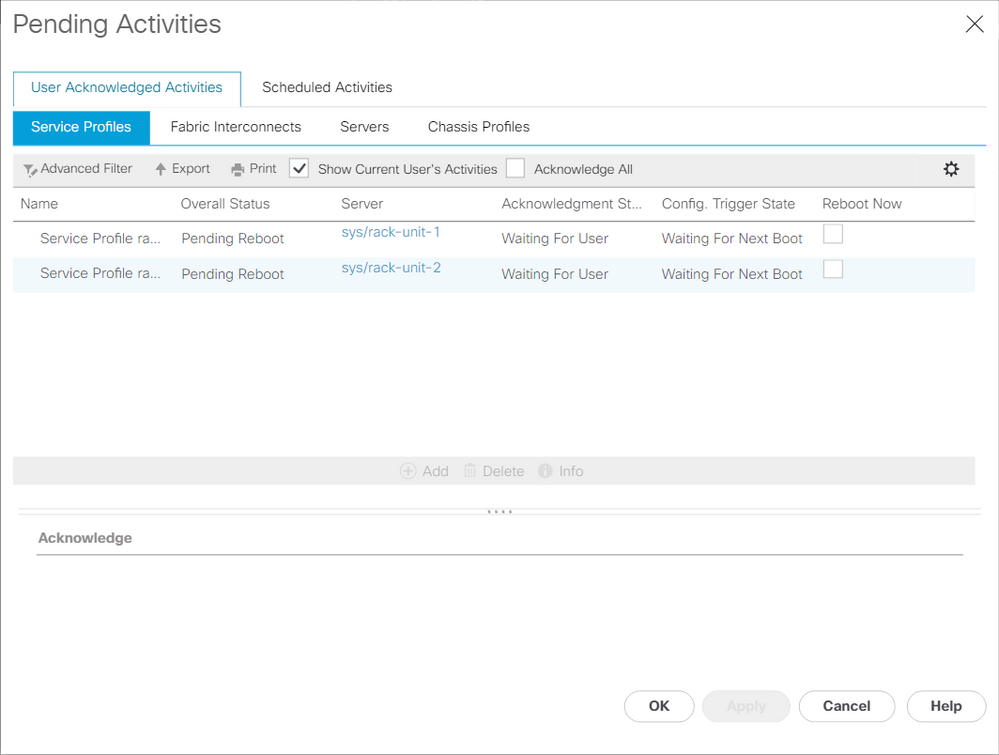
步驟 3.節點維護後,返回UCSM,按一下右上角的鈴聲圖示,然後在立即重新啟動下。
選中與當前正在維護的伺服器匹配的覈取方塊,然後按一下OK。
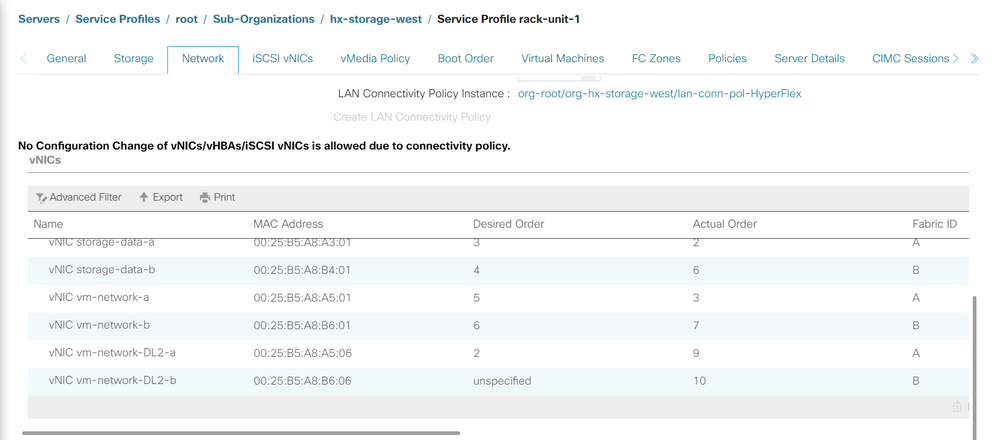
步驟 4.伺服器啟動後,導航到Servers > Service Profiles > root > Sub-Organizations > Sub-organization name > Service Profile name,確保新的vNIC存在。
按一下Network,向下滾動,新vNIC必須存在。
步驟 5.從HX Connect UI使伺服器退出維護模式。
按一下退出HX維護模式。
當伺服器停止維護時,儲存控制器虛擬機器(SCVM)將啟動,群集將啟動修復過程。
為了監控修復過程,請通過SSH連線到Hyperflex(HX)Cluster Manager IP並運行命令:
sysmtool --ns cluster --cmd healthdetail
Cluster Health Detail:
---------------------:
State: ONLINE
HealthState: HEALTHY
Policy Compliance: COMPLIANT
Creation Time: Tue May 30 04:48:45 2023
Uptime: 7 weeks, 1 days, 15 hours, 50 mins, 17 secs
Cluster Resiliency Detail:
-------------------------:
Health State Reason: Storage cluster is healthy.
# of nodes failure tolerable for cluster to be fully available: 1
# of node failures before cluster goes into readonly: NA
# of node failures before cluster goes to be crticial and partially available: 3
# of node failures before cluster goes to enospace warn trying to move the existing data: NA
# of persistent devices failures tolerable for cluster to be fully available: 2
# of persistent devices failures before cluster goes into readonly: NA
# of persistent devices failures before cluster goes to be critical and partially available: 3
# of caching devices failures tolerable for cluster to be fully available: 2
# of caching failures before cluster goes into readonly: NA
# of caching failures before cluster goes to be critical and partially available: 3
Current ensemble size: 3
Minimum data copies available for some user data: 3
Minimum cache copies remaining: 3
Minimum metadata copies available for cluster metadata: 3
Current healing status:
Time remaining before current healing operation finishes:
# of unavailable nodes: 0
步驟 6. 一旦集群運行正常,請重複步驟1-6。在所有伺服器都有新的vNIC之前,不要繼續執行下一步。
配置VLAN
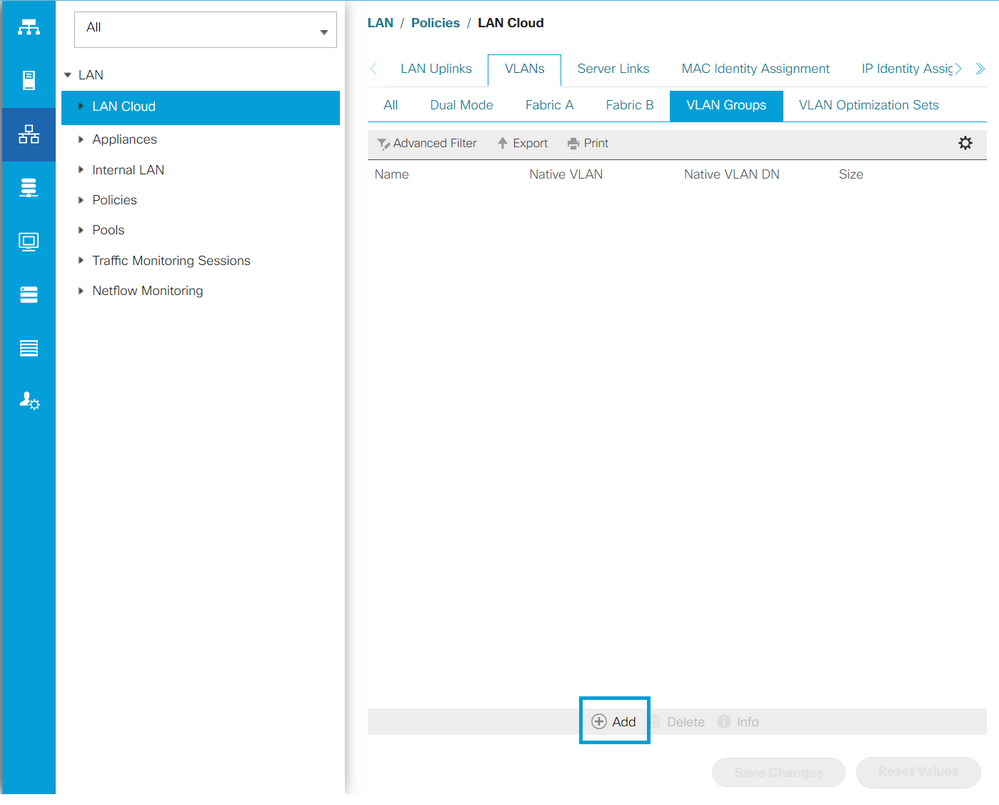
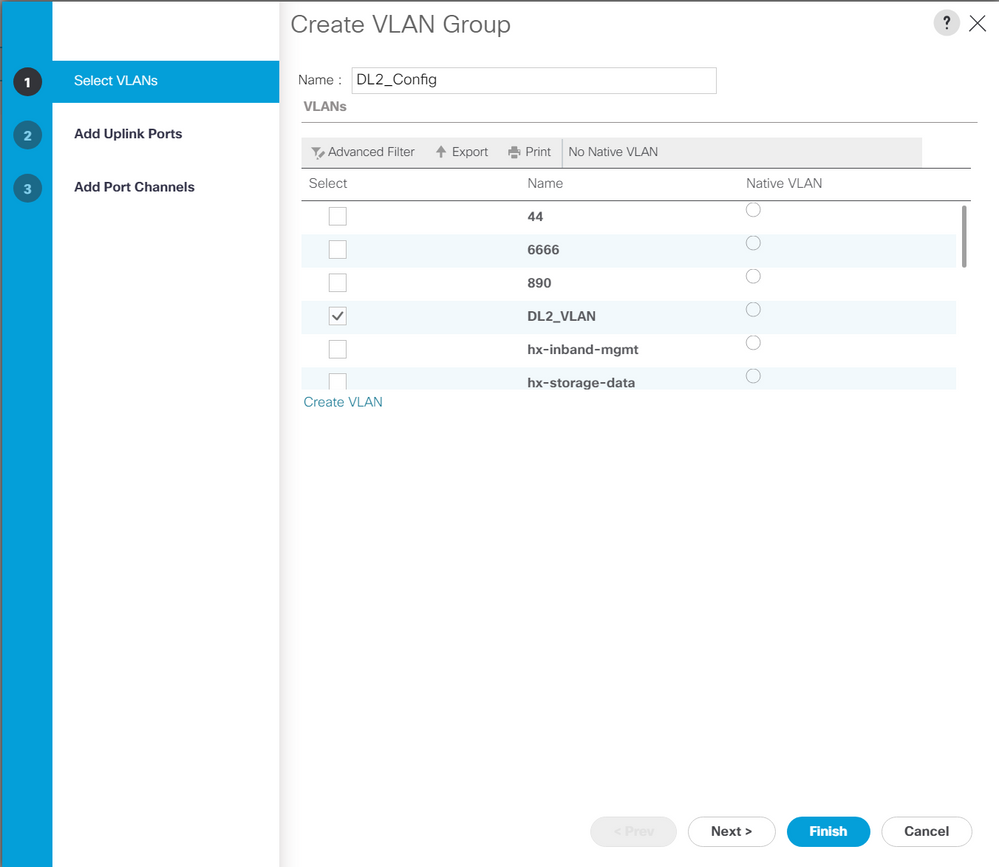
步驟 1.在UCSM中,導航到LAN > VLANs > VLAN Groups,然後點選Add。
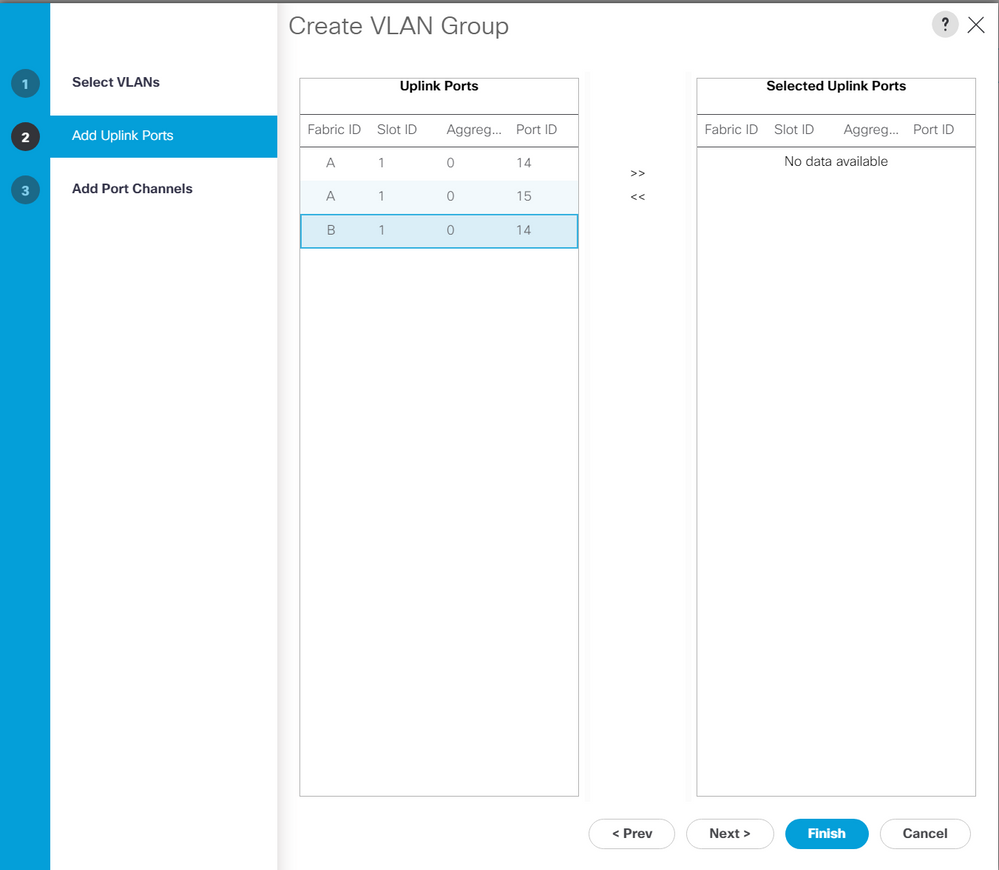
步驟 2.命名VLAN組並在下面選擇適當的VLAN,按一下下一步,然後轉到嚮導的第2步新增單個上行鏈路埠,或轉到第3步新增埠通道。
步驟 3.點選上行埠或埠通道並點選>>圖示新增上行端口。按一下底部的Finish。
ESXi配置
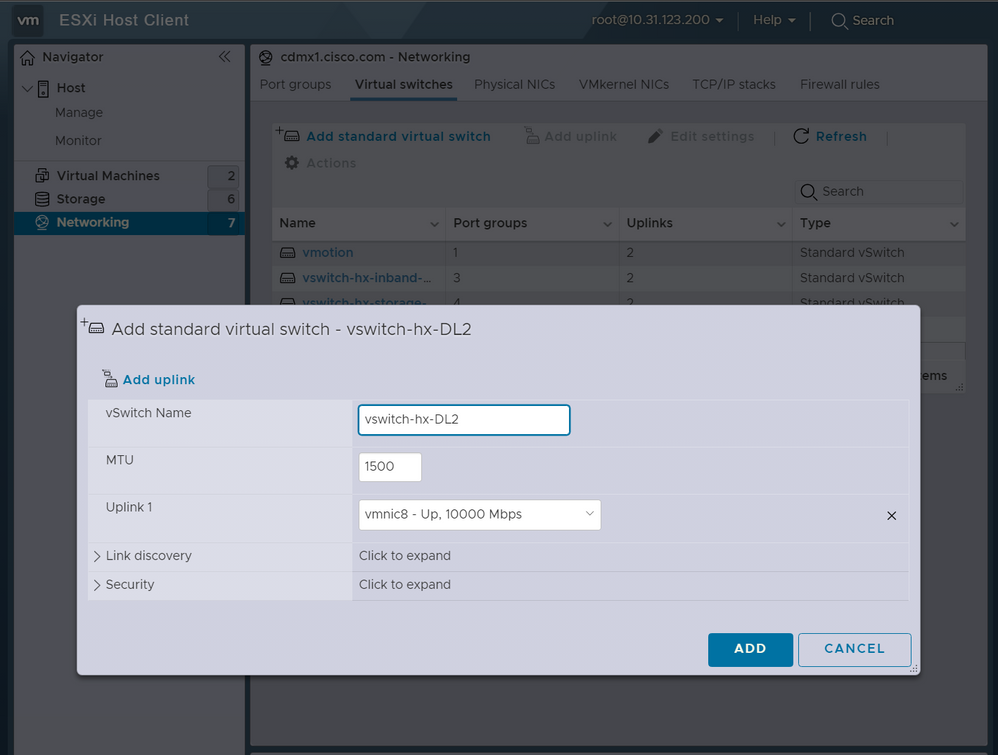
步驟 1.登入到ESXi主機的vSphere,導航到網路>虛擬交換機,然後按一下 新增標準虛擬交換機。
步驟 2.為vSwitch命名,並且已經有一個新虛擬機器,請按一下Add uplink以新增第二個虛擬機器。按一下「Add」。
步驟 3.導覽至Networking > Port groups,然後按一下Add port group
步驟 4.為埠組命名,輸入所需的VLAN,然後從下拉選單中選擇新的虛擬交換機。
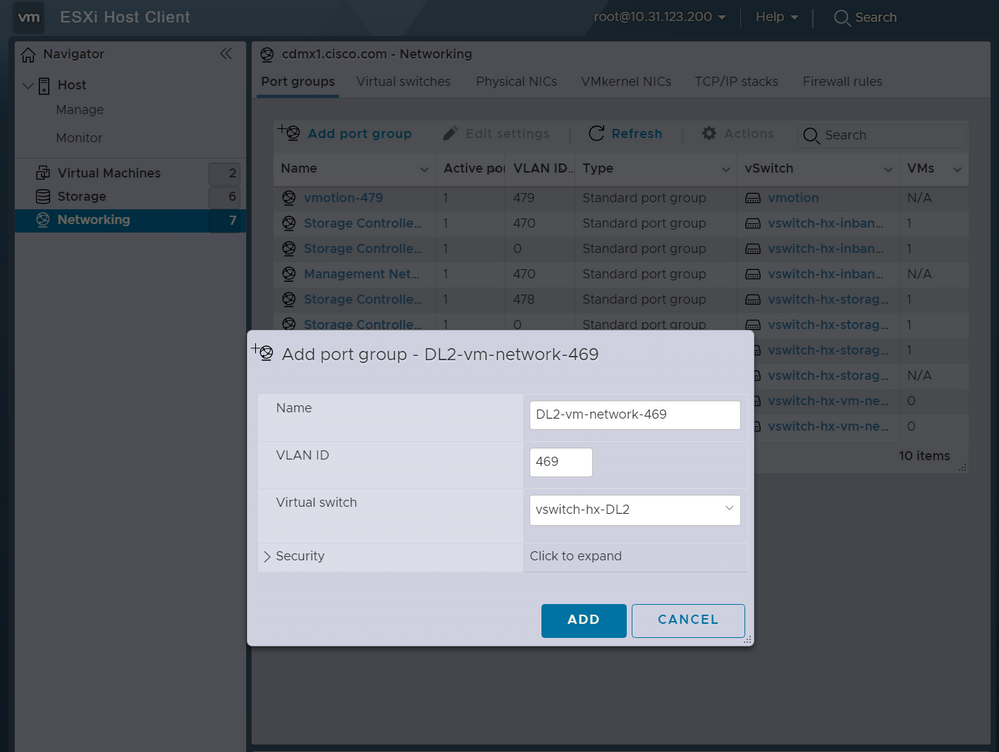
步驟 5.對流經新鏈路的每個VLAN重複步驟4。
步驟 6.對屬於群集的每個伺服器重複步驟1-5。
驗證
UCSM驗證
導覽至Equipment > Rack-Mounts > Servers > Server # > VIF Paths,然後展開Path A或B,在vNIC列下查詢與DL2 vNIC匹配且虛擬電路必須固定至最近配置的交換矩陣互聯(FI)上行鏈路或埠通道的路徑。

CLI 驗證
虛擬介面(VIF)路徑
在與交換矩陣互聯的SSH會話中,運行命令:
show service-profile circuit server <server-number>
此命令顯示VIF路徑、其對應的vNIC及其固定的介面。
    Fabric ID: A
        Path ID: 1
        VIF        vNIC            Link State  Oper State Prot State    Prot Role   Admin Pin  Oper Pin   Transport
        ---------- --------------- ----------- ---------- ------------- ----------- ---------- ---------- ---------
               966 hv-mgmt-a       Up          Active     No Protection Unprotected 0/0/0      0/0/1      Ether
               967 storage-data-a  Up          Active     No Protection Unprotected 0/0/0      0/0/1      Ether
               968 vm-network-a    Up          Active     No Protection Unprotected 0/0/0      0/0/1      Ether
               969 hv-vmotion-a    Up          Active     No Protection Unprotected 0/0/0      0/0/1      Ether
               990 network-DL2-a   Up          Active     No Protection Unprotected 0/0/0      1/0/14     Ether
Oper Pin列必須在與DL2 vNIC相同的線路下顯示最近配置的FI上行鏈路或埠通道。
在此輸出中,與vm-network-DL2-b vNIC對應的VIF 990被固定到介面1/0/14。
在上行鏈路中固定
Fabric-Interconnect-A# connect nx-os a
Fabric-Interconnect-A(nxos)# show pinning border-interfaces
--------------------+---------+----------------------------------------
Border Interface     Status    SIFs
--------------------+---------+----------------------------------------
Eth1/14              Active    sup-eth2 Veth990 Veth992 Veth994
在此輸出中,Veth編號必須與上一輸出中看到的VIF編號相匹配,並且與正確的上行鏈路介面位於同一條線路上。
指定接收方:
Fabric-Interconnect-A# connect nx-os a
Fabric-Interconnect-A(nxos)# show platform software enm internal info vlandb id <VLAN-ID>
vlan_id 469
-------------
Designated receiver: Eth1/14
Membership:
Eth1/14
在此輸出中,必須顯示正確的上行鏈路。
上游交換機
在與上游交換機的SSH會話中,可以檢查MAC地址表,並且必須顯示此VLAN上任何虛擬機器(VM)的MAC地址。
Nexus-5K# show mac address-table vlan 469
Legend:
        * - primary entry, G - Gateway MAC, (R) - Routed MAC, O - Overlay MAC
        age - seconds since last seen,+ - primary entry using vPC Peer-Link
   VLAN     MAC Address      Type      age     Secure NTFY   Ports/SWID.SSID.LID
---------+-----------------+--------+---------+------+----+------------------
* 469      0000.0c07.ac45    static    0          F    F  Router
* 469      002a.6a58.e3bc    static    0          F    F  Po1
* 469      0050.569b.048c    dynamic   50         F    F  Eth1/14
* 469      547f.ee6a.8041    static    0          F    F  Router
在此配置示例中,VLAN 469是分離VLAN,MAC地址0050:569B:048C屬於分配給vSwitch vswitch-hx-DL2和埠組DL2-vm-network-469的Linux VM,它在介面Ethernet 1/14(連線到交換矩陣互聯的上游交換機的介面)上正確顯示。
從與上游交換機的同一會話可以檢查VLAN配置。
Nexus-5K# show vlan brief

VLAN Name                             Status    Ports
---- -------------------------------- --------- -------------------------------
1    default                          active    Eth1/5, Eth1/8, Eth1/9, Eth1/10
                                                Eth1/11, Eth1/12, Eth1/13
                                                Eth1/15, Eth1/16, Eth1/17
                                                Eth1/19, Eth1/20, Eth1/21
                                                Eth1/22, Eth1/23, Eth1/24
                                                Eth1/25, Eth1/26
469  DMZ                              active    Po1, Eth1/14, Eth1/31, Eth1/32
在此輸出中,介面Ethernet 1/14已正確分配給VLAN 469。
疑難排解
UCSM配置錯誤
錯誤:「找不到任何可承載vNIC的所有VLAN的上行鏈路埠。vNIC將關閉,這將導致vNIC上所有現有VLAN上的流量中斷。
此錯誤表示沒有上行鏈路來承載新流量,丟棄介面上的任何第1層和第2層問題,然後重試。
錯誤:「ENM源固定失敗」
此錯誤與上行鏈路上未找到vNIC的關聯VLAN有關。
可能的不正確行為
先前的上行鏈路會停止資料流,因為新的VLAN已經存在於vNIC上,而且它們會被固定至新的上行鏈路。
刪除上一個vNIC模板上的任何重複VLAN。導航到Policies > root > Sub-organizations > Sub-organization name > vNIC templates,然後從vm-network vNIC模板中刪除VLAN。
相關資訊