소개
이 문서에서는 FND(Field Network Director)에서 PNP(Plug and Play)와 함께 사용하기 위해 Windows PKI(Private Key Infrastructure)에서 올바른 인증서를 생성하고 내보내는 방법에 대해 설명합니다.
문제
PNP를 사용하여 최신 Cisco IOS® 및 Cisco IOS®-XE 릴리스에서 ZTD(Zero Touch Deployment)를 수행하려고 하면 다음 PNP 오류 중 하나로 프로세스가 실패합니다.
Error while creating FND trustpoint on the device. errorCode: PnP Service Error 3341,
errorMessage: SSL Server ID check failed after cert-install
Error while creating FND trustpoint on the device. errorCode: PnP Service Error 3337,
errorMessage: Cant get PnP Hello Response after cert-install
Cisco IOS®/Cisco IOS®-XE의 PNP 코드는 PNP-서버/컨트롤러(이 경우 FND)가 제공하는 인증서에 SAN(주체 대체 이름) 필드를 입력해야 합니다.
PNP Cisco IOS® 에이전트는 인증서 SAN 필드에서만 서버 ID를 확인합니다. 더 이상 CN(Common Name) 필드를 확인하지 않습니다.
이는 다음 릴리스에 유효합니다.
-
Cisco IOS® 릴리스 15.2(6)E2 이상
-
Cisco IOS® 릴리스 15.6(3)M4 이상
-
Cisco IOS® 릴리스 15.7(3)M2 이상
-
Cisco IOS® XE Denali 16.3.6 이상
-
Cisco IOS® XE Everest 16.5.3 이상
-
Cisco IOS® Everest 16.6.3 이상
-
모든 Cisco IOS® 릴리스 16.7.1 이상
자세한 내용은 다음을 참조하십시오. https://www.cisco.com/c/en/us/td/docs/solutions/Enterprise/Plug-and-Play/solution/guidexml/b_pnp-solution-guide.html#id_70663
솔루션
FND에 대한 대부분의 가이드 및 설명서에는 아직 SAN 필드를 입력해야 한다는 언급이 없습니다.
PNP에 사용할 올바른 인증서를 생성 및 내보내고 키 저장소에 추가하려면 다음 단계를 수행합니다.
Windows CA-Server에서 FND/NMS 템플릿을 사용하여 새 인증서 생성
Start(시작) > Run(실행) > mmc > File(파일) > Add/Remove Snap-in...(스냅인 추가/제거) > Certificates(인증서) > Add(추가) > Computer Account(컴퓨터 계정) > Local Computer(로컬 컴퓨터) > OK(확인)로 이동하여 인증서 MMC 스냅인을 엽니다.
Certificates(인증서)(로컬 컴퓨터) > Personal(개인) > Certificates(인증서)를 펼칩니다
이미지에 표시된 대로 Certificates(인증서)를 마우스 오른쪽 버튼으로 클릭하고 All Tasks(모든 작업) > Request New Certificate(새 인증서 요청)...를 선택합니다.

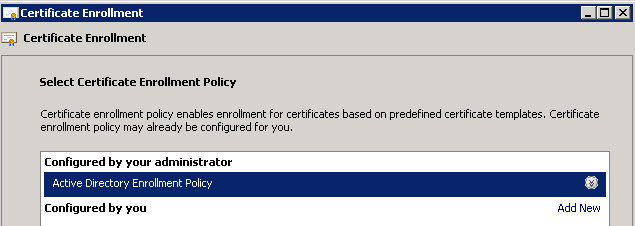
이미지에 표시된 대로 Next(다음)를 클릭하고 Active Directory Enrollment Policy(Active Directory 등록 정책)를 선택합니다.
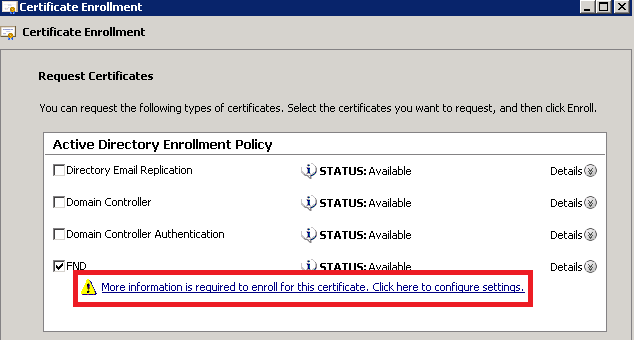
Next(다음)를 클릭하고 NMS/FND-server에 대해 생성된 템플릿을 선택하고(TPS(TelePresence Server)에 대해 나중에 반복) 이미지에 표시된 More Information(추가 정보) 링크를 클릭합니다.
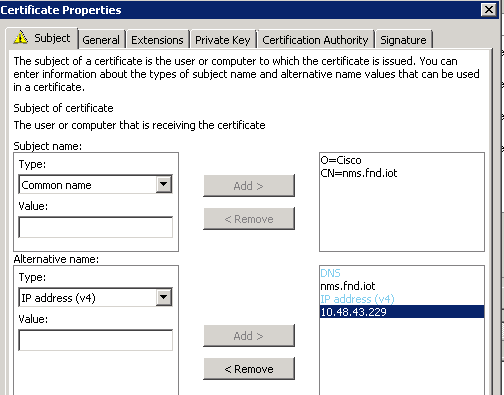
인증서 속성에서 다음 정보를 제공합니다.
주체 이름:
- 조직: 조직 이름
- 공용 이름: fnd-server의 FQDN(Fully Qualified Domain Name)(또는 해당되는 경우 TPS)
대체 이름(SAN 필드):
- DNS(Domain Name System)를 사용하여 FND 서버의 PNP 부분에 연결하는 경우 FQDN에 대한 DNS 항목을 추가합니다
- FND 서버의 PNP 부분에 연결하기 위해 IP를 사용하는 경우 IP에 대한 IPv4 항목을 추가합니다
검색 방법이 다를 경우 인증서에 여러 SAN 값을 포함하는 것이 좋습니다. 예를 들어 SAN 필드에 컨트롤러 FQDN과 IP 주소(또는 NAT IP 주소)를 모두 포함할 수 있습니다. 둘 다 포함할 경우 FQDN을 첫 번째 SAN 값으로 설정하고 그 뒤에 IP 주소를 설정합니다.
컨피그레이션 예:
완료되면 Certificate Properties(인증서 속성) 창에서 OK(확인)를 클릭한 다음 Enroll(등록)을 클릭하여 인증서를 생성하고 생성이 완료되면 Finish(마침)를 클릭합니다.
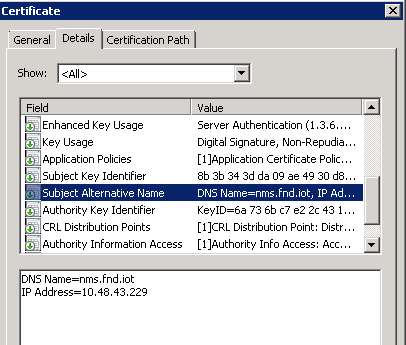
생성된 인증서에서 SAN-Field 확인
생성된 인증서에 올바른 정보가 포함되어 있는지 확인하기 위해 다음과 같이 확인할 수 있습니다.
MMC(Microsoft Management Console)에서 인증서 스냅인을 열고 Certificates(로컬 컴퓨터) > Personal > Certificates를 확장합니다.
생성된 인증서를 두 번 클릭하고 Details(세부사항) 탭을 엽니다. 그림과 같이 아래로 스크롤하여 SAN 필드를 찾습니다.
FND 키 저장소로 가져올 인증서 내보내기
FND 키 저장소에 있는 인증서를 가져오거나 교체하려면 먼저 .pfd 파일로 내보내야 합니다.
MMC의 인증서 스냅인에서 Certificates (Local Computer)(인증서(로컬 컴퓨터)) > Personal(개인) > Certificates(인증서)를 확장합니다
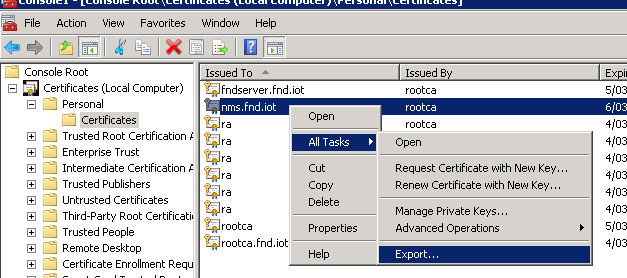
생성된 인증서를 마우스 오른쪽 단추로 클릭하고 이미지에 표시된 대로 All Tasks(모든 작업) > Export...(내보내기...)를 선택합니다.
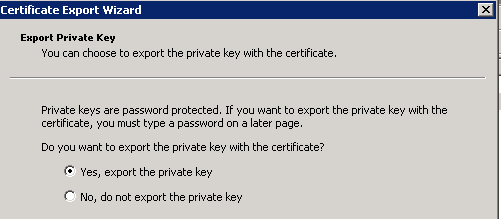
이미지에 표시된 대로 개인 키를 내보내려면 Next(다음)를 클릭하고 선택합니다.
이미지에 표시된 대로 모든 인증서를 인증 경로에 포함하려면 선택합니다.

Next(다음)를 클릭하고 내보낼 비밀번호를 선택한 다음 .pfx를 알려진 위치에 저장합니다.
PNP와 함께 사용할 FND 키 저장소 만들기
이제 인증서를 내보냈으므로 FND에 필요한 키 저장소를 구축할 수 있습니다.
생성된 .pfx를 이전 단계의 FND 서버(NMS(Network Management Systems) 머신 또는 OVA 호스트)에 안전하게 전송합니다(예: SCP 사용).
내보내기에서 자동 생성된 별칭을 확인할 .pfx의 내용을 나열합니다.
[root@iot-fnd ~]# keytool -list -v -keystore nms.pfx -srcstoretype pkcs12 | grep Alias
Enter keystore password:  keystore
Alias name: le-fnd-8f0908aa-dc8d-4101-a526-93b4eaad9481
다음 명령을 사용하여 새 키 저장소를 만듭니다.
root@iot-fnd ~]# keytool -importkeystore -v -srckeystore nms.pfx -srcstoretype pkcs12 -destkeystore cgms_keystore_new -deststoretype jks -srcalias le-fnd-8f0908aa-dc8d-4101-a526-93b4eaad9481 -destalias cgms -destkeypass keystore
Importing keystore nms.pfx to cgms_keystore_new...
Enter destination keystore password:
Re-enter new password:
Enter source keystore password:
[Storing cgms_keystore_new]

Warning:
The JKS keystore uses a proprietary format. It is recommended to migrate to PKCS12 which is an industry standard format using "keytool -importkeystore -srckeystore cgms_keystore_new -destkeystore cgms_keystore_new -deststoretype pkcs12".
이 명령에서 nms.pfx를 올바른 파일(Windows CA에서 내보냄)로 바꾸고 srcalias 값이 이전 명령의 출력(keytool -list)과 일치하는지 확인합니다.
생성한 후에는 권장 사항에 따라 새 형식으로 변환합니다.
[root@iot-fnd ~]# keytool -importkeystore -srckeystore cgms_keystore_new -destkeystore
cgms_keystore_new -deststoretype pkcs12
Enter source keystore password:
Entry for alias cgms successfully imported.
Import command completed:  1 entries successfully imported, 0 entries failed or cancelled

Warning:
Migrated "cgms_keystore_new" to Non JKS/JCEKS. The JKS keystore is backed up as
"cgms_keystore_new.old".
이전에 내보낸 CA 인증서를 키 저장소에 추가합니다.
[root@iot-fnd ~]# keytool -import -trustcacerts -alias root -keystore cgms_keystore_
new -file rootca.cer
Enter keystore password:
Owner: CN=rootca, DC=fnd, DC=iot
Issuer: CN=rootca, DC=fnd, DC=iot
...
Trust this certificate? [no]:  yes
Certificate was added to keystore
마지막으로 PNP를 사용할 때 FAR의 직렬별 ID를 확인하기 위해 사용되는 SUDI 인증서를 키 저장소에 추가합니다.
RPM 설치의 경우 SUDI 인증서는 패키지와 함께 번들로 제공되며 /opt/cgms/server/cgms/conf/ciscosudi/cisco-sudi-ca.pem에서 찾을 수 있습니다.
OVA 설치의 경우 먼저 SUDI 인증서를 호스트에 복사합니다.
[root@iot-fnd ~]# docker cp fnd-container:/opt/cgms/server/cgms/conf/ciscosudi/cisco-sudi-ca.pem .
그런 다음 별칭 SUDI를 통해 신뢰된 키 저장소에 추가합니다.
[root@iot-fnd ~]# keytool -import -trustcacerts -alias sudi -keystore cgms_keystore_new -file cisco-sudi-ca.pem
Enter keystore password:
Owner: CN=ACT2 SUDI CA, O=Cisco
Issuer: CN=Cisco Root CA 2048, O=Cisco Systems
...
Trust this certificate? [no]:  yes
Certificate was added to keystore
이제 키 저장소를 FND와 함께 사용할 준비가 되었습니다.
FND에 사용할 새/수정된 키 저장소 활성화
키 저장소를 사용하기 전에 이전 버전을 교체하고 cgms.properties 파일에서 선택적으로 비밀번호를 업데이트합니다.
먼저 이미 있는 키 저장소를 백업합니다.
RPM 설치의 경우:
[root@fndnms ~]# cp /opt/cgms/server/cgms/conf/cgms_keystore cgms_keystore_backup
OVA 설치의 경우
[root@iot-fnd ~]# cp /opt/fnd/data/cgms_keystore cgms_keystore_backup
기존 파일을 새 파일로 바꿉니다.
RPM 설치의 경우:
[root@fndnms ~]# cp cgms_keystore_new /opt/cgms/server/cgms/conf/cgms_keystore
OVA 설치의 경우
[root@iot-fnd ~]# cp cgms_keystore_new /opt/fnd/data/cgms_keystore
선택적으로, cgms.properties 파일에서 키 저장소의 비밀번호를 업데이트합니다.
먼저, 암호화된 새 비밀번호 문자열을 생성합니다.
RPM 설치의 경우:
[root@fndnms ~]# /opt/cgms/bin/encryption_util.sh encrypt keystore
7jlXPniVpMvat+TrDWqh1w==
OVA 설치의 경우
[root@iot-fnd ~]# docker exec -it fnd-container /opt/cgms/bin/encryption_util.sh encrypt keystore
7jlXPniVpMvat+TrDWqh1w==
키 저장소를 키 저장소의 올바른 암호로 바꾸십시오.
RPM 기반 설치의 경우 /opt/cgms/server/cgms/conf/cgms.properties에서 cgms.properties를 변경하고, OVA 기반 설치의 경우 /opt/fnd/data/cgms.properties에서 암호화된 새 비밀번호를 입력합니다.
마지막으로 FND를 다시 시작하여 새 키 저장소 및 암호 사용을 시작합니다.