Introduction
This document describes the integration of the Catalyst 9800 Wireless Controller with Aruba ClearPass Policy Manager.
Prerequisites
Requirements
Cisco recommends that you have knowledge of these topics and that they have been configured and verified:
- Catalyst 9800 Wireless Controller
- Aruba ClearPass Server (Requires Platform License, Access License, Onboard License)
- Operational Windows AD
- Optional Certificate Authority (CA)
- Operational DHCP Server
- Operational DNS Server (required for Certificate CRL validation)
- ESXi
- All pertinent components are synced to NTP and verified to have the correct time (required for certificate validation)
- Knowledge of topics:
- C9800 deployment and New Config Model
- FlexConnect operation on C9800
- Dot1x Authentication
Components Used
The information in this document is based on these hardware and software versions:
- C9800-L-C Cisco IOS-XE 17.3.3
- C9130AX, 4800 APs
- Aruba ClearPass, 6-8-0-109592 and 6.8-3 patch
- MS Windows Server
- Active Directory (GP configured for automated machine-based cert issuance to managed endpoints)
- DHCP Server with option 43 and option 60
- DNS Server
- NTP Server to time-sync all the components
- CA
The information in this document was created from the devices in a specific lab environment. All of the devices used in this document started with a cleared (default) configuration. If your network is live, ensure that you understand the potential impact of any command.
Background Information
Traffic Flow
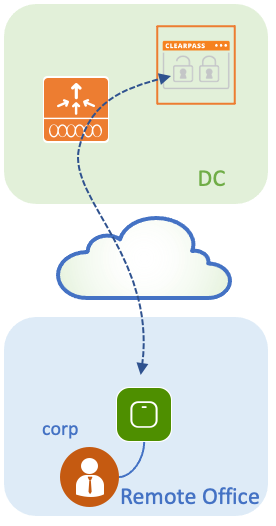
In a typical enterprise deployment with multiple branch offices, each branch office is set up to provide dot1x access to the corporate employees. In this configuration example, PEAP is used to provide dot1x access to corporate users via a ClearPass instance deployed in the central data center (DC). Machine certificates are used in conjunction with verification of employee credentials against a Microsoft AD server.
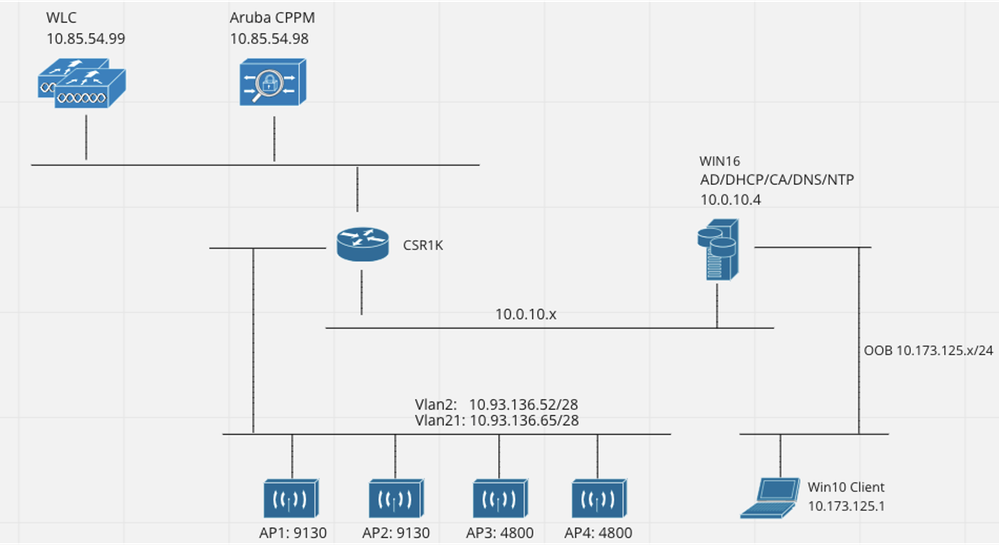
Network Diagram
Configure the Catalyst 9800 Wireless Controller
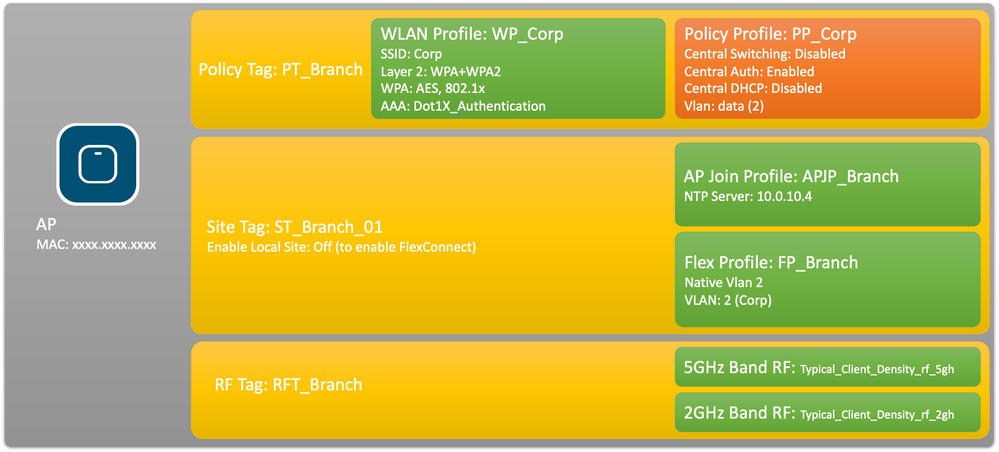
In this configuration example, the new configuration model on C9800 is leveraged to create the necessary profiles and tags to provide dot1x Corporate Access to enterprise branches. The resultant configuration is summarized in the diagram.
C9800 - Configure AAA Parameters for dot1x
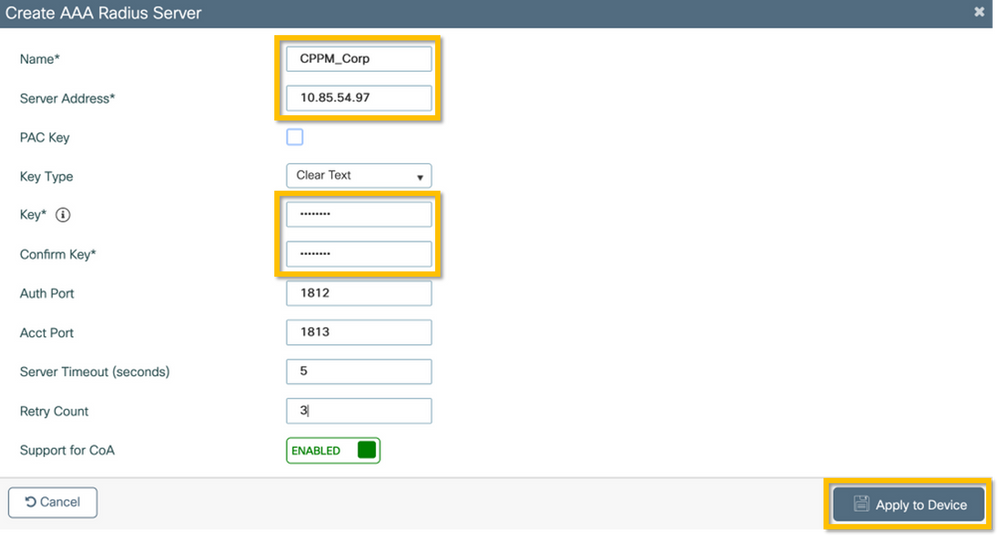
Step 1. Add the Aruba ClearPass Policy Manager 'Corp' server to the 9800 WLC configuration. Navigate to Configuration > Security > AAA > Servers/Groups > RADIUS > Servers. Click +Add and enter the RADIUS server information. Click on the Apply to Device button as shown in this image.
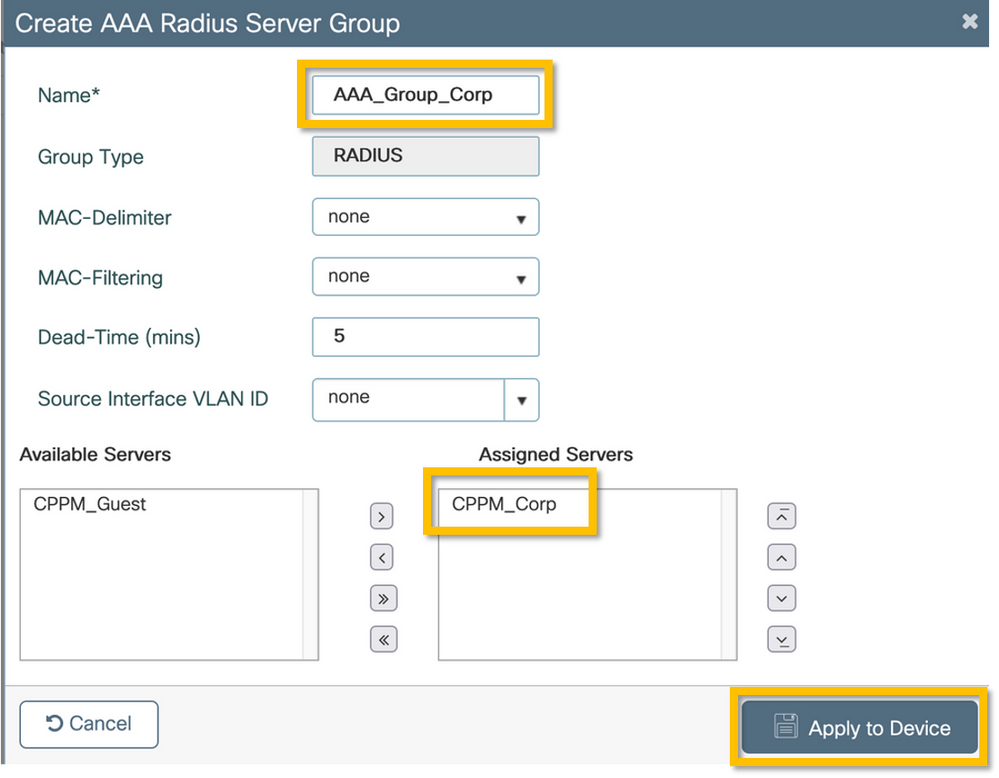
Step 2. Define AAA Server Group for corporate users. Navigate to Configuration > Security > AAA > Servers/Groups > RADIUS > Groups and click +Add, enter the RADIUS server group name and assign the RADIUS server information. Click on the Apply to Device button as shown in this image.
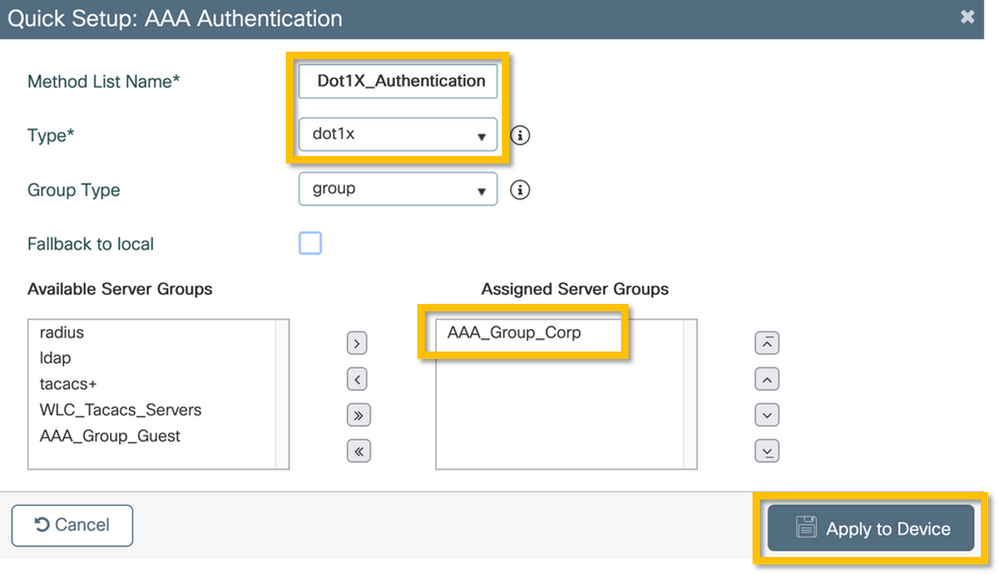
Step 3. Define dot1x Authentication Method List for corporate users. Navigate to Configuration > Security > AAA > AAA Method List > Authentication and click +Add. Select Type dot1x from the drop-down menu. Click on the Apply to Device button as shown in this image.
C9800 - Configure the 'Corp' WLAN Profile
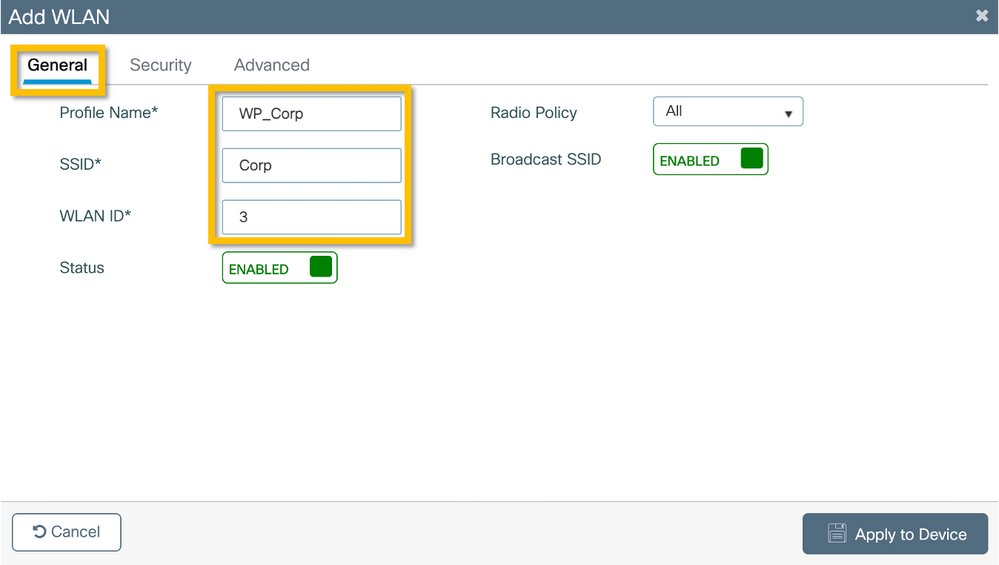
Step 1. Navigate to Configuration > Tags & Profiles > Wireless and click +Add. Enter a profile name, the SSID 'Corp', and a WLAN ID that is not already in use.
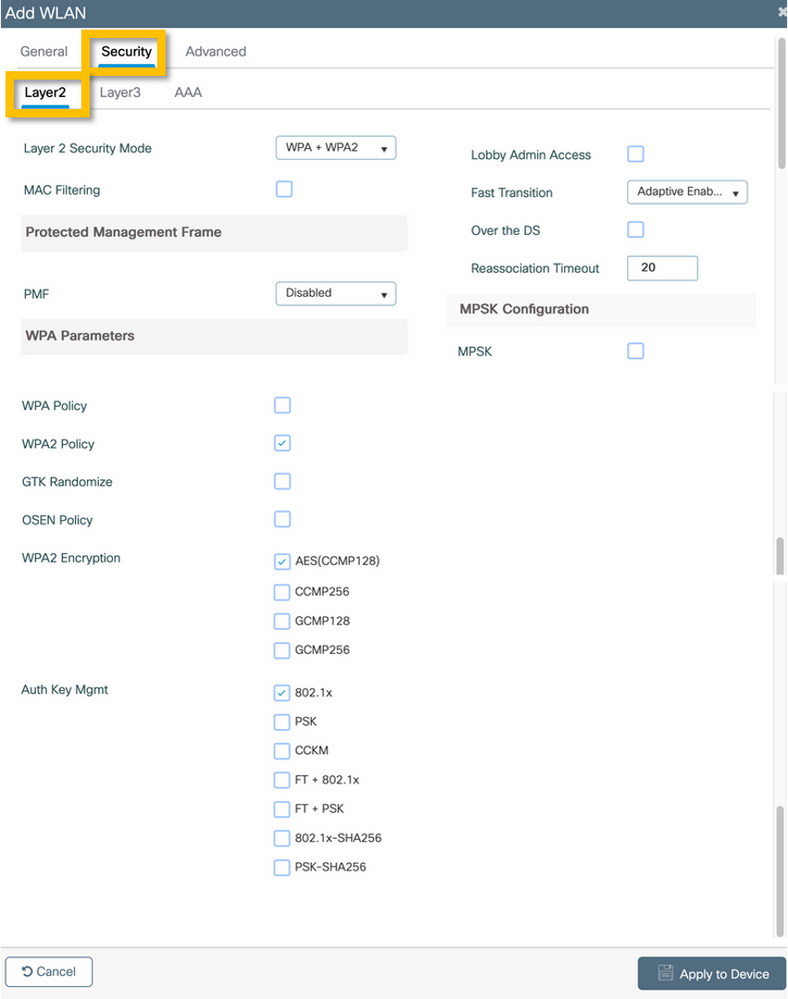
Step 2. Navigate to the Security tab and Layer2 subtab. No need to change any of the default parameters for this configuration example.
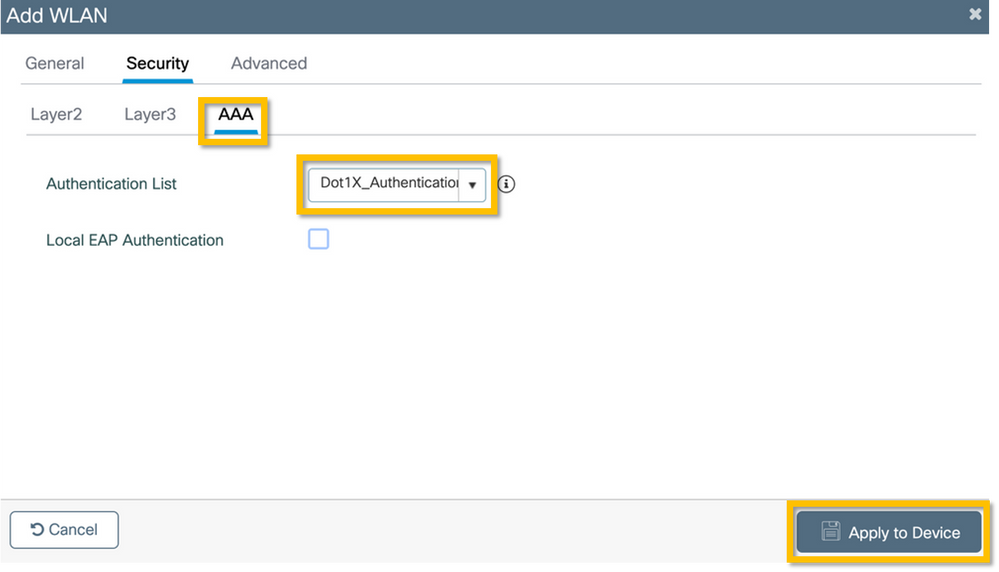
Step 3. Navigate to the AAA subtab and select the Authentication Method List configured previously. Click on the Apply to Device button as shown in this image.
C9800 - Configure Policy Profile
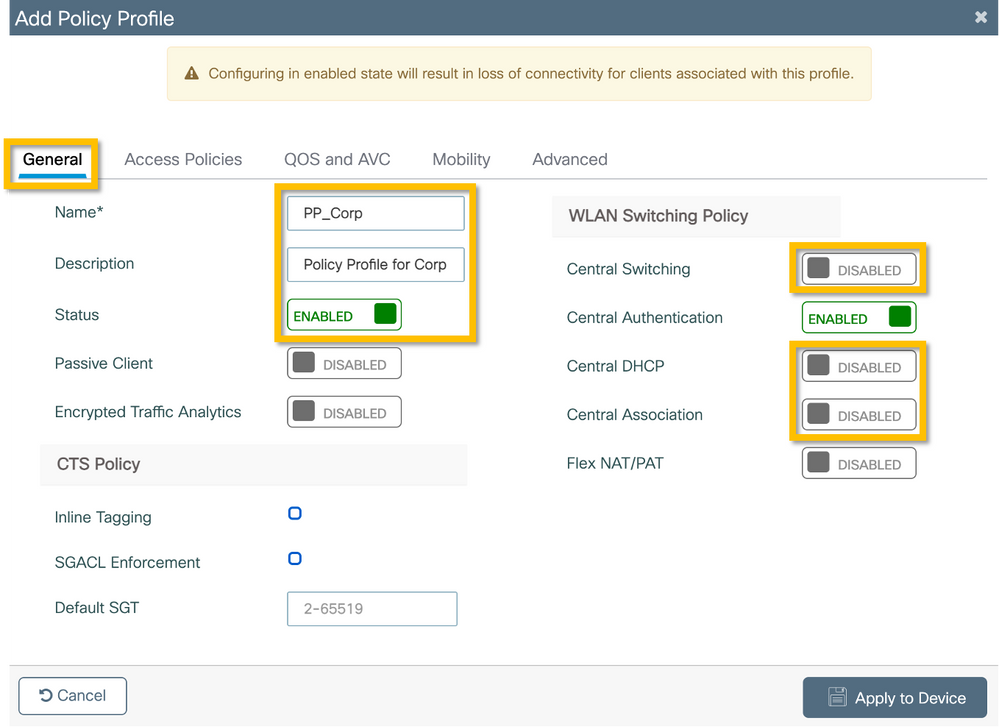
Step 1. Navigate to Configuration > Tags & Profiles > Policy and click +Add and enter a policy profile name and description. Enable the policy, and disable central switching, DHCP, and association, as the corporate user traffic is locally switched at the AP as shown in the image.
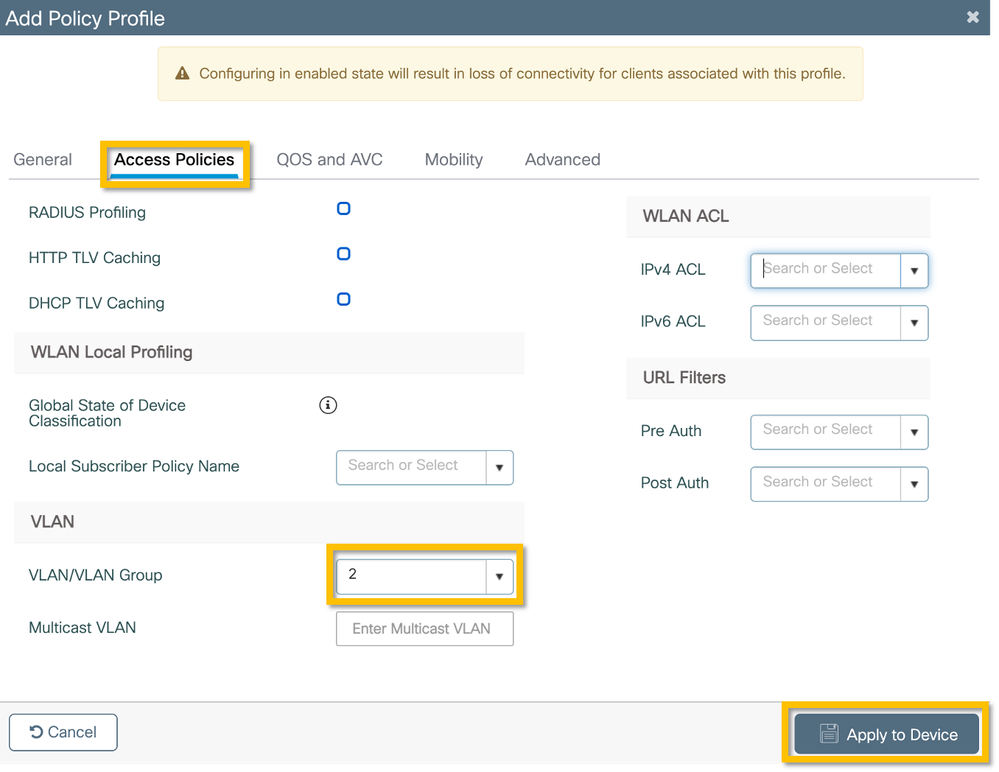
Step 2. Navigate to the Access Policies tab and manually enter the ID of the VLAN to be used at the branch for the corporate user traffic. This VLAN does not need to be configured on the C9800 itself. It must be configured in the Flex Profile, as detailed further. Do not select a VLAN name from the drop-down list (see Cisco bug ID CSCvn48234 for more information). Click on the Apply to Device button as shown in this image.
C9800 - Configure Policy Tag
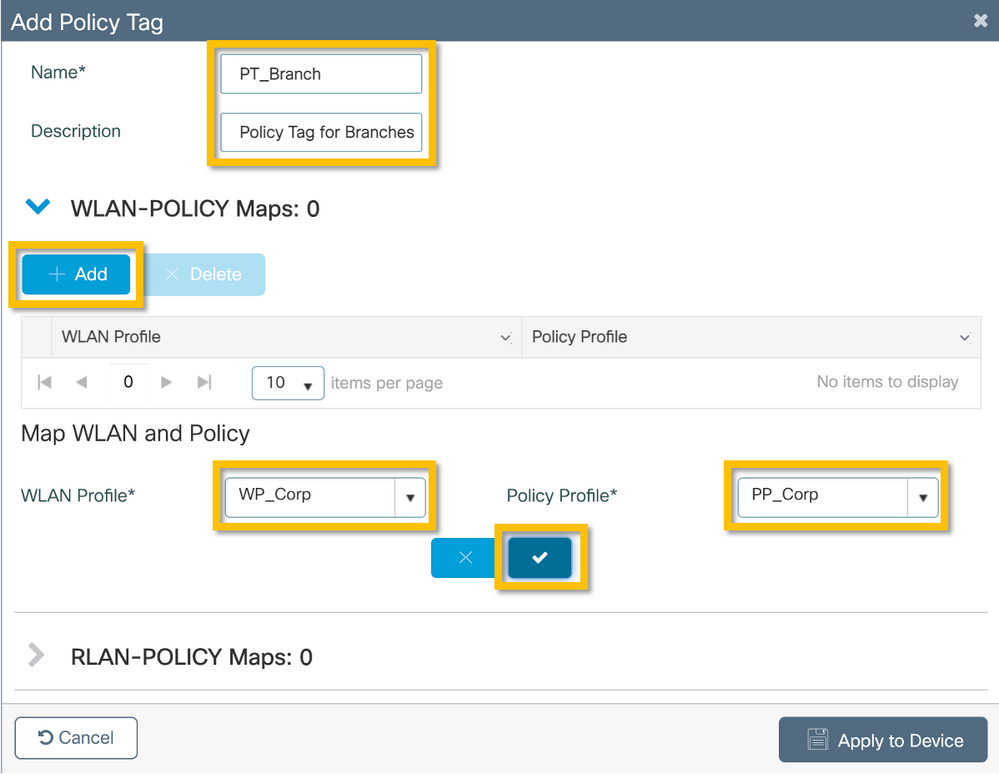
Once the WLAN Profile (WP_Corp) and Policy Profile (PP_Corp) are created, a Policy Tag must in turn be created to bind these WLAN and Policy Profiles together. This Policy Tag is applied to access points. Assign this Policy Tag to access points to trigger the configuration of these to enable the selected SSIDs on them.
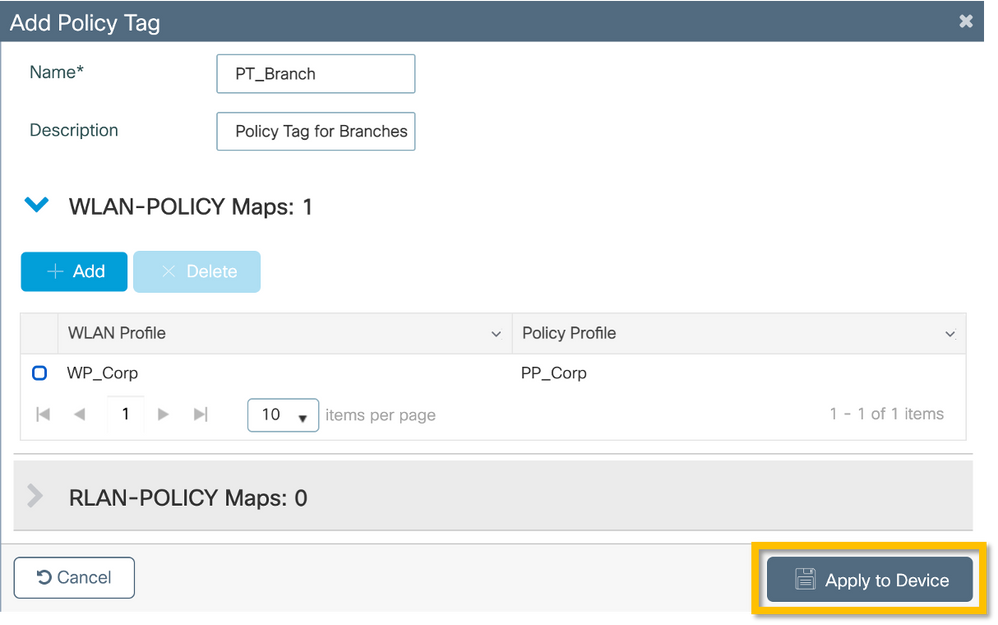
Step 1. Navigate to Configuration > Tags & Profiles > Tags, select the Policy tab and click +Add. Enter the Policy Tag name and description. Click on +Add under WLAN-POLICY Maps. Select the WLAN Profile and Policy Profile created earlier, and then click on the checkmark button as shown in this image.
Step 2. Verify and click on the Apply to Device button as shown in this image.
C9800 - AP Join Profile
AP Join Profiles and Flex Profiles need to be configured and assigned to access points with Site Tags. A different Site Tag must be used for each branch in order to support 802.11r Fast Transition (FT) within a branch, yet limit the distribution of the client PMK among the APs of that branch only. It is important not to re-use the same site tag across multiple branches. Configure an AP Join Profile. You can use a single AP Join Profile if all branches are similar, or create multiple profiles if some of the configured parameters must be different.
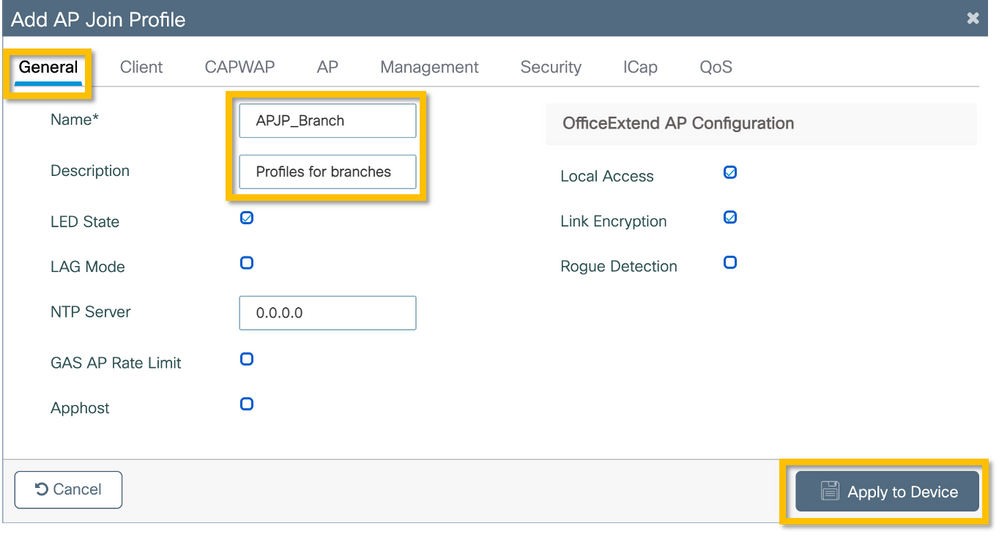
Step 1. Navigate to Configuration > Tags & Profiles > AP Join and click +Add. Enter the AP Join Profile name and description. Click on the Apply to Device button as shown in this image.
C9800 - Flex Profile
Now configure a Flex Profile. Again, you can use a single profile for all branches if these are similar, and have the same VLAN/SSID mapping. Or, you can create multiple profiles if some of the configured parameters such as the VLAN assignments are different.
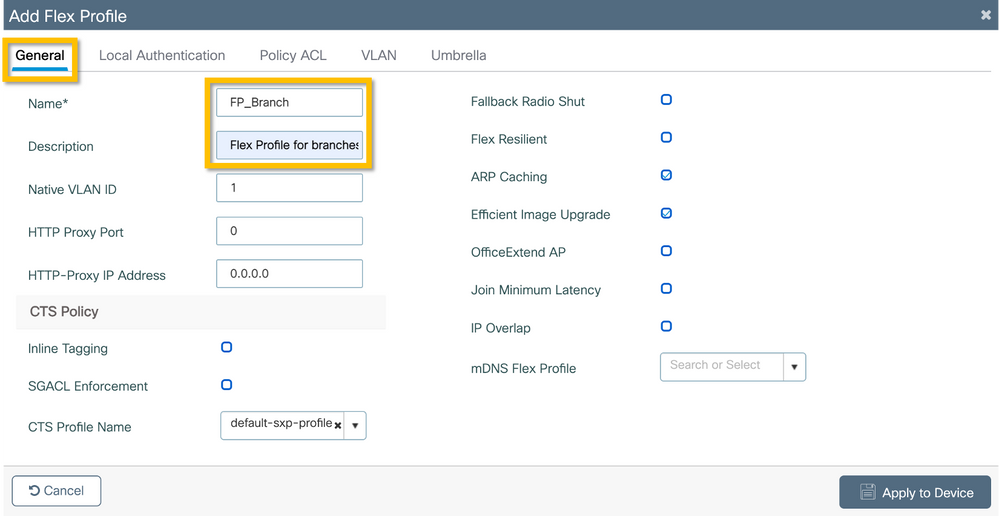
Step 1. Navigate to Configuration > Tags & Profiles > Flex and click +Add. Enter the Flex Profile name and description.
Step 2. Navigate to the VLAN tab and click +Add. Enter the VLAN name and ID of the local VLAN at the branch which the AP must use to locally switch the corporate user traffic. Click on the Save button as shown in this image.
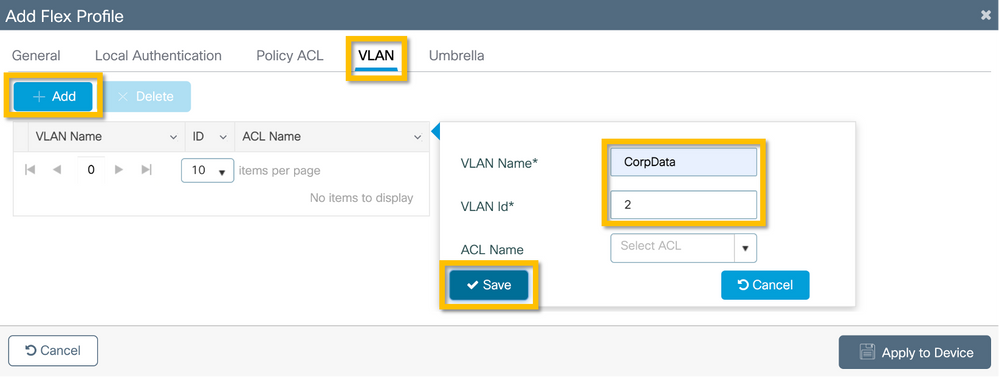
Step 3. Verify and click on the Apply to Device button as shown in this image.

C9800 - Site Tag
Site Tags are used to assign Join Profiles and Flex Profiles to access points. As mentioned before, a different Site Tag must be used for each branch in order to support 802.11r Fast Transition (FT) within a branch, yet limit the distribution of the client PMK among the APs of that branch only. It is important not to re-use the same site tag across multiple branches.
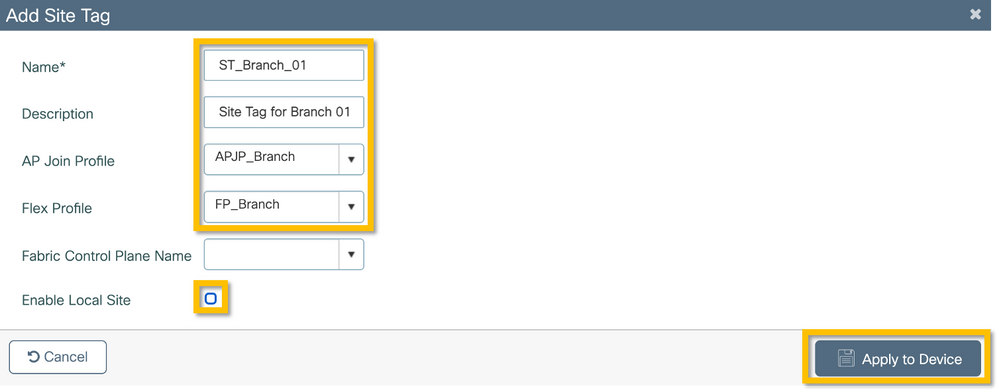
Step 1. Navigate to Configuration > Tags & Profiles > Tags, select the Site tab and click +Add. Enter a Site Tag name and description, select the AP Join Profile created, uncheck the Enable Local Site box, and finally select the Flex Profile created previously. Uncheck the Enable Local Site box to change the access point from Local Mode to FlexConnect. Finally, click on the Apply to Device button as shown in this image.
C9800 - RF Tag
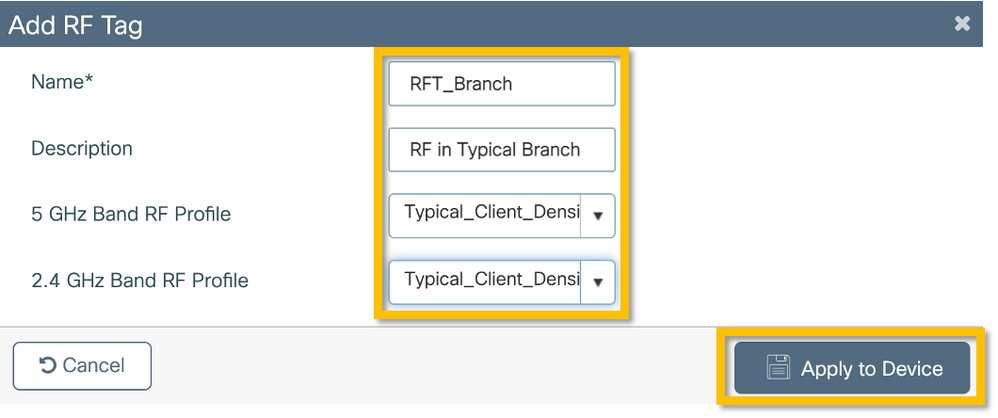
Step 1. Navigate to Configuration > Tags & Profiles > Tags, select the RF tab and click +Add. Enter a name and description for the RF tag.Select the system-defined RF profiles from the drop-down menu. Click on the Apply to Device button as shown in this image.
C9800 - Assign Tags to AP
Now that the tags are created that include the various policies and profiles required to configure the access points, we must assign them to the access points. This section shows how to perform a static tag assigned to an access point manually, based on its Ethernet MAC Address. For product production environments, it is recommended to use the Cisco DNA Center AP PNP Workflow, or use a static bulk CSV upload method available in 9800.
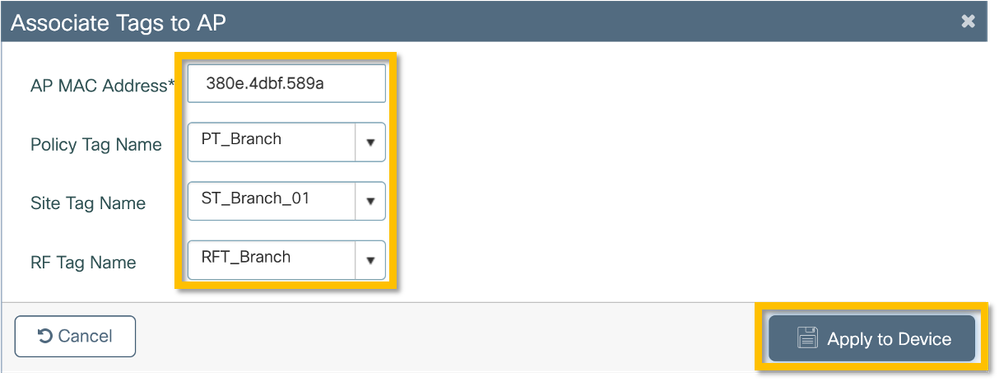
Step 1. Navigate to Configure > Tags & Profiles > Tags, select the AP tab, and then the Static tab. Click +Add and enter the AP MAC Address, and select the previously defined Policy Tag, Site Tag, and RF Tag. Click on the Apply to Device button as shown in this image.
Configure Aruba CPPM
Aruba ClearPass Policy Manager Server Initial Configuration
Aruba clearpass is deployed via OVF template on ESXi server with these resources:
- 2 reserved virtual CPUs
- 6 GB RAM
- 80 GB disk (must be added manually after initial VM deployment before the machine is powered on)
Apply Licenses
Apply platform license via: Administration > Server Manager > Licensing. Add Access and Onboard
Add the C9800 Wireless Controller as a Network Device
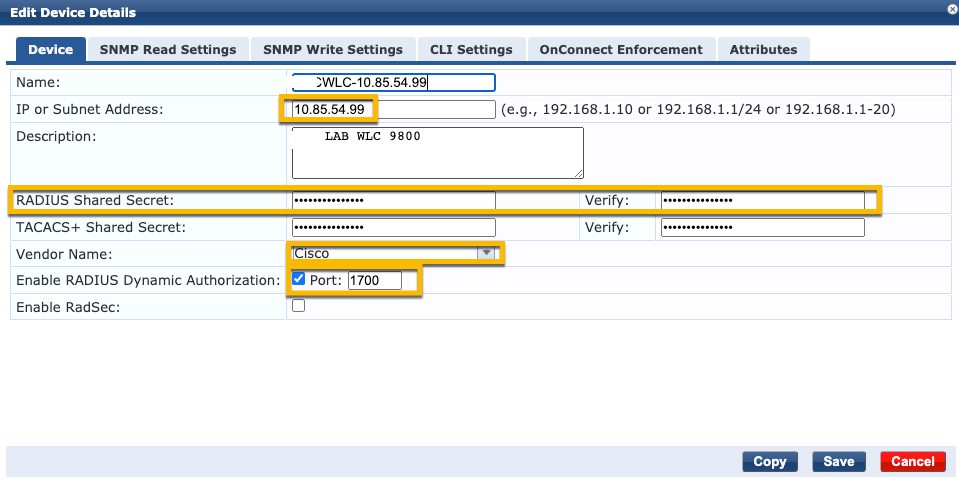
Navigate to Configuration > Network > Devices > Add as shown in this image.
Configure CPPM to Use Windows AD as an Authentication Source
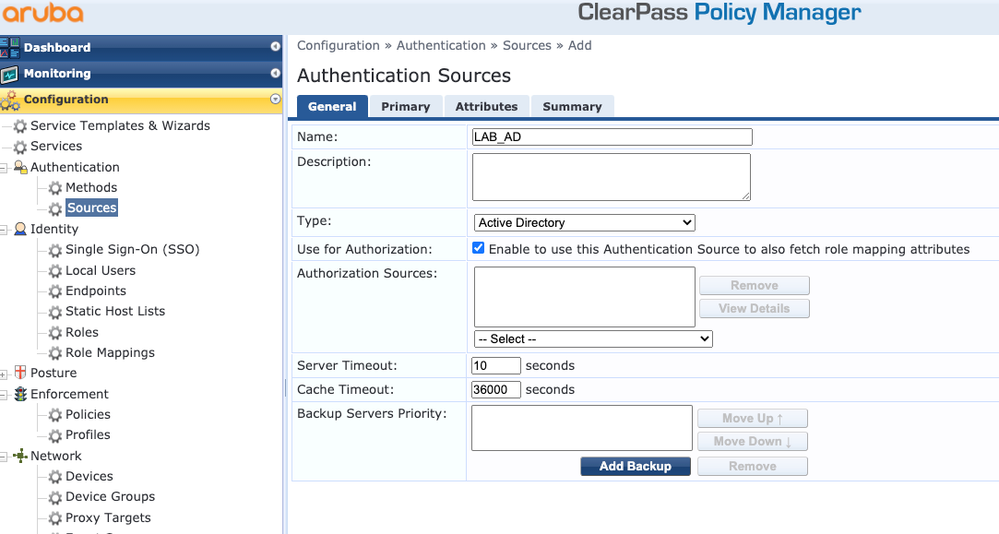
Navigate to Configuration > Authentication > Sources > Add. Select Type: Active Directory from the drop-down menu as shown in this image.
Configure CPPM Dot1X Authentication Service
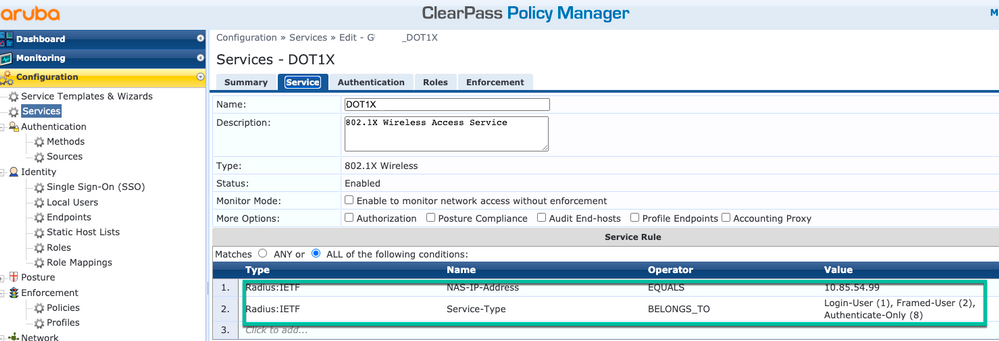
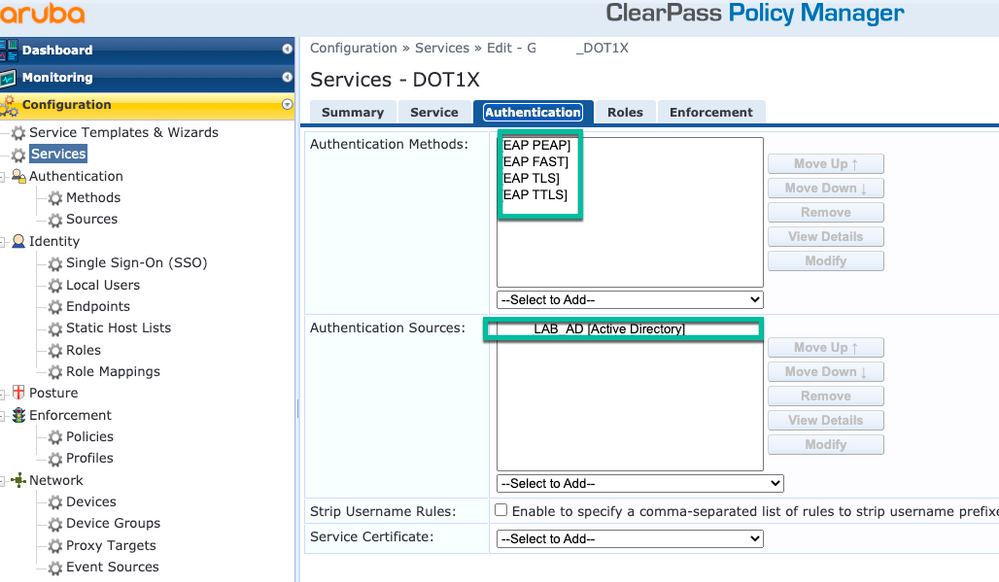
Step 1. Create a 'service' which matches on several RADIUS Attributes:
- Radius:IETF | Name: NAS-IP-Address | EQUALS | <IP ADDR>
- Radius:IETF | Name: Service-Type | EQUALS | 1,2,8
Step 2. For production, it is recommended to match on SSID name instead of 'NAS-IP-Address' so one condition suffices in a multi-WLC deployment. Radius:Cisco:Cisco-AVPair | cisco-wlan-ssid | Dot1XSSID
Verify
There is currently no verification procedure available for this configuration.
Troubleshoot
It is important to note that the 9800 WLC does not reliably use the same UDP source port for a given wireless client RADIUS transaction. This is something ClearPass can be sensitive to. It is also important to base any RADIUS load balancing on the client calling-station-id and not try to rely on UDP source port from the WLC side.
Related Information


 Feedback