Introduction
This document describes how to set up a Wireless Local Area Network (WLAN) with 802.1X and Extensible Authentication Protocol EAP-TLS.
Prerequisites
Requirements
Cisco recommends that you have knowledge of these topics:
- 802.1X authentication process
- Certificates
Components Used
The information in this document is based on these software and hardware versions:
- WLC 3504 version 8.10
- Identity Services Engine (ISE) version 2.7
The information in this document was created from the devices in a specific lab environment. All of the devices used in this document started with a cleared (default) configuration. If your network is live, ensure that you understand the potential impact of any command.
Background Information
EAP-TLS Flow
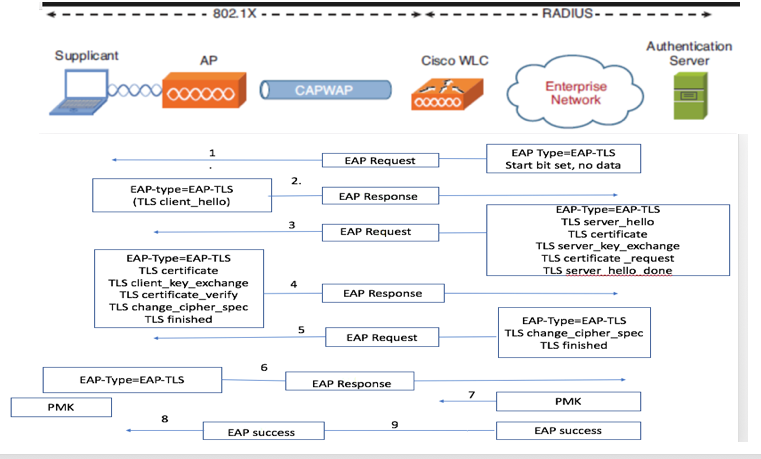
Steps in EAP-TLS Flow
- Wireless Client gets associated with the Access Point (AP). AP does not permit the client to send any data at this point and sends an authentication request. The supplicant then responds with an EAP-Response Identity. The WLC then communicates the user-id information to the Authentication Server. RADIUS server responds back to the client with an EAP-TLS Start Packet. The EAP-TLS conversation starts at this point.
- The peer sends an EAP-Response back to the authentication server which contains a client_hello handshake message, a cipher that is set for NULL.
- The authentication server responds with an Access-challenge packet that contains:
TLS server_hello
handshake message
certificate
server_key_exchange
certificate request
server_hello_done.
4. Client responds with a EAP-Response message that contains:
Certificate ¬ Server can validate to verify that it is trusted.

client_key_exchange

certificate_verify ¬ Verifies the server is trusted

change_cipher_spec

TLS finished
5. After the client authenticates successfully, the RADIUS server responds with an Access-challenge, which contains the change_cipher_spec and handshake finished message.
6. When it receives this, the client verifies the hash in order to authenticate the radius server.
7. A new encryption key is dynamically derived from the secret during the TLS handshake.
8. EAP-Success is finally sent from server to authenticator which then is passed to the supplicant.
At this point, the EAP-TLS enabled wireless client can access the wireless network.
Configure
Cisco Wireless LAN Controller
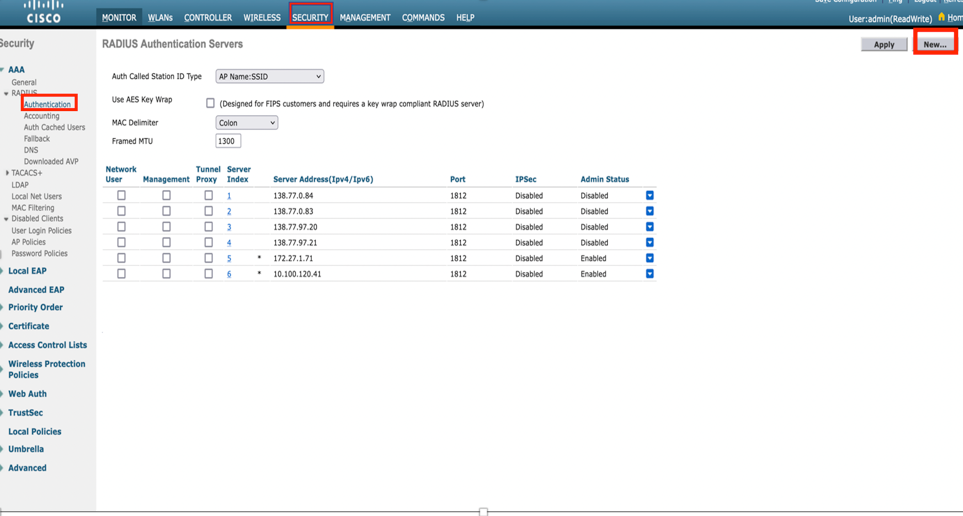
Step 1. The first step is to configure the RADIUS server on the Cisco WLC. In order to add a RADIUS server, navigate to Security > RADIUS > Authentication. Click New as shown in the image.
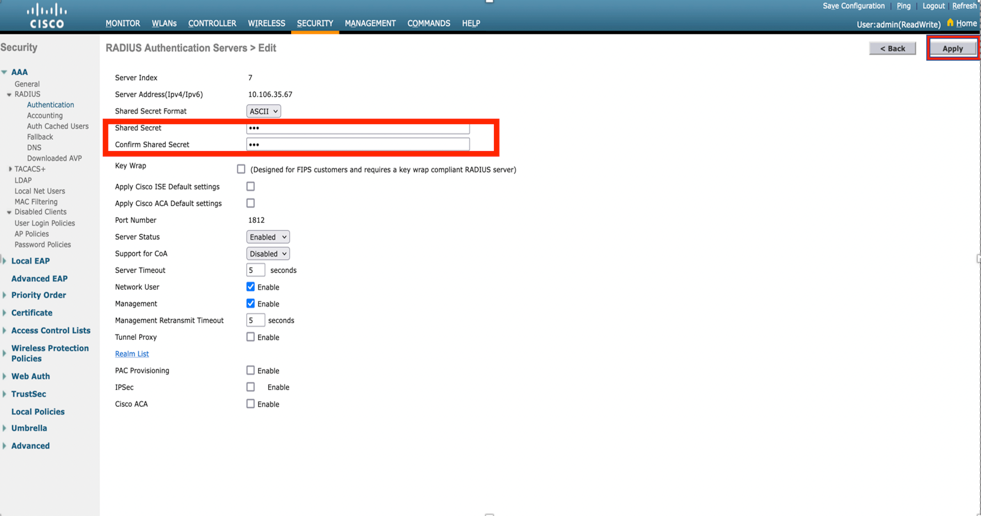
Step 2. Here, you need to enter the IP address and the shared secret <password> that is used in order to validate the WLC on the ISE. Click Apply in order to continue as shown in the image.
Step 3. Create WLAN for RADIUS Authentication.
Now, you can create a new WLAN and configure it to use WPA-enterprise mode so it can use RADIUS for authentication.
Step 4. Select WLANs from the main menu, choose Create New and click Go as shown in the image.

Step 5. Name the new WLAN EAP-TLS. Click Apply in order to continue as shown in the image.
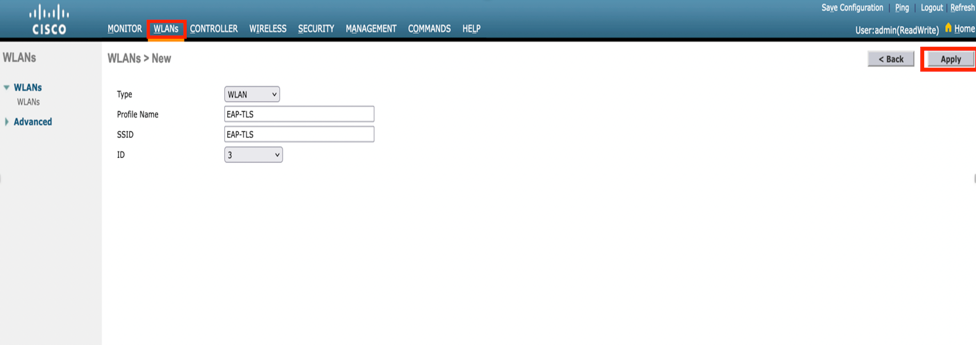
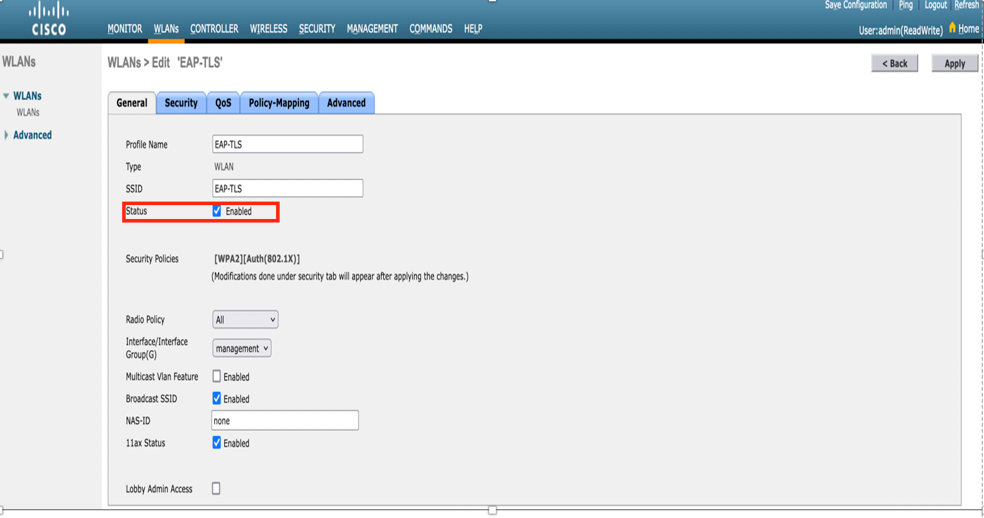
Step 6. Click General and ensure that the Status is Enabled. The default Security Policies is 802.1X authentication and WPA2 as shown in the image.
Step 7. Now, navigate to Security> AAA Servers tab, select the RADIUS server that you just configured as shown in the image.
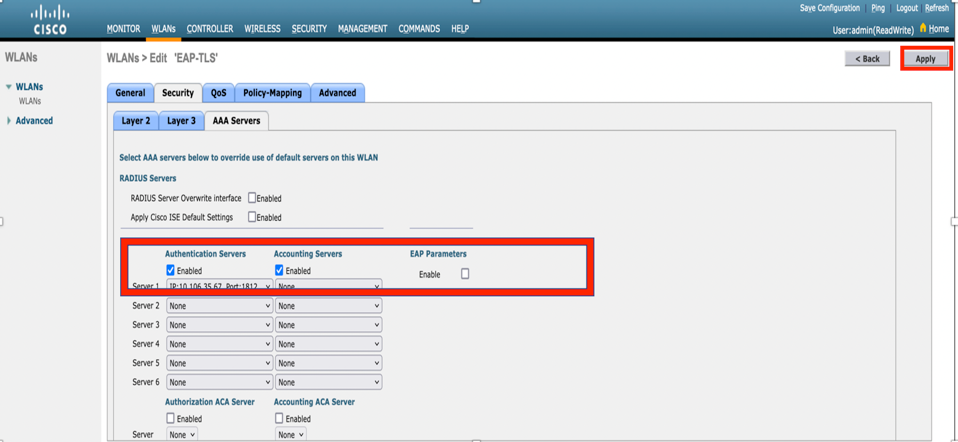

Note: It is a good idea to verify that you can reach the RADIUS server from the WLC before you continue. RADIUS uses UDP port 1812 (for authentication), so you need to ensure that this traffic does not get blocked anywhere in the network.
ISE with Cisco WLC
EAP-TLS Settings
In order to build the policy, you need to create the allowed protocol list to use in our policy. Since a dot1x policy is written, specify the allowed EAP type based on how the policy is configured.
If you use the default, you allow most EAP types for authentication which are not preferred if you need to lock down access to a specific EAP type.
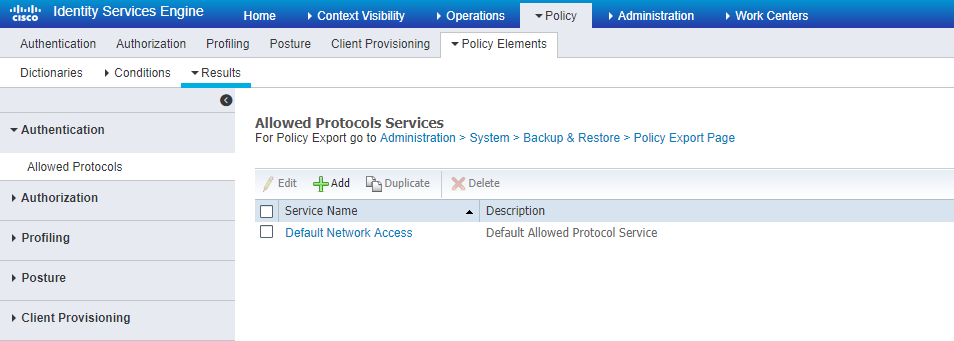
Step 1. Navigate toPolicy > Policy Elements > Results > Authentication > Allowed Protocolsand clickAdd as shown in the image.
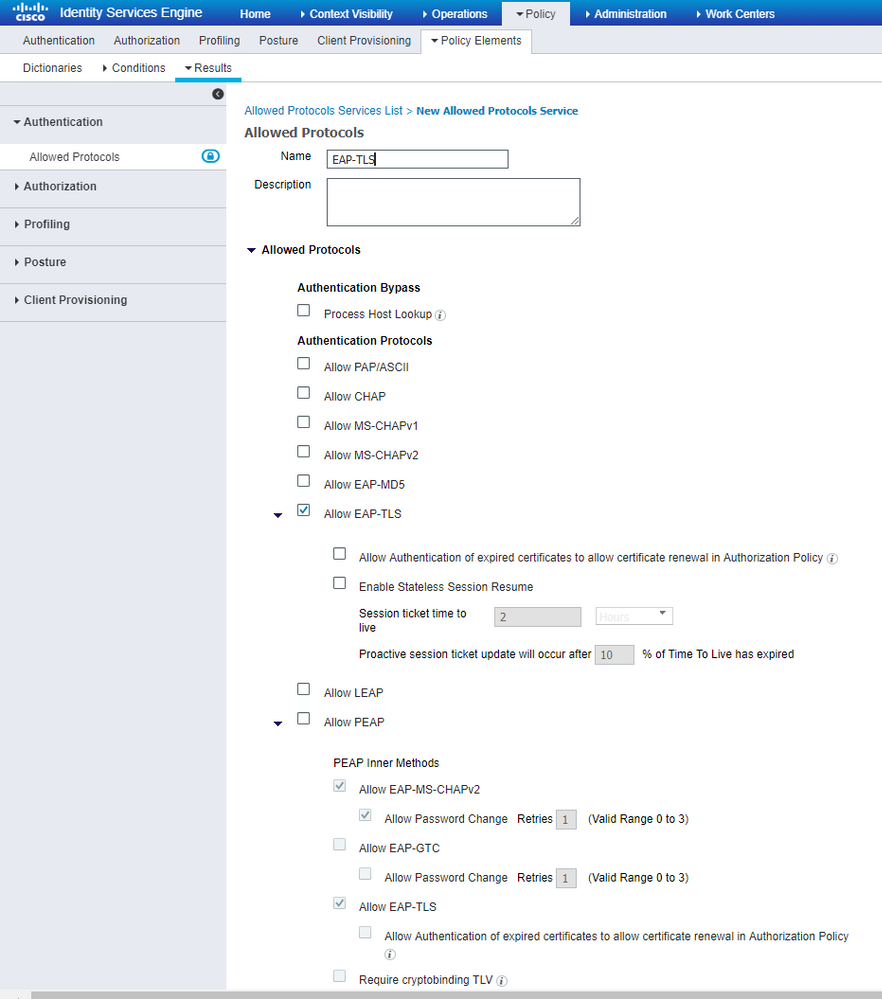
Step 2. On this Allowed Protocol list, you can enter the name for the list. In this case, Allow EAP-TLS box is checked and other boxes are unchecked as shown in the image.
WLC Settings on ISE
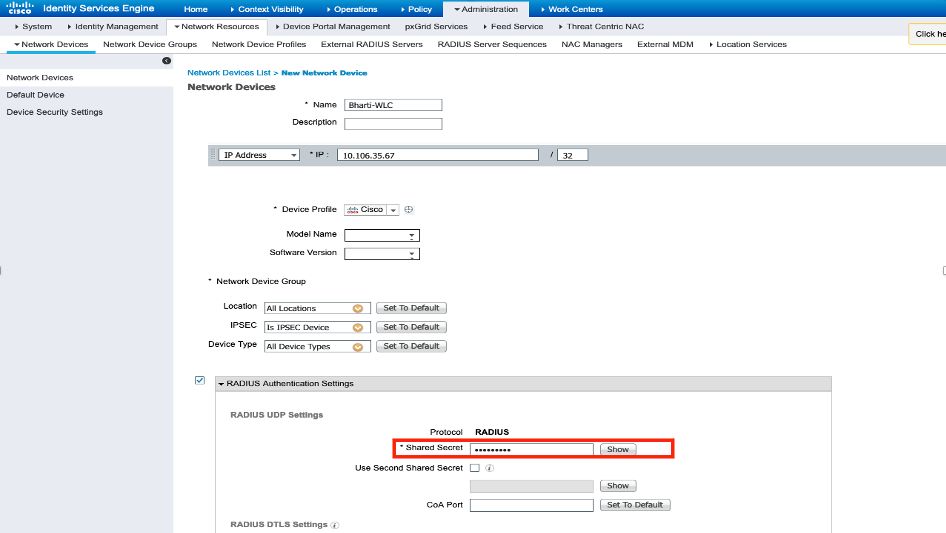
Step 1. Open ISE console and navigate to Administration > Network Resources > Network Devices > Add as shown in the image.

Step 2. Enter the values as shown in the image.
Create New User on ISE
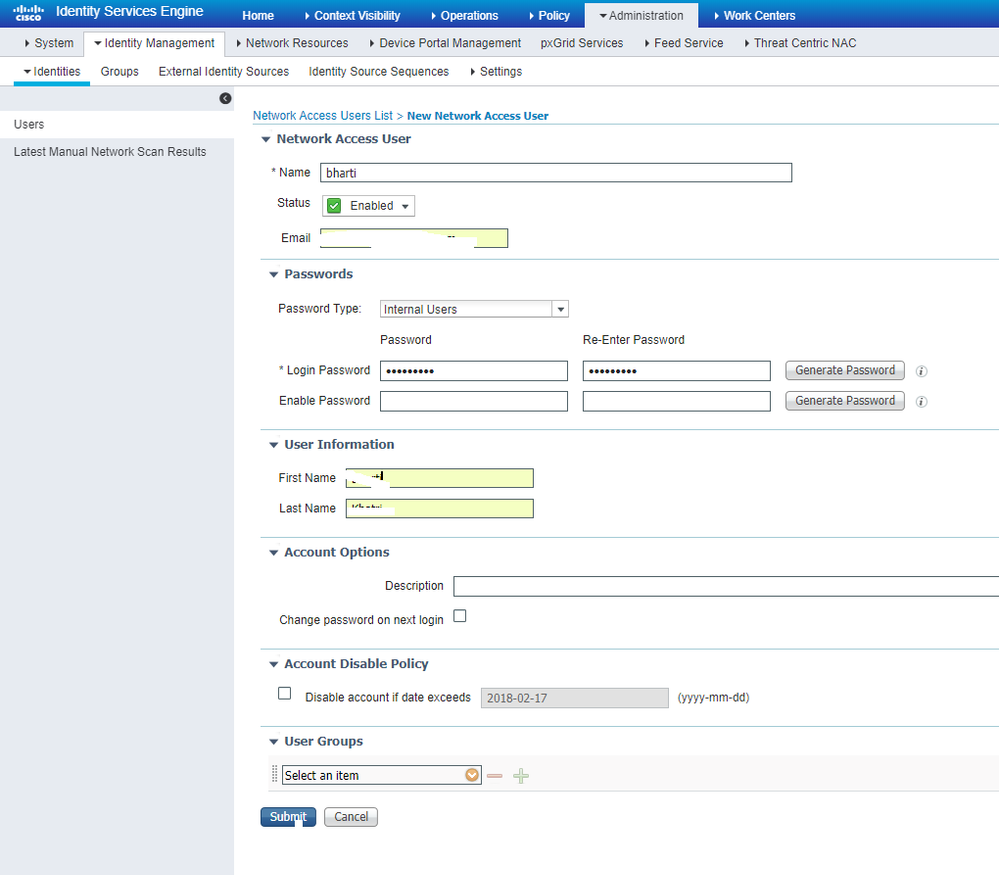
Step 1. Navigate to Administration > Identity Management > Identities > Users > Add as shown in the image.

Step 2. Enter the information as shown in the image.
Trust Certificate on ISE
Step 1. Navigate to Administration > System > Certificates > Certificate Management > Trusted certificates.
Click Import in order to import a certificate to ISE. Once you add a WLC and create a user on ISE, you need to do the most important part of EAP-TLS that is to trust the certificate on ISE. For that, you need to generate a CSR.
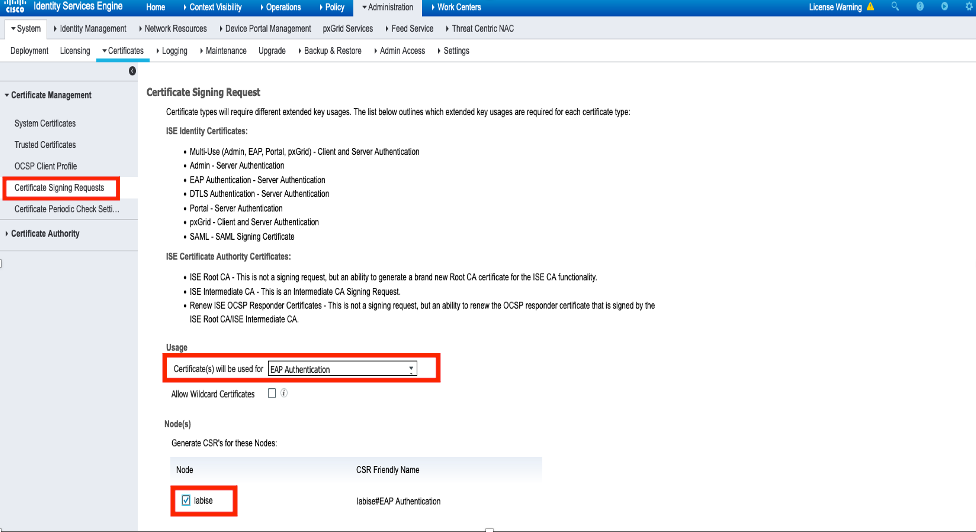
Step 2. Navigate to Administration > Certificates > Certificate Signing Requests > Generate Certificate Signing Requests (CSR) as shown in the image.

Step 3. In order to generate the CSR, navigate to Usage and from the Certificate(s) are used for drop down options, select EAP Authentication as shown in the image.
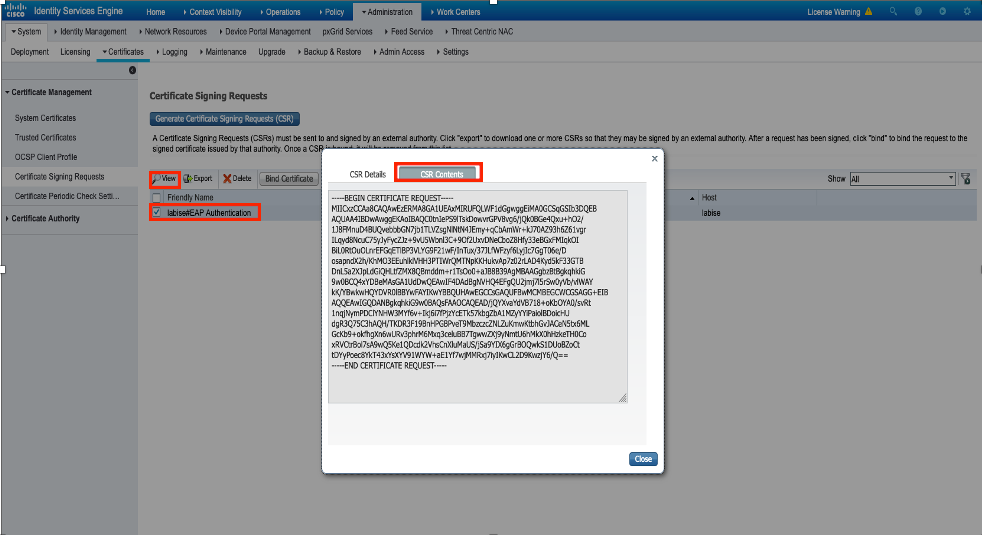
Step 4. The CSR generated on ISE can be viewed. Click View as shown in the image.
Step 5. Once CSR is generated, browse for CA server and click Request a certificate as shown in the image:

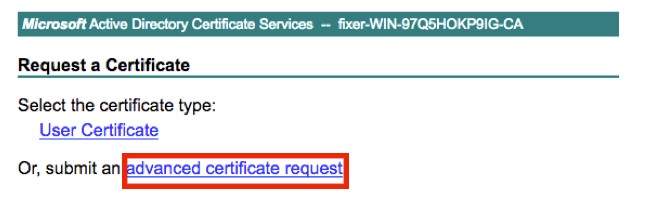
Step 6. Once you request a certificate, you get options for User Certificate and advanced certificate request. Click advanced certificate request as shown in the image.
Step 7. Paste the CSR generated in Base-64 encoded certificate request. From the Certificate Template drop down option, choose Web Server and click Submit as shown in the image.

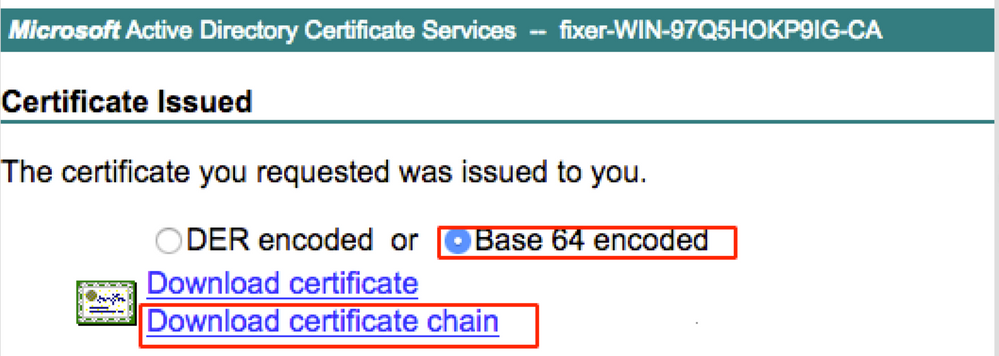
Step 8. Once you click Submit, you get the option to select the type of certificate. Select Base-64 encoded and click Download certificate chain as shown in the image.
Step 9. The certificate download is completed for the ISE server. You can extract the certificate. The certificate contains two certificates, one root certificate and other intermediate. The root certificate can be imported under Administration > Certificates > Trusted certificates > Import as shown in the images.

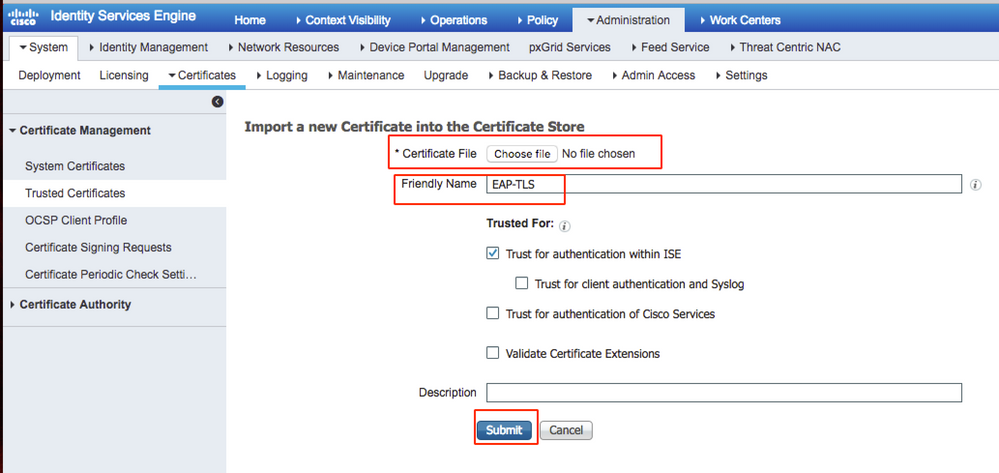
Step 10. Once you click Submit, the certificate is added to the trusted certificate list. Also, the intermediate certificate is needed in order to bind with CSR as shown in the image.

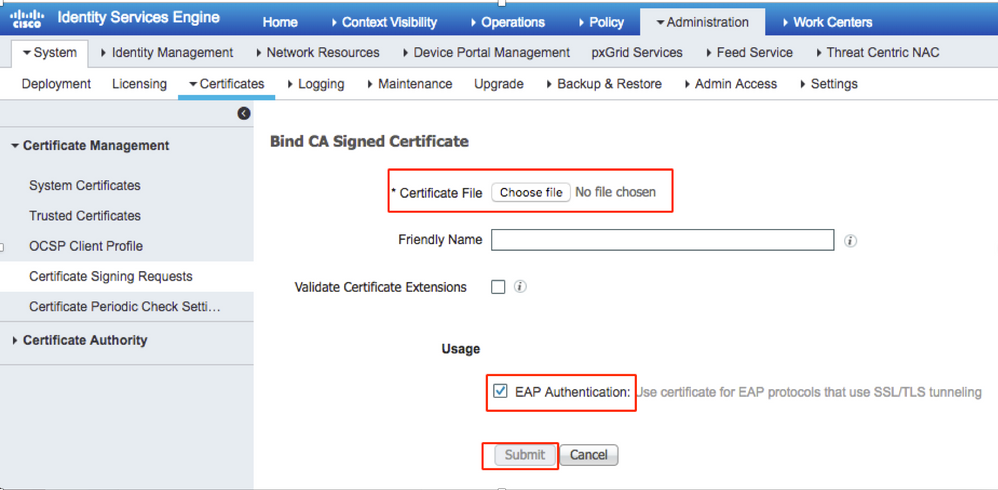
Step 11. Once you click Bind certificate, there is an option to choose the certificate file saved in your desktop. Browse to the intermediate certificate and click Submit as shown in the image.
Step 12. In order to view the certificate, navigate to Administration > Certificates > System Certificates as shown in the image.

Client for EAP-TLS
Download User Certificate on Client Machine (Windows Desktop)
Step 1. In order to authenticate a wireless user through EAP-TLS, you have to generate a client certificate. Connect your Windows computer to the network so that you can access the server. Open a web browser and enter this address.
Step 2. Note that the CA must be the same as the certificate that was downloaded for ISE.
For this, you need to browse for the same CA server that you used to download the certificate for server. On the same CA, click Request a certificate as previously done, however, this time you need to select User as the Certificate Template as shown in the image.
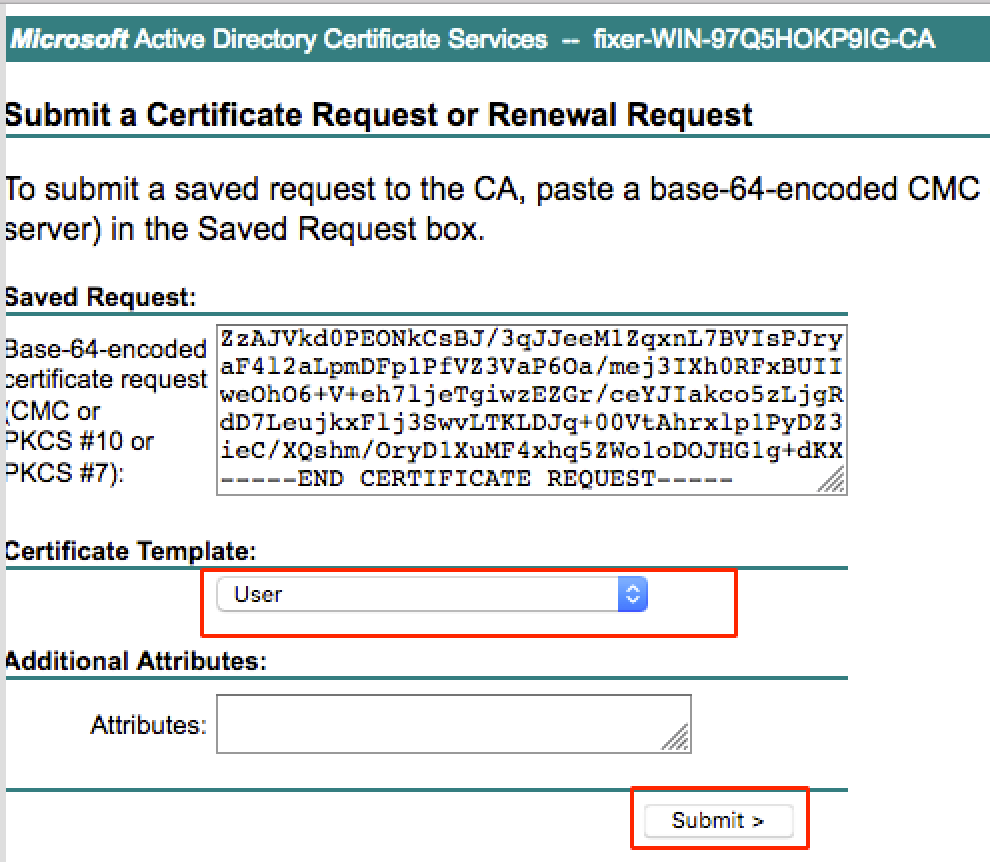
Step 3. Then, click download certificate chain as was done previously for server.
Once you get the certificates, use these steps in order to import the certificate on windows laptop.
Step 4. In order to import the certificate, you need to access it from the Microsoft Management Console (MMC).
- In order to open the MMC navigate to Start > Run > MMC.
- Navigate to File > Add / Remove Snap In.
- Double Click Certificates.
- SelectComputer Account.
- Select Local Computer > Finish
- Click OK in order to exit the Snap-In window.
- Click [+] next to Certificates > Personal > Certificates.
- Right click Certificates and select All Tasks> Import.
- Click Next.
- Click Browse.
- Select the .cer, .crt, or .pfx you would like to import.
- Click Open.
- Click Next.
- Select Automatically select the certificate store based on the type of certificate.
- Click Finish & OK.
Once import of certificate is done, you need to configure your wireless client (windows desktop, in this example) for EAP-TLS.
Wireless Profile for EAP-TLS
Step 1. Change the wireless profile that was created earlier for Protected Extensible Authentication Protocol (PEAP) in order to use the EAP-TLS instead. Click EAP wireless profile.
Step 2. Select Microsoft: Smart Card or other certificate and click OK shown in the image.
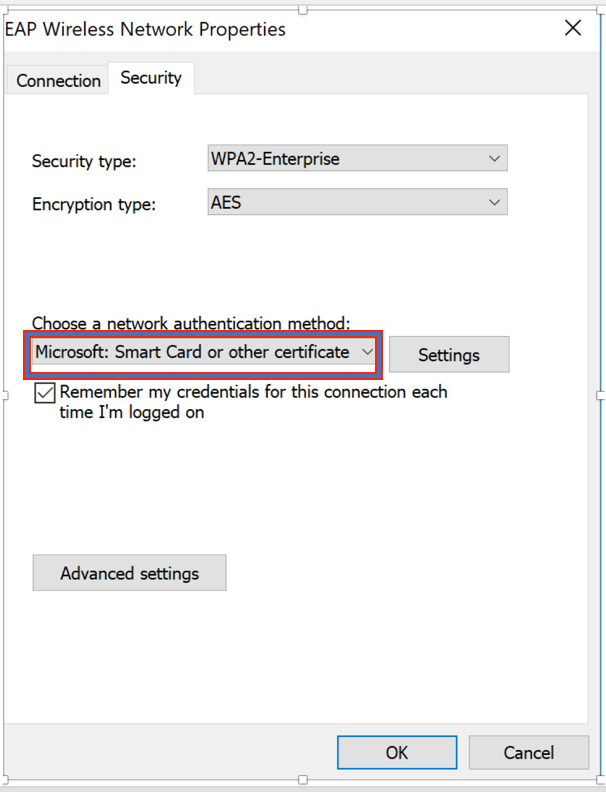
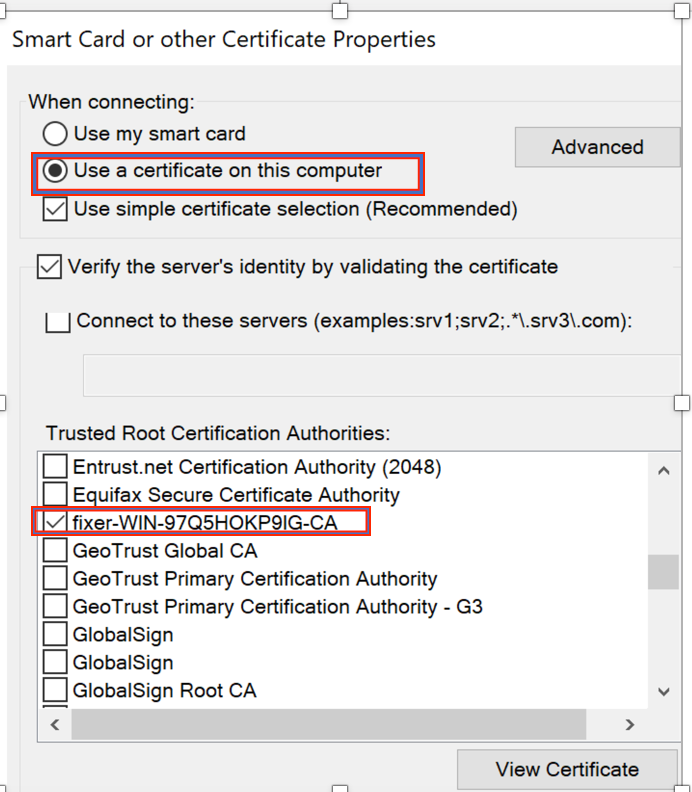
Step 3. Click settings and select the root certificate issued from CA server as shown in the image.
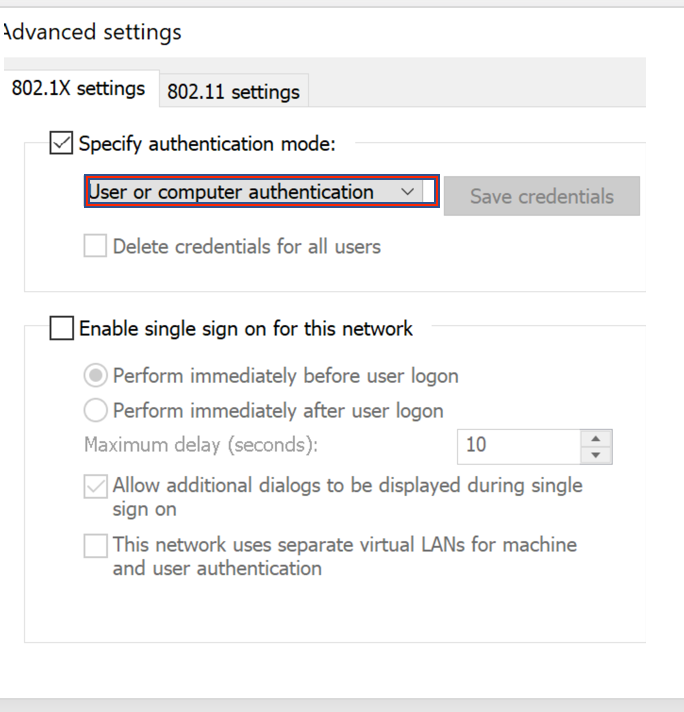
Step 4. Click Advanced Settings and select User or computer authentication from the 802.1x settings tab as shown in the image.
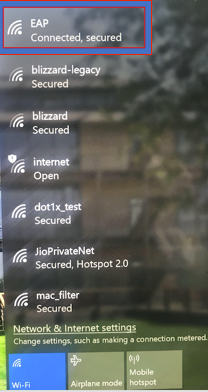
Step 5. Now, try to connect again to the wireless network, select the correct profile (EAP, in this example) and Connect. You are connected to the wireless network as shown in the image.
Verify
Use this section in order to confirm that your configuration works properly.
Step 1. The client policy manager state must show as RUN. This means that the client has completed authentication, obtained IP address, and is ready to pass the traffic shown in the image.
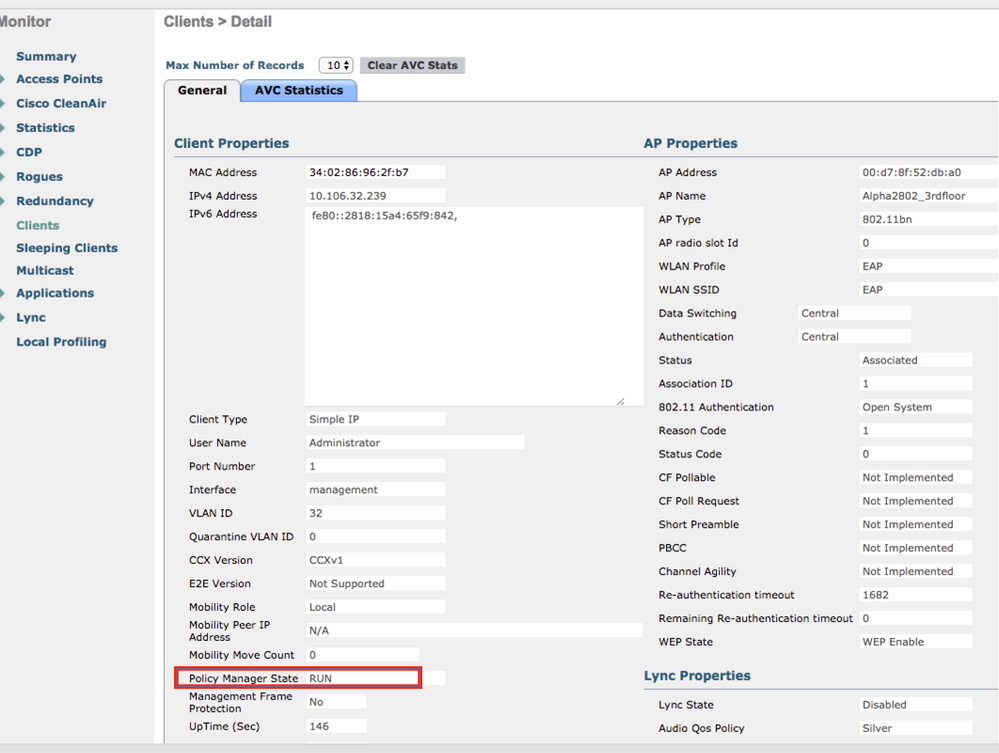
Step 2. Also, verify the correct EAP method on WLC in the client details page as shown in the image.
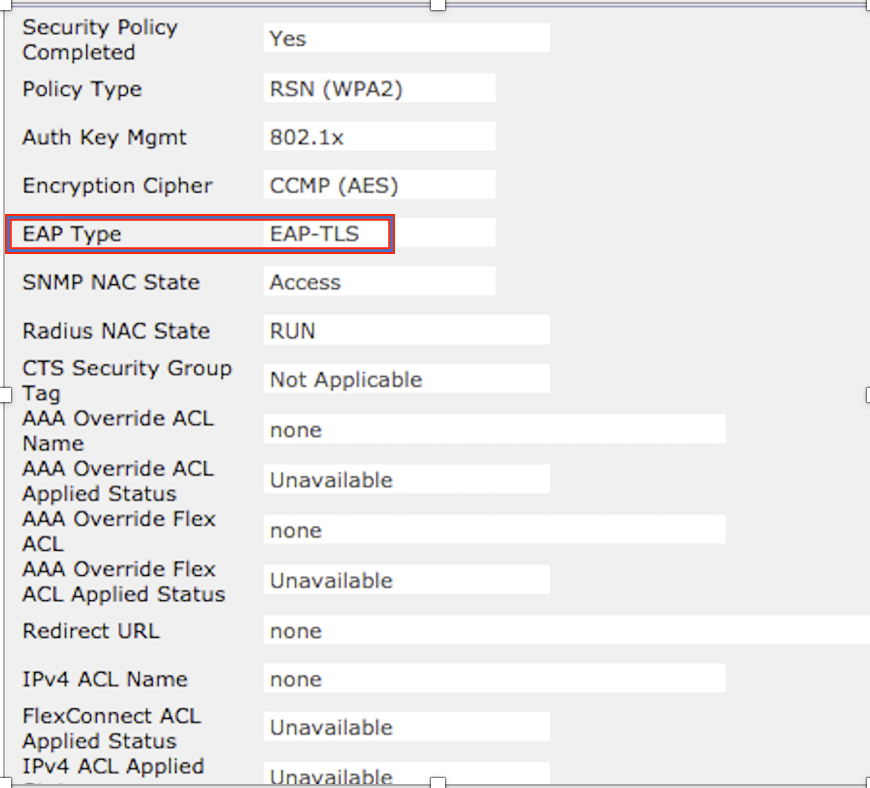
Step 3. Here are the client details from CLI of the controller (output clipped):
(Cisco Controller-Standby) >show client detail 34:02:86:96:2f:b7
Client MAC Address............................... 34:02:86:96:2f:b7
Client Username ................................. Administrator
AP MAC Address................................... 00:d7:8f:52:db:a0
AP Name.......................................... Alpha2802_3rdfloor
AP radio slot Id................................. 0
Client State..................................... Associated
Wireless LAN Id.................................. 5
Wireless LAN Network Name (SSID)................. EAP
Wireless LAN Profile Name........................ EAP
Hotspot (802.11u)................................ Not Supported
BSSID............................................ 00:d7:8f:52:db:a4
Connected For ................................... 48 secs
Channel.......................................... 1
IP Address....................................... 10.106.32.239
Gateway Address.................................. 10.106.32.1
Netmask.......................................... 255.255.255.0
Policy Manager State............................. RUN
Policy Type...................................... WPA2
Authentication Key Management.................... 802.1x
Encryption Cipher................................ CCMP-128 (AES)
Protected Management Frame ...................... No
Management Frame Protection...................... No
EAP Type......................................... EAP-TLS
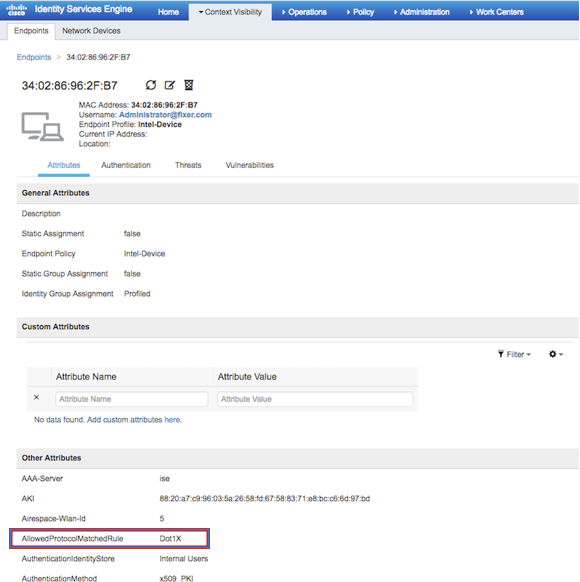
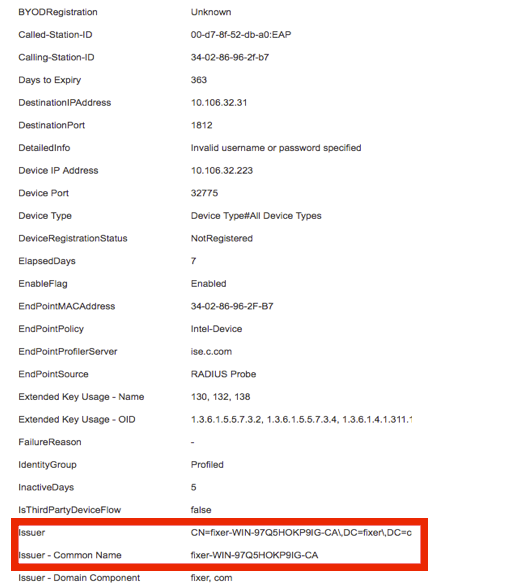
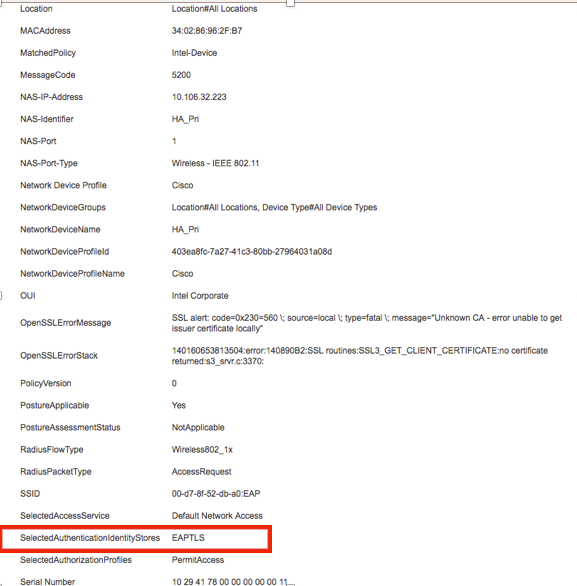
Step 4. On ISE, navigate to Context Visibility > End Points > Attributes as shown in the images.
Troubleshoot
There is currently no specific information available to troubleshoot for this configuration.


 Feedback