Introduction
This document describes the options of the user Voice Portal and the flow to configure each one.
Prerequisites
Requirements
Cisco recommends that you have knowledge of these topics:
- User Voice mail feature configuration
Components Used
The information in this document is based on these software and hardware versions:
- Webex Calling
- Webex Calling user
The information in this document was created from the devices in a specific lab environment. All of the devices used in this document started with a cleared (default) configuration. If your network is live, ensure that you understand the potential impact of any command.
Background Information
The Voice Portal provides an entry point for end users to access, use, and configure services via any phone interface such as Voice Messaging and Personalized Name Recording. The Voice Portal can be reached from any phone. Each party uses its configurable passcode to access its respective menu of services.
Options when Accessing the User Voice Portal
To access the user voice portal you need to set a passcode and record your name greeting by the least.
To enter the user Messaging Portal
Step 1. Call your Voice Portal
Step 2. Enter your Mailbox ID (usually, the user extension), followed by the Pound (#) key.
Step 3. Enter your passcode.
Step 4. The prompt for the voicemail menu options begins.
Step 5. Press 1 to access your voice mailbox.
IVR (Interactive Voice Response) Options:
- (1) Play message
- (1) Reply Message
- (1) Change Current Reply
- (2) Listen To Current Reply
- (3) Send Reply To Caller
- (6) Set/Clear Urgent Indicator
- (7) Set/Clear Confidential Indicator
- (2) Forward Message
- (1) Select Distribution List
- (2) Review Selected Distribution List
- (3) Send Message To Selected Distribution List
- (1) Change Current Introduction/Message
- (2) Listen To Current Introduction/Message
- (3) Send To Person
- (4) Send To All Group Members
- (5) Send To Distribution List
- (6) Set/Clear Urgent Indicator
- (7) Set/Clear Confidential Indicator
- (#) Save Message
- (2) Play Message
- (4) Previous Message
- (5) Play Envelope
- (6) Next Message
- (7) Delete Message
- (9) Additional Message Options
- (2) Change Busy Greeting
- (1) Record New Greeting
- (2) Listen To Current Greeting
- (3) Revert To System Default Greeting
- (3) Change No Answer Greeting
- (1) Record New Greeting
- (2) Listen To Current Greeting
- (3) Revert To System Default Greeting
- (4) Change Extended Away Greeting
- (1) Activate Extended Away Greeting
- (2) Deactivate Extended Away Greeting
- (3) Record New Greeting
- (4) Listen To Current Greeting
- (5) Compose Message
- (1) Change Current Introduction/Message
- (2) Listen To Current Introduction/Message
- (3) Send To Person
- (4) Send To All Group Members
- (5) Send To Distribution List
- (1) Select Distribution List
- (2) Review Selected Distribution List
- (3) Send Message To Selected Distribution List
- (6) Set/Clear Urgent Indicator
- (7) Set/Clear Confidential Indicator
- (7) Delete All Message
- (1) Confirm Deletion
- (*) Cancel Deletion
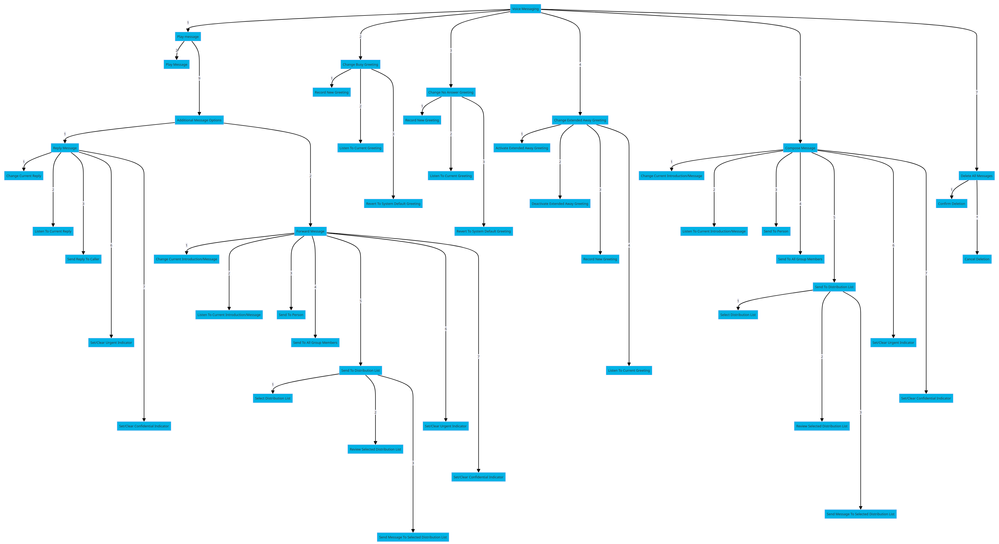
This diagram shows the complete flow of the user Voice Messaging.
 Menu Command Tree
Related Information
- Configure and Manage Voicemail Settings for a Webex Calling User


 Feedback