Recover from a Nexus 9336PQ Spine Switch Failure
Available Languages
Contents
Introduction
This document describes how to replace a failed Cisco Nexus 9336PQ Application Centric Infrastructure (ACI) Spine switch that runs on an ACI fabric.
Prerequisites
Requirements
There are no specific requirements for this document.
Components Used
The information in this document is based on these software and hardware versions:
- Cisco Nexus 9336PQ Spine switch
- Cisco Nexus 9000 Series ACI Mode Switch Software Releases 11.0(2m) and earlier
The information in this document was created from the devices in a specific lab environment. All of the devices used in this document started with a cleared (default) configuration. If your network is live, make sure that you understand the potential impact of any command.
Background Information
This information in this document is based on the assumption that your Nexus 9336PQ switch was fully functional and that it operated as a spine in an ACI fabric before it had a complete hardware failure and went down. This document is also based on the assumption that you have already received, and are ready to install, the replacement Nexus 9336PQ Spine switch.
Problem
There is a complete hardware failure on a Nexus 9336PQ device that operates in an ACI fabric. The node is now unreachable, and the device must be replaced.
Solution
Complete these steps in order to resolve this issue:
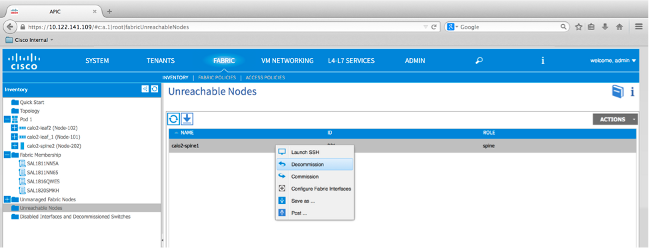
- From the Application Policy Infrastructure Controller (APIC) GUI, navigate to Fabric > Inventory > Unreachable Nodes.
- The failed spine switch should appear on this page. Record the Node ID and Node Name of the failed switch.
- Decommission the failed spine switch and remove it from the controller:
- Click the Actions drop down menu and select Decommission:

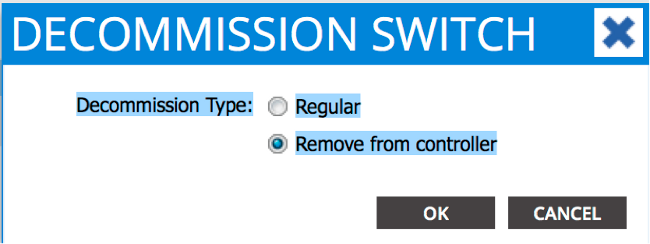
- Click the Remove from controller radio button, and then click OK:

- When the DECOMMISSION pop-up window appears, click YES:

- Click the Actions drop down menu and select Decommission:
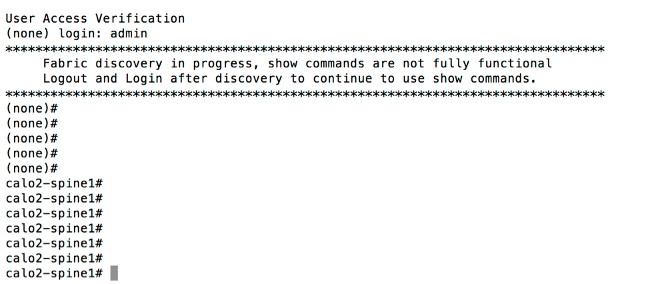
- Remove the failed spine switch from your rack and install the replacement. The spine switch then boots into ACI mode and moves into a fabric discovery state:

- From the APIC interface, navigate to Fabric > Inventory > Fabric Membership. You should see the new spine switch listed as a row in the Work pane.
- Double-click the row and enter the same Node ID and Node Name that you recorded for the old spine switch (Step 2):


- From the APIC GUI, verify that the spine switch receives a new IP address:

- The new spine switch has now fully joined the ACI fabric, and the APIC automatically pushes all relevant policies to the node. In this case, a spine switch with Node ID 201 failed. It was replaced by another spine switch, which was given the same node ID. The APIC then pushes all of the policies that are relevant to Node 201 down to the new spine switch without the need for further configuration.
On the Command Line Interface (CLI), you should see that the hostname has changed in order to reflect the information that was entered into the APIC GUI, which verifies that the policies have been pushed to the new node:
New Spine Switch Boots to Loader Prompt
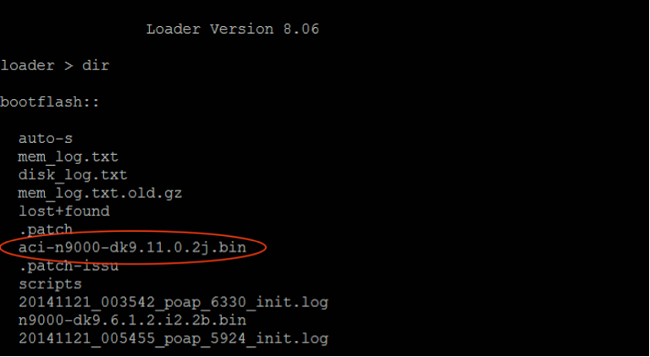
After you install the new spine switch (Step 4 in the previous section), the device might boot to the loader> prompt. If this occurs, complete these steps in order to reach ACI mode on the device:
- Enter the dir command in order to list the contents of the bootflash:

- Enter this command with the ACI switch image name that you found in the bootflash:
loader> boot <aci_image_name.bin>
- Verify that the device then boots into ACI mode and moves into a fabric discovery state.
Revision History
| Revision | Publish Date | Comments |
|---|---|---|
1.0 |
16-Apr-2015 |
Initial Release |
Contact Cisco
- Open a Support Case

- (Requires a Cisco Service Contract)


 Feedback