Introduction
This document describes how to configure Configure Serial Port Access to NX-OSv 9000 on VMware ESXi. The NX-OSv 9000 is a virtual switching platform that can be used to simulate many L2 aspects of the Cisco Nexus 9000. NX-OSv 9000 supports many control plane operations of the Nexus 9000 while supporting a subset of data plane functionality that includes basic L2/L3 functionality such as routing protcols (Enhanced Interior Gateway Routing Protocol (EIGRP), Open Shortest Path First (OSPF), Routing Information Protocol (RIP), and Border Gateway Protocol (BGP)), trunking, Switch Virtual Interface (SVI's), VXLAN (flood and learn), and standard (non-vPC) port-channels.
Note: As of 7.0(3)I5(1) certain NX-OS features such as Virtual Port-Channels (vPC), OTV, ACL's and VXLAN (BGP EVPN) might have CLI present and the switch will accept configuration but these features are not tested or supported. For more details on the supported functionality and limitation click this configuration guide link under Table 1 Supported Layer 2 and Layer 3 Features (Software) and Table 2 NXOS Features Not Supported (Not Tested).
The NX-OSv 9000 can be managed in a similar method as a physical switch that uses inband interfaces (SVI), management interfaces (mgmt0) or the console connection. The purpose of this article is to describe how to connect NX-OSv 9000 running on VMware ESXI hypervisor to a network backed virtual serial interface.
Prerequisites
Requirements
Cisco recommends you have knowledge of these topics:
- vSphere/ESXi host configuration fundamentals.
- Virtual Machine (VM) administration.
- Knowledge of the transit network.
Caution: This configuration example references 3rd party software that is not supported directly by Cisco. Additional assistance with ESXi/vSPhere can be attained directly from VMware: http://www.vmware.com/support.html.
Components Used
The information in this document is based on these software and hardware versions:
- NX-OSv 9000 deployed ESXi version ( 6.0.0 [Build 3620759] ).
- Sufficient priveleges on the ESXi host (standalone or vCenter managed) and NX-OSv 9000 virtual machine.
- Network access from a managment workstation sufficent to allow the TCP port of the virtual serial port to the ESXi VMkernel interface.
- Virtual Serial Port functionality requires ESXi Enterprise or Enterprise Plus licensing.
- VMware Distributed Switch (vDS) is not supported with NX-OSv 9000 and requires a standard vSwitch.
Note: vMotion is not supported with a direct URL for network backed Virtual Serial Port. If vMotion is needed a Virtual Serial Port Concentrator can be deployed (vSPC). The configuration details of a vSPC are beyond the scope of this document but can be found under the VMware vSphere Documentation Center.
Configure
Network Diagram
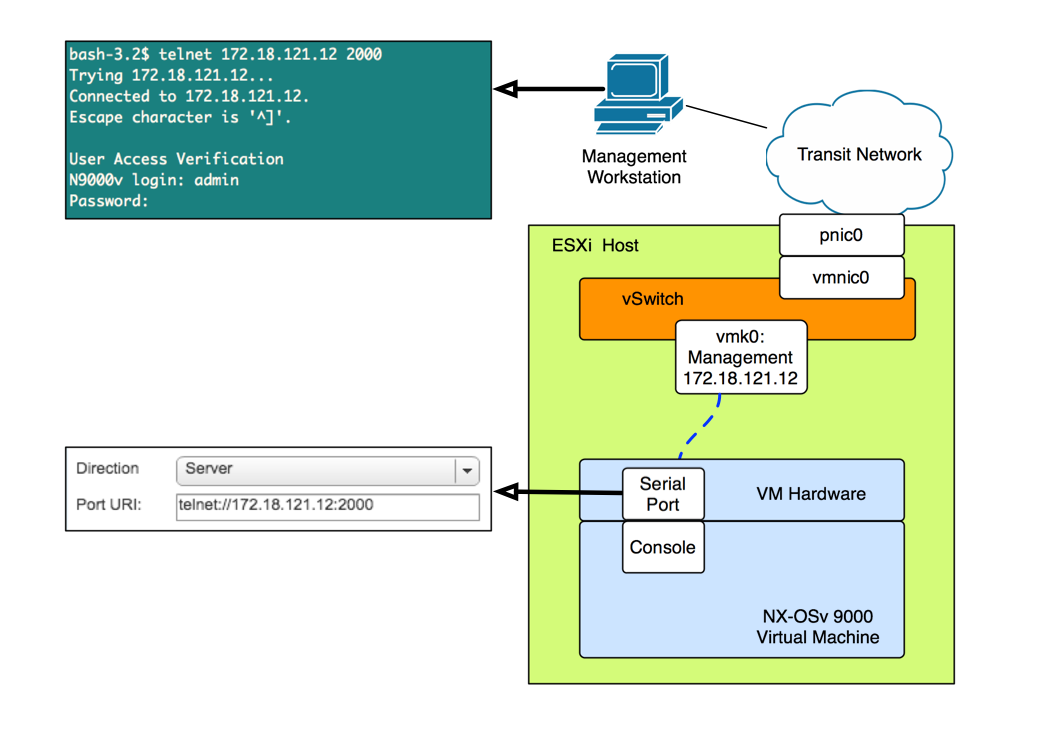
Configurations
1. Configure the ESXi host firewall to allow connectivity to the remote serial port. This can be done from both the GUI (such as the vSphere Client or Web Client) or the CLI. Both examples are given.
From the SSH CLI on the ESXi host:
!By default the Remote Serial Port service is disabled:
!
[root@localhost:~] esxcli network firewall ruleset list | grep remoteSerialPort
remoteSerialPort false

!Enable the  remoteSerialPort ruleset:
!
[root@localhost:~] esxcli network firewall ruleset set --enabled true --ruleset-id=remoteSerialPort

!Validate that the remoteSerialPort service is now enabled.
!
[root@localhost:~] esxcli network firewall ruleset list | grep remoteSerialPort
remoteSerialPort             true
From the GUI (vShere Web Client):
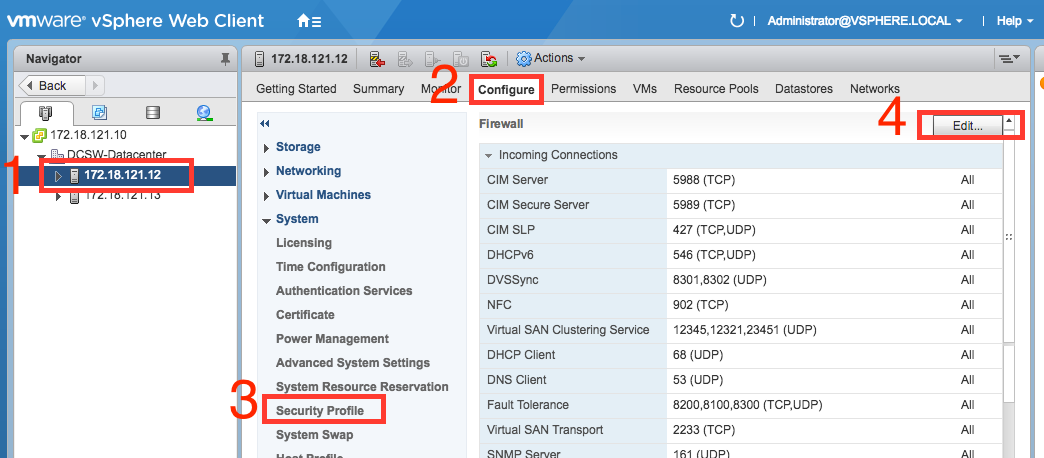

2. Under the VM Edit Settings menu add a network backed serial port to the NX-OSv 9000 Virtual Machine. The NX-OSv 9000 VM must be turned off to add this.
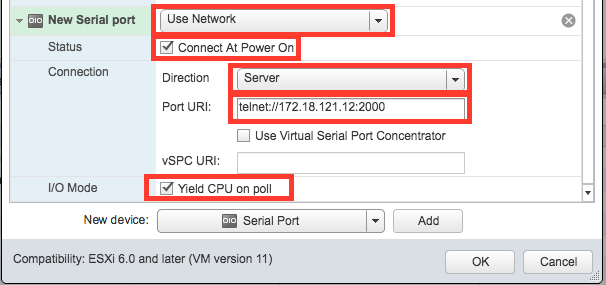
Note: the interface IP address specified for the port URI must be the VMkernel interface IP address that is used for managment services on the ESXi host the VM currently resides on. The port number may be any TCP port above 1024 that is not currently in use. Be sure to pick a port that is not used for any other VMkernel service such as vMotion, etc.
Note: vMotion is not supported with a direct URI for network backed Virtual Serial Port. If vMotion is needed a Virtual Serial Port Concentrator can be deployed (vSPC). The configuration details of a vSPC are beyond the scope of this document but can be found under the VMware vSphere Documentation Center.
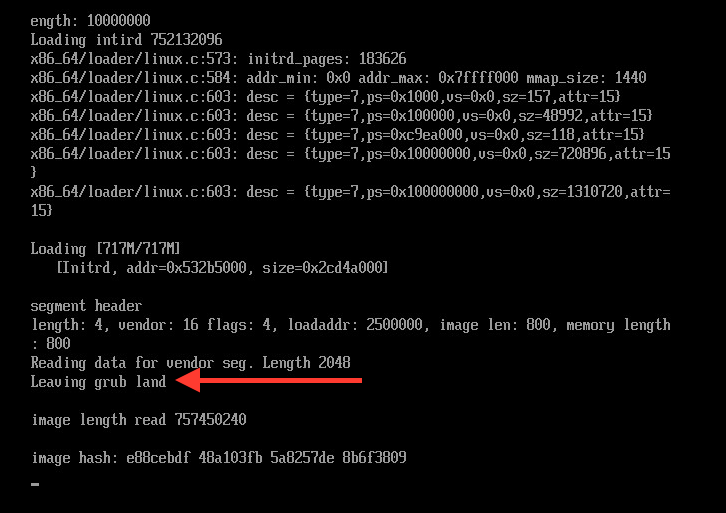
3. Boot the NX-OSv 9000 VM and wait until the boot loader has finished. Look for Leaving grub land message on the ESXi VM Console:
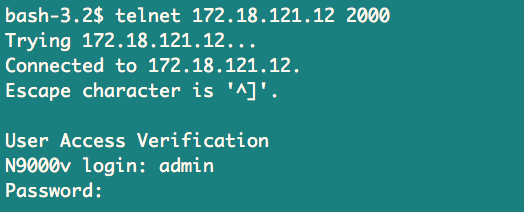
4. You can now use your terminal emulator to connect to the console of the NX-OSv 9000 VM.
Verify
Use this section in order to confirm that your configuration works properly.
Once connected to the console interface you can proceed to configuraton the management and data plane interfaces.
Note: mgmt0 is always mapped to VM Network Interface 1, Ethernet 1/1 = VM Network interface 2, etc.
Troubleshoot
This section provides information you can use in order to troubleshoot your configuration.
Issue: The NX-OSv 9000 VM boots to the loader prompt:
loader > dir
Setting listing for bootflash:
Number of devices detected by BIOS is 1
Number of devices detected by BIOS is 1
Number of devices detected by BIOS is 1
Going to print files for device bootflash:
 .rpmstore
nxos.7.0.3.I5.1.bin
Number of devices detected by BIOS is 1
Number of devices detected by BIOS is 1
Number of devices detected by BIOS is 1
Clearing listing for bootflash:

loader >
Solution: Use the boot syntax to boot the system image:
loader > boot nxos.7.0.3.I5.1.bin
Once booted configure the boot statement and save the running configuration:
N9k#configure
N9k(config)# boot nxos nxos.7.0.3.I5.1.bin
N9k#(config)# end
N9k# copy running-config startup-config
