Configure a Cluster on a Wireless Access Point (WAP) through Single Point Setup
Available Languages
Objective
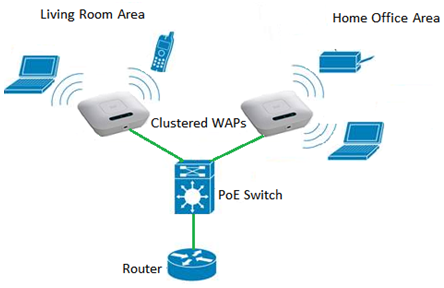
A Wireless Access Point (WAP) connects to a router and serves as a node to the Wireless Local Area Network (WLAN). Clustering is when multiple WAPs are joined on the same network. This technology is advanced intelligence that allows them to work together dynamically and simplifies wireless networking.
Why would you configure clustering?
Clustering access points provides utmost convenience and lesser work since you will be able to configure and manage a clustered wireless network as a single entity, and without having to configure and reconfigure the settings in each access point in the network separately. Multiple WAPs can be clustered in one wireless network, depending on the exact model of your WAP.
Each additional WAP installed on the network strengthens the wireless signal in areas that have weak or no signal. The WAP acts as a transmitter and receiver of WLAN radio signals, providing a larger wireless range as well as the ability to support more clients on a network.
Benefits of clustering Wireless Access Points:
- Saves the cost of a wireless controller.
- Reduces operations costs by saving hours of (internal or outsourced) technical staff time.
- Increases security.
- Increases productivity by improving roaming.
- Increases productivity by improving application performance.

Guidelines in configuring a cluster through Single Point Setup:
- A cluster can be created only among the same model of two or more WAPs that have the same Product Identification (PID) and firmware versions, each of which has Single Point Setup enabled and reference the same Single Point Setup name.
- The WAPs should use the same radio mode (for example, radio 1 uses 802.11g).
- The WAPs should be connected on the same bridged segment.
- You can edit the Single Point Setup settings only when Single Point Setup is disabled.
- The cluster name is not sent to other WAPs that belong to a cluster. You must configure the same name on each device that is a member of the cluster.
- The cluster name must be unique for each Single Point Setup that you configure on the network.
- Single Point Setup works only with WAPs that are using the same type of IP addressing. Devices will not cluster if IP versions are not similar.
- You cannot enable Single Point Setup if Wireless Distribution System (WDS) is enabled.
This article aims to show you how to configure a cluster on a WAP through Single Point Setup.
Applicable Devices
- WAP100 Series — WAP121, WAP150
- WAP300 Series
- WAP500 Series
Software Version
- 1.0.6.5 — WAP121, WAP321
- 1.1.0.5 — WAP150, WAP361
- 1.0.2.8 — WAP351
- 1.3.0.4 — WAP371
- 1.2.1.3 — WAP551, WAP561
- 1.0.1.9 — WAP571, WAP571E
Create a Cluster on a WAP
Note: The images may slightly vary depending on the exact model of your device. Images in this article are taken from the WAP361.
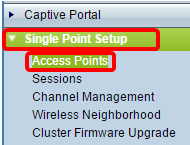
Step 1. Log in to one of the access point web-based utilities and choose Single Point Setup > Access Points.

Note: By default, Single Point Setup is disabled on the WAP. In this state, the Enable Single Point Setup button is visible, and vice versa.

Step 2. In the Location field, enter a description of where the WAP device is physically located. The range is from one to 64 characters.

Note: In this example, Entertainment Room is used.
Step 3. In the Cluster Name field, enter the name of the cluster for the WAP to join.

Note: In this example, First Class-ter is used.
Step 4. Choose the IP version that the WAPs in the cluster will use to communicate with other members.

Note: In this example, IPv4 is chosen. This is the default Clustering IP Version.
Step 5. Enter the priority of the cluster for Dominant WAP (Cluster Controller) election in the Cluster-Priority field. The higher number you set, the higher the chance for this WAP to become the Dominant WAP. In case of a tie, lowest Media Access Control (MAC) address becomes dominant.

Note: In this example, 3 is used.
Step 6. Click the Enable Single Point Setup button.

The WAP will start to search for other WAPs in the subnet that are configured with the same cluster name and IP version.
Step 7. Refresh the page until you see the new configuration. The Access Points page will show a table displaying the Locations, MAC Addresses, and IP Addresses of the access points detected currently in the cluster.

Note: In this example, two WAPs have been successfully clustered.All WAPs in a Single Point Setup cluster will now share the same device configuration settings. Changes to device settings on any WAP in the cluster will be propagated to other members.
Step 8. (Optional) To manage and access the cluster with a single IP address, you can enter a statically assigned IP address in the Cluster Management Address field in the Single IP Management area.

Note: In this example, 192.168.1.150 is used.
Step 9. Click Save.

Step 10. (Optional) If you no longer want your WAP to share configuration settings with others, simply remove it from the cluster by clicking Disable Single Point Setup.

You should now have successfully created a cluster of WAPs by configuring Single Point Setup on your access point.
Revision History
| Revision | Publish Date | Comments |
|---|---|---|
1.0 |
13-Dec-2018 |
Initial Release |
 Feedback