Configure Overlay Extension on SPA500S Attendant Console that is Connected to SPA500 Series IP Phone
Available Languages
Objective
The attendant console helps to increase the extension numbers of the SPA500 series IP phones. With the help of an overlay button you can easily map up to 25 lines in one single button which overcomes the use of limited buttons on an IP phone. To configure an overlay extension at least two normal, shared, or central office line extensions are needed.
This article explains how to configure an Overlay extension on SPA500S through the use of SPA500 Series IP Phones which is connected to a UC500 series device.
Note: To configure an overlay button on an SPA500S Attendant Console which is connected to SPA500 series IP phone, first you need to configure Extension Mobility User Profile for dual line. Because octal lines do not support overlay buttons. To know more about how to configure Extension Mobility User Profile refer to Configuration of Extension Mobility Feature on UC500 Series. The SPA500DS will not work with the UC500 series unified communication devices and will only work with UC320 unified communication device.
Applicable Devices
• SPA500S Attendant Console
• SPA500 Series IP Phone
Software Version
• v8.6.0 [ UC540 ]
• v3.2(1) [ Cisco Configuration Assistant ]
• spa525g-7-4-9c [SPA 509G IP Phone ]
Overlay Extension Configuration
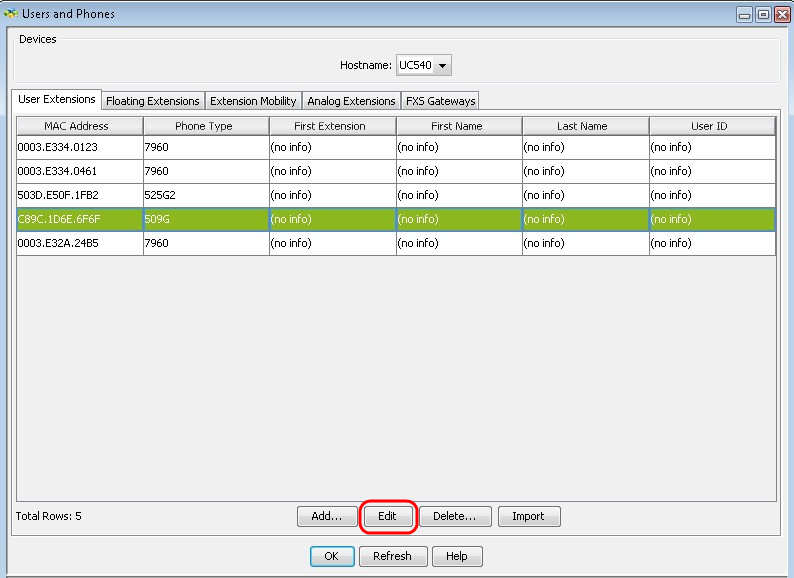
Step 1. From the Cisco Configuration Assistant (CCA), choose Configure > Telephony > Users/Extension > Users and Phones. The Users and Phones page opens:

Step 2. Choose the appropriate device from the Hostname drop-down list.

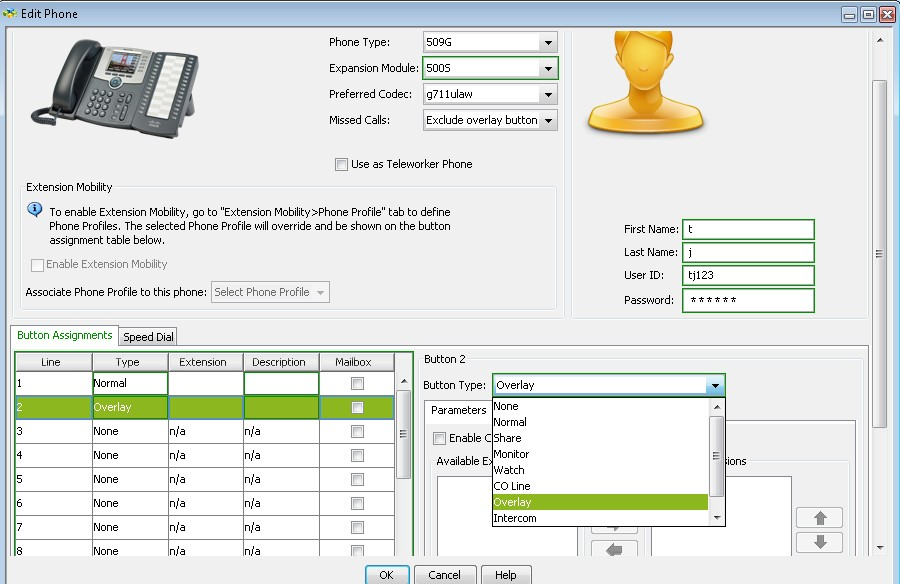
Step 3. Click the desired phone under the User Extension tab and click Edit. The Edit Phone window appears:

Note: When you use the SPA500S for the first time you need to add it. To know more on how to add SPA500S refer to the article, Add SPA500S Attendant Console that is Connected to SPA500 Series IP Phone.
Step 4. Click the button you want to use as an overlay button from the Button Assignments and choose Overlay from the Button Type drop-down list.
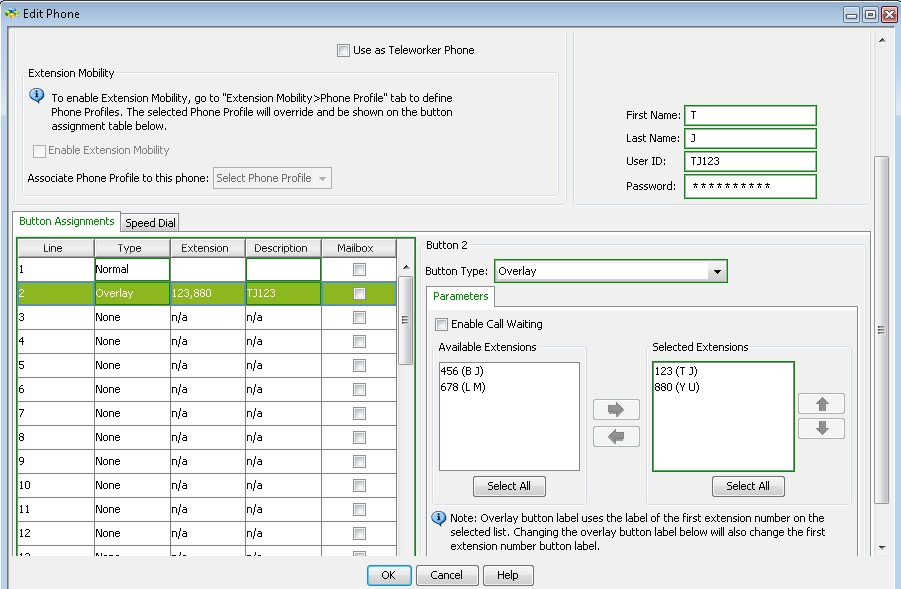
Step 5. Check Enable Call Waiting if you want to configure the overlay button with call waiting function. It will play a call waiting tone if the overlay extension is already in use and another call comes.

Step 6. Choose the extensions which you want to use as overlay from the Available Extensions to the Selected Extensions with the help of the Select All button and the Left and Right icons.
Step 7. (Optional) Rearrange the selected extension with the help of the Up and Down icons.
Step 8. (Optional) Enter a descriptive name for the overlay extensions to show in the IP phone in the Overlay Button Label field.
Step 9. Click OK to save the settings.
Revision History
| Revision | Publish Date | Comments |
|---|---|---|
1.0 |
12-Dec-2018 |
Initial Release |
 Feedback