Interfaces and VLAN Assignment Configuration on 200/300 Series Managed Switches
Available Languages
Objective
Each interface on a switch can be classified as one of several modes. These various modes serve different purposes within a VLAN and can be configured in the Interface Settings page. Once configured to a mode, interfaces can then be added as a member of a VLAN. This article explains how to manage the VLAN capabilities of interfaces on the 200/300 Series Managed Switches.
Applicable Devices
- SF/SG 200 and SF/SG 300 Series
Software Version
- 1.3.0.62
Port VLAN Configuration
Configure Interface Settings
Step 1. Log in to the web configuration utility and choose VLAN Management > Interface Settings. The Interface Settings page opens:
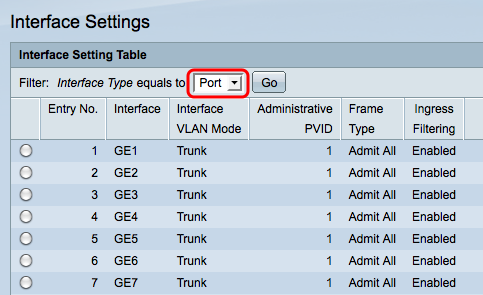
Step 2. Chose an interface from the Interface Type drop-down list and then click Go.
- Port — A single physical port on the switch.
- LAG — A group of ports used to increase link reliability.
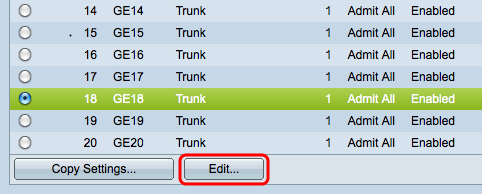
Step 3. Check the check box of the desired port/LAG and click Edit. The Edit Interface Setting window appears.
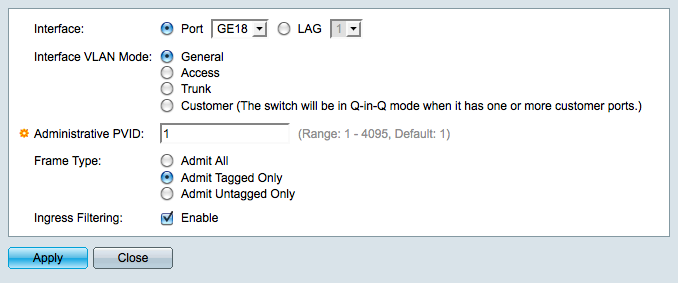
Step 4. Click the radio button that corresponds to the desired VLAN mode in the Interface VLAN Mode field.
- General — Can be a tagged or untagged member of multiple VLANs.
- Access — An untagged member of only one VLAN. If you choose this, skip to Step 8.
- Trunk — Can be a tagged member of multiple VLANs. Can only be an untagged member in at most one VLAN.
- Customer — Places the interface in QinQ mode which allows you to use your own VLAN arrangements. If you choose Customer, skip to Step 8.
Step 5. Enter the administrative VLAN in the Administrative PVID field. This is the VLAN that untagged frames are classified as.
Note: Steps 6 and 7 are only available if interface VLAN mode is General.
Step 6. Click the radio button that defines how to handle incoming frames in the Frame Type field.
- Admit All — All frames are handled by the switch.
- Admit Tagged Only — Only tagged frames are handled by the switch, all other frames are discarded.
- Admit Untagged Only — Only untagged frames are handled by the switch, all other frames are discarded.
Step 7. Check the Ingress Filtering check box to discard all frames that arrive on the interface that belong to a VLAN that the interface is not a member of.
Step 8. Click Apply to save your changes and then click Close to exit the Edit Interface Setting window.
Assign VLAN to Ports
Step 1. Log in to the web configuration utility and choose VLAN Management > Port VLAN Membership. The Port VLAN Membership page opens:
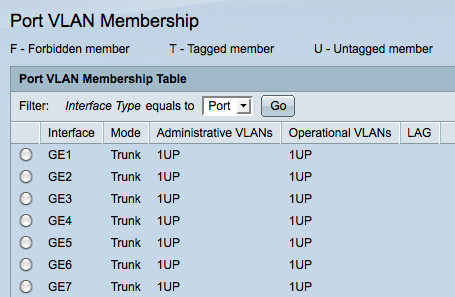
Step 2. Click the radio button of the port you would like to add to the VLAN.
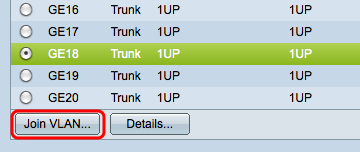
Step 3. Click Join VLAN. The Join VLAN window appears.
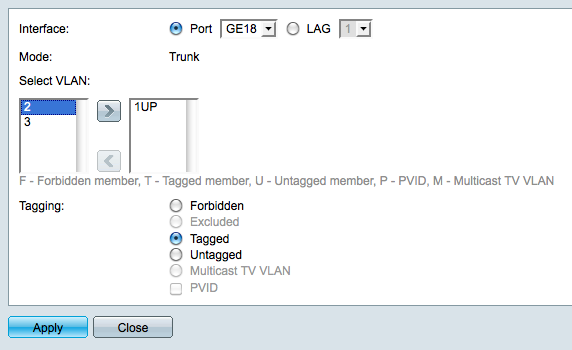
Step 4. In the Select VLAN list, choose one of the available VLANs.
Step 5. Click the Add button to add the chosen VLAN to the port.
Step 6. In the Tagging field, choose one of the following:
- Forbidden — The interface is not allowed to join the VLAN. The interface will be assigned to the internal VLAN 4095.
- Excluded —The interface is not a member of the VLAN but can join through GVRP.
- Tagged — The interface joins the VLAN as a tagged member. Tagged members attach a VLAN tag to each frame they send.
- Untagged — The interface joins the VLAN as an untagged member. Untagged members do not attach a VLAN tag to the frames.
- Multicast TV VLAN — The interface will be used for Digital TV purposes through the use of multicast IP.
- PVID —The PVID of the interface becomes the VID of the VLAN.
Note: Not all tagging options are available for all interface modes.
Step 7. Click Apply to save your settings.
Revision History
| Revision | Publish Date | Comments |
|---|---|---|
1.0 |
10-Dec-2018 |
Initial Release |
 Feedback