Port Settings on 200/300 Series Smart Switches
Available Languages
Objective
Port Settings can be modified to help control traffic flow through a managed network. The default settings of most ports should be sufficient for your network, however, when you want to get the most out of your device, you can manually select different options to configure the ports.
The objective of this document is to show you how to configure port settings on 200/300 Series Managed Switches.
Applicable Devices
• SF/SG 200 Series Managed Switches
• SF/SG 300 Series Managed Switches
Software Version
• 1.3.0.62
Configure Port Settings
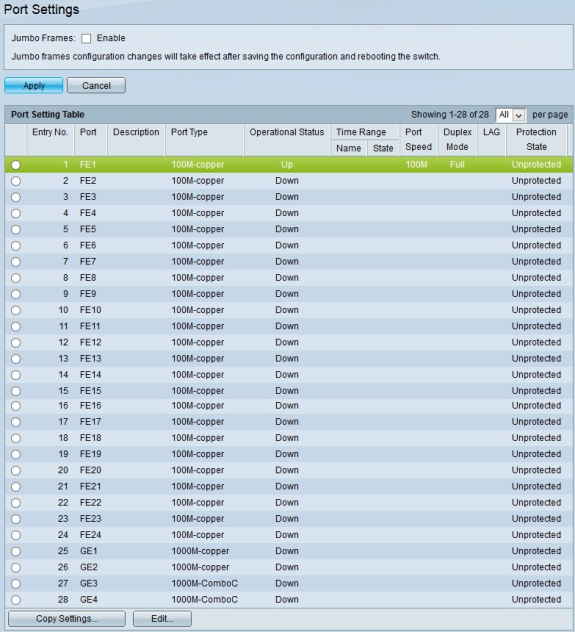
Step 1. Log in to the Switch Configuration Utility and choose Port Management > Port Settings. The Port Settings page opens:

Step 2. (Optional) Check the Jumbo Frames check box to enable Jumbo Frames on the interfaces. Jumbo Frames are Ethernet frames with a size of 1500 bytes or more.
Step 3. In the Port Setting Table, click the radio button of the port you wish to configure.
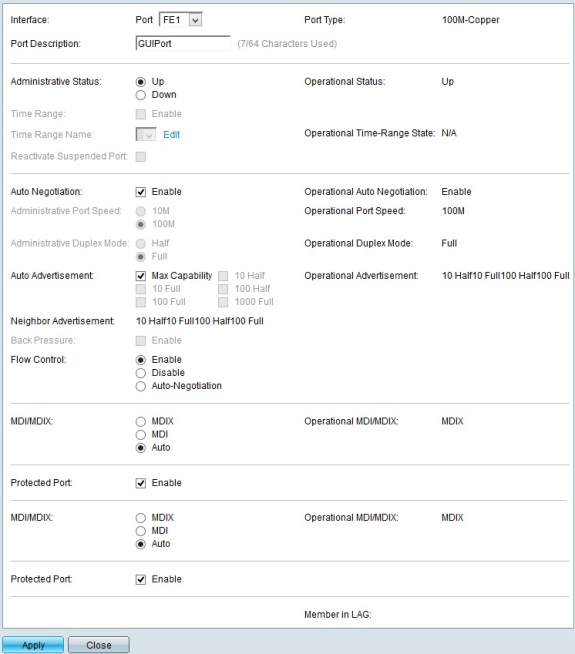
Step 4. Click Edit. The Port Settings window appears:

Step 5. (Optional) To change the chosen port, choose a port from the drop-down list in the Interface field.
Step 6. Enter a description for the port in the Port Description field.
Note: The Port Type field displays the type of physical connection currently used.
Step 7. Click the desired radio button in the Administrative Status field to choose an administrative status. The available options are:
• Up — Enable the port so it can be accessed by a PC or any other device.
• Down — Disable or shutdown the port so it cannot be accessed.
Note: The current status of the port is displayed in the Operational Status field.
Step 8. Check the Enable check box in the Time Range field to designate a time when the port should be enabled.
Step 9. If you enabled the time range in step 8, then choose a pre-configured time range from the Time Range Name drop-down list.
Note: The current operational state of the time range is displayed in the Operational Time-Range State field.
Note: Time Range is only available for SF/SG 300 Series Managed Switches. For more information on how to configure a time range, refer to the article 802.1X Time Range Configuration on 300 Series Managed Switches.
Step 10. Check the Enable check box in the Reactivate Suspended Port field to reactivate a port that has been suspended. A port can be suspended by any other security configuration previously done in the switch.
Step 11. Check the Enable check box in the Auto Negotiation field to enable Auto Negotiation. This enables a port to advertise its transmission parameters to the other end of the connection.
Note: If you leave the Auto Negotiation check box unchecked, you can then choose the transmission speeds and the duplex mode from the Administrative Port Speed field and Administrative Duplex Mode field.
Note: The Operational Auto-Negotiation field displays the current auto-negotiation status on the port.
Step 12. Click one of the available radio buttons from the Administrative Port Speed menu to configure speed on your port:
• 10 — This options sets the transmission speed of the port to 10Mbps
• 100 — This option sets the transmission speed of the port to 100Mbps
Note: The Operational Port Speed field displays the current port speed that is the result of negotiation.
Step 13. Choose a radio button from the Administrative Duplex Mode field. This field is configurable only when auto-negotiation is disabled, and the port speed is set to 10M or 100M. At port speed of 1G, the mode is always full duplex. The available options are defined as follows:
• Full — The port can transmit and receive at the same time.
• Half — The port can either transmit or receive, but cannot do both at the same time.
Note: The Operational Duplex Mode field displays the current duplex mode of the port.
Step 14. Check the check box of the desired option in the Auto Advertisement field. The options in this area are available only when auto negotiation is enabled. The available options are defined as follows:
• Max Capability — All port speeds and duplex mode settings can be accepted.
• 10 Half — 10 Mbps speed and Half Duplex mode.
• 10 Full — 10 Mbps speed and Full Duplex mode.
• 100 Half — 100 Mbps speed and Half Duplex mode.
• 100 Full — 100 Mbps speed and Full Duplex mode.
• 1000 Full — 1000 Mbps speed and Full Duplex mode.
Note: The Operational Advertisement field displays the capabilities currently advertised to the neighbor.
Note: The Neighbor Advertisement field displays the capabilities advertised by the neighbor device, that is, the device at the other end of the connection.
Step 15. Check the Enable check box to in the Back Pressure field to slow down the reception of data when the port switch is congested. This option can only be used on half duplex mode.
Step 16. Choose a radio button from the Flow Control field. The available options are defined as follows:
• Enable — Enables 802.3x Flow Control.
• Disable — Disables 802.3x Flow Control.
• Auto Negotiation — Enable the auto–negotiation of Flow Control on the port. This only works on full duplex mode.
Step 17. Click a radio button in the MDI/MDIX field. MDI/MDIX stands for Media Dependent Interface/Media Dependent Interface with Crossover. The available options are defined as follows:
• MDIX — Swaps the transmit and receives pairs of the port.
• MDI — Connects this switch to a station with a straight through cable.
• Auto — Configures this switch to automatically detect the correct pinouts for the connection to another device.
Note: The Operational MDI/MDIX field displays the current MDI/MDIX status.
Step 18. Check the Enable check box in the Protected Port field to provide enhanced security to the port.
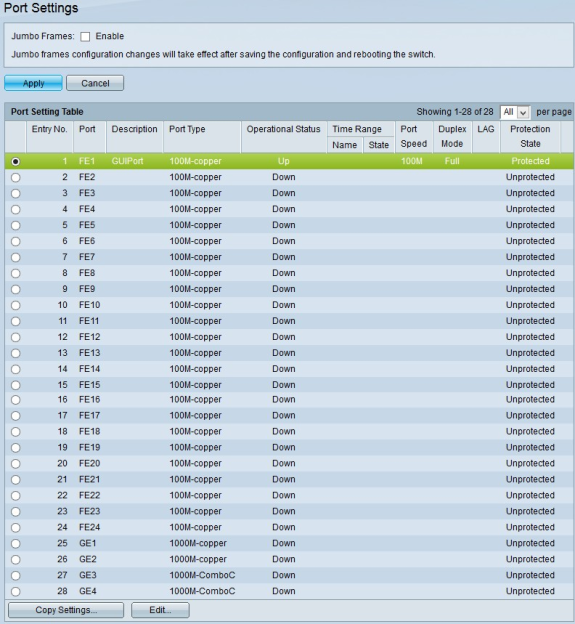
Step 19. Click Apply at the bottom of the page.
Apply an Interface Configuration to Multiple Interfaces
Step 1. Click the radio button of the interface whose configuration you want to copy.

Step 3. Click Copy Settings. The Copy Settings window appears.

Step 4. Enter the range of interfaces that you want to apply the configuration to. You can use the interface numbers or the name of the interfaces as input. You can enter each interface separated by a comma (For example: 1, 3, 5 or GE1, GE3, GE5) or you can enter a range of interfaces (For example: 1-5 or GE1-GE5).
Step 5. Click Apply to save your configuration.
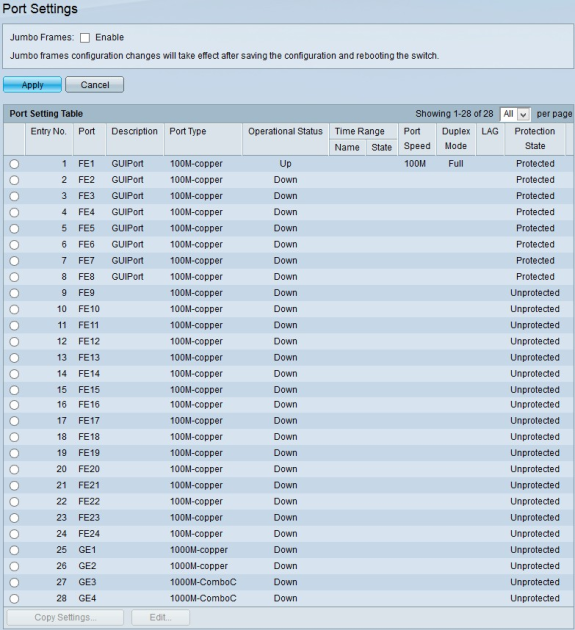
The image below depicts the changes after the configuration.

Revision History
| Revision | Publish Date | Comments |
|---|---|---|
1.0 |
13-Dec-2018 |
Initial Release |
 Feedback