Update Configuration Files on a Switch
Available Languages
Objective
The Cisco Small Business Switches contain several configuration and management files which determine the settings of the switch and how it operates. These files can be manipulated on the File Operations page of the web-based utility of the switch, where configuration files can be backed up, upgraded, or copied. Files can be moved between your computer, a connected USB device, the internal flash of the switch, or the Trivial File Transfer Protocol (TFTP) or Secure Copy (SCP) server. Storing these files in multiple locations can be useful in case you want to roll back the device to an earlier state, or in the event of a device failure.
This article provides instructions on how to update the system configuration file through any of the following methods:
- HTTP/HTTPS — Choose the source file from your local computer.
- USB or Internal Flash — Choose the source file from the internal flash memory or from a connected USB device on the switch.
- TFTP — Upload the source file to the switch from the TFTP server.
- SCP (File transfer via SSH) — Upload the source file to the switch from the SCP server.
Note: To know how to back up configuration files on a switch, click here. To duplicate a configuration file, click here for instructions.
Applicable Devices
- Sx250 Series
- Sx350 Series
- SG350X Series
- Sx550X Series
Software Version
- 2.3.0.130
Update Configuration Files
Step 1. Log in to the web-based utility of your switch. The default username and password is cisco/cisco.
Note: If you already have changed the password or created a new account, enter your new credentials instead.


Step 2. Choose Advanced from the Display Mode drop-down list.

Step 3. Click Administration > File Management > File Operations.

Step 4. In the Operation Type area, click the Update File radio button to update the existing configuration file with the converted configuration file.

Step 5. In the Destination File Type, click one of the configuration file types to update. The options are:
- Running Configuration — The current in-use configuration of the switch. This file is cleared whenever the switch reboots.
- Startup Configuration — When the switch starts up, it looks at this file and generates a running configuration file. This is how settings on the switch can be preserved across reboots.
- Mirror Configuration — A mirror configuration file is created by the switch if it has been running for 24 hours, no changes have been made to the running configuration in that time, and the startup and running configuration files are identical. The mirror configuration file can be useful in rolling the switch back to an earlier state.
- Logging File — This is where the switch stores all of its logs.
- Language File — This is where the switch stores language information.
Note: If a file does not exist on the switch, or if it cannot be updated, its radio button will be unavailable.
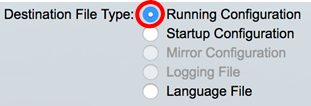
Note: In this example, Running configuration file is chosen. Choosing this option will update the current running configuration settings.
Step 6. Choose one from the following update methods:
Update a System Configuration File via HTTP/HTTPS
Step 1. Click HTTP/HTTPS as the copy method.

Step 2. Click the Choose File button to browse for the configuration file.

Step 3. Browse for the file then click Open.
Note: In this example, the updated configuration file named For SG350X-48MP.txt which is saved in the Firmware folder of the local computer will replace the running configuration file.
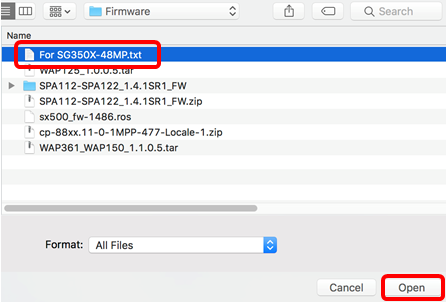
Step 4. The configuration file name will be displayed in the File Name area. Click Apply to update the configuration file.

Once the operation is finished, a Success message will be displayed in the File Operations page.

You should now have successfully updated the system configuration file on your switch through the HTTP/HTTPS copy method.
Update a System Configuration File via USB or Internal Flash
Step 1. Click USB or Internal Flash as the copy method. In this example, Internal Flash is chosen.

Step 2. In the File Name field, enter name of destination file.
Note: In this example, the updated configuration file named For SG350X-48MP.txt which is saved in the Internal Flash memory of the switch will replace the running configuration file.

Step 3. Click Apply to copy the configuration file from the Internal Flash to your switch.
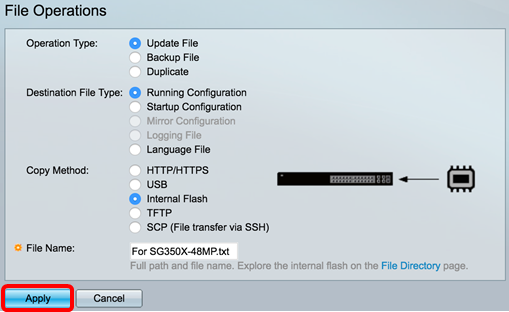
Once the operation is finished, a Success message will be displayed in the File Operations page.

You should now have successfully updated the system configuration file on your switch through the Internal Flash or USB copy method.
Update a System Configuration file via TFTP
Step 1. Click TFTP as the copy method. The switch will locate the configuration file from a TFTP server.

Step 2. Choose the server type in the Server Definition area. The options are:
- By IP address — Choose to enter the IP address of the TFTP server. In this example, this option is chosen.
- By name — Choose to enter the hostname of the TFTP server. If this option is chosen, skip to Step 4.

Step 3. (Optional) If you chose By IP address, choose either Version 4 (IPv4) or Version 6 (IPv6) from the IP Version area. If you chose Version 6, specify whether the IPv6 is a Link Local or Global address in the IPv6 Address Type area. If it is a link local address, choose the interface from the Link Local Interface drop-down list. If Version 4 is chosen, skip to Step 4.

Note: In this example, Version 4 is chosen.
Step 4. If you chose By name in Step 2, enter the hostname of the TFTP server in the Server IP Address/Name field. Otherwise, enter the IP address of the TFTP server.

Note: In this example, an IPv4 address of 192.168.100.147 is used.
Step 5. In the Source field, enter the file name of the updated configuration file. In this example, For SG350X-48MP.txt is entered.

Step 6. Click Apply to copy the configuration file from the TFTP server to your switch.

Once the operation is finished, a Success message will be displayed in the File Operations page.

You should now have successfully updated the system configuration file on your switch through the TFTP copy method.
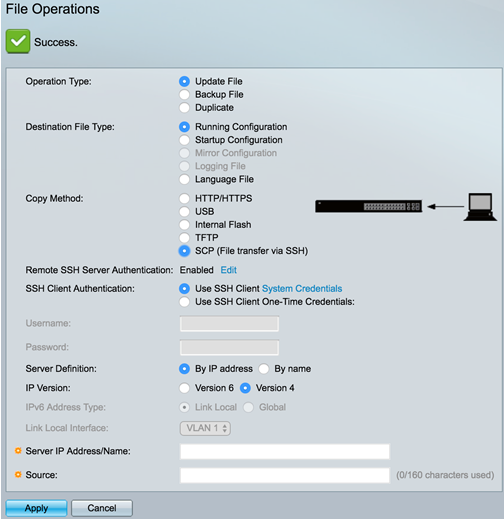
Update a System Configuration File via SCP
Important: Before you proceed with the SCP method, make sure that SSH server authentication is enabled and the corresponding settings have been configured. For instructions on how to configure SSH authentication settings on your switch, click here.
Step 1. Choose SCP (File transfer via SSH) as the copy method. The switch will locate the configuration file from an SCP server.

Step 2. The Remote SSH Server Authentication is disabled by default. To enable SSH server authentication, click Edit to configure the SSH Server Authentication settings.

Step 3. Choose one of the following methods to perform SSH Client Authentication:
- Use SSH Client System Credentials — Sets permanent SSH user credentials. Click System Credentials to go to the SSH User Authentication page where the user/password can be set once for all future use.
- Use SSH Client One-Time Credentials — Enter the username and password for this copy action.
Note: The username and password for one-time credential will not be saved in configuration file.

Note: In this example, Use SSH Client One-Time Credentials is chosen and the username and password details are entered accordingly.
Step 4. Choose the server type in the Server Definition area. The options are:
- By IP address — Choose to enter the IP address of the SCP server. In this example, this option is chosen.
- By name — Choose to enter the hostname of the SCP server. If this option is chosen, skip to Step 6.

Step 5. (Optional) If you chose By IP address, choose either Version 4 (IPv4) or Version 6 (IPv6) from the IP Version area. If you chose Version 6, specify whether the IPv6 is a Link Local or Global address in the IPv6 Address Type area. If it is a link local address, choose the interface from the Link Local Interface drop-down list. If Version 4 is chosen, skip to Step 6.

Note: In this example, Version 4 is chosen.
Step 6. If you chose By name in Step 4, enter the hostname of the SCP server in the Server IP Address/Name field. Otherwise, enter the IP address of the SCP server.

Note: In this example, the SCP server IPv4 address of 192.168.100.148 is used.
Step 7. In the Source field, enter the file name of the updated configuration file. In this example, For SG350X-48MP.txt is entered.

Step 8. Click Apply to copy the configuration file from the SCP server to your switch.
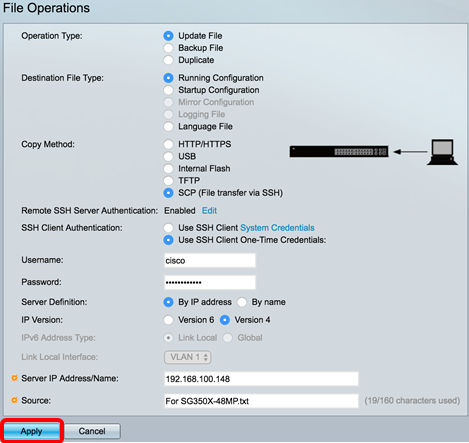
You should now have successfully updated the system configuration file on your switch through the SCP method.
Revision History
| Revision | Publish Date | Comments |
|---|---|---|
1.0 |
11-Dec-2018 |
Initial Release |
Contact Cisco
- Open a Support Case

- (Requires a Cisco Service Contract)
 Feedback