Bind Ingress or Egress Access Control List (ACL) on a Managed Switch
Available Languages
Objective
An Access Control List (ACL) is a list of network traffic filters and correlated actions used to improve security. It blocks or allows users to access specific resources. An ACL contains the hosts that are permitted or denied access to the network device.
ACLs can be applied not only to ingress, but also to egress interfaces. The purpose of ingress (inbound) and egress (outbound) ACL is to specify the types of network traffic that are allowed in or out from the device in the network. This feature allows administrators to filter the traffic in the network to the Internet, or to the organization firewall.
This article provides instructions on how to configure and bind ingress or egress ACL on your switch.
Applicable Devices
- Sx350 Series
- SG350X Series
- Sx550X Series
Software Version
- 2.2.0.66
Configure Ingress or Egress ACL
Important: Make sure you have ACL and Access Control Entry (ACE) configured on your switch. To configure IPv4-based ACL and ACE, click here for instructions. For IPv6-based, click here. To configure MAC-based ACL and ACE, click here.
Configure Ingress ACL on an Interface
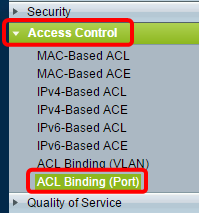
Step 1. Log in to the web-based utility then choose Access Control > ACL Binding (Port).
Note: In this scenario, the SG350-28MP switch is used.
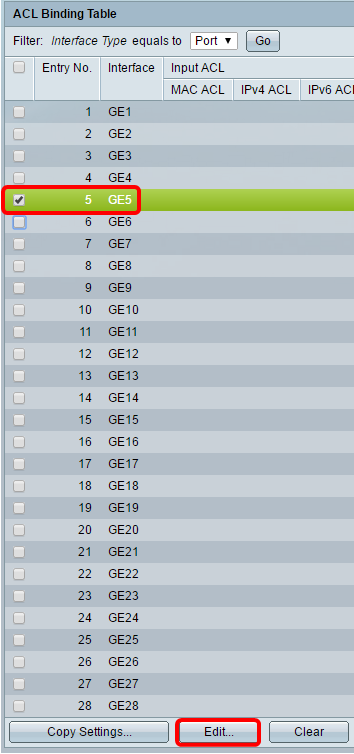
Step 2. Check the check box next to the interface that you want to apply the ACL to, then click Edit.
Note: In this example, the ACL will be applied to the GE5 interface.
Step 3. To configure Ingress ACL on an interface, check the desired Input ACL check box.
Note: In this example, the MAC-Based ACL is chosen.
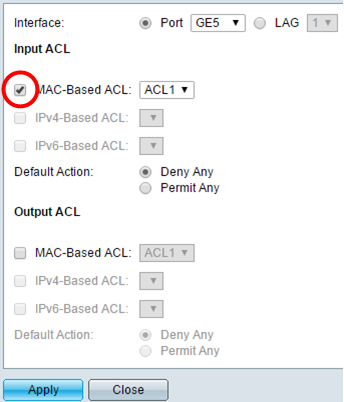
Note: If you want to bind an IPv4 or IPv6-Based ACL, click to choose accordingly.
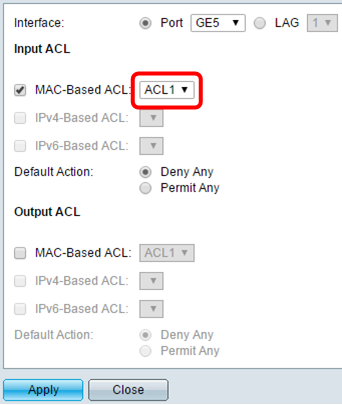
Step 4. Choose an ACL from the corresponding drop-down list.
Note: In this example, the pre-configured MAC-Based ACL ACL1 is chosen.
Step 5. Click a Default Action radio button.
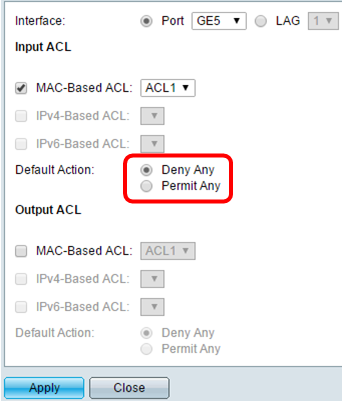
The options are:
- Deny Any — The switch drops packets that do not meet the required criteria of the ACL.
- Permit Any — The switch forwards packets that meet the required criteria of the ACL.
Step 6. Click Apply to save changes to the running configuration file then click Close.
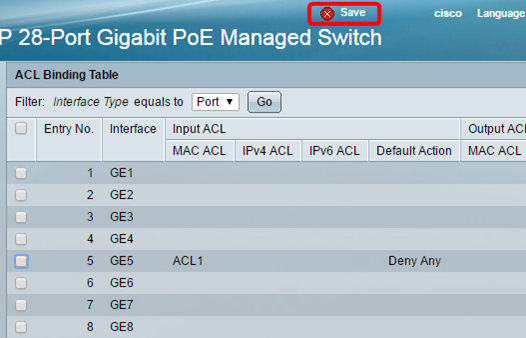
Step 7. The ACL Binding Table should display the configured ACL on the chosen interface. Click Save to update the startup configuration file.
Configure Egress ACL on an Interface
Important: Before proceeding with the steps, make sure you have already created a MAC-Based ACL and Access Control Entry (ACE) on your switch. For detailed instructions, click here.
Step 1. In the web-based utility, choose Access Control > ACL Binding (Port).
Note: In this scenario, the SG350-28MP switch is used.
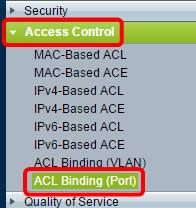
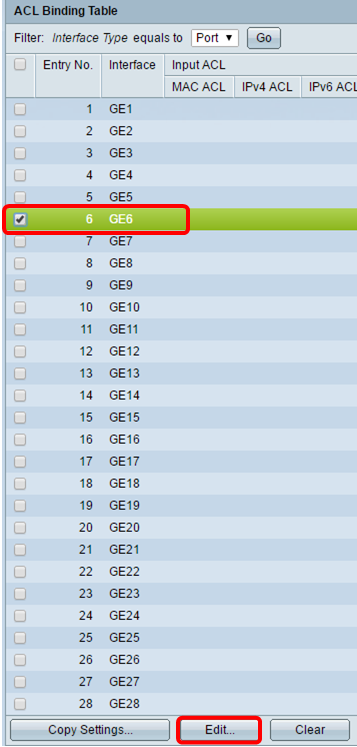
Step 2. Check the check box next to the interface that you want to apply the ACL to, then click Edit.
Note: In this example, GE6 is chosen.
Step 3. To configure Ingress ACL on an interface, check the desired Output ACL check box.
Note: In this example, the MAC-Based ACL is chosen.
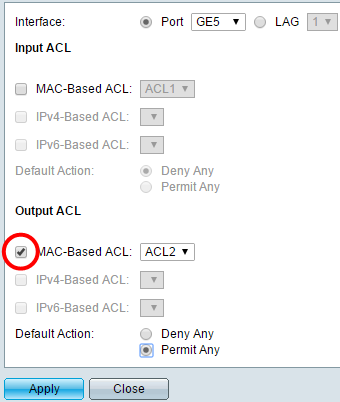
Note: If you want to bind an IPv4 or IPv6-Based ACL, click to choose accordingly.
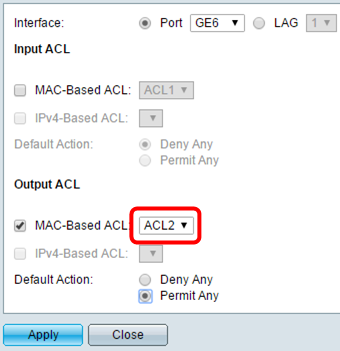
Step 4. Choose an ACL from the MAC-Based ACL drop-down list.
Note: In this example, the pre-configured MAC-Based ACL ACL2 is chosen.
Step 5. Click a Default Action radio button.
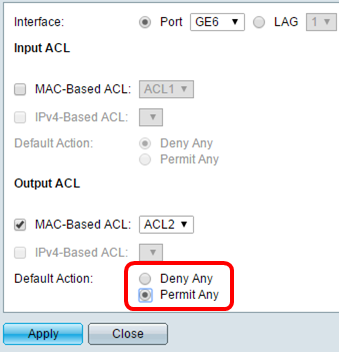
The options are:
- Deny Any — The switch drops packets that do not meet the required criteria of the ACL.
- Permit Any — The switch forwards packets that meet the required criteria of the ACL.
Step 6. Click Apply to save changes to the running configuration file then click Close.
Step 7. The ACL Binding Table should display the configured ACL on the chosen interface. Click Save to update the startup configuration file.
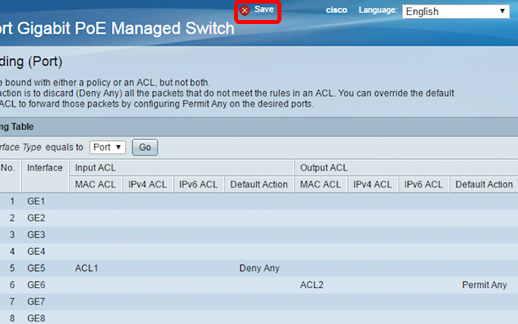
Note: If you wish to configure both egress and ingress ACLs at the same time, you may do so by configuring both Input ACL and Output ACL areas.
You should now have configured the egress and ingress ACLs on the interfaces of your switch.
 Feedback