Configure Voice Virtual Local Area Network (VLAN) Properties on a Switch
Available Languages
Objective
A Virtual Local Area Network (VLAN) allows you to logically segment a Local Area Network (LAN) into different broadcast domains. In scenarios where sensitive data may be broadcast on a network, VLANs can be created to enhance security by designating a broadcast to a specific VLAN. Only users that belong to a VLAN are able to access and manipulate the data on that VLAN. VLANs can also be used to enhance performance by reducing the need to send broadcasts and multicasts to unnecessary destinations.
The Voice VLAN is used when traffic from Voice over Internet Protocol (VoIP) equipment is assigned to a specific VLAN that is made up of voice devices such as IP phones, VoIP endpoints, and voice systems. The switch can automatically detect and add port members to the Voice VLAN, and assign the configured Quality of Service (QoS) to packets from the Voice VLAN. If the voice devices are in different Voice VLANs, IP routers are needed to provide communication.
This article provides instructions on how to configure Voice VLAN Properties on a switch.
Applicable Devices
- Sx350 Series
- SG350X Series
- Sx500 Series
- Sx550X Series
Software Version
- 2.2.5.68
Configure Voice VLAN Properties on the Switch
The default VLAN of the switch is VLAN 1 which cannot act as the Voice VLAN. However, if there is no other configured VLAN, VLAN 1 can be assigned to Voice VLAN.
Note: To know how to configure VLAN settings on your switch, click here for instructions.
Step 1. Log in to the web-based utility and choose Advanced from the Display Mode drop-down list.

Note: If you have an Sx500 Series switch, skip to Step 2.
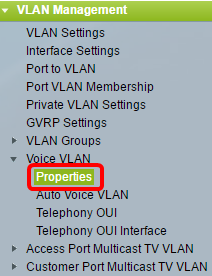
Step 2. Choose VLAN Management >Voice VLAN > Properties.
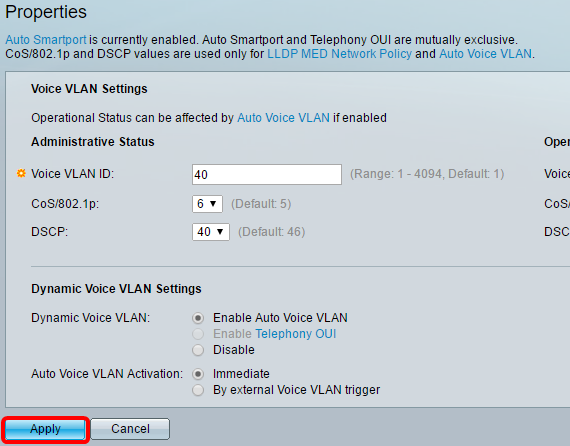
The page displays the following:

- The Voice VLAN settings configured on the device are displayed in the Voice VLAN Settings - Administrative Status area.
Note: Manually re-configuring the Voice VLAN ID, CoS/802.1p, and/or DSCP from their default values results in a static Voice VLAN, which has higher priority than auto Voice VLAN that was learned from external sources.
- The Voice VLAN settings that are actually being applied to the Voice VLAN deployment are displayed in the Voice VLAN Settings - Operational Status area.
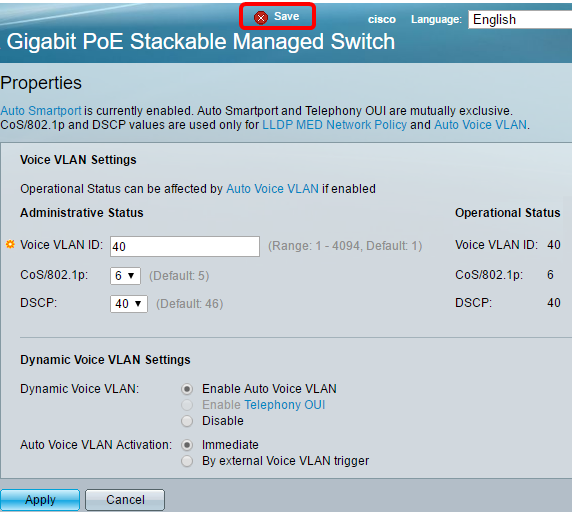
Step 3. In the Voice VLAN ID field, enter the ID of the VLAN that is to be the Voice VLAN.
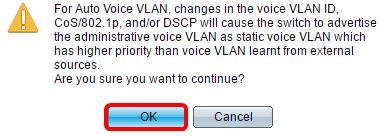
Important: Changes in the Voice VLAN ID, CoS/802.1p, and/or DSCP will cause the switch to advertise the administrative Voice VLAN as a static Voice VLAN. If the option Auto Voice VLAN Activation triggered by external Voice VLAN is chosen, then the default values need to be maintained. The Voice VLAN ID cannot be the default VLAN but can be a range.

Note: In this example, the Voice VLAN ID used is 40.
Step 4. (Optional) Choose the value from the CoS/802.1p which will be used by LLDP-MED as a voice network policy from the drop-down list. The value ranges from 0 to 7 and the default value is 5.
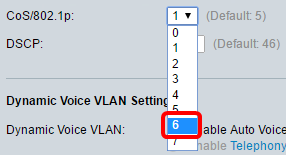
Note: In this example, 6 is chosen.
Step 5. (Optional) Choose the DSCP value which will be used by the LLDP-MED as a voice network policy from the DSCP drop-down list. The DSCP value is used to associate with application data sent by neighbors. This value informs them how they must mark the application traffic they send to the device. The DSCP value 46 is chosen by default.
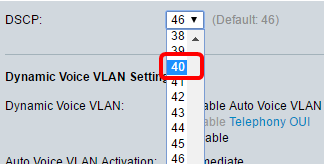
Note: In this example, 40 is chosen.
Step 6. (Optional) In the Dynamic Voice VLAN Settings area, click one of the following options to disable or enable dynamic Voice VLAN.

- Enable Auto Voice VLAN — Enables Dynamic Voice VLAN in Auto Voice VLAN mode. Only when this is enabled can options from the Auto Voice VLAN Activation field be clicked. To learn more about this feature, click here.
- Enable Telephony OUI — Enables Dynamic Voice VLAN in Telephony OUI mode. To learn about how to configure this feature, click here for instructions.
- Disable — Disables Auto Voice VLAN or Telephony OUI.
Note: In this example, Enable Auto Voice VLAN is clicked.
Step 7. (Optional) If Auto Voice VLAN is enabled in the Auto Voice VLAN Activation area, click one of the following options:

- Immediate — Immediately activates the Auto Voice VLAN.
- By external Voice VLAN trigger — When the device detects a Voice VLAN advertisement, Auto Voice VLAN is activated.
Note: In this example, Immediate is clicked.
Step 8. Click Apply.
Step 9. Click OK to proceed.
Step 10. (Optional) Click Save to save settings to the startup configuration file.
You should now have configured the Voice VLAN Properties on your switch.
Revision History
| Revision | Publish Date | Comments |
|---|---|---|
1.0 |
13-Dec-2018 |
Initial Release |
 Feedback