Configure Remote Network Monitoring (RMON) History Control Settings on a Switch
Available Languages
Objective
Remote Network Monitoring (RMON) was developed by the Internet Engineering Task Force (IETF) to support monitoring and protocol analysis of Local Area Networks (LANs). It is a standard monitoring specification which enables different network monitors and console systems to exchange their network-monitoring data with each other. RMON facilitates network administrators to choose among the network-monitoring probes and consoles with features that meet their particular networking needs. RMON specifically defines the information that any network monitoring system should be able to provide. Statistics, events, history, alarms, hosts, hosts top N, matrix, filter, capture, and token ring are the ten groups in RMON.
RMON enables a Simple Network Management Protocol (SNMP) agent in the device to proactively monitor traffic statistics over a given period and send traps to an SNMP manager. The local SNMP agent compares actual, real-time counters against predefined thresholds and generates alarms, without the need for polling by a central SNMP management platform. This is an effective mechanism for proactive management, provided that you have set the correct thresholds relative to the base line of your network.
Note: To know how to configure SNMP trap settings on your switch, click here for instructions.
This article provides instructions on how to configure RMON history control settings on your switch.
Applicable Devices
- Sx250 Series
- Sx300 Series
- Sx350 Series
- SG350X Series
- Sx500 Series
- Sx550X Series
Software Version
- 1.4.7.05 — Sx300, Sx500
- 2.2.8.04 — Sx250, Sx350, SG350X, Sx550X
Configure RMON History Control Settings on your Switch
Configure RMON History Control
The RMON feature enables monitoring statistics per interface. The History page defines the sampling frequency, amount of samples to store, and the port from which to gather the data. Follow the steps below to configure RMON history entries on your switch.
Step 1. Log in to the web-based utility of your switch then choose Advanced in the Display Mode drop-down list.
Note: In this example, SG350X-48MP switch is used.

Note: If you have an Sx300 or Sx500 Series switch, skip to Step 2.
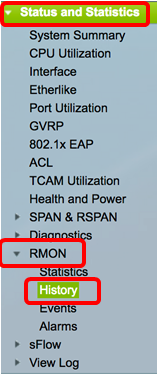
Step 2. Choose Status and Statistics > RMON > History.
The information on the History Control Table are defined by the Add RMON History dialog box except for the Current Number of Samples. RMON is allowed by the standard to not grant all requested samples, but rather to limit the number of samples per request. Therefore, this field represents the sample number actually granted to the request that is equal or less than the requested value.
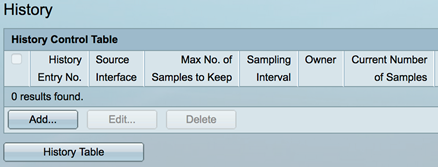
Step 3. Click Add to add a new entry to the History Control Table.

The New History Entry area displays the number of the new History table entry.
Step 4. In the Source Interface area, choose the type of interface from which the history samples are to be taken.
Note: In this example, Port GE3 of Unit 1 is chosen.

Note: If you have a non-stackable switch such as Sx250 or Sx300 Series switch, the options are Port and LAG only.

Step 5. Enter the number of samples to store in the Max No. of Samples to Keep field.

Note: In this example, 40 is used.
Step 6. In the Sampling Interval field, enter the time in seconds that samples are collected from the ports. The field range is 1 to 3600.

Note: In this example, 2400 seconds is used.
Step 7. Enter the RMON station or the user that requested RMON information in the Owner field. The range is 160 characters.

Note: In this example, cisco is used.
Step 8. Click Apply then click Close. The RMON history is saved to the running configuration file.

Step 9. (Optional) Click Save to save settings to the startup configuration file.
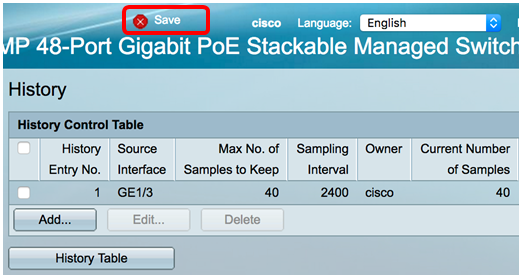
You should now have successfully added a new entry in the History Control Table.
Edit RMON History
Step 1. In History Control Table, check the box next to the History Entry that you would like to edit.

Note: In this example, Entry 1 is chosen.
Step 2. Click the Edit button to edit the RMON history entry.

Step 3. You can update the History Entry No., Source Interface, Max No. of Samples to Keep, Sampling Interval, and Owner details accordingly.
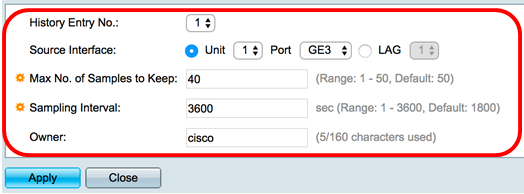
Note: In this example, the Sampling Interval value has been changed from 2400 to 3600 seconds.
Step 4. Click Apply then click Close.
Step 5. (Optional) Click Save to save settings to the startup configuration file.
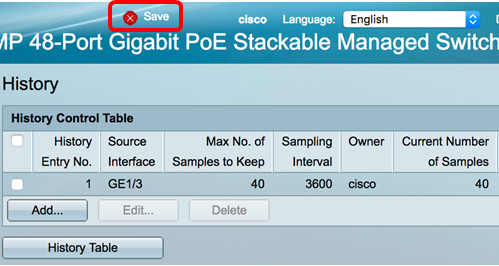
You should now have successfully edited an entry in the History Control Table.
Delete RMON History
Step 1. In History Control Table, check the box next to the History Entry that you would like to delete.

Step 2. Click the Delete button to edit the RMON history entry.

Step 3. (Optional) Click Save to save settings to the startup configuration file.
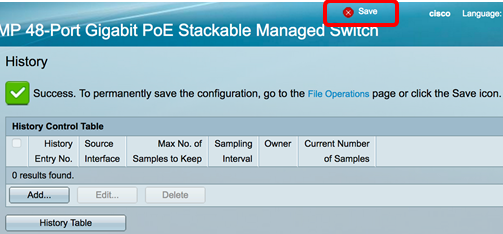
You should now have successfully deleted a history entry from the History Control Table.
View RMON History Table
After the data is sampled and stored, it appears in the History Table page. To view the History:
Step 1. Choose Status and Statistics > RMON > History.
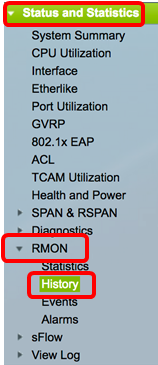
Step 2. Click the History Table button.
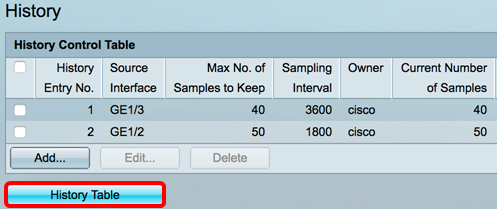
Step 3. (Optional) To specify the entry you wish to obtain RMON information from, check the Filter check box and choose from the History No. drop-down list, then click Go.

Note: In this example, History entry number 1 is chosen.
The History Table displays the next RMON information for the chosen RMON history entry:

- History Entry No. — The number of the current RMON history entry.
- Owner — The owner name.
- Sample No. — The sample number of the current RMON history entry.
- Drop Events — The number of dropped packets for each sample of the current RMON history entry.
- Bytes Received — The number of octets received for each sample of the current RMON history entry.
- Packets Received — The number of packets received for each sample of the current RMON history entry.
- Broadcast Packets — The number of broadcast packets used for each sample of the current RMON history entry.
- Multicast Packets — The number of multicast packets used for each sample of the current RMON history entry.
- CRC Align Errors — The number of Cyclic Redundancy Check (CRC) errors and Align errors occurred for each sample of the current RMON history table.
- Undersize Packets — The number of packets with less than 64 octets received for each sample of the current RMON history table.
- Oversize Packets — The number of packets with more than 2000 octets received for each sample of the current RMON history table.
- Fragments — The number of packets with less than 64 octets received without framing bits and with Frame Check Sequence (FCS) octets for each sample of the current RMON history table.
- Jabbers — The number of packets received with more than 2000 octets without frame bits and with FCS octets with either a bad FCS with an integral number of octets, or FCS octets with a bad FCS with a non-integral octet number
- Collisions — The number of collisions received for each sample of the current RMON history table.
- Utilization — The percentage of current interface traffic compared to maximum traffic that the interface can handle.
Step 4. (Optional) Click the History Control Table button to go back to the History Control Table.
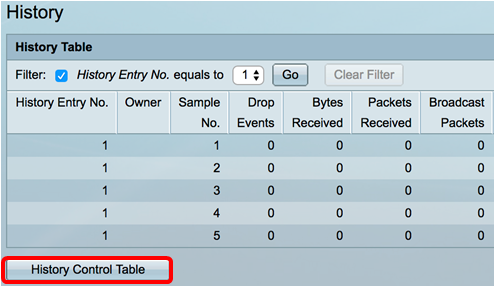
You should now have successfully viewed the RMON History Table on your switch.
Revision History
| Revision | Publish Date | Comments |
|---|---|---|
1.0 |
13-Dec-2018 |
Initial Release |
 Feedback