Configure User Accounts to Enhance Security on a Cisco Smart or Managed Switch
Available Languages
Objective
A user account is needed in order to be authorized to access the web-based utility of a device. It contains the username and password of the user in order to gain access. Configuring the user account on a Cisco Managed Switch is possible through the switch web-based utility. This is necessary if you want to do any of the following:
- Allow multiple users to gain access to the web-based utility and the Command Line Interface (CLI) of the switch simultaneously.
- Set up a username and password on the switch for additional users to prevent unauthorized access.
- Modify or edit passwords of existing users.
- Modify or edit the level of access of a particular user for enhanced security.
This article aims to show how to configure the user accounts on the Cisco Managed switch.
Applicable Devices
- Sx300 Series
- Sx250 Series
- Sx350 Series
- SG350X Series
- Sx550X Series
Software Version
- 1.4.5.02 - Sx300 and Sx500 Series
- 2.2.0.66 - Sx250, Sx350, SG350X, Sx550X Series
Configure User Account
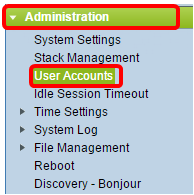
Step 1. Log in to the web-based utility of the switch and choose Administration > User Accounts.
Step 2. At the upper-right part of the page, choose Advanced from the Display Mode drop-down list.
Note: If you are using the Sx300 or Sx500 Series, skip this step.

Step 3. Verify that the Enable Password Recover Service check box is checked then click Apply.
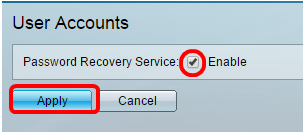
Note: This service is enabled by default.
The User Account table is shown with the current user. Choose from the following options:
- Add — Choose to add a new user account.
- Edit — Choose to edit or modify the password or the level of access of an existing user account.
- Delete — Choose to delete an existing user account and its corresponding level of access.
Add User Account
Step 1. In the User Account Table area, click the Add button to create a new user account.

Step 2. Enter a username in the User Name field.
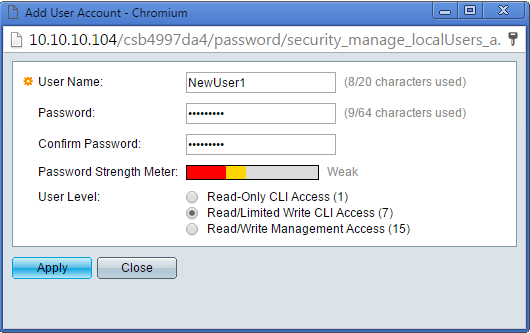
Step 3. Enter a password for the username in the Password field. The minimum requirements for the password are as follows:
- Cannot be the same as the user name.
- Minimum length is eight consisting of alphanumeric characters.
Step 4. Re-enter the password in the Confirm Password field.
Note: The Password Strength Meter displays the security strength of the entered password.
Step 5. In the User Level area, click the appropriate radio button based upon the level of access that needs to be provided to the user.
- Read-Only CLI Access — User can access the Command Line Interface (CLI) commands. User cannot access Graphical User Interface (GUI) or change the device configuration.
- Read/Limited Write CLI Access — User cannot access GUI but has access to some CLI commands that can change the device configuration.
- Read/Write Management Access— User can access GUI and has access to configure the device.
Note: In this example, Read/Limited Write CLI Access (7) is chosen.
Step 6. Click Apply. The user account is now created.
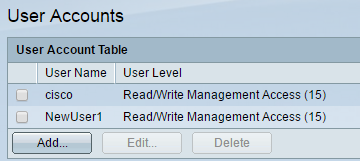
Step 7. (Optional) Repeat steps 1-6 for each new user you want to add.
Step 8. To save the configuration permanently, go to the Copy/Save Configuration page or click the  icon at the upper portion of the page.
You should now have successfully configured the user accounts on the Cisco Managed switch.
Edit User Password and User Level
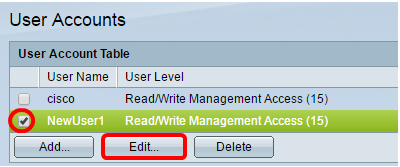
Step 1. Under the User Account table, check the box beside the user name that you want to edit then click the Edit button.
Step 2. Enter a new password for the specified username in the Password field.
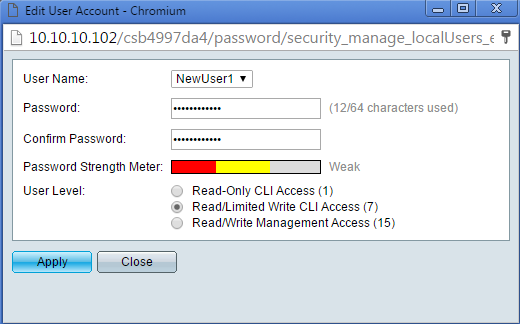
Step 3. Re-enter the password in the Confirm Password field.
Step 4. In the User Level area, click the appropriate radio button based upon the new level of access to be provided to the user.
Step 5. Click Apply. The user account is now modified.
Step 6. To save the configuration permanently, go to the Copy/Save Configuration page or click the  icon at the upper portion of the page.
Delete User Account
Step 1. Under the User Account table area, check the box beside the user that you want to delete then click the Delete button.
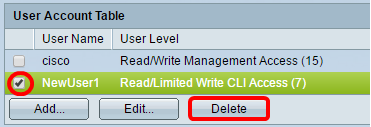
The user account is now deleted.

Step 2. To save the configuration permanently, go to the Copy/Save Configuration page or click the  icon at the upper portion of the page.
Revision History
| Revision | Publish Date | Comments |
|---|---|---|
1.0 |
13-Dec-2018 |
Initial Release |
 Feedback