Configure Link Layer Discovery Protocol (LLDP) Media Endpoint Discovery (MED) Network Policy Settings on a Switch
Available Languages
Objective
Link Layer Discovery Protocol (LLDP) Media Endpoint Discovery (LLDP MED) provides additional capabilities for traditional LLDP to support media endpoint devices. An LLDP MED network policy is a set of configuration settings used for real-time applications such as voice or video. Each outgoing LLDP packets to the attached media endpoint device will have a network policy included to it. The MED sends its traffic as defined on the network policy.
LLDP is often used to provide vendor interoperability where Cisco Discovery Protocol (CDP), a Cisco proprietary discovery protocol, cannot be used. The administrator uses these network policies for the advertisement of the Virtual Local Area Network (VLAN) configurations and associated Layer 2 and Layer 3 attributes for specific application on that port. Therefore, a phone can get notifications from the switch it is attached to about the VLAN ID that it should use. This allows the phone to connect to any switch, obtain its VLAN number, and start to communicate with the switch with the help of call control.
Note: To learn how to associate network policies with ports, click here for instructions. You can manually configure one or more network policies and the interfaces where the policies are to be sent. It is your responsibility to manually create the VLANs and their port memberships based on the network policies and their associated interfaces.
This article provides instructions on how to configure the LLDP MED network policy settings on your switch.
Applicable Devices
- Sx250 Series
- Sx300 Series
- Sx350 Series
- SG350X Series
- Sx500 Series
- Sx550X Series
Software Version
- 1.4.7.05 — Sx300, Sx500
- 2.2.5.68 — Sx250, Sx350, SG350X, Sx550X
Configure LLDP MED Network Policy Settings on a Switch
Enable LLDP MED Network Policy for Voice Application
Step 1. Log in to the web-based utility of your switch then choose Advanced in the Display Mode drop-down list.
Note: In this example, SG350X-48MP switch is used.

Note: If you have an Sx300 Series switch, skip to Step 2.
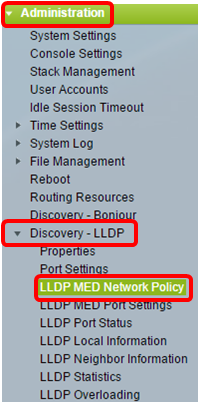
Step 2. Choose Administration > Discovery – LLDP > LLDP MED Network Policy.
Step 3. Make sure the Auto check box for LLDP MED Network Policy for Voice Application is checked. This will allow the switch to automatically generate and advertise a network policy for the voice application. This option is checked by default.
Note: The user will not be able to manually configure a voice network policy when the Auto box is checked.

Step 4. Click Apply.
Step 5. (Optional) Click Save to save settings to the startup configuration file.
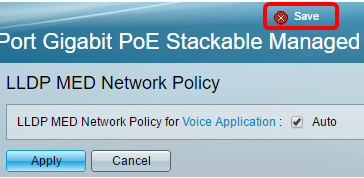
You should now have successfully enabled the LLDP MED Network Policy for Voice Application settings on your switch.
Add LLDP MED Network Policy
Step 1. Click the Add button to define a new network policy in the LLDP Network Policy Table.

Step 2. Choose the number of the policy to be created from the Network Policy Number drop-down list.

Note: In this example, 1 is chosen.
Step 3. Choose the type of application (traffic) for which the network policy is defined from the Application drop-down list.
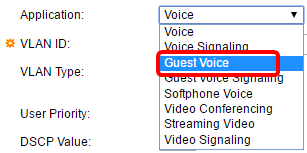
The options are:
- Voice — Apply the network policy to a voice application.
- Voice Signaling — Apply the network policy to a Voice Signaling application.
- Guest Voice — Apply the network policy to a guest voice application.
- Guest Voice Signaling — Apply the network policy to a guest voice signaling application.
- Softphone Voice — Apply the network policy to a softphone voice application.
- Video Conferencing — Apply the network policy to a video conferencing application.
- Streaming Video — Apply the network policy to a streaming video application.
- Video Signaling — Apply the network policy to a video signaling application.
Note: In this example, Guest Voice is chosen.
Step 4. Enter the VLAN ID to which the traffic should be sent in the VLAN ID field.

Note: In this example, 100 is used.
Step 5. Click the desired tag for the VLAN Type area.

- Tagged — The interface is a member of the chosen VLAN and packets sent from this interface destined to the chosen VLAN have the packets tagged with the VLAN ID.
- Untagged — The interface is a member of the chosen VLAN and packets sent from this interface destined to the chosen VLAN are not tagged with the VLAN ID. A port can be added as untagged only to one VLAN.
Note: In this example, Tagged is chosen.
Step 6. Choose the traffic priority applied to traffic defined by this network policy from the User Priority drop-down list. This is the Cost of Service (CoS) value. The least priority is 0 and 7 is the highest priority.
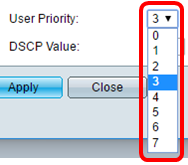
Note: In this example, 3 is chosen.
Step 7. Choose the Differentiated Services Code Point (DSCP) value to associate with application data sent by neighbors from the DSCP Value drop-down list. This informs the neighbors how they should mark the application traffic that they send to the switch. It ranges from 0 to 63.
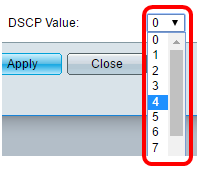
Note: In this example, 4 is chosen.
Step 8. Click Apply then click Close.
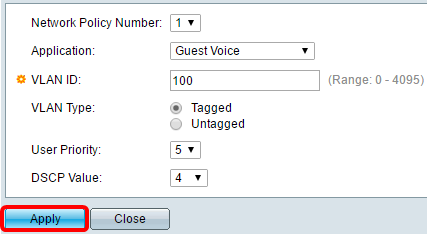
Step 9. (Optional) Click Save to save settings to the startup configuration file.
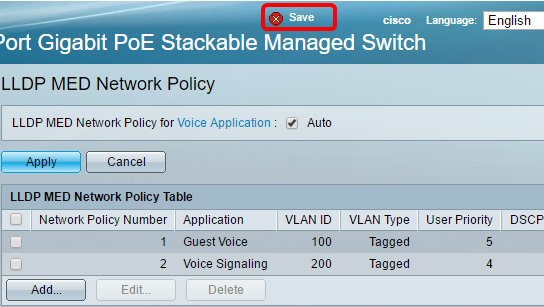
You should now have successfully added an LLDP MED Network Policy for Voice Application settings on your switch.
Edit LLDP MED Network Policy
Step 1. Check an entry and click Edit to update the settings of a particular entry in the LLDP Network Policy Table.

Step 2. Choose the type of application or traffic for which the network policy is defined from the Application drop-down list.
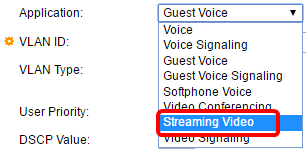
The options are:
- Voice — Apply the network policy to a voice application.
- Voice Signaling — Apply the network policy to a Voice Signaling application.
- Guest Voice — Apply the network policy to a guest voice application.
- Guest Voice Signaling — Apply the network policy to a guest voice signaling application.
- Softphone Voice — Apply the network policy to a softphone voice application.
- Video Conferencing — Apply the network policy to a video conferencing application.
- Streaming Video — Apply the network policy to a streaming video application.
- Video Signaling — Apply the network policy to a video signaling application.
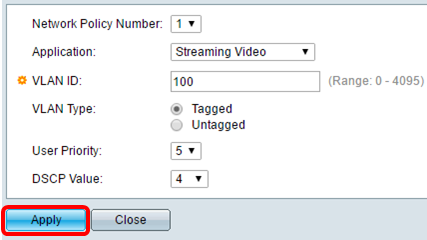
Note: In this example, Guest Voice has been changed to Streaming Video.
Step 3. Enter the VLAN ID to which the traffic should be sent in the VLAN ID field.

Note: In this example, VLAN ID 100 is retained.
Step 4. Click the desired tag from the VLAN Type area.

- Tagged — The interface is a member of the chosen VLAN and packets sent from this interface destined to the chosen VLAN have the packets tagged with the VLAN ID.
- Untagged — The interface is a member of the chosen VLAN and packets sent from this interface destined to the chosen VLAN are not tagged with the VLAN ID. A port can be added as untagged only to one VLAN.
Note: In this example, Tagged is retained.
Step 5. Choose the traffic priority applied to traffic defined by this network policy from the User Priority drop-down list. This is the CoS value. The least priority is 0 and 7 is the highest priority.
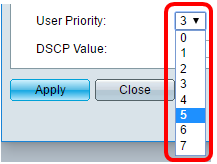
Note: In this example, User Priority 3 is changed to 5.
Step 6. Choose the DSCP value to associate with application data sent by neighbors from the DSCP Value drop-down list. This informs the neighbors how they should mark the application traffic that they send to the switch. It ranges from 0 to 63.

Note: In this example, the DSCP Value of 4 is retained.
Step 7. Click Apply then click Close.
Step 8. (Optional) Choose an appropriate entry and click Delete to delete the entry in the LLDP Network Policy Table.

Step 9. (Optional) Click Save to save settings to the startup configuration file.
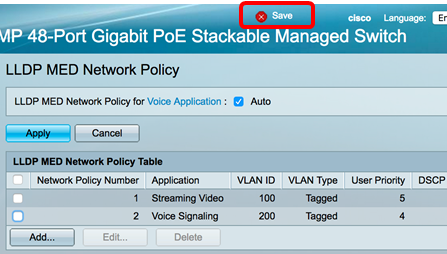
You should now have successfully edited the LLDP MED Network Policy for Voice Application settings on your switch.
Revision History
| Revision | Publish Date | Comments |
|---|---|---|
1.0 |
13-Dec-2018 |
Initial Release |
 Feedback