Configure SNMP Groups on a Cisco Business Switch
Available Languages
Objective
This document explains how to create and configure an SNMP group on a Cisco Business switch.
Introduction
Simple Network Management Protocol (SNMP) is a network management protocol which helps to record, store, and share information about the devices in the network. This helps the administrator address network issues. SNMP uses Management Information Bases (MIBs) to store available information in a hierarchical manner. SNMP Groups are used to combine the SNMP users based on access privileges and authorization to different SNMP views at the MIBs. Each SNMP group is uniquely identified by a combination of group name and the security levels. It assumes that SNMP Views has already been configured for the device.
For information on configuring SNMP views, check out:
Applicable Devices | Software Version
- CBS220 (Data Sheet) | 2.0.1.5 (Download latest)
- CBS250 (DataSheet) | 3.0.0.69 (Download latest)
- CBS350 (Data Sheet) | 3.0.0.69 (Download latest)
- CBS350-2X (Data Sheet) | 3.0.0.69 (Download latest)
- CBS350-4X (Data Sheet) | 3.0.0.69 (Download latest)
Configure SNMP Groups on a Switch
Step 1
Log in to the web user interface (UI) of the switch.
The UI options may be different based on your switch model. In this article, CBS350 switch is used.
Step 2
If you have a CBS250 or CBS350 switch, change the Display Mode to Advanced.

If you have a CBS220 switch, skip this step and go to Step 3.
Step 3
Choose SNMP > Groups.

Step 4
Click Add to create a new SNMP group.

Step 5
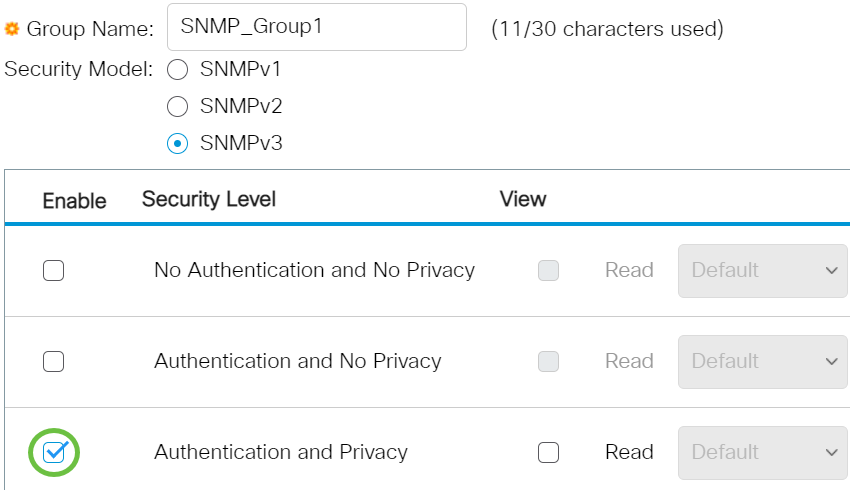
Enter the name of the SNMP group in the Group Name field.

In this example, the group name is SNMP_Group1.
Step 6
Choose the radio button for the SNMP Version in the Security Model area. The options are:
- SNMPv1 - This option means that there is no authentication and no privacy.
- SNMPv2 - This option includes most of the SNMPv1 features. It also provides authentication to ensure the SNMP messages are exchanged between authorized entities.
- SNMPv3 - This option incorporates the SNMPv2 features and offers authentication together with privacy to ensure that only authorized entities can view the SNMP messages.

In this example, SNMPv3 is chosen.
Step 7
Check the Enable check boxes that correspond to the desired security level for the newly created SNMP group. The options are:
- No Authentication and No Privacy - This option means that no authentication and no data encryption are assigned to the group.
- Authentication and No Privacy - This option authenticates SNMP messages and ensures that their origin is authenticated.
- Authentication and Privacy - This option authenticates SNMP messages and encrypts them.

Step 8
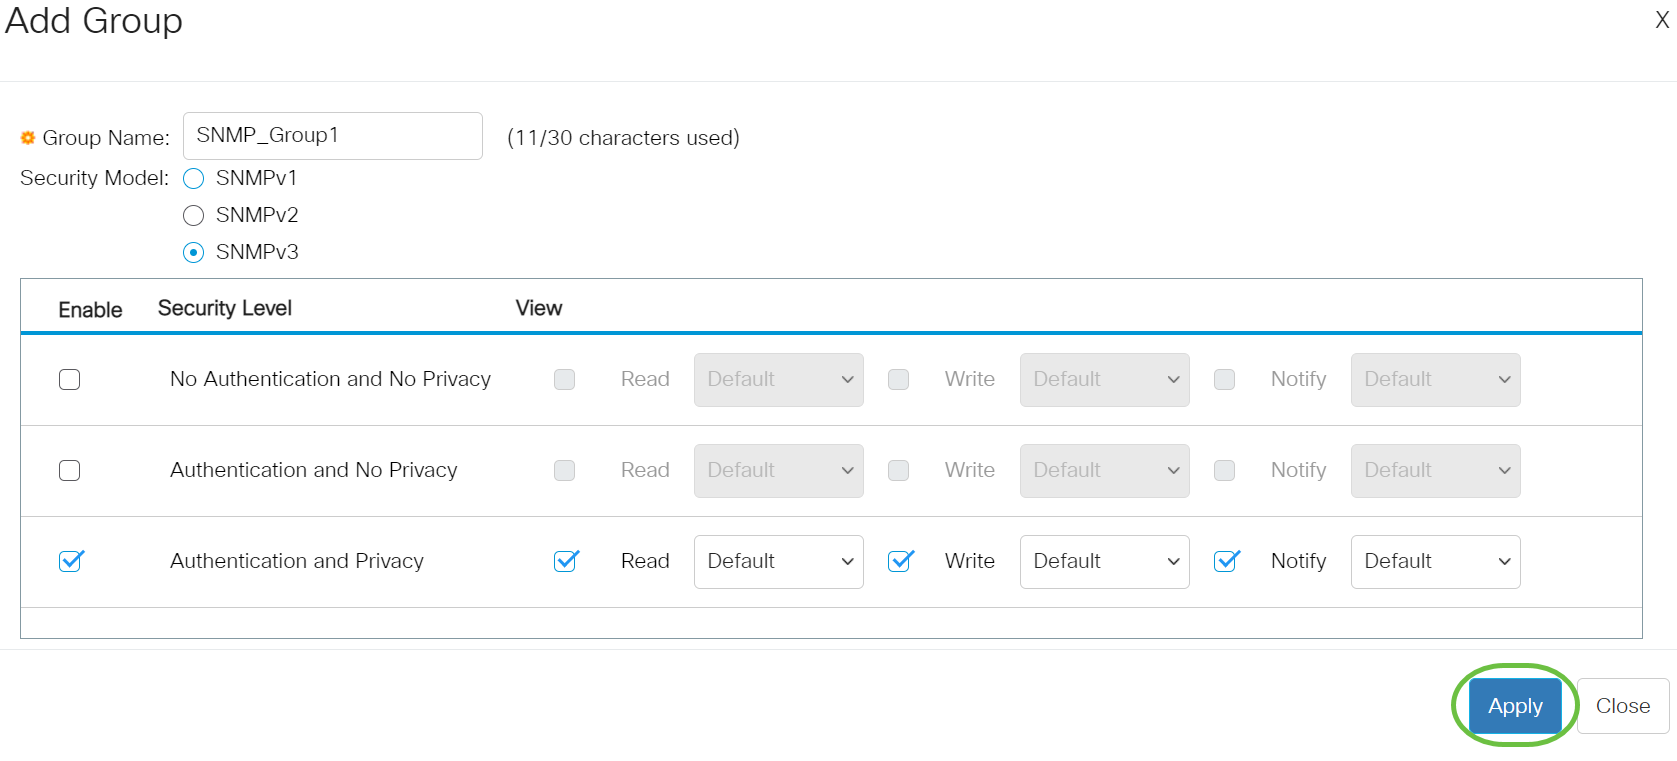
The SNMP views are the subset of MIB objects that can be assigned to an SNMP group to control write, read, and notification privileges of SNMP users over MIB object information. Check the desired access privileges such as Read, Write, and Notify check boxes and choose the desired view from the drop-down list for the newly created SNMP group. The drop-down list contains both default views and the user defined views.
- Read - The management access is read-only for the chosen view.
- Write - The management access is write for the chosen view.
- Notify - A notification message is sent to the SNMP users when an event occurs on the chosen view. This is available only on SNMPv3.

Step 9
Click Apply to save the SNMP group to the running configuration file.

Step 10
(Optional) If the security model or security level of the configured group needs to be changed, check the corresponding check box and click Edit to implement the changes.

Step 11
(Optional) In order to delete the groups from the Group Table, check the corresponding check box and then click Delete.

Step 12
(Optional) Click Save to save the settings to the startup configuration file.

You have now successfully configured SNMP Groups on your switch.
Check out any of the links below for more information!
Revision History
| Revision | Publish Date | Comments |
|---|---|---|
1.0 |
08-Jan-2021 |
Initial Release |
Contact Cisco
- Open a Support Case

- (Requires a Cisco Service Contract)
 Feedback