Configure Virtual Private Network (VPN) Connection using the Setup Wizard on the RV34x Series Router
Available Languages
Objective
A Virtual Private Network (VPN) connection allows users to access, send, and receive data to and from a private network by means of going through a public or shared network such as the Internet but still ensuring secure connections to an underlying network infrastructure to protect the private network and its resources.
A VPN tunnel establishes a private network that can send data securely using encryption and authentication. Corporate offices mostly use VPN connection since it is both useful and necessary to allow their employees to have access to their private network even if they are outside the office.
The VPN allows a remote host to act as if they were located on the same local network. The router supports 50 tunnels. The VPN Setup Wizard makes it possible to configure a secure connection for site-to-site IPSec tunnel. This feature makes the configuration simple and prevents complex settings and optional parameters. This way, anybody can set up the IPSec tunnel in a fast and efficient manner.

Benefits of using a VPN connection:
- Using a VPN connection helps protect confidential network data and resources.
- Provides convenience and accessibility for remote workers or corporate employees since they will be able to easily access the main office without having to be physically present and yet, still maintain the security of the private network and its resources.
- Communication using a VPN connection provides a higher level of security compared to other methods of remote communication. Advanced level of technology nowadays makes this possible, thus, protecting the private network from unauthorized access.
- Actual geographic locations of the users are protected and not exposed to the public or shared networks like the Internet.
- Adding new users or group of users to the network is easy since VPNs are very adjustable. It is possible to make the network grow without the need for additional new components or complicated configurations.
Risks of using VPN connection:
- Security risk due to misconfiguration. Since the design and implementation of a VPN can be complicated, it is necessary to entrust the task of configuring the connection to a highly knowledgeable and experienced professional in order to make sure that the security of the private network will not be compromised.
- Reliability. Since a VPN connection requires Internet connection, it is important to choose a provider that is proven and tested to provide excellent Internet service and guarantee minimal to no downtime.
- Scalability. If it comes to a situation that there is a need to add new infrastructure or set new configurations, technical issues may possibly arise due to incompatibility especially if it involves different products or vendors other than the ones you are already using.
- Security issues for mobile devices. Sometimes, when using mobile devices when initiating the VPN connection, security issues may arise especially when using wireless connection. Some unverified providers pose as “free VPN providers” and can even install malware on your computer. Due to this, it is possible to add more security measures to prevent such problems when using mobile devices.
- Slow connection speeds. If you are using a VPN client who provides free VPN service, it may be expected that your connection speed would slow down since these providers do not prioritize connection speeds.
The objective of this document is to show you how to configure VPN connection on the RV34x Series Router using the Setup Wizard.
Applicable Devices
- RV34x Series
Software Version
- 1.0.01.16
Configure VPN Connection using the Setup Wizard
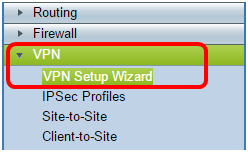
Step 1. Log in to the router web-based utility and choose Configuration Wizard. Then click Launch Wizard under VPN Setup Wizard section.
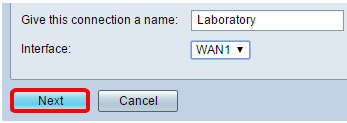
Step 2. In the field provided, enter a name to identify this connection.

Note: In this example, TestVPN is used.
Step 3. In the Interface area, click the drop-down menu and choose which interface you want to enable this connection. The options are:
- WAN1
- WAN2
- USB1
- USB2

Note: In this example, WAN1 is used.
Step 4. Click Next.
Step 5. Choose the Remote Connection Type by clicking on the drop-down arrow. The options are:
- IP Address — Choose this option if you want to use the IP address of the remote router at the other end of the VPN tunnel.
- FQDN — (Fully Qualified Domain Name) Choose this option if you want to use the domain name of the remote router at the other end of the VPN tunnel.

Note: In this example, IP Address is chosen.
Step 6. Enter the WAN IP address of the Remote Connection in the field provided and then click Next.

Note: In this example, 128.123.2.1 is used.
Step 7. Under the Local Traffic Selection area, click on the drop-down to choose the Local IP. The options are:
- Subnet — Choose this if you want to enter both the IP address and Subnet mask of the Local network.
- IP Address — Choose this if you want to enter just the IP address of the local network.
- Any — Choose this if you want any of the two.
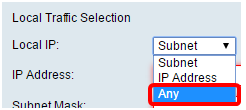
Note: In this example, Any is chosen.
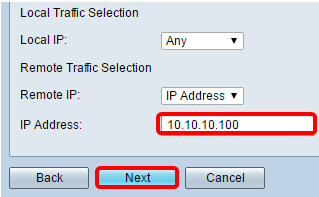
Step 8. Under Remote Traffic Selection area, click the drop-down arrow to choose the Remote IP. Enter the remote IP address and subnet mask in the field provided then click Next. The options are:
- Subnet — Choose this if you want to enter both the IP address and Subnet mask of the remote network.
- IP Address — Choose this if you want to enter just the IP address of the remote network.

Note: In this example, Subnet is chosen. 10.10.10.0 was entered as the IP address and 255.255.255.0 was entered as the subnet mask.
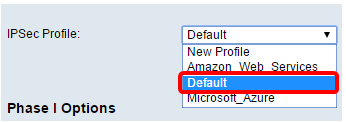
Step 9. Click the drop-down arrow in the IPSec Profile area to choose which profile to use.
Note: In this example, Default is chosen.
Step 10. Under the Phase 1 Options area, enter the pre-shared key for this connection in the field provided. This is the pre-shared key to be used to authenticate the remote Internet Key Exchange (IKE) peer. Both ends of the VPN tunnel must use the same pre-shared key. Up to 30 characters or hexadecimal values are allowed to be used for this key.
Note: It is highly advised to change the pre-shared key regularly to maintain the security of your VPN connection.
Note: The Preshared Key Strength Meter indicates the strength of the key you have entered based on the following:
- Red — The password is weak.
- Amber — The password is fairly strong.
- Green — The password is strong.
Step 11. (Optional) You can also check the Enable check box in the Show plain text when edit to see the password in plain text.

Step 12. Click Next. .
.
Step 13. The page will then show all the configuration details of your VPN connection. Click Submit.

You should now have successfully configured VPN connection on the RV34x Series Router using the Setup Wizard. To successfully connect a site-to-site VPN, you will need to configure the Setup Wizard on the remote router.
 Feedback